Seamless Tumbler Wraps: The EASY Photoshop Method

ฝัง
- เผยแพร่เมื่อ 5 ก.พ. 2025
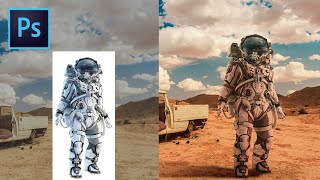
- In this video, I'll show you how to create a seamless tumbler wrap using Photoshop.
How I Can Save You Time and Money on Your Journey!! ⬇️⬇️
🔔 Don't forget to like, comment, and subscribe for more design tips and tutorials!
_______________________________________
Tools I use:
⭐️ Seamless Wraps in Seconds with Photoshop Actions! danadigitaltut...
⭐️ (25% Discount) MyDesigns: bit.ly/DDTMyDe...
_______________________________________
Supporting Video
Check our video update on showing why I create the seamless before I upscale fully: • Unlocking the Secret t...
Full Description
Whether you're a beginner or have more experience, this step-by-step tutorial will guide you through the entire process, from setting up your document to achieving a flawless, seamless design. You'll learn how to use Photoshop tools effectively, work with layers, and apply finishing touches to ensure your tumbler wrap looks perfect every time. Follow along and transform your design skills with this easy-to-follow guide.
A Note from Me:
I use a Mac computer and often I will just say press command and the key for a shortcut. To use the shortcut on a PC you can usually just use the CRTL key instead. Checkout Adobe's list of shortcuts for both Macs and PCs: helpx.adobe.co...
#AIArt #EtsySeller #DigitalDesign #TumblerWraps #DesignTutorial


Wow brilliant tutorial! thank you
Thank you so much for the kind words! I'm really happy you enjoyed the tutorial!
Great videos. Thanks for the help and advice!
You're welcome!
Definitely would love to learn how to set up custom short cuts 😊
@@Aldlis2020 I just recorded this and will be posting next week. ☺️
@ Awesome! You're the best! 💕
I keep forgetting to mention that option is alt on a PC. I pinned my bar to the upper left so it's not in the way. I wish we could add it to the panels on the right. I never even considered the offset. Thanks as always Dana. I would love a tutorial on how you got such a beautiful image from MyDesigns. I have the worst luck with their AI generator so I've mostly been sticking with Midjourney. I have credits to use up though.
@@aeli999 Thank you for that! I'll remember to mention it when I'm recording. Adding it to the right panel would be fantastic. I created a custom shortcut and use that. My next video is MyDesigns basics. Then I'll do a followup for AJ image like the butterfly.
sounds like you really know what you're doing, but for someone who is just trying to understand photopea and wanting to learn this process, I was totally lost with terminology and procedure. Too, advanced a tutorial. If anyone has other suggestions, would appreciate a starting point. Thanks
@@margievanhandel259 hello, it can be difficult to get it to create the seamless part. The terminology is a bit different. I can make a tutorial in Photopea for you.
@@danadigitaltutorials Thanks Dana. That would be great.