5:26 THANK YOU! I want to experiment with box joints, but have been racking my brain trying to figure out how to cut a dado for the bottom that would not be visible from the outside. I concluded that a router table would be the only way to do it. It is surprisingly hard to find videos where they explicitly talk about this problem instead of glossing over it. Thank you for calling it out. Beautiful box and great video all around.
It's beautiful. Simple and elegant. I would make it but without the box joints because I would mess those up. I am wondering what would happen if the walnut top was glued instead of attached with magnets?
I've used brusso hinges on a lot of boxes, and have always fought with the screws! My latest box I stayed away from using a steel screw, and just used paste wax to lubricate the brass ones as I put them in. I went very slowly, when resistance felt high id back it out and add more wax. And I gotta say I've had the best results yet!!
Love this box. Any chance you could tell me how tall you made it. The measurement of the bottom & top half would be great. Thanks so much. Have a great Memorial Day.
Very cool. Coincidentally I made a very similar box a few years back. I beveled all edges however which ended up giving the corners triangular facets which mimicked gem facets. Also, I stained the wood before beveling so the faceted edges had contrast with the faces. Anyhow, I only recently found your channel and really enjoy the eclectic designs. 👍
@@Woodumakeit Just threw together a slideshow of an older box from a few years back on my channel. It has the same stain and bevel technique. This was my first project beyond a cutting board or painted shelf back then.
Wood U Make It... Yes and I like what I saw. I am just starting to do small boxes which I find have their own challenges. Thanks for the nice video. Just found you on the channel so you made a Subscriber of me. John in Pensacola, Fl
A beautiful box. I would make a suggestion on brass hinge screws. I do everything that you did but I coat my brass screws with beeswax before installing. This is a great video because you explain the process. Thanks Tom Maples
Thanks, Tom. You're absolutely right. I mentioned that in my follow-on video where I explained how to remove a broken screw. The second time around I used a gimlet to properly thread the screws, and I coated the screws with wax to make sure they went in smoothly. Worked like a charm!
A beautifully crafted jewellery box! I'm enjoying your videos immensely - fantastic designs and excellent instructions which are so helpful for a beginner woodworker like myself. Thanks so much :)
This is the first video on your channel that I have seen. After watching it, I subscribed. I have made many hundreds of boxes over the years and I never once thought to mount the top in the carcass with magnets. That is really a cool idea and the result is a nice clean look. Thanks for sharing this idea. Well done!
Thanks for your comment, Jerry, and thanks for subscribing! It means a lot to me, especially coming from someone with so much experience. I'm going to start a new box tonight that will be a cremation urn. If all goes well, I should be able to post the video in a week or two.
I wud, I wud! Excellent video! What a beautiful jewelry box, your wife is going to love that forever. I've got gear envy there friend, you've got a great shop. Keep up the good work. I'm going to have to get one of those Incra jigs so I can start making box joints. When you put the finish on those they just really pop. Nice touch with the walnut splines too. Keep `em comin'.
Beautiful box. I’m crafting my daughter a music box for Christmas and had no idea how I was going to glue the edges of the 2 bottom pieces, and saw your rubber band trick. Perfect idea that I’ll be using. Thanks for the great video!
Excellent work.Don't know where you live, but I have built lots of boxes and vever had a problem with glued panels. I believe the thinness of the panel is fine for shrinkage and movement
The box is gorgeous! It is excellent craftsmanship. I would definitely make it. However, as a matter of personal preference, I would not use magnets on the top. True, you don’t want to glue it to allow for movement, but I would make it more permanent. I have made boxes in the past where I have used the raised panel method, just to raise the panel to be flush with the top.
Thanks for the feedback, Jerry. The magnets were a bit of a gimmick because the removable top doesn't really serve a purpose. I thought about doing a raised panel, like you suggested, but this piece of walnut was quite thin and I was worried that cutting rabbets for the raised panel could create a problem.
Wood U Make It : That is a challenge. What I do love about the magnets though is it’s out of the box thinking. I never would have considered it. So, even though I wouldn’t use it for a jewelry box, I would totally use it on say, a tea box or slide top box
First time ever seen your work. Very nice job , both video and of course the build. I appreciate your honesty and telling us your mistakes WHICH TEACHES US. Unlike the ones who hide it on video and are to proud? To show mistakes.Thanks from MR.B your newest subscriber.
Being removable served no purpose. The reason for the magnets was simply to allow for wood movement while maximizing that amount of visible walnut on the top.
Jab the screws into a clear/white candle to get some wax on the threads, Broseppi. Wax is your best friend with those tiny fragile material screws on a lot of hinges. Trust it. Or also dramatically reduces splinter and cracking into a shallow screw location or close to edges on thinner cuts. 🧐👍🏼🇺🇸
Here's another vote for an Incra box joint video. I've made box joints with a shop-made jig but I'm unsatisfied with it and am considering purchasing the Incra jig.
Yes, I would and probably will. The only change I'll make will be using jewelry box liners that are premade. They're inexpensive and they're cover in felt. I'll have to see about finding some bird's eye maple. My WoodCraft store rarely has it. But, I have a fair amount of ambrosia and that just might make a great look.
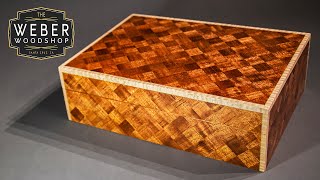
Wow! This jewelry box is so lovely. I love how the top's pattern looks like a butterfly. I would be so happy to get a gift like this. Maybe I'll try to make this for myself.
I'm new to your channel this only the third video I have watched and I just wanted to say I love this jewelry box and the style you made it the box joints but then rounded over, the option for the top with magnets the re sawing off the wood just AWESOME. Keep up the great work. Can't wait to see the next video. And also it would be great to see the incra box joint jig in action.
Very nice work! You could put a little golden chain to hold the lid while it's open so it doesn't go all the way to the back maybe :) other than that, the box is awesome and I bet your wife was very happy. Keep the videos coming! :D
Good build. Add extra long stop blocks on your router fence by making long adjustable ones that mount to your existing fence by clamps, screws or bolts. Then when done take them off.
I've seen a bunch of your videos and you do some amazing work especially with this jewelry box. You should consider making things for sale. I'd buy some even though I'm slowly gradually getting into wood working.
Thanks for your comment. I have sold quite a few things at craft sales, but it's a fairly inefficient way to conduct business. I hope to set up an online shop sometime in 2018 to make it easier for people to view and purchase some of the things that I make.
Thank you for sharing your skill with us. I am inspired by your skill and the ease with which you present. Feels much like you talking to a friend. I for one would love to see a video on the Incra box joint (I just purchased one). Thanks again.
Thank you, Richard. I've had several requests to do a video on the INCRA i-Box jig, so I'll plan on making that my next video. Hopefully I can get that done in the next week or two. --Mike
I love this jewellery box. I like how you added the splines. ( i think that's what you called them) if I had the time and resources for doing projects like this I think this would be a great project to do 😊
Thanks! Yes, those are splines that I added to the corners. I hope one day you'll be able to find the time to work on something like this. It's not super hard, and it feels great when you succeed with a project.
Definitely a gorgeous box and your work looks amazing. I am puzzled on the magnets. Why not float the top as the bottom? Magnets would be so time consuming to get matched
First, it's a beautiful box and you did a great job crafting it. That said, I agree with Belinda...set the top in a dado with sufficient clearance for seasonal movement!
Yeah, I'd make it. Well cept for the magnets part, I don't get that at all. First of your videos I've seen so now I gotta go check out some more. Nice box
Watched the video series and I am considering getting the Incra iBox gig. Would you please create a video on it. I have marveled at Incra products for over 40 years, but now am getting my shop (finely) and would like to know about the gigs.
Here's a video that I made last year on how to use the I-Box jig that you may not have seen: th-cam.com/video/Jhl9ZOcDrSk/w-d-xo.html. After making that video, I proceeded with two other videos that show how I used the jig to make a jewelry box with center-keyed splined box joints. I hope that gives you the info you're looking for. --Mike
I have been meaning to put together a video on that, but I've been busier than expected. I'll try to get one out in late April, and I will definitely address that issue.


Yes that is a beautiful box I would be proud of.
A very comprehensive video! I think this is the best video of the type that I’ve ever watched! I will subscribe.👍👍👍
The box attracts with its simplicity, and most importantly with its functionality. Nature has already created beauty as a texture, texture ...
Very nice and relatively simple. Good work.
Yes! Absolutely. Well done.
Beautiful craftsmanship with excellent video production. Fantastic job!
Yes I would like to. Look forward to watching more of your videos.
Very very very very beautiful
5:26 THANK YOU! I want to experiment with box joints, but have been racking my brain trying to figure out how to cut a dado for the bottom that would not be visible from the outside. I concluded that a router table would be the only way to do it. It is surprisingly hard to find videos where they explicitly talk about this problem instead of glossing over it. Thank you for calling it out. Beautiful box and great video all around.
It's beautiful. Simple and elegant. I would make it but without the box joints because I would mess those up.
I am wondering what would happen if the walnut top was glued instead of attached with magnets?
Delicate and beautiful work! I always wanted to learn it. I will.
More than happy to make it ' thank you sir 👍
Very nice...your attention to details is admirable.
I really appreciate you! Thankyou for taking the time to teach us how to make this awesome box 😎
I love the box. The contrast between the walnut and maple is super. Thanks for sharing
Thank you!
I am ot sure that I can make it, but since my granddaughter turns 12 in early March, I am going to give it a try. If only I had a few more tools!
Excellent Job .
I've used brusso hinges on a lot of boxes, and have always fought with the screws! My latest box I stayed away from using a steel screw, and just used paste wax to lubricate the brass ones as I put them in. I went very slowly, when resistance felt high id back it out and add more wax. And I gotta say I've had the best results yet!!
Cody Pederson Using slightly moist bar soap on the screws also helps get them in n without stripping.
Beautiful!
I love you work! You show your artistic side with every project. Thanks for sharing!
That was a wonderful piece! Liked your video style too. Cheers!!
Thanks! Glad you watched.
Love this box. Any chance you could tell me how tall you made it. The measurement of the bottom & top half would be great. Thanks so much. Have a great Memorial Day.
Lovely use of the wood marking. Great box
Thank you!
Very nice project! I have enough scrap wood for this. Great job!
Quality craftsmanship! Really enjoyed this video.
Thank you, Maren!
Brilliant Build, well done Mike and if your wife doesn't like it then send it my way, as my wife will love it ha ha Barry (ENG)
Ha ha...thanks, Barry. I doubt that she will let it go, but you'll be first on the list if she doesn't like it.
Very cool. Coincidentally I made a very similar box a few years back. I beveled all edges however which ended up giving the corners triangular facets which mimicked gem facets. Also, I stained the wood before beveling so the faceted edges had contrast with the faces. Anyhow, I only recently found your channel and really enjoy the eclectic designs. 👍
That sounds like a really interesting design idea. Thanks for the feedback!
@@Woodumakeit Just threw together a slideshow of an older box from a few years back on my channel. It has the same stain and bevel technique. This was my first project beyond a cutting board or painted shelf back then.
Yes I would to see if I could. I’m trying so hard to get to your level. Great work! I would add flocking
Wood U Make It... Yes and I like what I saw. I am just starting to do small boxes which I find have their own challenges. Thanks for the nice video. Just found you on the channel so you made a Subscriber of me. John in Pensacola, Fl
Awesome. Thank you for subscribing!
hey i got my incra 1000hd for my 78th birthday love it fantastic tool
Beautiful. .... I shall try
A beautiful box. I would make a suggestion on brass hinge screws. I do everything that you did but I coat my brass screws with beeswax before installing. This is a great video because you explain the process. Thanks Tom Maples
Thanks, Tom. You're absolutely right. I mentioned that in my follow-on video where I explained how to remove a broken screw. The second time around I used a gimlet to properly thread the screws, and I coated the screws with wax to make sure they went in smoothly. Worked like a charm!
A beautifully crafted jewellery box! I'm enjoying your videos immensely - fantastic designs and excellent instructions which are so helpful for a beginner woodworker like myself. Thanks so much :)
Very nice. I would love to make some of these for my nieces. Thanks for sharing!!
Beside the Great Box I like your calm and unstressful way of explaining the things You are creating. Thanks a lot! :-)
This is the first video on your channel that I have seen. After watching it, I subscribed.
I have made many hundreds of boxes over the years and I never once thought to mount the top in the carcass with magnets. That is really a cool idea and the result is a nice clean look. Thanks for sharing this idea.
Well done!
Thanks for your comment, Jerry, and thanks for subscribing! It means a lot to me, especially coming from someone with so much experience. I'm going to start a new box tonight that will be a cremation urn. If all goes well, I should be able to post the video in a week or two.
I WOULD make if I thought I could. Really nice.
very nice work and some clever ideas!
Thank you, Stephen!
Nice work thanks for sharing, gave me an idea.
Nice job 👍
Beautiful box, beautiful workmanship.
Thank you!
I love it
Great video - and yes, if I had the tools, I'd def make one too. Well done.
AWSOME, I like it very much 💕. Love Big from Colorado
I wud, I wud! Excellent video! What a beautiful jewelry box, your wife is going to love that forever. I've got gear envy there friend, you've got a great shop. Keep up the good work. I'm going to have to get one of those Incra jigs so I can start making box joints. When you put the finish on those they just really pop. Nice touch with the walnut splines too. Keep `em comin'.
Thanks, Jeff!
Great build. Could you have rearranged the build to cut the rabbets for the top in singular panels before you had it glued up?
Beautiful box. I’m crafting my daughter a music box for Christmas and had no idea how I was going to glue the edges of the 2 bottom pieces, and saw your rubber band trick. Perfect idea that I’ll be using. Thanks for the great video!
Glad I could help. Merry Christmas!
Very nice.
Love your videos
Excellent work.Don't know where you live, but I have built lots of boxes and vever had a problem with glued panels. I believe the thinness of the panel is fine for shrinkage and movement
The box is gorgeous! It is excellent craftsmanship. I would definitely make it. However, as a matter of personal preference, I would not use magnets on the top. True, you don’t want to glue it to allow for movement, but I would make it more permanent. I have made boxes in the past where I have used the raised panel method, just to raise the panel to be flush with the top.
Thanks for the feedback, Jerry. The magnets were a bit of a gimmick because the removable top doesn't really serve a purpose. I thought about doing a raised panel, like you suggested, but this piece of walnut was quite thin and I was worried that cutting rabbets for the raised panel could create a problem.
Wood U Make It : That is a challenge. What I do love about the magnets though is it’s out of the box thinking. I never would have considered it. So, even though I wouldn’t use it for a jewelry box, I would totally use it on say, a tea box or slide top box
I love it thanks for that 👌👌👌
First time ever seen your work. Very nice job , both video and of course the build. I appreciate your honesty and telling us your mistakes WHICH TEACHES US. Unlike the ones who hide it on video and are to proud? To show mistakes.Thanks from MR.B your newest subscriber.
Thanks for the feedback, and also for the subscription! --Mike
Love it
Yes I would make it but this project is above my skill level & I only have a few tools. But if not for that I'd love to make this project!
A beautiful box! Thank you. I am not understanding the reason for the removable top piece with magnets? Why removable?
Being removable served no purpose. The reason for the magnets was simply to allow for wood movement while maximizing that amount of visible walnut on the top.
I've watched a few of your videos now, and i'm very impressed, well done with the box.
Jab the screws into a clear/white candle to get some wax on the threads, Broseppi. Wax is your best friend with those tiny fragile material screws on a lot of hinges. Trust it. Or also dramatically reduces splinter and cracking into a shallow screw location or close to edges on thinner cuts. 🧐👍🏼🇺🇸
Here's another vote for an Incra box joint video. I've made box joints with a shop-made jig but I'm unsatisfied with it and am considering purchasing the Incra jig.
one of the better boxes i have seen... and I've seen a lot. lol
Yes, I would and probably will. The only change I'll make will be using jewelry box liners that are premade. They're inexpensive and they're cover in felt. I'll have to see about finding some bird's eye maple. My WoodCraft store rarely has it. But, I have a fair amount of ambrosia and that just might make a great look.
Wow! This jewelry box is so lovely. I love how the top's pattern looks like a butterfly. I would be so happy to get a gift like this. Maybe I'll try to make this for myself.
LootFixPlan.xyz - Here are some great woodworking plans if you are interested.
She better LOVE it. It’s gorgeous.
Very nice! Great job
Excellent!
I'm new to your channel this only the third video I have watched and I just wanted to say I love this jewelry box and the style you made it the box joints but then rounded over, the option for the top with magnets the re sawing off the wood just AWESOME. Keep up the great work. Can't wait to see the next video. And also it would be great to see the incra box joint jig in action.
Thank you, Thom. I'm glad you found my channel. I'll definitely work on putting together a video on the INCRA i-box jig one day soon.
I would love to make that box I don't have the wood for it and it's very very awesome too
Very elegant box and positive video ))
Thank you!
Really nice project but I would prefer a hinged top.
Great job! I’m sure your wife loved it. Thanks for sharing.
Very nice work! You could put a little golden chain to hold the lid while it's open so it doesn't go all the way to the back maybe :) other than that, the box is awesome and I bet your wife was very happy. Keep the videos coming! :D
Excellent, just need some marquetry now !!!
Good build. Add extra long stop blocks on your router fence by making long adjustable ones that mount to your existing fence by clamps, screws or bolts. Then when done take them off.
Great idea. I'll definitely do that. Thanks!
Great idea!
Hey Mike! Beautiful job!
Thanks, Paul!
I've seen a bunch of your videos and you do some amazing work especially with this jewelry box. You should consider making things for sale. I'd buy some even though I'm slowly gradually getting into wood working.
Thanks for your comment. I have sold quite a few things at craft sales, but it's a fairly inefficient way to conduct business. I hope to set up an online shop sometime in 2018 to make it easier for people to view and purchase some of the things that I make.
Sure I would make it. Looks great!
Super design, beautiful wood and some great woodworking tips. Thanks for sharing. Excellent video. Best wishes.
yes i love it
Thank you for sharing your skill with us. I am inspired by your skill and the ease with which you present. Feels much like you talking to a friend. I for one would love to see a video on the Incra box joint (I just purchased one). Thanks again.
Thank you, Richard. I've had several requests to do a video on the INCRA i-Box jig, so I'll plan on making that my next video. Hopefully I can get that done in the next week or two. --Mike
Great! Looking forward to it.
Wood U Make a three dimetial carved pict
Enjoyed your video, thank you for talking the time and sharing. Cheers.
I love this jewellery box. I like how you added the splines. ( i think that's what you called them) if I had the time and resources for doing projects like this I think this would be a great project to do 😊
Thanks! Yes, those are splines that I added to the corners. I hope one day you'll be able to find the time to work on something like this. It's not super hard, and it feels great when you succeed with a project.
Definitely a gorgeous box and your work looks amazing. I am puzzled on the magnets. Why not float the top as the bottom? Magnets would be so time consuming to get matched
First, it's a beautiful box and you did a great job crafting it. That said, I agree with Belinda...set the top in a dado with sufficient clearance for seasonal movement!
Very nice jewelry box! I love magnets, I use them in lots of my projects so I was excited to see a design that utilizes them. Oh, and I'd make it!
Maybe I missed it in the video, did you go over what you did with the holes in the top? Did you fill them with something? Good idea about the magnets.
Really enjoy watching your videos, learned something from each of them, beautiful box, and yes I wood make it.
Thanks, Tom. I'm glad you're finding them useful. --Mike
Un bel lavoro! Complimenti.
Grazie!
Great video and great jewellery box too.
great work,yes would make it
Yeah, I'd make it. Well cept for the magnets part, I don't get that at all. First of your videos I've seen so now I gotta go check out some more. Nice box
Howard Hagadorn
Id glue the lid. Don't know why he bothered with magnets. Noce box though
Yes I would make it it's a gorgeous box, your wife should be feel well LOVED!
Watched the video series and I am considering getting the Incra iBox gig. Would you please create a video on it. I have marveled at Incra products for over 40 years, but now am getting my shop (finely) and would like to know about the gigs.
Here's a video that I made last year on how to use the I-Box jig that you may not have seen: th-cam.com/video/Jhl9ZOcDrSk/w-d-xo.html. After making that video, I proceeded with two other videos that show how I used the jig to make a jewelry box with center-keyed splined box joints. I hope that gives you the info you're looking for. --Mike
Thank you for making this video! I will add this to my projects list!
good🎉
respect u sir u r great i have learn lots from it
I would like to see a video on the Incra box joint jig. I have one and I've had trouble with the setup. The joints always seem to turn out too tight.
I have been meaning to put together a video on that, but I've been busier than expected. I'll try to get one out in late April, and I will definitely address that issue.
Beautiful! Thanks for the lesson!
That is really nice!!
Awesome !
Beautiful work, dude! 😃
As soon as I can I'm definitely going to make something like that! 😃