Yes, but doesn't fully shield the H-Field component unless it's a special mu-metal designed to do that. Nickel screening alone mostly works on the E-field component, but only has about 1/100th the permeability of MuMetal so it's not that great on the H-field.
What’s really hard is trying to shield low frequency signals, it was once described to me that trying to stop 50/60 Hz is equivalent to trying to stop a bullet with tinfoil. High frequency of hundreds of MHz or GHz that a modern laptop would produce can be pretty much stopped by nearly anything in its path.
npgatech it’s not just black magic to some of us, it’s black magic to ALL of us lol... there’s principles you should follow, but a way to engineer this problem out of existence would be impossible, it’s so dependent on each design. I’ve had job interviews where the chief engineer would desperately ask if I had any EMI compliance experience, because they had failed the test so many times and didn’t have a clue what to do about it... if you end up with a product that’s badly misbehaving it can be a real nightmare even for professionals that specialize in this type of work... the problem you will face is not learning the techniques, it’s the massive expense of it; it’s stupidity expensive to test EMI, and without testing you will have no idea where you are. You need really expensive gear just to start asking if your efforts did anything at all...
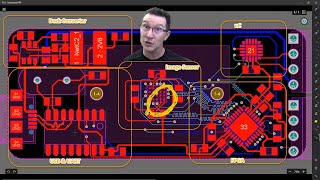
This is great, the first time I have ever seen someone do this on the same pcb as a 2 layer and 4 layer with groundplane. Thanks Dave this is a really really useful emc video.
Thanks. Can't say I've seen it anywhere else either which is why I was interested in doing it. Perhaps another video with a 6 layer version with ground planes on the outside layers?
EEVblog You video should be used in electronic schools! Why not make the top and bottom layers ground with the traces and power layer internal? Would that make it super shielded?
@@Daveyk021 lol. Maybe it would. On the other hand, having had to do amateur fixes to old electronics at times, the thought of having all the critical traces being internal within the board kinda gives me nightmares... Multilayer boards in general can be a bit intimidating when you're trying to figure out what the circuit looks like from the PCB traces alone. When large chunks of the traces are effectively invisible... Well... Yeah. Good luck. >__
I am a PCB designer in a small electronics designing company and we are aiming a lot on the low price, so most of thw stuff we do is 2 layer. It caused a lot of problems to us when we go to EMC testing. Biggest problem is the fast switching, you can put 10R to 22R resistor in series in the high speed traces, this helps a lot. Also keep your traces as short as possible and always look for the ground loop.
Yes, it is an excellent idea to put small resistors in series with the IC outputs that drive high speed traces. This helps control the edge rates, reducing radiated emissions. It also reduces the current spikes as the high speed outputs drive the capacitive loading of the traces, vias, and other IC input pins.
The resistors typically allow you to match the impedance of the trace. This stops current sloshing around hence lowering emissions. Think of a wave in a bath of water. Now put some form of blockage in the path and you will see ripples all over. This is what impedance mismatches are. You are trying to make everything look the same to the wave fronts. A better analogy is your tyre across a dirt road and the suspension. Fill in the holes and you creat a smooth surface, or remove dirt piles and create a smooth surface.
@@ZeusandHades You use a Signal Integrity simulator tool. This calculates the impedance of the trace based on the characteristic impedances of the materials of the PCB. Ie using microwave stripline and microstrip modelling. You could do it by hand too (as we did in the old days) using microstrip and stripline formulas (there are books and internet resources - ARRL HAM manual has a lot of info in). Tools such as Altium can do this for you too but for better quality Mentor/Siemens Hyperlynx and Cadence’s Allegro SI package. There’s also Ansoft RF tools too and a few others.
To be more accurate you use IBIS models Io Bus Interface Standard which also models the Inputs and outputs of various ICs on your board. This allows you to simulate the whole signal chain and the trace and figure out the correct termination scheme. I will add that this can be fairly complext to get right if you are working on SerDes or other very fast signalling technologies. It’s a field in it’s own right.
This is so nice to see the effects directly and the difference between 2 and 4 layers. I made a lot of PCBs for my DIY projects that are using radio connection. I always had problems with the radio module because the SPI for that was very "sensitive", but once I place that on the exterior of the PCB and made a ground and Vcc plane, the board had no more radio errors. Especially that my board was using PWM signals and MOSFET control and that made a lot more noise. Thank you for all that you show us!
I'm an electrical engineer and I love these type of videos. I'm still pretty young a very hungry and eager to improve my skills. Work for a large company and so there are other engineers whose careers have been dedicated to Signal integrity. So I don't really get to learn this as they are the ones who are the real experts on these topics. Then again I don't think we've ever done anything smaller than a 6 layer board. We ground flood the top and bottom layers and all signals are inside the board. That's how they deal with Emi and EMC. They just surround everything in ground. Please do more videos on practical engineering tips and tricks. I enjoy these types of teaching the young engineers much more than I like an unboxing video. I do really like your tear-downs to as they can teach a lot
Just dropping in to say how refreshing it is to see a content creator who actually interacts whit their viewers. I barely understand any of what I'm watching, but as a hobbyist going nowhere I still find it all super interesting.
Good work Dave, amazing video. I have never seen a 2 to 4 layer PCB comparison before, and to have a board for the test with this level of complexity is really a bonus.
FCC Part 15 is the compliance regs in the US. In the late 70's these new personal computers (Apple II, CP/M systems, but NO IBM PC, yet) plus video game consoles, and other microprocessor based products needed to be added to the compliance standard. So subpart J was added. The whole Part 15 reg has been since realigned, so there is no subpart J anymore. I'm old enough, and had was in the electronics business when subpart J was added. The company gave me the task of making sure our product designs complied with the new regs. Some of these RFI/EMI testing houses are better than others. The first one we went to just ran the test, and we had to fix it back at the shop, before retesting. Another house, let us try things while at their facility, and ran shortened tests to check our intermediate results. They also gave us suggestions. That was a good test facility ! Now products come out of China, and testing boils down to applying a compliance sticker.
Of course testing is still required, but is it actually performed. The thing is when Chinese products are sold directly to customers on websites like eBay, then the testing might be just a sticker. The importing party is responsible for compliance, and when this importing party is a end-user who doesn't know or care about compliance, then the Chinese manufacturer wouldn't bother performing tests. When I have a company importing Chinese electronics and reselling them, then I must be sure they're complaint.
GromBeestje That’s a downside of importing items. If it has a compliance label then it also has an associated number that you can check. Some stuff I have seen has no compliance at all, or only domestic compliance (which may be tighter in some cases - particularly when you have Trump toadies in charge of compliance). Retailers are always liable for what they sell, and certainly here items are anonymously bought by compliance authorities and sent to labs for verification. If they don’t comply then the retailer must recall the item(s). I’ve seen it happen with appliances a couple of times, and often with infant and children’s clothing and the like. Regulation is a necessary part of a functional society.
heh. I have a lot of old game consoles and computers around, and it's interesting seeing the progression in the shielding. Also the history of some designs. Like the 800XL vs it's predecessor from 4 years earlier. Mostly the same internal components, but the shielding... The early 80's variant has some pretty hefty metal shielding inside the plastic outer case... But the late 70's variant is basically all metal construction with an additional, very thick inner layer of metal just for shielding purposes. Because at the time it HAD to be to have any hope of meeting compliance standards, yet a few years later near enough the same internal hardware could get away with comparatively flimsy and insubstantial shielding. (still extremely heavy shielding compared to more modern devices though.)
KuraIthys It’s more a case of not knowing how to meet the standards, so ensuring compliance by excessive shielding. By the early 1980s it was easier to include EMC compliance testing in the R&D process.
Great credit to Dave for going to the effort of making this board and exhibiting the measurements! Some of Dave's videos can be relatively blab or rant oriented, of which there is much on TH-cam :-), but videos like the current one really distinguish this channel. Well done Dave!
This was super helpful! Thank you. Short loops, via stitching and watch out for bypass caps. Perfect timing for a current project as well. Still killin' it after all these years!
Great job Dave. I love your video not only the technical aspect, but the way you spit out your knowledge with so much emphasis. Keep doing more and more video.
Do you have any opinion regarding the pros and cons of having 4-layer boards with the power-planes as the outer layers and the signal tracks on the inner layers, versus having the signal tracks on the outer layers and the power-planes on the inner layers?
@@MaxWattage 1. Propagation delay is higher for internal layers. 2. You'll need a ton of vias, that would break up the ground/power planes and that wouldn't be great for return paths. Also reducing vias on high speed signals is desirable. 3. It would be difficult to rework the board if needed.
@@EveryThingTechet Points 1 and 3 you are correct. Point 2 is completely wrong. It wouldn't make any difference to the number of vias. You could simply swap the layers but still use the same artwork. You could actually REDUCE the numbers of vias by using blind/buried vias which you can't do with the signal layers on the top and bottom.
@@mrgibbo63me46 nah it really would increase via count. Depending on the board, you could add a ton of vias. Some signal traces wouldn't normally go into the middle or bottom layers, but to make a ground plane on the outside you'd have to add 2 vias per trace.
@@TheRealMonnie Definitely true for an SMD design. Through hole like in this video - the layer orders would not affect via count. You want the power/GND layers to be close together though - increases capacitance between them. There is something to be said for having further GND on additional outer layers and the Faraday shield effect. High speed data is often sandwiched between 2 GND layers to maintain transmission line impedance.
Ground planes are a must for high frequency digital designs, but I was not expecting such a big difference for these low frequency boards. Pretty instructive, thanks for the video!
Awesome video! Seeing a side-by-side with identical boards with different layers is something that many of us have never seen done. Quick question: What would the difference be if you reversed the layers and did the traces internally and the ground and 5V externally? Thanks so much for your efforts, Dave!
@@EEVblog I would love to see that. Also, what effect does placing a ground "ring" around the outer perimeter of the board that attaches to the device connector shields and then attaches to the board ground plane through capacitors? I know that technique is for ESD protection, but does it help to reduce EMI at all? If you want to see an example of what I'm referring to, you can look at the BeagleBone PCB files. They have that "ground" perimeter on every single layer of the board, not just the outer layers that connect to connector shields. Does that have to do with the high-speed DDR or HDMI signals that are on the board?
With a board with 100% through hole components, not much difference except for the better shielding of the signals that now are inside a shielded box (planes on the outer layers). In a board with SMT components it makes a big difference, since having ground/power internal layers means they are almost a complete plane with no voids, while if they are on the outer layers, you have all the pads of the SMT components creating voids and discontinuities in the planes which reduce the effectiveness of the planes. But if you are really concerned with emissions and you have money to spare for a couple of extra layers, you can fill top/bottom layers with ground (only if there is another solid ground internal plane) plus ground ring on the edge of every other layer and use lots of vias on the edges of the PCB to make the PCB like a shielded box for all the signals in the internal layers. Mentor Graphics wrote a book about how using top/bottom layers as ground helps to reduce the number of layers (on board with 16+ layers) since it means bypass caps don't need a via to ground (otherwise every bypass cap has a via to power and one to ground). Also the pair power/ground planes creates a capacitor which is part of the power distribution network to the high speed chips. Changing the position of the power/ground planes in the PCB stackup will change the capacitance and the inductance. FPGA (or other highs speed ICs) companies have lots on apps notes on this topic.
You missed the *3rd* orientation by having the probe vertical (looking at the video). It might help to determine if a problem is with horizontal left right traces versus vertical up down traces.
I love your explanation about near and far field extra to the main subject. When it comes to layers, I newly redesigned an RF board (up to 6 GHz) from 4 to 6 layers. A lot of other changes had to be made, mostly because of the last problems with delivery of the components and because of the heat issue. But I have taken care of the appropriate routing of the RF lines and of grounding in general, in the same time REMOVING many decoupling capacitors (after watching Eric Bogatin presentation at Altium Live) and... the PLL on the board is soooo less noisy!! The biggest Spourious reduced from ca. 30 dBc to less than 50. Sadly I could not compare the grounding alone so nicely as you did
Regarding the heatmat, a rather different ("real") kind of heatmap I have seen many years ago in a video (that I can't find): The guy took some thin layer pcb ground planes (full, with split etc.), painted them black and took some prepreg with signal traces, overlayed them and then ran high power high frequency signals through them. In the end he took an image with a thermal camera. The result was very neatly showing how the low frequency components chose the intuitive shortest path, but the high frequency ones were following the signals, or spreading out in places nobody would have thought of.
Yes please on more EMC / EMI videos, especially radiated. Basically what you can and can't get away with in a design and pass compliance testing. And what you can and can't derive from a semi-affordable pre-compliance testing setup. Examples of topics I'd love - I'd especially love to see comparisons between lab measurements, DIY antennas and middle road spectrum analyzers like your Siglent and Rigol, DIY OATS , the probes as you did in this video, semi-anechoic chambers, and *especially* with TEM cells since they're supposedly usable in lieu of a proper OATS. How to properly setup and run the equipment to test against compliance standards for intentional and unintentional radiators.
If you decide you want to make a heat map of the emissions, using the Python imaging library (PIL/Pillow) combined with an XY table (to line scan the board) and a way to get the data into a computer would be really neat!
I was thinking about that before he mentioned it, definitely would be neat to setup a rig for that. Kinda like a CNC machine and you put the board in and it just slowly tests each spot. The same rig could perhaps also be used for taking very high res photos of PCBs. Imagine doing something kind of like google maps but with PCBs.
Yes, I was thinking a printable detector for a 3d printer, Dave did say he was going to show how to "roll your own detector" now we could print a clip on case that attaches to a 3d printer head like my creality ender 3 and boom a few hours work and you have a very high spec 3d EMI scanner! the ability to create 3d plots would be of immense use for problematic layouts and great ones too, the ability to log the EMI values in 3d space will lead to all sorts of clever solutions... just a brilliant idea.
It also raises some interesting points too, like getting the DUT to behave in stable consistent way over time, as the scan progresses you don't want the test device changing power levels or turning on and off antennas etc.
What a coincidence, I was just watching the older video of Dave working on this board in KiCad. Just as I finished, got a notification for this one... sweet.
Interesting. FWIW, a coil like that measures the magnetic flux though the coil, so when the coil is flat you're measuring the vertical component of the H field.
Great stuff! I've tried to find information on the internet, but there's so much conflicting information on doing good PCB layout. Videos like this really help. More, please! How about splitting up four layer board ground for isolating sensitive areas? Can't find any reliable info on how to do it. Some recommend star ground, but I never manage to figure out where to put the center node for best effect. Anyway, thanks again.
Frans de Bruijn Looking in random data sheets for this is going to be hit or miss, as different writers and skill levels will be used from one datasheet to the next.
@@johnfrancisdoe1563 The datasheets often show the component layout with ground isolation for components that have both digital and analog components. T.I. has the board layouts for their evaluation boards available for download, thats a good start to see how they do things. There is also some software called AppCad that you can use for calculating the impedance of tracks if you want to design controlled impedance boards. this is especially important when you are working above 20mhz clock speeds.
The information is conflicting because people try to compress a complicated subject into simple rules of thumb and this rarely works in EMC. As for splitting ground planes, I'd try to avoid it. It can have benefits, but the risks are much bigger and it's full of traps. 9 of 10 times a single uninterrupted ground plane will be best. As for information online, check out Henry Ott's website and the book EMC for product designers.
Make more stuff like this! There is so much stuff we are told about PCB layout best practices that we take for granted but an engineer doesn't have time to make all these mistakes for themselves.
An interesting measurement would be to take a bare (unstuffed) board and measure the capacitance between Vcc and Gnd to find out how much filtering it would be.
Great video. A couple of questions: 1) On a 4-layer PCB, is there any significant difference between a SIGNAL-PLANE-PLANE-SIGNAL and a PLANE-SIGNAL-SIGNAL-PLANE arrangement? 2) Are GND+GND and GND+VCC planes equivalent? My guess is that: 1) PLANE-SIGNAL-SIGNAL-PLANE would be slightly better for radiated EMI because it traps the noise inside the PCB, but that also means it will slightly degrade the signals. 2) Shielding would be equivalent but GND+VCC planes would be better than GND+GND as it lowers the impedance on VCC nets, also the GND+VCC planes would form a wide bypass cap which might help at very high frequencies. Any thoughts? edit: Just realized several people came up with the same questions :)
I've done one for conducted mode emissions. I might do another one on mains conducted mode as I have some kit for that. But radiated requires a decent antenna and either an OATS or chamber, or at least something half decent.
@@EEVblog I just passed EMC compliance testing for FCC in north america last weekend. I had some issues with the 200MHz region on my board just over the limit so I tried some bench top probing like in the video with no luck. No matter what I changed, little difference was seen. The issue was the external connections to the PCB were acting as antennas, transmitting trash. A few properly sized ferrites and I was able to obtain one class lower then was the original target.
Why are E-field probes not orientation sensitive? In fact at 17:07 the scope screen does change as you change the orientation. And the E-field itself has an orientation.
The 4 layer board shown has the power/ground planes in the middle. What would be the radiated difference if it were reversed, with signals inside, and power/ground outside? I admit that debugging the layout would be terrible, but once it is working, would it make a difference to reverse things?
First thing I thought when seeing the layout of the 4 layer board ;-) Will be quite interesting to see the difference it makes! Let's take a wild guess: another 10-15dB?
Expect it will give some improvement as the signal traces will be in a faraday cage. In practice this would be of limited relevance since with SMT the component pads are on the outer layers, and you don’t want to add vias for every signal pin....
To further improve the performance of this board, how much would copper pours on the outside layers help? In example Top: Vcc and signal Inner top: Gnd Inner bottom: Vcc Bottom: Gnd and signal Lots of vias everywhere I changed between Gnd and Vcc to further increase capacitance / reduce inductance (the latter probably will have a greater effect)
I LOVE when you do EMC Videos.... My companies units need to be compliant to EN12895 for our systems. I found using a Walkie Talkie is an excellent way to perform some precompliance Radiated Immunity Testing. You should try it out Dave.
Hi Dave, many thanks for the valuable contents. I was wondering if you have / intend to do a tutorial on how to route mixed signal boards, how to separate analog and digital Vccs, GNDs planes. Thank you
Would it make a difference if the signal layers were sandwiched in between the supply and ground planes? Wouldn’t they act as outer shielding? Just guessing, sorry for my ignorance
If the shorter path has lots of vias the current distribution might not be that obvious, as it favors the path of least impedance, whereas vias can have high impedance for higher frequencies
Dave! That clip of an anechoic chamber looks exactly like an acoustic anechoic chamber with the sound absorbing wedges. Why would that be needed for radio frequency measurements, or are they different material???
One of the main parts of my Ph.D. was looking at the comparison of EFT performance between two and four layer PCBs and how they affected micro controllers. Took physical boards, tested them, and then was able to simulate their characteristics. "An investigation of the EMC properties of modern microcontrollers", thesis available in the British Library! If you have to use two layer boards best to have ground on both sides, and flood as much as possible between signal lines. Lots of vias to stitch those layers together. Think low impedance! Think of making any ground path as short as possible around tracks, around ICs and their decoupling. Don't be afraid to use capacitors, and even bulk capacitors further in to the board as a well of power! Don't just think of having the power supply at one side feeding everything but by using those bulk capacitors to have localised reserves. So if your power line has gone deep in to the board don't be afraid to add another electrolytic to reduce the impedance of the supply at the far reaches.
Great video. At the moment I'm mostly wondering what will happen if you put the traces inside the inner layers and put the ground planes on the outsides.
Need to split ground planes for e.g. analogue and digital processing on the one board. Not to mention high voltage stuff! Ground loop is your friend if you treat it well.
Dave - You have concentrated about 15 years of school of hard knocks learning into a 36 minute video. If you do PCB layout and you have to get PCBs tested, all of these topics you will eventually have to consider and deal with. The DaveCad explanation of the the E an H fields is spot on. This is a great introduction of how antennas work and you can begin to see the effects having objects in the near field of an antenna. I have done most of my work doing RF design and layout. I began to be required to outsource the layouts and got some odd looks when I wrote out a list of layout requirements for the person who was layout out my designs. One requirement got a ton of pushback. I required that every power and ground via be doubled on the layout. This has many effects. The first is that it halves the impedance of the connection to further prevent noise generation. Secondly, it allows for simple identification of via locations on the pcb as the power and ground vias look different from normal signal vias. There are so many other little rules that are required to make the odds of a design passing EMC they are exhausting to think about. No unterminated stubs, don't place inductors near sensitive traces, if you do, make the layout orthogonal. Place inductors at 90 degrees to one another in filters. Traces always traverse pads. The order in which parts are laid out in a filter matters. The list just goes on and on and on.
Loop area is critical. But there can also be resonances, which can actually amplify harmonic noise. So, solid ground and power planes and a good assortment of decoupling caps is the way to go. FYI, I recommend you take a look at K-SIM at Kemet.com. It's a handy free tool for choosing your bypass caps. Shows a nice Bode plot.
What’s a real pain these days is getting power consumption low while not having ridiculously fast rise times on the board, thankfully most hyper fast signals can be held within the small confines of the ICs themselves or we’d be in real trouble. Impedance matched low voltage tracks with pre emphasis becomes hard to avoid.
Great Video Dave! What a fantastic job, doing a complete layout and board to being able to do the comparison! I don't agree with you though that it is a "huge difference" with 10 to 15dB. But then again I'm an RF guy that often work with ranges of 100dB or more in signal dynamics. Again, great work!!
Exactly the same as on that silent terminal, where you had the massive copper bodge wires to make loop area small on the plug in daughter boards, as the original ones had a long snaking ground path around the perimeter of the board.
@@EEVblog Yes, thanks. I did buy a FFT module for my Tek TDS3054 scope so I am equipped. It may be necessary to buy the preamp and "sniffer" probes like you used.
Haaaaa the joys of EMI compliance. Love the Tekbox probes I have the same kit with a Siglent SA3021X spectrum analyser, awesome for the price. I also built clamp on RF probes with ferites (Wurth electronics makes great ones) works great to measure radiated emissions from cables and see the difference cable impedance can do. Today there's no reason to not do EMI pre compliance testing in house, it saves a bunch of money and time.
Hi Dave. What I would really love to know is having VCC and GND on the outer layers of the board and the tracks on the inner layers. Wouldn't that reduce the radiated emissions even more?
I have tested this to some extent, it does help ‘a bit’. On my six layer boards, I tend to bury SPI and clocks and other high speed bus lines in an inner layer. I found that it helps ‘a bit’, in the 1-3 dB region, but you can get most of the way there paying attention to grounding and layout and slew rate control on a standard 4 layer stackup. One thing to remember is that vias and pads do break up the ground plane a bit as well.
Most available EMC probes are listed for frequencies from about 1 MhZ to a couple of GhZ. Are they also applicable for lower frequecies (about 100kHz)? I'd like to compare the EM field emitted by an induction oven (which has about 200kHz resonance frequency)
One of the earliest things I was taught for circuit board layout, mid 70s, was to first layout the vertical ground and power traces in parallel right next to each other and going right underneath the chips. This was to keep the length of the ground loop for the chip and bypass capacitors as short as possible. Next, on the other side of the PCB you placed your horizontal power and ground traces at the end of each chip. If you had a long package, you could disrupt them but it was preferred not to. Those were tied with vias to the vertical ground and power traces every place they crossed. Thesy always ran from board edge to board edge. Next you laid out your highest speed switching traces first so that they were the shortest length possible. You're pre-planning when you chosing chip locations on the board was to get the chips involved with these highest speed traces as close as possible to each other.
In really fast edge rate electronics we used to run traces between two ground layers (gnd/trace/trace/gnd) just to control the trace impedance better. I was fortunate in that I rarely had to worry about EMI because the enclosure was fully shielded. Used to run vias around the perimeter to control the emissions sometimes.
it is not simple to think, 4 layes is like a huge capacitor which smooths the rising edge, and that way it lowes the EMC?. I means, two solid middle layer plates, which in parallel with all tracks?.
Is there a guideline or rule of thumb for what is the max freq you should be routing through vias without having to resort to using coaxial vias (surrounded by GND vias)? Same thing with signal routing through sub-layer traces (microstrip vs having to use buried stripline or CPWG)?
Yes, a completely enclosed pcb cannot radiate beyond the enclosure. The problem is that there will always be some openings in an enclosure that allows the emissions to leak out. Or the same emissions couple to wires leaving the board through the enclosure.
Here is an interesting question - would ground filling on a 4 layer board help with EMC? If the clearance from trace to ground fill is smaller than the distance between the outer and inner layers, shouldn't it make a difference?
Just a thought; I don't think you - generally - would be able to get significantly lower inductance and higher capacitance from a flood fill than from an adjacent ground plane. Even though you might get slightly closer to the ground fill with tight tolerances on clearance.
What would happen if you instead of Horizontal traces Ground 5V Vertical traces you had Ground Horizontal traces Vertical traces Ground Would having the ground planes on the outside act as a shield?
I had the same question, it offcorse hide all traces within the board (nightmare to patch or repair), and the 5V will have to bounce a lot between two floatfills areas on layers 2 and 3 I suppose
That is common practice for that exact reason. But in this case ditching the power plane for an extra ground plane is a bad idea. From an AC perspective, 5V and GND are the same (thanks to all the decoupling capacitors) so 5V Horizontal traces Vertical traces GND would be almost as good EMI-wise and make for a much better power distribution network.
There's a book that's generally considered 'the bible' of EMI. It's by a man named Henry w. Ott. In this book he says that this is the best stackup you can have besides using a 12 layer board! Even better than 6 and 8 layer boards!
@@lyfeofajavadevwithfrank9813 Thanks, I found his website. "the two ground planes can be stitched together around the periphery of the board to enclose all the signal traces in a faraday cage. ". NOICE! www.hottconsultants.com/techtips/pcb-stack-up-2.html Two of these three problems can be alleviated with the stack-up shown in Fig. 3b, where the two outer planes are ground planes and power is routed as a trace on the signal planes. The power should be routed as a grid, using wide traces, on the signal layers. Two added advantages of this configuration are that; (1) the two ground planes produce a much lower ground impedance and hence less common-mode cable radiation, and (2) the two ground planes can be stitched together around the periphery of the board to enclose all the signal traces in a faraday cage. From an EMC point of view this configuration, if properly done, is the best stack-up possible with a four-layer PCB. Now we have satisfied objectives, (1), (2), (4), and (5) while using only a four-layer board. _____________ Ground. _____________ Sig./Pwr. Figure 3b _____________ Sig./Pwr. _____________ Ground
Great video, I would be interested in seeing a comparison of the 4 layer, ground power on the inner vs the outer layers - I _vaguely_ remember reading sections of Henry Ott's book on the matter some years back - I seem to remember that burying the signal on a 4 layer board gave slightly better performance but made the layout less ideal. Going up in the layers then gave more options with better performance. When we've sent boards for review to Telit (3G/4G modem) they always recommend signals on the inner layers but I always wondered how much difference it actually made on a 4 layer board.
I have made some RF designs using PCB for in the 1-2 GHz range and the method we used was to use an entire GND plane or several layers with GND and other layers with RF using microstrip. But in order not to have RF signals propagate via the GND planes and the Power plane, the Power plane was not filled, only traces with decoupling caps at either end, to make it work as a lowpass filter i.e. shunt C- serial L - shunt C. Would be interesting to see if that made a difference to the EMC of that PCB you made. Great video by the way, Really liked it! More of this stuff please!
Why did you remove the flooded ground plane from the top and bottom layer? Good of even got some better performance if you left it and then via stiched it to the internal ground.
I would have to assume if you redid this with a full ground plane on each of the outside layers, it.would reduce more? May make it a pita for other reasons but.
Back in the 80s I had a TRS-80 model I, which did not have true audio output. There was a program that got around this limitation by intentionally generating EMI that could be picked up by a radio placed near the computer.
I'm a bit of a topology and graph theory geek, and I've taken multiple 4- and 2-layer boards down to a single-sided board with a few zero-ohm resistors (AKA "jumpers"). When is using the simpler and cheaper single-sided solution NOT a good idea from an EMC/EMI perspective?


So this is what the metalised plastic on cheap laptops is for, shielding the board from radiating EMI. Neat.
Yes, but doesn't fully shield the H-Field component unless it's a special mu-metal designed to do that. Nickel screening alone mostly works on the E-field component, but only has about 1/100th the permeability of MuMetal so it's not that great on the H-field.
@@EEVblog could you please do an smd vs th emc?
kapios kapiopoylos There would be hardly any difference if you kept the layout otherwise identical
What’s really hard is trying to shield low frequency signals, it was once described to me that trying to stop 50/60 Hz is equivalent to trying to stop a bullet with tinfoil. High frequency of hundreds of MHz or GHz that a modern laptop would produce can be pretty much stopped by nearly anything in its path.
npgatech it’s not just black magic to some of us, it’s black magic to ALL of us lol... there’s principles you should follow, but a way to engineer this problem out of existence would be impossible, it’s so dependent on each design. I’ve had job interviews where the chief engineer would desperately ask if I had any EMI compliance experience, because they had failed the test so many times and didn’t have a clue what to do about it... if you end up with a product that’s badly misbehaving it can be a real nightmare even for professionals that specialize in this type of work... the problem you will face is not learning the techniques, it’s the massive expense of it; it’s stupidity expensive to test EMI, and without testing you will have no idea where you are. You need really expensive gear just to start asking if your efforts did anything at all...
This is great, the first time I have ever seen someone do this on the same pcb as a 2 layer and 4 layer with groundplane.
Thanks Dave this is a really really useful emc video.
Thanks. Can't say I've seen it anywhere else either which is why I was interested in doing it. Perhaps another video with a 6 layer version with ground planes on the outside layers?
Or even a four layers with the ground planes on the outside.
Yeah, doh, layer with ground and power outside. Crosstalk signal integrity on signal layers isn't really an issue here.
EEVblog You video should be used in electronic schools! Why not make the top and bottom layers ground with the traces and power layer internal? Would that make it super shielded?
@@Daveyk021 lol. Maybe it would.
On the other hand, having had to do amateur fixes to old electronics at times, the thought of having all the critical traces being internal within the board kinda gives me nightmares...
Multilayer boards in general can be a bit intimidating when you're trying to figure out what the circuit looks like from the PCB traces alone. When large chunks of the traces are effectively invisible...
Well... Yeah. Good luck. >__
I am a PCB designer in a small electronics designing company and we are aiming a lot on the low price, so most of thw stuff we do is 2 layer. It caused a lot of problems to us when we go to EMC testing. Biggest problem is the fast switching, you can put 10R to 22R resistor in series in the high speed traces, this helps a lot. Also keep your traces as short as possible and always look for the ground loop.
Yes, it is an excellent idea to put small resistors in series with the IC outputs that drive high speed traces. This helps control the edge rates, reducing radiated emissions. It also reduces the current spikes as the high speed outputs drive the capacitive loading of the traces, vias, and other IC input pins.
The resistors typically allow you to match the impedance of the trace. This stops current sloshing around hence lowering emissions. Think of a wave in a bath of water. Now put some form of blockage in the path and you will see ripples all over. This is what impedance mismatches are. You are trying to make everything look the same to the wave fronts. A better analogy is your tyre across a dirt road and the suspension. Fill in the holes and you creat a smooth surface, or remove dirt piles and create a smooth surface.
@@GodzillaGoesGaga How do you simulate this to know what resistor to add?
@@ZeusandHades You use a Signal Integrity simulator tool. This calculates the impedance of the trace based on the characteristic impedances of the materials of the PCB. Ie using microwave stripline and microstrip modelling. You could do it by hand too (as we did in the old days) using microstrip and stripline formulas (there are books and internet resources - ARRL HAM manual has a lot of info in). Tools such as Altium can do this for you too but for better quality Mentor/Siemens Hyperlynx and Cadence’s Allegro SI package. There’s also Ansoft RF tools too and a few others.
To be more accurate you use IBIS models Io Bus Interface Standard which also models the Inputs and outputs of various ICs on your board. This allows you to simulate the whole signal chain and the trace and figure out the correct termination scheme. I will add that this can be fairly complext to get right if you are working on SerDes or other very fast signalling technologies. It’s a field in it’s own right.
This is so nice to see the effects directly and the difference between 2 and 4 layers. I made a lot of PCBs for my DIY projects that are using radio connection. I always had problems with the radio module because the SPI for that was very "sensitive", but once I place that on the exterior of the PCB and made a ground and Vcc plane, the board had no more radio errors. Especially that my board was using PWM signals and MOSFET control and that made a lot more noise. Thank you for all that you show us!
Yep, can make a huge difference when you have an intentional high-ish power transmitter on your board!
I'm an electrical engineer and I love these type of videos. I'm still pretty young a very hungry and eager to improve my skills. Work for a large company and so there are other engineers whose careers have been dedicated to Signal integrity. So I don't really get to learn this as they are the ones who are the real experts on these topics. Then again I don't think we've ever done anything smaller than a 6 layer board. We ground flood the top and bottom layers and all signals are inside the board. That's how they deal with Emi and EMC. They just surround everything in ground. Please do more videos on practical engineering tips and tricks. I enjoy these types of teaching the young engineers much more than I like an unboxing video. I do really like your tear-downs to as they can teach a lot
More EMC videos are welcome :)
I'm delighted to see this high-quality educational content.
Great to see A-B-A comparison of the same layout in 2 and 4 layer. Thanks Dave.
Just dropping in to say how refreshing it is to see a content creator who actually interacts whit their viewers. I barely understand any of what I'm watching, but as a hobbyist going nowhere I still find it all super interesting.
Thanks, I try to reply to comment as much as possible
Good work Dave, amazing video. I have never seen a 2 to 4 layer PCB comparison before, and to have a board for the test with this level of complexity is really a bonus.
FCC Part 15 is the compliance regs in the US. In the late 70's these new personal computers (Apple II, CP/M systems, but NO IBM PC, yet) plus video game consoles, and other microprocessor based products needed to be added to the compliance standard. So subpart J was added. The whole Part 15 reg has been since realigned, so there is no subpart J anymore. I'm old enough, and had was in the electronics business when subpart J was added. The company gave me the task of making sure our product designs complied with the new regs. Some of these RFI/EMI testing houses are better than others. The first one we went to just ran the test, and we had to fix it back at the shop, before retesting. Another house, let us try things while at their facility, and ran shortened tests to check our intermediate results. They also gave us suggestions. That was a good test facility !
Now products come out of China, and testing boils down to applying a compliance sticker.
Michael Moorrees
No, compliance is still required for foreign products.
Of course testing is still required, but is it actually performed. The thing is when Chinese products are sold directly to customers on websites like eBay, then the testing might be just a sticker. The importing party is responsible for compliance, and when this importing party is a end-user who doesn't know or care about compliance, then the Chinese manufacturer wouldn't bother performing tests. When I have a company importing Chinese electronics and reselling them, then I must be sure they're complaint.
GromBeestje
That’s a downside of importing items. If it has a compliance label then it also has an associated number that you can check. Some stuff I have seen has no compliance at all, or only domestic compliance (which may be tighter in some cases - particularly when you have Trump toadies in charge of compliance).
Retailers are always liable for what they sell, and certainly here items are anonymously bought by compliance authorities and sent to labs for verification. If they don’t comply then the retailer must recall the item(s). I’ve seen it happen with appliances a couple of times, and often with infant and children’s clothing and the like. Regulation is a necessary part of a functional society.
heh. I have a lot of old game consoles and computers around, and it's interesting seeing the progression in the shielding.
Also the history of some designs.
Like the 800XL vs it's predecessor from 4 years earlier.
Mostly the same internal components, but the shielding...
The early 80's variant has some pretty hefty metal shielding inside the plastic outer case...
But the late 70's variant is basically all metal construction with an additional, very thick inner layer of metal just for shielding purposes.
Because at the time it HAD to be to have any hope of meeting compliance standards, yet a few years later near enough the same internal hardware could get away with comparatively flimsy and insubstantial shielding.
(still extremely heavy shielding compared to more modern devices though.)
KuraIthys
It’s more a case of not knowing how to meet the standards, so ensuring compliance by excessive shielding. By the early 1980s it was easier to include EMC compliance testing in the R&D process.
Ah yes, the Gigatron Computer is back. Almost forgot about your 4 layer version. Watching with interest!
Great credit to Dave for going to the effort of making this board and exhibiting the measurements! Some of Dave's videos can be relatively blab or rant oriented, of which there is much on TH-cam :-), but videos like the current one really distinguish this channel. Well done Dave!
This was super helpful! Thank you. Short loops, via stitching and watch out for bypass caps. Perfect timing for a current project as well. Still killin' it after all these years!
Sometimes, as professionals, we overlook some basics. Thanks for the post. Great refresher.
Great job Dave. I love your video not only the technical aspect, but the way you spit out your knowledge with so much emphasis. Keep doing more and more video.
That's the plan
Thank you again Dave for sharing your knowledge and wisdom, I am finally able to wrap my head around this.
@Dave, please take it to an official EMC lab to compare the boards (if a lab would measure it for you for free)
Do you have any opinion regarding the pros and cons of having 4-layer boards with the power-planes as the outer layers and the signal tracks on the inner layers, versus having the signal tracks on the outer layers and the power-planes on the inner layers?
@@MaxWattage
1. Propagation delay is higher for internal layers.
2. You'll need a ton of vias, that would break up the ground/power planes and that wouldn't be great for return paths. Also reducing vias on high speed signals is desirable.
3. It would be difficult to rework the board if needed.
@@EveryThingTechet Points 1 and 3 you are correct. Point 2 is completely wrong. It wouldn't make any difference to the number of vias. You could simply swap the layers but still use the same artwork. You could actually REDUCE the numbers of vias by using blind/buried vias which you can't do with the signal layers on the top and bottom.
@@mrgibbo63me46 nah it really would increase via count. Depending on the board, you could add a ton of vias. Some signal traces wouldn't normally go into the middle or bottom layers, but to make a ground plane on the outside you'd have to add 2 vias per trace.
@@TheRealMonnie Definitely true for an SMD design. Through hole like in this video - the layer orders would not affect via count. You want the power/GND layers to be close together though - increases capacitance between them. There is something to be said for having further GND on additional outer layers and the Faraday shield effect. High speed data is often sandwiched between 2 GND layers to maintain transmission line impedance.
This is just the sort of thing that I have been meaning to learn. Thanks Dave!
one of the best videos I found during my search for this topic
A great experiment to directly show the difference a full ground and power plane can make. Thanks for a really informative video.
I have never designed a PCB but I am an engineering student and will soon start. This was very informative, as always with your videos.
Ground planes are a must for high frequency digital designs, but I was not expecting such a big difference for these low frequency boards. Pretty instructive, thanks for the video!
Excellent insight into the practical aspects of EMI world! Thanks for doing this video 😃
Awesome video! Seeing a side-by-side with identical boards with different layers is something that many of us have never seen done. Quick question: What would the difference be if you reversed the layers and did the traces internally and the ground and 5V externally? Thanks so much for your efforts, Dave!
That would be an interesting experiment.
I guess I just asked this question myself. Would be very interesting
@@EEVblog I would love to see that. Also, what effect does placing a ground "ring" around the outer perimeter of the board that attaches to the device connector shields and then attaches to the board ground plane through capacitors? I know that technique is for ESD protection, but does it help to reduce EMI at all? If you want to see an example of what I'm referring to, you can look at the BeagleBone PCB files. They have that "ground" perimeter on every single layer of the board, not just the outer layers that connect to connector shields. Does that have to do with the high-speed DDR or HDMI signals that are on the board?
Oopps, just asked the same thing.
With a board with 100% through hole components, not much difference except for the better shielding of the signals that now are inside a shielded box (planes on the outer layers). In a board with SMT components it makes a big difference, since having ground/power internal layers means they are almost a complete plane with no voids, while if they are on the outer layers, you have all the pads of the SMT components creating voids and discontinuities in the planes which reduce the effectiveness of the planes. But if you are really concerned with emissions and you have money to spare for a couple of extra layers, you can fill top/bottom layers with ground (only if there is another solid ground internal plane) plus ground ring on the edge of every other layer and use lots of vias on the edges of the PCB to make the PCB like a shielded box for all the signals in the internal layers. Mentor Graphics wrote a book about how using top/bottom layers as ground helps to reduce the number of layers (on board with 16+ layers) since it means bypass caps don't need a via to ground (otherwise every bypass cap has a via to power and one to ground). Also the pair power/ground planes creates a capacitor which is part of the power distribution network to the high speed chips. Changing the position of the power/ground planes in the PCB stackup will change the capacitance and the inductance. FPGA (or other highs speed ICs) companies have lots on apps notes on this topic.
It used to be a challenge to route everything on a 2 layer board. Since I've had a couple of products compliance tested I go straight to the 4 layers.
Yeah, not much cost difference these days.
You missed the *3rd* orientation by having the probe vertical (looking at the video). It might help to determine if a problem is with horizontal left right traces versus vertical up down traces.
... at the 10:55 mark.
I love your explanation about near and far field extra to the main subject. When it comes to layers, I newly redesigned an RF board (up to 6 GHz) from 4 to 6 layers. A lot of other changes had to be made, mostly because of the last problems with delivery of the components and because of the heat issue. But I have taken care of the appropriate routing of the RF lines and of grounding in general, in the same time REMOVING many decoupling capacitors (after watching Eric Bogatin presentation at Altium Live) and... the PLL on the board is soooo less noisy!! The biggest Spourious reduced from ca. 30 dBc to less than 50. Sadly I could not compare the grounding alone so nicely as you did
Would be great to have more videos about EMI and EMC, more projects, techniques, measures and recommendations. Thanks for the effort!
Thank you for sharing this, it helped me to understand better than difference between 2 layer and 4 layer, EMI's source in PCB.
Regarding the heatmat, a rather different ("real") kind of heatmap I have seen many years ago in a video (that I can't find):
The guy took some thin layer pcb ground planes (full, with split etc.), painted them black and took some prepreg with signal traces, overlayed them and then ran high power high frequency signals through them. In the end he took an image with a thermal camera. The result was very neatly showing how the low frequency components chose the intuitive shortest path, but the high frequency ones were following the signals, or spreading out in places nobody would have thought of.
DaveCAD, now in 3D and augmented reality.
where can I get the update and how much is it? ;-)
Uh oh! One board has plastic feet on it, and the other doesn't? Slightly different measurement distance! :D
Well spotted! I can confirm it only makes a slight difference, about 1-2dB tops.
@@EEVblog Thanks for checking! :)
And BTW, it doesn't change the characteristic response shape, just the average amplitude by a small amount.
EEVblog But throughout the video. Both had same general shape, at some distance (you kept mentioning 15dB).
@@EEVblog thats what they all say ;)
Yes please on more EMC / EMI videos, especially radiated.
Basically what you can and can't get away with in a design and pass compliance testing. And what you can and can't derive from a semi-affordable pre-compliance testing setup.
Examples of topics I'd love - I'd especially love to see comparisons between lab measurements, DIY antennas and middle road spectrum analyzers like your Siglent and Rigol, DIY OATS , the probes as you did in this video, semi-anechoic chambers, and *especially* with TEM cells since they're supposedly usable in lieu of a proper OATS.
How to properly setup and run the equipment to test against compliance standards for intentional and unintentional radiators.
If you decide you want to make a heat map of the emissions, using the Python imaging library (PIL/Pillow) combined with an XY table (to line scan the board) and a way to get the data into a computer would be really neat!
Matplotlib may also work quite well for the application. its easy to use. there is a library called seaborn which is even better for the task.
I'd be very interested in the heat map generation idea Dave, give that one a ++
I was thinking about that before he mentioned it, definitely would be neat to setup a rig for that. Kinda like a CNC machine and you put the board in and it just slowly tests each spot. The same rig could perhaps also be used for taking very high res photos of PCBs. Imagine doing something kind of like google maps but with PCBs.
Yes, I was thinking a printable detector for a 3d printer, Dave did say he was going to show how to "roll your own detector" now we could print a clip on case that attaches to a 3d printer head like my creality ender 3 and boom a few hours work and you have a very high spec 3d EMI scanner! the ability to create 3d plots would be of immense use for problematic layouts and great ones too, the ability to log the EMI values in 3d space will lead to all sorts of clever solutions... just a brilliant idea.
It also raises some interesting points too, like getting the DUT to behave in stable consistent way over time, as the scan progresses you don't want the test device changing power levels or turning on and off antennas etc.
great to see you making uses of those probes :)
What a coincidence, I was just watching the older video of Dave working on this board in KiCad. Just as I finished, got a notification for this one... sweet.
Spooky
@@EEVblog Spooky, but convenient. I think you planned it that way all along... haha
Brilliantly thought EMC video. Big thumbs up for Dave!
What about different sizes (diameters) of vias? Or is it better to use more vias instead?
Both should decrease the impedance.
Interesting. FWIW, a coil like that measures the magnetic flux though the coil, so when the coil is flat you're measuring the vertical component of the H field.
Great stuff! I've tried to find information on the internet, but there's so much conflicting information on doing good PCB layout. Videos like this really help. More, please!
How about splitting up four layer board ground for isolating sensitive areas? Can't find any reliable info on how to do it. Some recommend star ground, but I never manage to figure out where to put the center node for best effect. Anyway, thanks again.
look through the texas instruments and analog devices data sheets for their high perormance ADCs and DACs.
Frans de Bruijn Looking in random data sheets for this is going to be hit or miss, as different writers and skill levels will be used from one datasheet to the next.
@@johnfrancisdoe1563 The datasheets often show the component layout with ground isolation for components that have both digital and analog components. T.I. has the board layouts for their evaluation boards available for download, thats a good start to see how they do things. There is also some software called AppCad that you can use for calculating the impedance of tracks if you want to design controlled impedance boards. this is especially important when you are working above 20mhz clock speeds.
The information is conflicting because people try to compress a complicated subject into simple rules of thumb and this rarely works in EMC. As for splitting ground planes, I'd try to avoid it. It can have benefits, but the risks are much bigger and it's full of traps. 9 of 10 times a single uninterrupted ground plane will be best. As for information online, check out Henry Ott's website and the book EMC for product designers.
Great video Dave. More videos please on EMC pre-compliance testing and isolating the issues with probes.
Thank you very much Dave. Very interesting video! Could you do more EMC video?
Sure!
Make more stuff like this! There is so much stuff we are told about PCB layout best practices that we take for granted but an engineer doesn't have time to make all these mistakes for themselves.
An interesting measurement would be to take a bare (unstuffed) board and measure the capacitance between Vcc and Gnd to find out how much filtering it would be.
24:50 - I'm curious. Did the layout package they used contain 'smarts' to deal with a 2-layer board?
KiCAD, and just manual routing.
Great video. A couple of questions:
1) On a 4-layer PCB, is there any significant difference between a SIGNAL-PLANE-PLANE-SIGNAL and a PLANE-SIGNAL-SIGNAL-PLANE arrangement?
2) Are GND+GND and GND+VCC planes equivalent?
My guess is that:
1) PLANE-SIGNAL-SIGNAL-PLANE would be slightly better for radiated EMI because it traps the noise inside the PCB, but that also means it will slightly degrade the signals.
2) Shielding would be equivalent but GND+VCC planes would be better than GND+GND as it lowers the impedance on VCC nets, also the GND+VCC planes would form a wide bypass cap which might help at very high frequencies.
Any thoughts?
edit: Just realized several people came up with the same questions :)
Can you make a Video about (pre) compliance testing?
I've done one for conducted mode emissions. I might do another one on mains conducted mode as I have some kit for that. But radiated requires a decent antenna and either an OATS or chamber, or at least something half decent.
@@EEVblog I just passed EMC compliance testing for FCC in north america last weekend. I had some issues with the 200MHz region on my board just over the limit so I tried some bench top probing like in the video with no luck. No matter what I changed, little difference was seen. The issue was the external connections to the PCB were acting as antennas, transmitting trash. A few properly sized ferrites and I was able to obtain one class lower then was the original target.
You were have a common mode radiation problems which is best dealt with by using common mode filters at the point where your signal leaves the PCB
Why are E-field probes not orientation sensitive? In fact at 17:07 the scope screen does change as you change the orientation. And the E-field itself has an orientation.
The 4 layer board shown has the power/ground planes in the middle. What would be the radiated difference if it were reversed, with signals inside, and power/ground outside? I admit that debugging the layout would be terrible, but once it is working, would it make a difference to reverse things?
It will make a difference. I'll try it.
First thing I thought when seeing the layout of the 4 layer board ;-) Will be quite interesting to see the difference it makes! Let's take a wild guess: another 10-15dB?
Expect it will give some improvement as the signal traces will be in a faraday cage. In practice this would be of limited relevance since with SMT the component pads are on the outer layers, and you don’t want to add vias for every signal pin....
Identical PCB, except for the audio out socket?
I expected to be a difference of -3db to -6db.
This difference you've shown is incredible!
To further improve the performance of this board, how much would copper pours on the outside layers help? In example
Top: Vcc and signal
Inner top: Gnd
Inner bottom: Vcc
Bottom: Gnd and signal
Lots of vias everywhere
I changed between Gnd and Vcc to further increase capacitance / reduce inductance (the latter probably will have a greater effect)
I LOVE when you do EMC Videos.... My companies units need to be compliant to EN12895 for our systems. I found using a Walkie Talkie is an excellent way to perform some precompliance Radiated Immunity Testing. You should try it out Dave.
Hi Dave, many thanks for the valuable contents. I was wondering if you have / intend to do a tutorial on how to route mixed signal boards, how to separate analog and digital Vccs, GNDs planes. Thank you
Probe + some servos -> planar near-field scan -> near-field back-projection. The "near-field back-projection" would be interesting.
This was a really good video hope to see more pcb design videos in the future.
Would it make a difference if the signal layers were sandwiched in between the supply and ground planes? Wouldn’t they act as outer shielding? Just guessing, sorry for my ignorance
If the shorter path has lots of vias the current distribution might not be that obvious, as it favors the path of least impedance, whereas vias can have high impedance for higher frequencies
This is awesome. Thanks, Dave! Much new information learned.
Learned very much from this video. Thanks Dave!
This needs to go viral
Dave! That clip of an anechoic chamber looks exactly like an acoustic anechoic chamber with the sound absorbing wedges. Why would that be needed for radio frequency measurements, or are they different material???
It's a frequency range thing.
30:34 - I guess using jumpers here would be 'bodgy' ?
One of the main parts of my Ph.D. was looking at the comparison of EFT performance between two and four layer PCBs and how they affected micro controllers. Took physical boards, tested them, and then was able to simulate their characteristics. "An investigation of the EMC properties of modern microcontrollers", thesis available in the British Library!
If you have to use two layer boards best to have ground on both sides, and flood as much as possible between signal lines. Lots of vias to stitch those layers together. Think low impedance! Think of making any ground path as short as possible around tracks, around ICs and their decoupling. Don't be afraid to use capacitors, and even bulk capacitors further in to the board as a well of power! Don't just think of having the power supply at one side feeding everything but by using those bulk capacitors to have localised reserves. So if your power line has gone deep in to the board don't be afraid to add another electrolytic to reduce the impedance of the supply at the far reaches.
Very interesting stuff here, Dave! Thanks for the video. 👍
Great video. At the moment I'm mostly wondering what will happen if you put the traces inside the inner layers and put the ground planes on the outsides.
That was great! Good piece of knowledge!
And lol, just how precisely the ad profiling works. Right after your video I've got AD isoPower advert xD
Need to split ground planes for e.g. analogue and digital processing on the one board. Not to mention high voltage stuff! Ground loop is your friend if you treat it well.
Dave - You have concentrated about 15 years of school of hard knocks learning into a 36 minute video. If you do PCB layout and you have to get PCBs tested, all of these topics you will eventually have to consider and deal with. The DaveCad explanation of the the E an H fields is spot on. This is a great introduction of how antennas work and you can begin to see the effects having objects in the near field of an antenna. I have done most of my work doing RF design and layout. I began to be required to outsource the layouts and got some odd looks when I wrote out a list of layout requirements for the person who was layout out my designs. One requirement got a ton of pushback. I required that every power and ground via be doubled on the layout. This has many effects. The first is that it halves the impedance of the connection to further prevent noise generation. Secondly, it allows for simple identification of via locations on the pcb as the power and ground vias look different from normal signal vias. There are so many other little rules that are required to make the odds of a design passing EMC they are exhausting to think about. No unterminated stubs, don't place inductors near sensitive traces, if you do, make the layout orthogonal. Place inductors at 90 degrees to one another in filters. Traces always traverse pads. The order in which parts are laid out in a filter matters. The list just goes on and on and on.
I learned something yet again. Thanks Dave :)
Loop area is critical. But there can also be resonances, which can actually amplify harmonic noise. So, solid ground and power planes and a good assortment of decoupling caps is the way to go. FYI, I recommend you take a look at K-SIM at Kemet.com. It's a handy free tool for choosing your bypass caps. Shows a nice Bode plot.
Absolutely, I mentioned that in my bypass capacitor videos.
What’s a real pain these days is getting power consumption low while not having ridiculously fast rise times on the board, thankfully most hyper fast signals can be held within the small confines of the ICs themselves or we’d be in real trouble. Impedance matched low voltage tracks with pre emphasis becomes hard to avoid.
Great tool! Thanks!
Great Video Dave!
What a fantastic job, doing a complete layout and board to being able to do the comparison!
I don't agree with you though that it is a "huge difference" with 10 to 15dB. But then again I'm an RF guy that often work with ranges of 100dB or more in signal dynamics. Again, great work!!
I absolutely would love an emi emc video follow up! I have some testing to do next month
Exactly the same as on that silent terminal, where you had the massive copper bodge wires to make loop area small on the plug in daughter boards, as the original ones had a long snaking ground path around the perimeter of the board.
Thanks for an excellent and very helpful demo. I don't own a spec analyzer so have never been able to check my pcb radiation. Now, I might invest,
You can use your scope FFT function
@@EEVblog Yes, thanks. I did buy a FFT module for my Tek TDS3054 scope so I am equipped. It may be necessary to buy the preamp and "sniffer" probes like you used.
31:00 Wouldn't the pin and through hole of the bypass cap count as via as well? And ground pins of other chips too?
Haaaaa the joys of EMI compliance. Love the Tekbox probes I have the same kit with a Siglent SA3021X spectrum analyser, awesome for the price. I also built clamp on RF probes with ferites (Wurth electronics makes great ones) works great to measure radiated emissions from cables and see the difference cable impedance can do. Today there's no reason to not do EMI pre compliance testing in house, it saves a bunch of money and time.
Oh yes, I want some near field probes, I was going to try and find some, but if you have a diy option that might suit me better.
Yep, will do a video on this shortly.
Hi Dave. What I would really love to know is having VCC and GND on the outer layers of the board and the tracks on the inner layers. Wouldn't that reduce the radiated emissions even more?
I have tested this to some extent, it does help ‘a bit’. On my six layer boards, I tend to bury SPI and clocks and other high speed bus lines in an inner layer. I found that it helps ‘a bit’, in the 1-3 dB region, but you can get most of the way there paying attention to grounding and layout and slew rate control on a standard 4 layer stackup. One thing to remember is that vias and pads do break up the ground plane a bit as well.
Most available EMC probes are listed for frequencies from about 1 MhZ to a couple of GhZ. Are they also applicable for lower frequecies (about 100kHz)? I'd like to compare the EM field emitted by an induction oven (which has about 200kHz resonance frequency)
Love this sort of video. Classic Dave.
One of the earliest things I was taught for circuit board layout, mid 70s, was to first layout the vertical ground and power traces in parallel right next to each other and going right underneath the chips. This was to keep the length of the ground loop for the chip and bypass capacitors as short as possible. Next, on the other side of the PCB you placed your horizontal power and ground traces at the end of each chip. If you had a long package, you could disrupt them but it was preferred not to. Those were tied with vias to the vertical ground and power traces every place they crossed. Thesy always ran from board edge to board edge. Next you laid out your highest speed switching traces first so that they were the shortest length possible. You're pre-planning when you chosing chip locations on the board was to get the chips involved with these highest speed traces as close as possible to each other.
In really fast edge rate electronics we used to run traces between two ground layers (gnd/trace/trace/gnd) just to control the trace impedance better. I was fortunate in that I rarely had to worry about EMI because the enclosure was fully shielded. Used to run vias around the perimeter to control the emissions sometimes.
it is not simple to think, 4 layes is like a huge capacitor which smooths the rising edge, and that way it lowes the EMC?. I means, two solid middle layer plates, which in parallel with all tracks?.
I've done a video on PCB power planes as a capacitor.
Yes Dave more videos about this subject!
ok!
@@EEVblog you could go deeper in different kinds of electronics certifications too, for example for consumer, industrial and military rating designs.
What about making the ground plane and +5v plane on the outter layers, and the layout with those radiating traces in the middle two layers?
Is there a guideline or rule of thumb for what is the max freq you should be routing through vias without having to resort to using coaxial vias (surrounded by GND vias)? Same thing with signal routing through sub-layer traces (microstrip vs having to use buried stripline or CPWG)?
I'm all for the DIY probes! Can you please include a DIY external preamp?
Was going to do that, but you can buy them on ebay for $10, so not really worth it.
I have no clue about electronics. Would a metal Case (grounded)do any positive to Emissions?
Yes, a completely enclosed pcb cannot radiate beyond the enclosure. The problem is that there will always be some openings in an enclosure that allows the emissions to leak out. Or the same emissions couple to wires leaving the board through the enclosure.
Here is an interesting question - would ground filling on a 4 layer board help with EMC? If the clearance from trace to ground fill is smaller than the distance between the outer and inner layers, shouldn't it make a difference?
Just a thought; I don't think you - generally - would be able to get significantly lower inductance and higher capacitance from a flood fill than from an adjacent ground plane. Even though you might get slightly closer to the ground fill with tight tolerances on clearance.
@@mr_gerber Oh yeah, the loop area will be the same. I'm talking about ground pour acting as shielding.
Where was that test house bit 18:34 ? I don't remember any video about that! Could you link it in?
What would happen if you instead of
Horizontal traces
Ground
5V
Vertical traces
you had
Ground
Horizontal traces
Vertical traces
Ground
Would having the ground planes on the outside act as a shield?
I had the same question, it offcorse hide all traces within the board (nightmare to patch or repair), and the 5V will have to bounce a lot between two floatfills areas on layers 2 and 3 I suppose
Signals could interfere more easily
That is common practice for that exact reason. But in this case ditching the power plane for an extra ground plane is a bad idea. From an AC perspective, 5V and GND are the same (thanks to all the decoupling capacitors) so
5V
Horizontal traces
Vertical traces
GND
would be almost as good EMI-wise and make for a much better power distribution network.
There's a book that's generally considered 'the bible' of EMI. It's by a man named Henry w. Ott. In this book he says that this is the best stackup you can have besides using a 12 layer board! Even better than 6 and 8 layer boards!
@@lyfeofajavadevwithfrank9813 Thanks, I found his website. "the two ground planes can be stitched together around the periphery of the board to enclose all the signal traces in a faraday cage. ". NOICE!
www.hottconsultants.com/techtips/pcb-stack-up-2.html
Two of these three problems can be alleviated with the stack-up shown in Fig. 3b, where the two outer planes are ground planes and power is routed as a trace on the signal planes. The power should be routed as a grid, using wide traces, on the signal layers. Two added advantages of this configuration are that; (1) the two ground planes produce a much lower ground impedance and hence less common-mode cable radiation, and (2) the two ground planes can be stitched together around the periphery of the board to enclose all the signal traces in a faraday cage. From an EMC point of view this configuration, if properly done, is the best stack-up possible with a four-layer PCB. Now we have satisfied objectives, (1), (2), (4), and (5) while using only a four-layer board.
_____________ Ground.
_____________ Sig./Pwr.
Figure 3b
_____________ Sig./Pwr.
_____________ Ground
Great video, I would be interested in seeing a comparison of the 4 layer, ground power on the inner vs the outer layers - I _vaguely_ remember reading sections of Henry Ott's book on the matter some years back - I seem to remember that burying the signal on a 4 layer board gave slightly better performance but made the layout less ideal. Going up in the layers then gave more options with better performance. When we've sent boards for review to Telit (3G/4G modem) they always recommend signals on the inner layers but I always wondered how much difference it actually made on a 4 layer board.
I might have to try this.
I have made some RF designs using PCB for in the 1-2 GHz range and the method we used was to use an entire GND plane or several layers with GND and other layers with RF using microstrip. But in order not to have RF signals propagate via the GND planes and the Power plane, the Power plane was not filled, only traces with decoupling caps at either end, to make it work as a lowpass filter i.e. shunt C- serial L - shunt C. Would be interesting to see if that made a difference to the EMC of that PCB you made. Great video by the way, Really liked it! More of this stuff please!
Why did you remove the flooded ground plane from the top and bottom layer? Good of even got some better performance if you left it and then via stiched it to the internal ground.
I would have to assume if you redid this with a full ground plane on each of the outside layers, it.would reduce more? May make it a pita for other reasons but.
Thanks for the video, Dave. The EMC performance would get better if the open spaces on the outer layers are tied to ground, right?
Back in the 80s I had a TRS-80 model I, which did not have true audio output. There was a program that got around this limitation by intentionally generating EMI that could be picked up by a radio placed near the computer.
I'm a bit of a topology and graph theory geek, and I've taken multiple 4- and 2-layer boards down to a single-sided board with a few zero-ohm resistors (AKA "jumpers").
When is using the simpler and cheaper single-sided solution NOT a good idea from an EMC/EMI perspective?
Single sided is almost always going to be worse. The routing can't be as efficient.