Easy Bead Bracelet tutorial for Beginners (தமிழ்) | DIY bead bracelet

ฝัง
- เผยแพร่เมื่อ 10 ก.พ. 2025
- Making bead bracelets is a fun and creative hobby that allows you to design unique pieces of jewelry. Here’s a step-by-step guide to help you create your own bead bracelet:
Materials Needed:
Beads: Choose beads of various sizes, shapes, and colors.
Elastic Cord or Jewelry Wire: Elastic cord is flexible and easy to work with, while jewelry wire provides a more durable and professional look.
Crimp Beads: If using jewelry wire, you'll need these to secure the ends.
Crimping Tool: For securing the crimp beads.
Scissors or Wire Cutters: To cut the cord or wire.
Bead Board or Tray: To layout your design.
Clasps: Optional, if you want to add a clasp to your bracelet.
Step-by-Step Instructions:
Design Your Bracelet:
Use a bead board or tray to lay out your beads in the desired pattern. This helps you visualize the final design and make adjustments before stringing.
Measure and Cut the Cord/Wire:
Measure your wrist and add a couple of inches to ensure the bracelet will fit comfortably. Cut the elastic cord or jewelry wire to this length.
String the Beads:
Begin stringing the beads onto the cord or wire according to your design. If using elastic cord, you can start and end with a knot. If using jewelry wire, leave a small tail at each end to attach the clasp later.
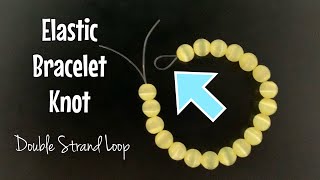
Secure the Ends:
Elastic Cord: Tie a secure knot once all beads are strung. To ensure the knot doesn’t come undone, you can add a drop of jewelry glue and let it dry.
Jewelry Wire: Thread a crimp bead onto one end, followed by half of the clasp. Loop the wire back through the crimp bead and use the crimping tool to secure it in place. Repeat this process on the other end.
Finish the Bracelet:
Trim any excess cord or wire. If using elastic cord, make sure the knot is secure and hidden within a bead if possible. For jewelry wire, ensure all crimp beads are tightly secured and excess wire is trimmed.
Test the Fit:
Try on your bracelet to ensure it fits comfortably and securely. Make any adjustments as needed.
Tips:
Mix different bead sizes and colors to create interesting patterns.
Use spacer beads or charms to add variety and texture.
If you’re new to beading, start with a simple design and gradually try more complex patterns as you gain confidence.
Enjoy the process of creating your custom bead bracelet!
Bead Bracelet Tutorial
DIY Beaded Bracelets
Bead Bracelet Patterns
How to Make Bead Bracelets
Easy Beaded Bracelets
Bead Bracelet Ideas
Handmade Bead Bracelets
Bead Bracelet Designs
Bracelet Making for Beginners
Bead Bracelet Techniques
#BeadBracelet
#DIYBracelet
#BeadedBracelet
#BraceletMaking
#BeginnerBracelet
#HandmadeJewelry
#JewelryMaking
#CraftTutorial
#Beadwork
#DIYJewelry