I've seen vids where the door hinges are welded in place before completely cutting the door loose. Just cut under the hinge first, then weld the hinge, then cut the rest of the door. guaranteed aligned.
Dude - I love this. I don’t want to pay for a pre-built one. I saved the video, bought the list of stuff - and got to grinding, cutting, welding and sanding. Thank you, thank you, for sending me in the right direction as a beginner.
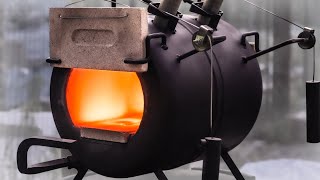
I have no idea why anyone would down vote this video. It is probably the best propane forge build by a beginner that I have seen on youtube. You clearly did some research on the subject before you started. For forging small, more or less straight parts up to as much as 5/8" square, this should work very well and for larger things you can always run it with the door open. On forges that are kept in a shop it is often more versatile if you forgo a front door altogether and instead stack fire brick up, leaving the smallest possible opening for whatever item you are forging. You can easily adjust the width and height of the opening by moving the bricks around or using things like 1" spacers to raise the opening height a little bit. A buddy of mine made his door of two vertical light weight (insulating) fire brick that slide to the left and right in a track. I just stack brick up, myself. You will also find it quite useful to incorporate a sliding stock support into your design. On your railroad track I hope you won't take offense if I tell you that generally speaking, they make very poor anvils...at least when used in the orientation that you seem inclined towards. I'd like to suggest that you consider studying the ABANA page covering adapting RR track and crane track for use as an anvil. www.anvilfire.com/21centbs/anvils/making/RR-rail_anvils.php The issue is that the web between the working surface and the base is far too thin and has too little mass to allow efficient forging. It flexes, absorbing some of the energy of your blows and robbing your hammer strikes of a fair amount of energy. RR track is more effectively used place on end. Check out that page. Generally speaking, a damn decent job. This is coming from someone with roughly 25 years as a hobby smith and after having built or rebuilt about six propane forges. At some point you should also try out a coal/coke forge, either by building one or by trying out someone else's. I forged only with propane for my first 20 years but acquired a coal forge about 5 years ago and now I rarely use my propane forges. I find coal or coke much better suited for the small hand forged items I make.
+ Scott Rich Thanks for the wonderful comment, with you having 25 years in smithing and experience building forges I take it as sincere compliment that you liked the forge I made :) I had no experience at ever making one, and did watch many videos on YTube of people who made theirs, some with great success and others who had problems. I watched the problem videos more than the successes to learn what “not to do” and to learn from other’s mistakes. I had a clear idea on exactly how to go about making mine before I even broke out the angle grinder because I did do my research. I was essentially building the forge around the burner I had made for it previously. I saw a number of forges made with the firebrick doors…..decided against it so I wouldn’t have to mess with moving bricks around all the time even tho it IS a great option and I am sure works well. I just decided that wasn’t for me. I do have a stock holding “apparatus” I made for the forge that is adjustable and built into the forge. I should maybe do a follow up video on the forge since it is currently my most watched video. I can’t believe it almost has 15,000 views as of today (7/18/16), I never thought any of my vids would reach 1,000 views but lots of them seem to be well received on YTube for which I am happy :) I know RR Track is a poor choice and I actually spent a lot of time on the site you mentioned prior to making the forge. Thanks for putting that link, hopefully others will check it out as well. Not being overly rich I worked with what was in my budget so use RR Track for now. Would LOVE to have a real anvil, even attended a few auctions but they always went above what I could afford :( Anvils aren’t cheap, would die to have a “real one” LOL! Hopefully one day I can afford one. I did my best on building the forge so you saying a “damn decent job” makes me feel good about it. Regarding “thumbs down(s), had I been better at editing last year when the vid was put up I think I could have put on a much nicer presentation, but it is what it is. I do plan on make a coal forge as well, I can make my own charcoal as free oak is easy to get. Just need a 55 gal and a 30 gal drum and the wood. Coal or Coke isn’t easily found here in Florida, but is the better choice. Well again, thanks for the great comment and for watching the video, means a lot! :)
Hey man just wanted to let you know that your video helped me A LOT. Finally pulled the trigger on building my forge and i referenced this video a TON! I appreciate you sharing your knowledge man
I have seen more then a few of these propane forge tutorials. Not only was it enjoyable to watch, but when it comes time to build my own, this will be the one I refer to. Most excellent vid. A subscription to your channel may be in the works.
Thanks for the kind words Drew, my most recent video features this forge as well if ya care to take a look. I anneal some bearing races in it. Thanks for considering a subscription :)
Well sir, you now have a new subscriber. I've been looking for ideas for making up a forge. I've been seriously considering using an air tank just like you did and the way you set up your forge is pretty much what I had in mind for my own forge. You put my own thoughts into a video so now I know what my own forge will look like. Well done sir! Well done indeed!!!!!
What a great build. The best propane forge build, simple to follow in the construction. I'm now in the process of cutting the tank. Thanks again for the video. Regards from Panama City, Panama.
Thank You Sir, greetings from the USA. I hope your build goes smoothly and performs as expected and I appreciate you taking the time to watch my build. Like & Subscribe if you enjoy the content here :)
you did a great job! i have purchased thru a friend steel from Tampa Steel. i hear they are great people. haha, your home owners insurance must love you, lol but well done.
I'm modeling mine (with minor adjustments) from what you've done here. The only thing different I'm doing is making it open ended to work longer pieces of stock. Great video and build. Thanks for the contribution.
My brother made a cold forging anvil from RR trax (he didn't want to use his Peters anvils) and we bolted it to a heavy plate to take care of the lightweight issue we also used a 30" length. An example, I cold forged small feet for stair rail posts that were too small to put into the forge. We built a natural gas forge we could melt steel in. That's a foundry. That was scary at times. LOL Oh I should warn you to wear darkened shooter's glasses, the yellow ones. Reason is the light from a bright glowing yellow forge damages your eye sight in time. Just a heads up. My brother's shop is in CA and his web site is themetalguy.com. we did quite a bit of cold forging, we're both sheet metal guys, blacksmiths, coppersmiths and I'm an ultra precision TIG welder and have welded RR trax and believe you me it needs some serious preheat with that high carbon content, that's knife making steel. Oh FYI, angled steel bed frames are also 1084 steel.
So those metal bed frames that collapse and fold up in pieces with the formed legs with plastic feet are made with 1080 tool steel...that's good to know! See those setting out for free sometimes.
Great job, that forge should last a lifetime and looks great in your shop. That Craigslist haul for $50 was a score. The table you used for the forge was from a tile/brick saw, I've had two over the years I found in the garbage and repurposed. I'm a new subscriber, I'm looking forward to your other videos.
Thanks for that info and for subscribing. I got that forge table free, wasnt sure of it original purpose, just cleaned it up a bit and works good for the forge. My Video List is gettin bigger if ya wanna check them out, I am the ultimate "repurposer" LOL :)
+Makin Sumthin From Nuthin Recycling things to make new tools is a great thing, we learn new skills, help the environment, save money and make new friends and mostly we get new toys to use! There's no downside!
I did my piece of railroad track with a hacksaw using a bi-metal blade. it costed me 2 hours under a burning hot sun. Your method seems a bit more sane.
Thanks for the quick reply. I was just getting ready to wander on to some other interesting video, forgetting to subscribe. Done. Subscribed. I'll be rifling through your vids at some point, I'm sure.
I went ahead and gave you a thumbs up there. I also went ahead and left you a comment. Really cool build. I really like the rack you built, that is a great idea
Cement board affixed to the ceiling directly above the forge and a cheap box fan or two to move the hot air outside if you keep the garage door open while in use
Makin Sumthin From Nuthin I like to use flap discs for sanding jobs like you did in this vide. They're not near as LOUD, and they don't dig in to the material as much. Gotta have a Makita or Dewalt. Hey, where did you order that wool material from? Considering making one like this after this knife season ends. The forge I have now is just a little gingerbread house looking thing I made out of refractory brick. It works, but a lot of heat escapes through the single layer brick that I think could be better served INSIDE the forge !
I bought the angle grinder just for the forge build, never owned one B 4. Didnt discover flap discs til later 😡 I got the wool online from a pottery supply, most sell it as well as rigidizer and sodium silicate....shop around as price varies greatly. Use 1" wool and double up on it...is easier to work with that way IMO :)
Perfect. I'm going to be making the same forge real soon. I found the tank etc. at a auto flea market. I learned some cool tricks here. Thanks Buddy. Nice job.
Its hard stuff and I used it as is. Its a "poor mans anvil", not really a long term solution for serious blacksmithing but ok as a beginner anvil. I have sold off 1 or 2 of them to subscribers that wanted one
@@MakinSumthinFromNuthin I'm from the state of Florida too, and you may want to do some checking. I was told by CSX that selling Railroad tracks even the ones that may see little use, "they may be disused but they are never abandoned."... It is illegal to sell railroad iron (even the plates and spikes) for scrap metal in the U.S., and the only people allowed to do it are contractors hired by the railroad to remove and recycle or scrap out abandoned railroad tracks. I don't think you want to be putting all of your video and comments on youtube...I know, I know..."everyone does it"...just do what you think is best and CYA...great job, I'm working on my forge now!
Nice job on the forge. I think I like your design with the air tank better than anything I've seen, so I think I'll steal it! Keep up the great work and the videos.
Awesome job when you have everything to start off. I have a few ideas to start my own but since it's a long process I pass on the list to a buddy of mines and throw in a few $100 bucks to get it done for me lol. It's better when you do it your self but I hate going through that entire process. Great video my friend
Your more than welcome my friend. Normally I skip the video process but on this one it was a must see. Again great piece of art I enjoyed ever minute of it. God bless
Thank you for doing this video. The greatest things that I taking away are your dedication and discipline to a process that is both repeatable and focused on insuring safety of the individuals. You have provided knowledge consumable for all. I was going down this route before, but I think that you have sparked motivation and inspiration to get busy with it again! Thank You
Thank you for your kind and generous words Barry! I wish you all the best in your endeavors and THANK YOU for your support & patronage of my channel!~Richard
I'm a furniture maker, but when I see things being built, like the foundry in your video, it gets me excited about trying new things. when I'm ready, I'd like to pick your brain if that's ok. The foundry is the best built that I've seen. That's just my opinion.
Amazing idea with the air tank. I have been kicking around ideas for a while on what I want to use to build my own forge. I have two of these tanks in my shed collecting dust.
Very well done Sir, very good looking set up. Going with the old air tank looks much better than going with the old 20lb propane tank. The geometry looks all around better.
Nice job on the forge my friend. I'm getting ready to start up forging myself and I'm looking at all kinds of videos on how to make my own forge. This was a great idea and very informative too. Many thanks for sharing!
All your videos make me wish I had the room to build the forging equipment to try my hand at it. Good job and excellent job for not getting overly technical and keeping it in layman's terms.
Thanks, I watched many vids prior to building all my stuff, most made it more complicated than it was and didnt explain much. Some were good tho. I try to keep it simple (KISS Method)
I wasnt sure about this thing either when I started! But I had a plan and stuck to it and it was well worth the effort in the end. The beer was well deserved IMO :)
Hi , I bought a nice Wadkin radial arm wood cutting saw. The foot holding the upright post was smashed into about four pieces. Wadkin stuff is top price but then their stuff is top quality. I nearly died when I asked for a replacement foot. I was costing me what I paid for the saw more or less. Someone suggested I use J B weld which I had never heard of it did a fantastic job and all the pieces of cast iron were put together so as when sanded up and painted it looked and felt like new. That was a bout four or more years ago so I see why you went for it too. I never realised though it would take that kind of heat though someone enlighten me more please great project. Alistair in Scotland uk
JB weld is good for up to appox 500 degrees F. I knew if I built it properly (the forge) that the outside would never approach that kind of temp and I was right. In another video I demonstrated putting my hand multiple times on the outside of the forge after it had been operating for quite some time.
1st class job. I have seen this same design built by others over and over again but you nailed it. It's all in the prep. Thanks for sharing this, should be an inspiration and benchmark.
I used a Lenox diamond hole saw. It worked well. Kept the handle on as well. I also have refractory cement to use along with the Kaowool and ridgidizer. I kept both of the square door plates and pop riveted them on with hinges so that I could close it up and carry it. I bought some two inch black steel pipe and cut it down to weld to the holes for the burners and drilled three holes in each for thumb screws. Also acquired a fairly heavy duty cart which I’m filling the top of with kiln bricks and four large mounting bolts sticking up through them to mount the forge to. Built my own double burners with an extra valve on the second so I can run only one when I don’t need two. I meant for mine to be more portable so that’s the reason for the differences. Also the way I’m building the cart I can always upgrade to a larger tank as mine is a little smaller than yours. Mine was certainly probably not the cheapest route although I’ve been buying all the components over the last year and a half. Good job though your forge looks good.
Very nice work. I have a 5 gallon tank I am getting ready to convert and I am going to use some of your design features for mine. I am replacing a coffee can forge i have been working out of for a while, so I am excited to have a little more space. Enjoy your forge!
Awesome job on the forge design and construction. Looks to work a lot better than mine does, but with a bigger volume and still only one burner - a very effective one it seems. I'd have expected you might need 2 for a forge that size. A quick word on the anvil - since you have spares kicking about, consider boxing in the sides of one and adding something to increase the weight - maybe pouring lead in if you find it for cheap enough.
I got me a 1922 ford model t and you show is gonna help me to cast parts and i got me a lathe show infrequent and between both of youse guys i think i can keep my jalopy on the road.
Very nice forge. I wish I had the space to make one, but my place has no garage or even a shed. But eventually I will be moving and hopefully find a place where I can build my own forge. I will be trying to use your method as I always figured an air tank would be much better than using an old propane cylinder. I used to have a nice #55 anvil but someone decided they needed it more than I did and walked off with it.
Nice build!! I may sacrifice my Campbell hausfeld air pig and build a forge like yours!! I’ll probably use paint stripper to remove all the blue paint though...grinding that would suck ass! I might leave mine bare metal and use high temp clear coat! Thx for sharing!!
+Makin Sumthin From Nuthin I'll absolutely check them out. I'm just now trying to get into blade smithing and forging small stuff so any and all videos on the subject you have I'll be more than happy to check out and learn all I can
I know it's late, but a pair of carhartt overalls are awesome for grinding jobs. not too comfy in Phoenix during the summer. I also saved some leather from a couch bound for the landfill and made a apron to protect the family jewels.
If I am wearing anything more than a bathing suit I am lucky (Central Florida).... nice snag on the leather :) I bought a leather apron from Horror Freight for $8 on sale...Lmao
My 12 x 16' shop was so full 3 weeks ago I couldnt fit another thing in it....so what do I do? Of course.....go out and buy a 6 foot Lathe :) See my most recent video 👀
Great job man I've made up two burners myself ready for a gas bottle forge, I've got to cut the bottle up myself and I'm hoping it'll come out half as nice as yours. My disk has slipped out at the minute so I'm in pain watching videos like yours. Thanks for the ideas mate. Peace from Wales uk!
You really did an incredible job on this forge!! I had the same idea using a air compressor tank so I'm glad I ran across your video!! I have the burner finished.. I used 316ss and turned all the parts myself.. I'm a machinist sooo.. it's a little over kill.. it's what we had in-stock at work sooo...LOL!! It's taken quite a while.. I had a couple of heart attacks so I have to take my time.. The only thing I did different was weld a 1inch by 1/8 band around the door where it was cut off the tank so it would seal up a little better..I know.. over kill.. You take great pride in your work!! I hope mine turns out as good!! Where in Florida are you? I'm about 20 minutes outside of Ocala.. Good Luck!! John
I am in Gibsonton, FL just South of Brandon. I appreciate the kind words....the research I did paid off as I never made one before. Best of luck on your build! :)
hello sir, I'm glad I found your channel. I gave an old air compressor that came off of my welding truck that I am doing the same thing to it. most of what you did is spot on to what I would like to do for mine. however I believe I will make a door for the back as well as my belief a door on the side. I was planning on 4 burners 2 on each side alternating. I think my tank is a 40 gallon. I have a bus brake drum to make a Coke Forge as well.
I have complete confidence you could make one just as good if not better than mine. I built it with no plans or drawings, just follow what I did and you will have a great forge :)
Great video, some great ideas for my next forge build. My current one is made from a 1 gal paint can using perlite and plaster for the insulation and coated with refractory cement. It work great for knives, but the size limits what I can forge. Thank you for sharing your build sir.
Awesome work, have a coal forge myself, planning a propane build at the minute, random suggestion, if you had a hole in the back of the forge you would be able to heat specific bits of longer stock material. Keep up the good work 😁
Have the same idea except I plan on using Refracture cement and two burners. If I do the build I will do a video. I do wish I could find a big chunk of RR track like that. No one around here willing to list one so far...lol
great work bud! book marking this for my build in the near future. (hard to hear you in the beginning though) but i get the jist of it. for now I'm using the ole coffee can style forge and blow torches.
Hello and Merry Xmas, Nice project and executed very well. I would suggest that you take a piece of 16 ga strap (2" worked well) steel and weld it inside your door opening with an inch protruding. It bends to shape with the heat of the welding and some 'C' clamps. Overlap the ends and weld close to them before cutting off to complete the circle. This gives you a nice seal when you close the door over the top of the protruding one inch. I have used hot water tanks, propane, air and compressed gas cylinders (condemned diving tanks also) for projects. I made a welding rod oven with a hot water tank keeping the foam insulation except where I cut it which I replaced with a can of spray foam. A small silicone heating pad keeps it toasty. Take care and enjoy the holidays. Doug
Hapy Holidays to you as well, appreciate the kind words and suggestion. Will keep that trick in mind for any future builds. Was hoping you had some vids documenting the process, I certainly woulda watched them! :)


I've seen vids where the door hinges are welded in place before completely cutting the door loose. Just cut under the hinge first, then weld the hinge, then cut the rest of the door. guaranteed aligned.
I like !! 👍🏼😊
David Saunders
YOU DA MAN!
Dude - I love this. I don’t want to pay for a pre-built one. I saved the video, bought the list of stuff - and got to grinding, cutting, welding and sanding. Thank you, thank you, for sending me in the right direction as a beginner.
This was my first and only forge...I was a beginner when I made it. Thanks!
I have no idea why anyone would down vote this video. It is probably the best propane forge build by a beginner that I have seen on youtube. You clearly did some research on the subject before you started. For forging small, more or less straight parts up to as much as 5/8" square, this should work very well and for larger things you can always run it with the door open. On forges that are kept in a shop it is often more versatile if you forgo a front door altogether and instead stack fire brick up, leaving the smallest possible opening for whatever item you are forging. You can easily adjust the width and height of the opening by moving the bricks around or using things like 1" spacers to raise the opening height a little bit. A buddy of mine made his door of two vertical light weight (insulating) fire brick that slide to the left and right in a track. I just stack brick up, myself. You will also find it quite useful to incorporate a sliding stock support into your design.
On your railroad track I hope you won't take offense if I tell you that generally speaking, they make very poor anvils...at least when used in the orientation that you seem inclined towards. I'd like to suggest that you consider studying the ABANA page covering adapting RR track and crane track for use as an anvil.
www.anvilfire.com/21centbs/anvils/making/RR-rail_anvils.php
The issue is that the web between the working surface and the base is far too thin and has too little mass to allow efficient forging. It flexes, absorbing some of the energy of your blows and robbing your hammer strikes of a fair amount of energy. RR track is more effectively used place on end. Check out that page.
Generally speaking, a damn decent job. This is coming from someone with roughly 25 years as a hobby smith and after having built or rebuilt about six propane forges. At some point you should also try out a coal/coke forge, either by building one or by trying out someone else's. I forged only with propane for my first 20 years but acquired a coal forge about 5 years ago and now I rarely use my propane forges. I find coal or coke much better suited for the small hand forged items I make.
+ Scott Rich Thanks for the wonderful comment, with you having 25 years in smithing and experience building forges I take it as sincere compliment that you liked the forge I made :)
I had no experience at ever making one, and did watch many videos on YTube of people who made theirs, some with great success and others who had problems. I watched the problem videos more than the successes to learn what “not to do” and to learn from other’s mistakes. I had a clear idea on exactly how to go about making mine before I even broke out the angle grinder because I did do my research. I was essentially building the forge around the burner I had made for it previously.
I saw a number of forges made with the firebrick doors…..decided against it so I wouldn’t have to mess with moving bricks around all the time even tho it IS a great option and I am sure works well. I just decided that wasn’t for me. I do have a stock holding “apparatus” I made for the forge that is adjustable and built into the forge. I should maybe do a follow up video on the forge since it is currently my most watched video. I can’t believe it almost has 15,000 views as of today (7/18/16), I never thought any of my vids would reach 1,000 views but lots of them seem to be well received on YTube for which I am happy :)
I know RR Track is a poor choice and I actually spent a lot of time on the site you mentioned prior to making the forge. Thanks for putting that link, hopefully others will check it out as well. Not being overly rich I worked with what was in my budget so use RR Track for now. Would LOVE to have a real anvil, even attended a few auctions but they always went above what I could afford :(
Anvils aren’t cheap, would die to have a “real one” LOL! Hopefully one day I can afford one. I did my best on building the forge so you saying a “damn decent job” makes me feel good about it. Regarding “thumbs down(s), had I been better at editing last year when the vid was put up I think I could have put on a much nicer presentation, but it is what it is. I do plan on make a coal forge as well, I can make my own charcoal as free oak is easy to get. Just need a 55 gal and a 30 gal drum and the wood. Coal or Coke isn’t easily found here in Florida, but is the better choice. Well again, thanks for the great comment and for watching the video, means a lot! :)
Hey man just wanted to let you know that your video helped me A LOT. Finally pulled the trigger on building my forge and i referenced this video a TON! I appreciate you sharing your knowledge man
AWESOME! & THANKS!!
@@MakinSumthinFromNuthin How is it holding up?
@@briholt100 still works perfectly as designed
@@MakinSumthinFromNuthin hey, great to hear and not surprised. Good quality.
Nice job on the forge! I have watched quite a few and I like the way you did yours. Very clean and neat. Once again good job.
Thanks William. I watched a ton of vids before making mine...most lacked "vision" I appreciate ya!
dude, that is really awesome and you take pride in your work. 2 thumbs up man
Thanks Joey, much appreciated! :)
That was a brilliant piece of work my friend, well done!
Thanks Nelson!
I have seen more then a few of these propane forge tutorials. Not only was it enjoyable to watch, but when it comes time to build my own, this will be the one I refer to. Most excellent vid. A subscription to your channel may be in the works.
Thanks for the kind words Drew, my most recent video features this forge as well if ya care to take a look. I anneal some bearing races in it. Thanks for considering a subscription :)
Nice work on the forge sir thanks for sharing
Thanks, hopefully will help someone looking to make one that will work right out of the gate :)
Makin Sumthin From Nuthin I'm sure it will. It gave me some ideas to improve the one I built
Great! Keep me posted! I should do a follow up vid of it in action more, not much of this vid showed off the fire breathing dragon :)
My latest video has my forge in it and I'll try do a video of me upgrading it. Also had a bash at forge welding 👍🏼
Will check it out after dinner. Thanks! :)
Well sir, you now have a new subscriber. I've been looking for ideas for making up a forge. I've been seriously considering using an air tank just like you did and the way you set up your forge is pretty much what I had in mind for my own forge. You put my own thoughts into a video so now I know what my own forge will look like. Well done sir! Well done indeed!!!!!
Thanks Brian, good luck!
That. Was. AWESOME! What a great looking build! I hope it serves you well.
Thanks Piper! I appreciate you Watchin! :)
What a great build. The best propane forge build, simple to follow in the construction. I'm now in the process of cutting the tank. Thanks again for the video. Regards from Panama City, Panama.
Thank You Sir, greetings from the USA. I hope your build goes smoothly and performs as expected and I appreciate you taking the time to watch my build. Like & Subscribe if you enjoy the content here :)
Done.
Appreciate the Vote of Confidence! :) Best of Luck On Your Forge Build!
Hows the forge build going Jose?
you did a great job! i have purchased thru a friend steel from Tampa Steel. i hear they are great people. haha, your home owners insurance must love you, lol but well done.
My homeowners insurance company ordered two forges as soon as the vid was published :)
Tampa Bay Steel are great people, Thanks for Watching! :)
I'm modeling mine (with minor adjustments) from what you've done here. The only thing different I'm doing is making it open ended to work longer pieces of stock. Great video and build. Thanks for the contribution.
You will likely need 2 burners with an open ended design...best of luck!
Railroad track is made from 1080 tool steel, you have very good steel for an anvil.
they are a bit small but work ok
My brother made a cold forging anvil from RR trax (he didn't want to use his Peters anvils) and we bolted it to a heavy plate to take care of the lightweight issue we also used a 30" length. An example, I cold forged small feet for stair rail posts that were too small to put into the forge. We built a natural gas forge we could melt steel in. That's a foundry. That was scary at times. LOL Oh I should warn you to wear darkened shooter's glasses, the yellow ones. Reason is the light from a bright glowing yellow forge damages your eye sight in time. Just a heads up. My brother's shop is in CA and his web site is themetalguy.com. we did quite a bit of cold forging, we're both sheet metal guys, blacksmiths, coppersmiths and I'm an ultra precision TIG welder and have welded RR trax and believe you me it needs some serious preheat with that high carbon content, that's knife making steel. Oh FYI, angled steel bed frames are also 1084 steel.
Sounds like you guys got stuff under control! 😎
So those metal bed frames that collapse and fold up in pieces with the formed legs with plastic feet are made with 1080 tool steel...that's good to know! See those setting out for free sometimes.
I am going to make a forge also. This video has given me a lot of ideas. It was a super well done video.
Thanks John! 😊
Great job, that forge should last a lifetime and looks great in your shop. That Craigslist haul for $50 was a score. The table you used for the forge was from a tile/brick saw, I've had two over the years I found in the garbage and repurposed. I'm a new subscriber, I'm looking forward to your other videos.
Thanks for that info and for subscribing. I got that forge table free, wasnt sure of it original purpose, just cleaned it up a bit and works good for the forge. My Video List is gettin bigger if ya wanna check them out, I am the ultimate "repurposer" LOL :)
+Makin Sumthin From Nuthin Recycling things to make new tools is a great thing, we learn new skills, help the environment, save money and make new friends and mostly we get new toys to use! There's no downside!
I agree! :)
nice bud, best lil forge I've seen and surely well worth the time.
Thanks Steve, U thinkin about building one?
Makin Sumthin From Nuthin yes sir. something I'm bout to play with as I like to do everything myself.
Nice, hope the vid helped :)
I did my piece of railroad track with a hacksaw using a bi-metal blade. it costed me 2 hours under a burning hot sun. Your method seems a bit more sane.
Yikes, you are more ambitious than me! I didnt have the $$ at the time but was $$ well spent!
I don't know why but yer bell is on and this didn't come up. Glad I found it ! Keep em coming fella !
Ohhh Lord, that video was uploaded over 2.5 years ago...my most popular video oddly enough Dean 😊
A good build bud.
Thanks my friend 😊
Piece of art. Nice work. Really well thought out.
Many Thanks 😊 Merry Christmas!
Very nice. I enjoyed watching this video with my morning coffee. Thanks for sharing it.
Thanks, glad you enjoyed it! I have lotsa other videos featuring fire breathing dragons if ya wanna check them out :)
Thanks for the quick reply. I was just getting ready to wander on to some other interesting video, forgetting to subscribe. Done. Subscribed. I'll be rifling through your vids at some point, I'm sure.
Welcome aboard...I appreciate ya! :)
Hit the Like Button if you like the forge. TY :)
Makin Sumthin From Nuthin
great job...thumbs up...
Makin Sumthin From Nuthin Wil
how do you keep the forge outside from hearing up
@@texasbackroads55 The ceramic wool
I went ahead and gave you a thumbs up there. I also went ahead and left you a comment. Really cool build. I really like the rack you built, that is a great idea
Thanks much David, I appreciate ya watching! :)
awesome build.. one of the best DIY forge builds I've seen. how do you have your propane setup?
Thanks for the kind words..... I have vids on the burners, they are interchangeable from the forge to my foundry furnace
Nice work. That looks like it will really do the job for you.
Thanks, it works rather well and still looks great :)
I worry about the amount of heat rising up onto the ceiling of my garage when I use mine. Do have any input on that?
Cement board affixed to the ceiling directly above the forge and a cheap box fan or two to move the hot air outside if you keep the garage door open while in use
Great work. You and your angle grinder seem to be really good friends!!
Thanks!, however I think I have drove the angle grinder to its death ☠
Makin Sumthin From Nuthin I like to use flap discs for sanding jobs like you did in this vide. They're not near as LOUD, and they don't dig in to the material as much. Gotta have a Makita or Dewalt. Hey, where did you order that wool material from? Considering making one like this after this knife season ends. The forge I have now is just a little gingerbread house looking thing I made out of refractory brick. It works, but a lot of heat escapes through the single layer brick that I think could be better served INSIDE the forge !
I bought the angle grinder just for the forge build, never owned one B 4. Didnt discover flap discs til later 😡
I got the wool online from a pottery supply, most sell it as well as rigidizer and sodium silicate....shop around as price varies greatly. Use 1" wool and double up on it...is easier to work with that way IMO :)
Makin Sumthin From Nuthin Cool. I'm currently looking to score a tank, then I'll get started. Loved your design.
Sweet, keep an eye on Craigslist 👀
Does the 1 burner setup give enough heat to forge weld? Also, how much fued does the burner take per hour?
With this forge & burner I can. 1lb+ per hour is approx usage
Perfect. I'm going to be making the same forge real soon. I found the tank etc. at a auto flea market. I learned some cool tricks here. Thanks Buddy. Nice job.
Thats great Jake, glad to help out :)
Great build thanks for sharing
Thanks Scott, I appreciate ya watching! :)
Bravo from New Zealand mate, great approach and honesty in the build!
Thanks, share with like-minded friends! :)
great job!
turned out really nice, wel done!!
Many Thanks! Consider Subscribing :)
Is the railway rail hard enough on its own to serve as an anvil, or did you have to weld a steel facing onto it?
Its hard stuff and I used it as is. Its a "poor mans anvil", not really a long term solution for serious blacksmithing but ok as a beginner anvil. I have sold off 1 or 2 of them to subscribers that wanted one
@@MakinSumthinFromNuthin I'm from the state of Florida too, and you may want to do some checking. I was told by CSX that selling Railroad tracks even the ones that may see little use, "they may be disused but they are never abandoned."... It is illegal to sell railroad iron (even the plates and spikes) for scrap metal in the U.S., and the only people allowed to do it are contractors hired by the railroad to remove and recycle or scrap out abandoned railroad tracks. I don't think you want to be putting all of your video and comments on youtube...I know, I know..."everyone does it"...just do what you think is best and CYA...great job, I'm working on my forge now!
Nice job on the forge. I think I like your design with the air tank better than anything I've seen, so I think I'll steal it! Keep up the great work and the videos.
Great, build one just like it....It's why I put the vid up! :)
Black bear forge shows how to fabricate tools for the forge. Tongs without another pair of tongs to hold the pair your making.
Nicest DIY forge I've seen so far.
You have a great ability seeing final creation in just scrap objects.
Thanks for the video.
Thanks for the kind words!! :)
Harbor Freight has a welding table for $59.
Thanks Larry, I appreciate you watching!
Awesome job when you have everything to start off. I have a few ideas to start my own but since it's a long process I pass on the list to a buddy of mines and throw in a few $100 bucks to get it done for me lol. It's better when you do it your self but I hate going through that entire process. Great video my friend
Thanks a lot Ivan, appreciate the kind words :)
Your more than welcome my friend. Normally I skip the video process but on this one it was a must see. Again great piece of art I enjoyed ever minute of it. God bless
Great video but I would have enjoyed it more if it were a little bit more condensed 😊👍
Agree, I wasnt very good at producing a video back then :)
Thank you for doing this video. The greatest things that I taking away are your dedication and discipline to a process that is both repeatable and focused on insuring safety of the individuals. You have provided knowledge consumable for all. I was going down this route before, but I think that you have sparked motivation and inspiration to get busy with it again! Thank You
Thank you for your kind and generous words Barry! I wish you all the best in your endeavors and THANK YOU for your support & patronage of my channel!~Richard
You never sent it thing about the burner have you ever heard about a sandblaster
I have other videos about the burners. I dont have a sandblaster, but the shop does accept donations :)
I really like what you did with the air tAnk. that's a nice forge. good work..
Thanks Dale!, consider subscribing! :)
Why would you give this a thumbs down????
Thanks for your support 👍🏼
no prob. great detailed forge build. the majority of the newer generations would just buy a pre fab junk one online.
Agree, probly think Venturi is a Band too...LOL
This is an incredible build. Loved the video.
Thanks a Lot! I appreciate you watching. Consider subscribing! :)
The build is fantastic but the video contained far too much time just looking at the forge from different angles and stuff.
My apologies.... I agree... I wasnt good at making videos back then :(
I'm a furniture maker, but when I see things being built, like the foundry in your video, it gets me excited about trying
new things. when I'm ready, I'd like to pick your brain if that's ok. The foundry is the best built that I've seen. That's just my opinion.
good documentation of your building process, thanks fir sharing it with us all:)
Much appreciated Jim, thanks for watchin! :)
Absolutely brilliant work! Your attention to fine detail deserves a reward! Keep it up
Thanks for watchin and the kind words! :)
Amazing idea with the air tank. I have been kicking around ideas for a while on what I want to use to build my own forge. I have two of these tanks in my shed collecting dust.
Go make ya one from one of those tanks 😊
Great channel. I love working with forges and metals. Thanks for your videos.
Thanks For the kind words, I appreciate ya! :)
That forge looks awesome
Thanks a lot Keith...I appreciate ya! :)
Hernâni
nice forge build indeed and nice score on the railroad track and other stuff .
Thanks Mingo!, Consider subscribing :)
I just sent you a mail about the forge. interesting and useful videos. A couple of friends and I are watching them. Good stuff ... keep'em comin'.
Glad you enjoy the channel. Am working on a Lathe project currently, will check my email later tonight. :)
I liked your door the most. Simple and efficient.
Thanks Wes, the hinge from the scrapped out BBQ grill worked out well! :)
Very well done Sir, very good looking set up. Going with the old air tank looks much better than going with the old 20lb propane tank. The geometry looks all around better.
Thanks, I feel it turned out nice and works very well! :)
Nice job on the forge my friend. I'm getting ready to start up forging myself and I'm looking at all kinds of videos on how to make my own forge. This was a great idea and very informative too. Many thanks for sharing!
Loving the paint job mate great color just sets it off nicely
Thanks Dion!
All your videos make me wish I had the room to build the forging equipment to try my hand at it. Good job and excellent job for not getting overly technical and keeping it in layman's terms.
Thanks, I watched many vids prior to building all my stuff, most made it more complicated than it was and didnt explain much. Some were good tho. I try to keep it simple (KISS Method)
Like the way you work.....excellent job !!!
Thanks Ricardo! :)
I wasn't too sure about this thing from the start but I am very impressed. Good job! Also, I approve of the Busch appearance!
I wasnt sure about this thing either when I started! But I had a plan and stuck to it and it was well worth the effort in the end. The beer was well deserved IMO :)
Hi , I bought a nice Wadkin radial arm wood cutting saw. The foot holding the upright post was smashed into about four pieces. Wadkin stuff is top price but then their stuff is top quality. I nearly died when I asked for a replacement foot. I was costing me what I paid for the saw more or less. Someone suggested I use J B weld which I had never heard of it did a fantastic job and all the pieces of cast iron were put together so as when sanded up and painted it looked and felt like new. That was a bout four or more years ago so I see why you went for it too. I never realised though it would take that kind of heat though someone enlighten me more please great project. Alistair in Scotland uk
JB weld is good for up to appox 500 degrees F. I knew if I built it properly (the forge) that the outside would never approach that kind of temp and I was right. In another video I demonstrated putting my hand multiple times on the outside of the forge after it had been operating for quite some time.
Easy build, a leather apron when grinding is easier on the jewelry, nice presentation
LOL!, I have one now! Thanks for the suggestion & kind words! :)
Frederick Olson yessir ... only takes once to learn that one ...
Well done. Inspired me a lot.
Thanks, hope it helps you make one :)
nice. i like it. gave me a few ideas. keep up the good work
Thanks Victor, glad it sparked a few ideas! :)
I plan on doing this same setup with a Water well think or beer keg later on depending on how well I’m able to build the # 10 food can.
Good luck with the project
Awesome build! Best one I've seen on TH-cam yet!
Thanks Ace!, I appreciate you watching! :)
I agree! Very simple and well built. Thank you for sharing. You gotta love the Craigslist!
I love craigslist! LOL
1st class job. I have seen this same design built by others over and over again but you nailed it. It's all in the prep. Thanks for sharing this, should be an inspiration and benchmark.
Much appreciated sir! 😊
You did a excellent job making the forge. Very well designed, how you make lots of items with it. Great job
Thanks!, appreciate the kind words! :)
You like it...We all like it too! Great Job!
Thank You very much! Be sure to subscribe and check out my other metal casting vids for other fire breathing dragons! :)
I have to agree a great simple forge that is not over engineered or complicated. Well done on the KISS method...
Ingenious and very resourceful. fun to watch it come together.
Thanks Thomas!
I used a Lenox diamond hole saw. It worked well. Kept the handle on as well. I also have refractory cement to use along with the Kaowool and ridgidizer. I kept both of the square door plates and pop riveted them on with hinges so that I could close it up and carry it. I bought some two inch black steel pipe and cut it down to weld to the holes for the burners and drilled three holes in each for thumb screws. Also acquired a fairly heavy duty cart which I’m filling the top of with kiln bricks and four large mounting bolts sticking up through them to mount the forge to. Built my own double burners with an extra valve on the second so I can run only one when I don’t need two. I meant for mine to be more portable so that’s the reason for the differences. Also the way I’m building the cart I can always upgrade to a larger tank as mine is a little smaller than yours. Mine was certainly probably not the cheapest route although I’ve been buying all the components over the last year and a half. Good job though your forge looks good.
Very nice work. I have a 5 gallon tank I am getting ready to convert and I am going to use some of your design features for mine. I am replacing a coffee can forge i have been working out of for a while, so I am excited to have a little more space. Enjoy your forge!
I have a paint can forge too....they work ok for small things. For serious heat...go with the big forge!
Outstanding video and Forge!
Thanks! :)
Awesome job on the forge design and construction. Looks to work a lot better than mine does, but with a bigger volume and still only one burner - a very effective one it seems. I'd have expected you might need 2 for a forge that size. A quick word on the anvil - since you have spares kicking about, consider boxing in the sides of one and adding something to increase the weight - maybe pouring lead in if you find it for cheap enough.
Thanks Matt!, if you have a video of yours I would like to check it out. Interesting idea on the anvil, will take a closer look at it...I have lead :)
I've been thinking of making a video for a long time - I might just do it one of these days. I'll let you know if I do
Please do! :)
I got me a 1922 ford model t and you show is gonna help me to cast parts and i got me a lathe show infrequent and between both of youse guys i think i can keep my jalopy on the road.
Very nice forge. I wish I had the space to make one, but my place has no garage or even a shed. But eventually I will be moving and hopefully find a place where I can build my own forge. I will be trying to use your method as I always figured an air tank would be much better than using an old propane cylinder. I used to have a nice #55 anvil but someone decided they needed it more than I did and walked off with it.
Thanks....and sorry to hear about your anvil 😡 I am sure your forge will turn out great! :)
Nice build!! I may sacrifice my Campbell hausfeld air pig and build a forge like yours!! I’ll probably use paint stripper to remove all the blue paint though...grinding that would suck ass! I might leave mine bare metal and use high temp clear coat!
Thx for sharing!!
I had the time so stripping the paint manually was within the budget. I hope yours turns out nice, its all in the burner
very informative. thankyou. gave me some great ideas for my own first forge. great video
Thanks Dub, I have other videos of the forge in use. Thx for Watching! :)
Nice Build. I like the fire brick for a replaceable floor. Good idea if you plan on doing any forge welding and using borax.
Thanks, is exactly why I did it that way, was thinkin long term. Appreciate ya watching & commenting!
Good job man!!! You really thought that out. Hope it works out good for ya!
Thanks Brandon!, its a killer forge!
awesome. I have a old air tank I can work with. I think you're really onto something with your forge. really cool stuff
Thanks Jake! I have coupla other vids on the forge stuff (burner, operation) if ya care to look. Consider subscribin! :)
+Makin Sumthin From Nuthin I'll absolutely check them out. I'm just now trying to get into blade smithing and forging small stuff so any and all videos on the subject you have I'll be more than happy to check out and learn all I can
Great! Hope they help ya! :)
I know it's late, but a pair of carhartt overalls are awesome for grinding jobs. not too comfy in Phoenix during the summer. I also saved some leather from a couch bound for the landfill and made a apron to protect the family jewels.
also anything kobalt I bought has been a piece of crap. I'd buy horrible fright over kobalt
Me & you would get along good, LOL
If I am wearing anything more than a bathing suit I am lucky (Central Florida).... nice snag on the leather :)
I bought a leather apron from Horror Freight for $8 on sale...Lmao
my life is a constant struggle between "waste not want not" and "holy sh$t I got a lotta crap".
My 12 x 16' shop was so full 3 weeks ago I couldnt fit another thing in it....so what do I do? Of course.....go out and buy a 6 foot Lathe :) See my most recent video 👀
Great job man I've made up two burners myself ready for a gas bottle forge, I've got to cut the bottle up myself and I'm hoping it'll come out half as nice as yours. My disk has slipped out at the minute so I'm in pain watching videos like yours. Thanks for the ideas mate. Peace from Wales uk!
Thanks for the kind words and get well soon!
You really did an incredible job on this forge!! I had the same idea using a air compressor tank so I'm glad I ran across your video!! I have the burner finished.. I used 316ss and turned all the parts myself.. I'm a machinist sooo.. it's a little over kill.. it's what we had in-stock at work sooo...LOL!! It's taken quite a while.. I had a couple of heart attacks so I have to take my time.. The only thing I did different was weld a 1inch by 1/8 band around the door where it was cut off the tank so it would seal up a little better..I know.. over kill.. You take great pride in your work!! I hope mine turns out as good!! Where in Florida are you? I'm about 20 minutes outside of Ocala.. Good Luck!!
John
I am in Gibsonton, FL just South of Brandon. I appreciate the kind words....the research I did paid off as I never made one before. Best of luck on your build! :)
I bought my first Lathe in Sept 2016 (newbie LOL) I have a few machining vids up if you think you can stomach them..ha :)
John Wade
love the idea using an old compressor tank i have a half a dozen laying around i may attempt to build a forge with looks awesome aswell
Go for it! Thx for watching!
Very nice.. I will have to keep my eye open for parts
Thanks, I tried to build it with as little out of pocket as I could :)
hello sir, I'm glad I found your channel. I gave an old air compressor that came off of my welding truck that I am doing the same thing to it. most of what you did is spot on to what I would like to do for mine. however I believe I will make a door for the back as well as my belief a door on the side. I was planning on 4 burners 2 on each side alternating. I think my tank is a 40 gallon.
I have a bus brake drum to make a Coke Forge as well.
Sweet, sounds like a good plan. Probly roast a whole turkey in 4 min with that one! :)
Glad you like the channel :)
Wow very nice wish I could make one like that thx for sharing your build.
I have complete confidence you could make one just as good if not better than mine. I built it with no plans or drawings, just follow what I did and you will have a great forge :)
Great video, some great ideas for my next forge build. My current one is made from a 1 gal paint can using perlite and plaster for the insulation and coated with refractory cement. It work great for knives, but the size limits what I can forge. Thank you for sharing your build sir.
I am glad it sparked some ideas 😊 Thanks for the kind words
Awesome work, have a coal forge myself, planning a propane build at the minute, random suggestion, if you had a hole in the back of the forge you would be able to heat specific bits of longer stock material. Keep up the good work 😁
I never planned on doing any stuff longer than the 18" I got to work with. Good luck with yours!
it's absolutely beautiful
Thanks Josh!
Have the same idea except I plan on using Refracture cement and two burners. If I do the build I will do a video. I do wish I could find a big chunk of RR track like that. No one around here willing to list one so far...lol
Would like to see your video. RR Track doesnt make the best anvil, I would put the $$ towards a real one if you can :)
great work bud! book marking this for my build in the near future. (hard to hear you in the beginning though) but i get the jist of it. for now I'm using the ole coffee can style forge and blow torches.
Glad you liked my design, it's one of the most popular forge build videos on youtube. See video description if you need materials sources :)
Loved the build, explanations, everything...... looking forward to starting mine. Might be shooting you some questions soon. Again, GREAT JOB!!!!!
Thanks Mark! Appreciate ya watching! :)
Very impressed with your build, learnt heaps mate. with some good ideas
Glad it helped! Thanks for watching & Happy Holidays! 😊🎉
Exactly how I am going to make my forge. Good work! Im making mine out of a 11 gallons tank.
Thanks Scott, yes I made the burner and have some videos on the various burners I have made. I did get that email off to you...have a great day! :)
Hello and Merry Xmas, Nice project and executed very well. I would suggest that you take a piece of 16 ga strap (2" worked well) steel and weld it inside your door opening with an inch protruding. It bends to shape with the heat of the welding and some 'C' clamps. Overlap the ends and weld close to them before cutting off to complete the circle. This gives you a nice seal when you close the door over the top of the protruding one inch. I have used hot water tanks, propane, air and compressed gas cylinders (condemned diving tanks also) for projects. I made a welding rod oven with a hot water tank keeping the foam insulation except where I cut it which I replaced with a can of spray foam. A small silicone heating pad keeps it toasty. Take care and enjoy the holidays. Doug
Hapy Holidays to you as well, appreciate the kind words and suggestion. Will keep that trick in mind for any future builds. Was hoping you had some vids documenting the process, I certainly woulda watched them! :)
very good job ! congratulations from Brazil
Thank You Caruso! :)