How to Fabricate an Edge on Solid Surface Material

ฝัง
- เผยแพร่เมื่อ 6 พ.ค. 2013
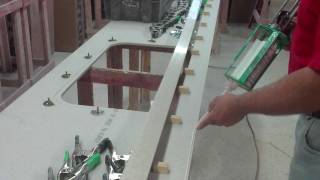
- Lotte Staron Solid Surface edge fabrication. In this video I will show you how to do a stacked edge, drop edge and a v-grooved edge. Each process has its pros and cons.
Solid surface material lends itself to endless possibilities and these are only some of the great ways to make edge profiles on countertops using solid surface material.
______________
This video is NOT sponsored. Some product links are affiliate links which means if you buy something we'll receive a small commission.
👉 EXACT TOOLS NEEDED
Sawstop 10” Table Saw - amzn.to/3l6kaaB
Router 3-¼ HP - amzn.to/3rao3he
Hot Melt Glue Gun - amzn.to/3vePvgc
Jig Saw - amzn.to/37CYKNP
Spring Clamp 3” Opening - amzn.to/38uSxD2
250ml Adhesive Gun - amzn.to/2N4spaI
1️⃣ POWER TOOLS
Router 3-¼ HP - amzn.to/3rao3he
Jig Saw - amzn.to/37CYKNP
Betterly Cove Router - betterleytools.com/products/c...
Sawstop 10” Table Saw - amzn.to/3l6kaaB
½” Corded Drill - amzn.to/2N3ZBPA
⅜” Corded Drill - amzn.to/3eqmTdV
4-½” Grinder - amzn.to/30K3PiR
1” Belt Sander - amzn.to/2OBwSCd
Makita Electric Polisher - amzn.to/2Hql3vz
Hot Melt Glue Gun - amzn.to/3vePvgc
Bosch Random Orbital Sander - amzn.to/30zuTkF
3M 6” Random Orbital Air Sander - amzn.to/3bwla4N
Makita Electric Polisher - amzn.to/2Hql3vz
Makita Rotary Hammer - amzn.to/3t5wlaA
Metabo 5” VS Angle Grinder - amzn.to/2OKS7Bt
Makita 1-1/4HP Router - amzn.to/3lcqZI0
Makita Belt Sander - amzn.to/30xdZTS
2️⃣ FABRICATION TOOLS
Jorgensen 6-Inch Clamp - amzn.to/2HHVYfC
Spring Clamp 3” Opening - amzn.to/38uSxD2
Vise Grip Locking Pliers - amzn.to/3oBHD5a
250ml Adhesive Gun - amzn.to/2N4spaI
1 ¼” Hole Saw - amzn.to/2OBxXKh
1 ⅜” Hole Saw - amzn.to/3cjDNZ0
Universal Dust Shroud 5” Grinder - amzn.to/30C1shK
3️⃣ CNC ROUTER TOOLS
CNC Router Bit (Onsrud) - amzn.to/3mJ5xKg
ER32 CNC Tool Holder - amzn.to/34OvtxC
ER32 Collet - amzn.to/34PbFKS
4️⃣ SANDING AND POLISHING SUPPLIES
3M Wool Polishing Pad - amzn.to/2J2VLnv
3M Wool Compounding Pad - amzn.to/2TmEkQK
3M Perfect-It II Foam Polishing Pad Glaze - 1 qt - amzn.to/2HCjj29
3M 05954 Super Duty Rubbing Compound, 1 qt - amzn.to/37DfHI1
80 Grit - 6” Hook and Loop - amzn.to/3byEtdD
150 Grit - 6” Hook and Loop - amzn.to/3cd1EcA
220 Grit - 6” Hook and Loop - amzn.to/3rHCGcc
400 Grit - 6” Hook and Loop - amzn.to/38tMuPk
600 Grit - 6” Hook and Loop - amzn.to/30yImsN
Scotch-Brite Maroon - amzn.to/3cnF3Kv
5️⃣ MISC
Oatey 38711 Foam Closet Flange Spacer - amzn.to/3nnx8kt
PROFLO 2" Brass No-Caulk Shower Drain Body - amzn.to/3lpN7xT
Oatey 31177 Plumbers Putty, 9 oz - amzn.to/36sNgu5
Scotch 3M 355 Tape - amzn.to/3nUFyzW
6️⃣ COUNTERTOP CARE & CLEANING SUPPLIES
Glass Cleaner - amzn.to/3rF4o9a
Bar Keepers Friend - amzn.to/34qLYA0
ScotchBrite Pad - amzn.to/3dURONf
OxiClean - amzn.to/2HCtXWC
Magic Countertop - amzn.to/3jxbmrY
Microfiber Cleaning Cloth - amzn.to/34Dx7Ci
Website - www.OliveMill.com
Follow on Facebook - / olivemill
Follow on Instagram - / olivemill_countertops
____________________________
QUESTION - Have a question about Countertops, Fabrication or Anything Else? Post in the comments section of this video!
#olivemill #coriancountertops #solidsurfacecountertops #staron #wilsonart #himacs #backstand #fabrication #livingstone #dupontcorian #diycountertop #splash #kitchencountertops #countertopedges #v-groove #
Disclaimer: Wear safety equipment at all times. At times we remove safety equipment for the sake of filming. These videos are for entertainment and as such any process you follow is done at your own risk. - แนวปฏิบัติและการใช้ชีวิต


![ตัวอย่างภาพยนตร์ Venom: The Last Dance [Official - Sub Thai]](http://i.ytimg.com/vi/DHPjvAwmnRE/mqdefault.jpg)

Thanks for watching. If you have any ideas or questions please comment. Let me know if you have any ideas for future videos.
Very helpful demonstration of inside corner build ups. Thanks for sharing.
You're welcome
Thanks for the video.
Thanks that just go's to show you ur never to old to learn
Awesome
TY Andy, I’ve always “cut” Corian with a router but I never tried using a jigsaw. I will play around on a scrap first but I thought I’d ask if you’ve ever tried that. BTW, I like your fabrication videos. As long as I’ve been working w Solid Surface, I’ve still learned a few techniques from you
You're welcome. I have a jigsaw video and it shows the correct blade that will cut solid surface.
Thanks for all of your great videos, watched them for years now. I was wondering if you ever have an issue with building that type of edge, if you have a problem with the dishwasher being able to be removed after the countertop is installed. I have come across some very thick floor tile which leaves little room for removal of the dishwasher, especially with such a thick edge. Thanks again for all of your time and informative videos.
We do not install kitchen countertops unless the measurement from the finished floor to the underside of the edge is 34.5" . That way you will always be able to remove the dishwasher when it breaks.
how do you fabricate your inside corner pieces, do you use a template first to fabricate the pieces. Thanks.
I just cut a rectangle on the table saw and miter saw. Then place in the corner, trace with pencil and cut the inside corner with a jig saw or band saw. If you have a CNC, you can just make the piece when cutting the countertop.
How do you stick the wood's blocks? I'm becoming a solid surface fan, greetings from Mexico.
Hello, We use a hot glue gun. Thanks for watching
Hey Andy, I have a Corian slab already installed as an office top. I am converting that area to a kitchenette now. How would you cut the Corian to install a stainless drop in sink? I am inclined to use a router but I don’t know if the body of the router would allow me to do the hole cutout. Would you suggest a jig saw?
Exactly. The only thing I would suggest is to sand the cutout smooth to remove the jagged cuts from the jigsaw.
And this is super important, do not cut square corners, they must be round even if it's only a 1/4" radius. The bigger the radius the better
I know this is an older video... but I have a question, I'm about to install a larger undermount sink in my afford surface countertop. Can I cut the counter top to fit then polish down the edges that are along the sink? Or do I need to use another product to smooth the edge?
Thanks in advance if you see my question! :)
After you cut the hole bigger just sand the edge with 220 and 400 grit sandpaper. Then use a scotch brite pad to add as little shine. If you want to make it shinier, just sand to 600 grit.
Great info! The edge is starting to separate (small crack line). Is that repairable or have to replace? Thanks in advance!
Thanks. Yeah, it can be repaired.
@@AndyGraves Thanks! Couldn't find any video about that... I guess I have to call professional. Thanks for your reply!
Once I open the adhesive tube can it be resealed? I have several small pieces to join. Thanks for the great videos. Richard
Yes, but the tip is not reusable. If you need just a little adhesive, squeeze a little it and mix with a popsicle stick. It will cure exactly the same. Then just put the cap back on and it will keep the two parts separated.
@@AndyGraves Andy THANKS! I have extra mixing tips (5 in all) But I love your idea of using a popsicle stick for small applications. I am doing a kitchen for a good friend and he had a bunch of Corian given to him from a condo remodel. Another concern I have is that these pieces have the edge build-ups already and I have to try and do a mirror cut with my 1/2 inch (2-1/4 HP) router to get the joints close to perfect before using the adhesive. Any suggestions on the best way to router through the 1-1/2 inch front edges? Also I like the fact you use a square base on your router, looks like it was made out of scrap solid surface material. Is there an advantage to using a square base over the round standard router base? Thanks again and for a prompt reply! Richard
ANDY -- Another quick question ---Do the clamping blocks get hot glued to the top surface or the underside of the material?
Whats best for out side corner build up
How big of a radius are you doing?
Typically you can just return the edge back down the side and then put the radius on the outside corner. There should be plenty of material.
Hi what kind of andhesive?
Artisan Adhesive. You can get it on Amazon. Be sure to get a color that matches your material.
How much this glue dries?
Glue dries 100%. It will be solid when it's cured after about 30 - 60 minutes.
Hello brother
Hello
That music? Seriously?
Hit the mute button if you don't like my shitty music you lazy twat.
Or just use some music that repeats less often.
@@AndyGraves Why would you call me a twat on here when in person you wouldn't consider it? I don't get it. Little internet bitch
That music is simply awful…
Music was chosen by Samsung, blame them.
Method 2 is so not the way to do it. Dirt on your clambs wil get in your glue. You will get a dity seam
We blow the clamps off with air before we start cleaning the parts. Never had a problem, you should be alright with method two.