DIY Wood Plant Stand

ฝัง
- เผยแพร่เมื่อ 5 ต.ค. 2024
- In this DIY video, I’ll show you how to make a wood plant stand using wooden dowels. I saw this exact mid-century modern plant stand at West Elm - it’s easy to make yourself at a fraction of the cost!
SUBSCRIBE TO MY CHANNEL:
www.youtube.co...
BLOG POST: www.diymontrea...
BUY IT on ETSY!
www.etsy.com/c...
DIY CONCRETE PLANTER VIDEO:
• How to Make a Large Co...
MATERIALS USED (affiliate links):
7/8” dowels amzn.to/2wd60Nd
1x2 Poplar board amzn.to/2wcIu2V
1/4” Dowel pins amzn.to/2wE5skF
Early American wood stain amzn.to/2vEje1Q
Wood glue amzn.to/2wHo1nM
TOOLS USED (affiliate links):
7/8 Forstner bit amzn.to/2wcpP7d
¼ Forstner bit amzn.to/2wEd5re
Combination square amzn.to/2gjrYsr
6 inch metal ruler amzn.to/2gkjQI3
Quick clamps amzn.to/2vlTpbR
Sandpaper amzn.to/2wcSKYN
Mitre Saw amzn.to/2vQbi1G
Drill amzn.to/2wTz3To
Band saw amzn.to/2wcUktW
ALL MY TOOLS & GEAR
www.diymontrea...
SOCIAL MEDIA
Instagram / diymontreal
Pinterest www.pinterest....
Facebook / diymtl
Twitter / diymontreal
MUSIC
Daily Beetle by Kevin MacLeod is licensed under a Creative Commons Attribution license (creativecommon...)
Source: incompetech.com...
Artist: incompetech.com/


This would be a great project even for outdoor planters. With this video as a guide, a new stand could be made if the old one got weathered. Great video.
Well done, Marie. Nice and simple. Which is usually the best way to go. 👍
Great tutorial, design is much better than most I've seen. I just wish there was an option to change levels on the stand.
Your explanations are excellent. And this build is a great companion for your planter. Excellent job.
Great project! The way you used the dowels was really different than most other similar stands I've seen.
Trendy design, definitely gonna be worth trying this one out...........Thanks 👍🏽
looks nice and an easy process! Nice material combo with the concrete.
Thanks!
Simple and effective. Nicely done.
Great looking plant stand! Love the use of dowel for the legs :)
Thanks!
Wonderful. I will try to make one. Thank you.
Half lap and Early American, good choices.
This was the best I’ve seen!! The drill bit you used gave it a very professional look. Make me one! How much?
I love it and I will make one.
Bravo! Excellent video. You make it look very easy. Thank you 🌟😊🌟
I made 3 different styles, one similar to this, one using just 1x2 for the legs, and one that has a tapered platform, thanks for the inspiration!
Cool, love to know that I helped inspire creativity!
It's beautiful.
Thank you!
Love your video en the tutorial but for a person like me not having all those tools or the experience its a little hard to try to do it. Maybe if you make one with more common tools 😊😩
Yeah, I understand. I just love to use all my tools ;) Maybe I'll try to make it using only hand tools one day.
You can do it with a hand saw and wood file. It will just take a while longer..
@@DIYMontreal 33s
Good project and great directions new subscriber.
This is exactly what I was looking for. Thanks for the great DIY!
Awesome, my pleasure!
Nicely done. I think your miter saw needs a new blade. The blow out it's causing is pretty outrageous.
Beautifully done.
Thanks Kirk!
Very nice pal!
Thanks for sharing
Great Video! I bet it would be twice as interesting if there was minimal equipment; mostly handcrafted.
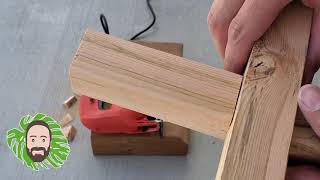
Gonna try this. Apologies for the basic question, but why is your center notch only to a depth of 3/4" not 1" if the poplar board is 2x1? Seem like a 3/4" notch on each piece wouldn't yield a flush fit like you got. Sorry if I am wrong---just wanted to double check before I give it a go.
So a 1 x 2 isn't actually 2 inches thick as you would think. It's 1-1/2 inches. That's why I went half way through to 3/4.
nice idea
Awesome video!! Is there a way to make the planter base without all the tools you used? I'm a beginner woodworker and I dont have a lot of tools yet.
You could always just use square legs and use screws to assemble.
Thank you for this video I got an email saying Dad can you make me a potholder she showed me a photo much the same as your's so it looks like I making one simply
Regards
Steve UK London
great video! after applying the stain do you sand again? how many coats did you apply?
No, I never sand after stain. Apply one coat of stain. Ideally you want to seal it after it dries with a clear coat, like maybe a wipe on poly 2 coats.
@@DIYMontreal thanks
I love it! Really elegant and simple, and it looks awesome with that concrete planter. Thanks for sharing the know-how!
Edit: I just realised this almost sounds a bit shilly-y :P Sorry about that - I don't actually do woodworking (yet...), but saw your video through Instructables, and thought I'd send some love, is all. Carry on!
Hey, thank you so much! I really appreciate it.
Cool project and great video :)
Thanks fellow maker!
Cool, but it drove me nuts that the two pieces weren't flush when you were marking.
What do you mean? Because the ends weren't flush? I cut off both ends by drilling through with the Forstner bit, so I din't see the need ;)
DIY Montreal at like 0:38 were the ends weren’t lined up other than that it looks beautiful you did a great job! So cool that you have all the cool tools to do everything. They cost so much already made so it’s nice that you can do it for way cheaper. Will be subscribing to your channel 👍🏽
How much weight can it hold ?
This is so great. But we can make it simple, buy from shops.etc.
Can I make a suggestion. Use the metric system in your videos. It's international used and so much easier to follow. Thanks
As much as I’d prefer using the metric system myself, all of our lumber and tool sizes in Canada are based on the imperial system due to our commercial proximity with the US.
@@DIYMontreal Well said, Maria. Let them make their own videos.
Wow ❤🇵🇰❤
I saw a lamp with a metal version of this stand.The lamp itself was a large coloured glass jar
Wait, I'm not subscribed to you?! Well that's unacceptable for many reasons. Just going to go ahead and fix that issue. Maybe one day we can do a colab build! Québécois unite hahaha.
hehe no worries my friend! Happy to have you on as a subscriber. New video is almost ready, hopefully out by tomorrow. As for a future colab, I'm definitely open to the idea fellow maker!
Where are the materials list please
Expensive machine which I dont have 😌
Would be MUCH easier using square dowels.
This is great! All you need is scrap wood, gorilla glue, and a fully stocked fuckin wood shop and you’re good! I saved $200 by spending $10k on equipment. If I can do it, you can too!
faded spice legend. Lmao
😂😂😂😂
LoL that was exactly what I thought when I started watching it LoL!!!
Your explaination is hiding the measurements please correct this error
Check out the flower stand I built.. you inspire me
ey... be my friend.
No wonder these things cost like $50 at the store. You need $1000 worth of equipment to make them
Those wooden pegs seen to weak
ص
You see, the thing is 99.99% of people dont have a drill press sooooo yah
This is the most complicated “simple” plant stand I’ve ever seen.
forst-ner bit
lol did I say Fost-ner? Happens all the time.
this is not diy. No bleeding diyer has this many tools!😑
You can do all of that with a regular saw and an electric drill
How the f**** is this diy, with all the machinery ?