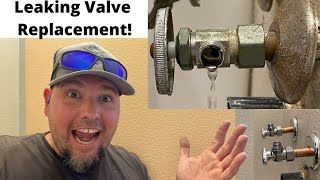
How To Remove/Install a LEAKY/NEW SHUT-OFF Valve (Compression, Soldered or Push fit) | GOT2LEARN

ฝัง
- เผยแพร่เมื่อ 4 มิ.ย. 2024
- If you have a leaky shut off valve, whether it's COMPRESSION, SOLDERED or PUSH FIT, here's how to remove and install a new one the CORRECT way!
Join my plumbing forum for FREE!
got2learn.freeforums.net/
Stuff I used in this video from Amazon:
Compression sleeve puller: amzn.to/3xD050e
1/2" drill brush tool: amzn.to/3jIV5SR
Bicycle wrench kit: amzn.to/3CzRu2f
Sharkbite depth gauge: amzn.to/2VAHqFK
Soldering heat shield: amzn.to/3F8SJWA
Pencil reamer: amzn.to/2tBuhKW
All-in-one deburring tool: amzn.to/3B9dLUv
Sharkbite video: • Beginners Guide To SHA...
INTRO - 0:00
WHY REPLACE ONE? - 0:23
TYPES OF VALVES - 1:12
COMPRESSION VALVE - 2:24
SOLDERED/SWEATED - 4:25
PUSH FIT - 6:22
DISCLAIMER: Got2Learn is NOT responsible for any damage done to a property of which the plumbing wasn't done by a professional, I do not recommend doing your own plumbing if you are unsure about what you are doing, always hire a LICENSED contractor when doing any type of plumbing so you can be covered by insurances if something does happen, these videos are for entertainment purposes only!


It's 1:30am and your video just saved my house from a flood. THANK YOU!
🥴👍
One thing I do to future proof supply valves in my house:
I have a mix of compression and soldered supply valves around my house. When I replace one, I sweat on a male threaded fitting, and then I install a female threaded 1/4 turn supply valve. Using this method, I can get the benefits of the solid, reliable connection formed by the solder and threads, while still being easy to replace if necessary.
I have had issues with both compression and shark bite fittings leaking in certain situations, but I always know I'll get a good connection with solder and threads, as long as the parts are not damaged. I want to renew mechanical aspects of my house in a way that will be easy to maintain and last a lifetime. That is why I started using this method.
I just wanted to let you know that I have been watching your videos for years now. Every one of them is spectacular. At first your first couple, you could tell you were a little more nervous. But I absolutely love them all. I like the fact that you don't show yourself pulling up in a truck and then explaining how this is your friend's house that you've known for 20 years. When im just Trying to figure out how to debur a pipe. So keep up the good work, make as many as you can because the world needs decent information. And Without a bunch hype. Because as you obviously know your work should always speak for itself and yours most certainly shows you have integrity. . Sincerely, Deathmerchant
You are the apprentice of the plumbing gods. Phenomenal work dude.
Thanks man!
Great video, Glad it was the first one TH-cam search gave me. I have to remove a leaky soldered value and want to replace it with a compression fitting. Since I am just a DIY'er I like to confirm my knowledge before tearing things apart! You did a great job at that. I feel a lot more prepared and have a couple of new tricks that I didn't know before.
Glad it helped!! :)
I like your accent. I've always just damaged and replaced the escutcheon. I didn't know that tool existed. I always suggest replacing a ball valve with a quarter turn shut-off. It's the modern way. Great Sharkbite tips.
A ball valve is a quarter turn valve. What you're referring to is a gate valve.
@DL You are correct; I did mean ball valve over a gate valve. Thank you.
I love your username “davidpierce9065”
@@davidpierce9065sorry he is married. No more “like your accent” flirting needed lol
@@tinali9200 What a weird ass flex 2 years later. Gain some confidence in your relationship then you don't have to post weird comments 2 years later.
A big THANK YOU for your channel ~ you have taught me everything I know about soldering copper pipes. I have already managed to do a few repair jobs on my own house for a fraction of what a plumber would cost.
💪💪💪🙏🙏🙏
Great video helped me out a lot. My local hardware stores didn’t carry compression sleeve pullers. Was able to pull the
sleeve off with just a pair of
channel locks pliers. Thanks again. 3:36
Always great videos..and always room for suggestions. When removing a soldered valve, take out the valve stem and just warm up the valve body only. A little light pulling pressure on the valve will tell you when it's ready to leave. You'll need much less heat if the valve is disassembled first.
On the press-fit valves; the escutcheon can be used as the removal tool by just pulling it forward to the valve. The use of low temp solder is wise. As is the use of eutectic solder.
Thank you! I was able to replace soldered valve with a new compression valve. Your presentation was well communicated to include the pipe insertion depth chart. I was in and out in less than 30 minutes!
Awesomeeee!!!
OMG! You're amazing. You just save me some headache and having someone to do it for me for the compression valves. Thank you.
Nice pointers on the compression type and the push on type! For the solder type I'd recommend removing the stem first to avoid overheating the seat washer and packing washer.
This is awesome! I literally just recently found one of these valves that needs to be replaced because it’s seized, and I need to replace that toilet. I didn’t even know they used compression fittings or had a tool for that. You saved me probably two or more trips to the store! Legend!
Awesome!!!!!
As always - good, thorough explanation and no fluff. Thanks!
The multi turn valves you can rebuild those. You can get new seals and nylon stem at a hardware store. I would try that first before replacing. Great videos as usual keep it up 👍🏼
Yep. My under sink kitchen shutoffs were replaced this way. I removed the innards and replaced them with those from new valves bought at the big box store. This was instead of replacing only the washer that had started coming apart and pieces were ending up inside my faucet ceramic valve. Since they were both about 20 years old, I replaced both hot and cold while the water was off. The quarter-turn innards would not close completely, so I used the multi-turn valves.
Absolutely. $2.98 for the kit at the Depot. Lot cheaper and easier.
This guy is so AWESOME !!! I've learned so much about plumbing from him. Plumbing has become a hobby for me, it's so intriguing.
Me too 🙂 We had a pipe leaking last December, couple days before Christmas. I put a bucket under the pipe, shut the cold water off, then called my husband to let him know to call the plumber. While waiting for plumber , I began searching on TH-cam and came across this channel; watched few videos for about an hour, then decided to drive to Home Depot to get shark bite, copper tubing cutter, and caliper to measure the pipe. I was like; okay I ‘ll give it a shot , if I screw up the plumber will come over, anyway. Few hours later, when the plumber came in, I was told, the pipe it’s fixed for few months. And of course, I decided to create a notebook for plumbing stuff, purchased some tools and keep on learning from this channel. I know it’s not a job for women, as well as carpentering, electronic stuff ( learned how to..from TH-cam) but I don’t care, because I can save thousands of dollars and make money 💰 too. 😁
@@rosacuore15 GOOD for you Ramona !!!! Pretty soon the plumbers will be asking you for advice 😊😊😊. Sure, plumbing is for woman too. I don't see a lot of women plumbers on TH-cam, I do see a lot of really good women in carpentering and have learn from them on that craft. Take care & keep on saving money on plumbing, we both probably do a better job then a lot of "pro's" since their more into quantity then quality. Homeowners are into QUALITY since the fix belongs to us !!!
@@rosacuore15 I'm bothered by that. Why not "for women?" I've heard this about drums and they don't realize WOMEN (priestesses) were the very first drummers.
Wow was replacing in my kitchen a compression shutoff valve today and your video was thorough and super useful. Thanks!
Glad it helped!
I liked this presentation ! It covered different types of Shut-Off Valves that I never knew about in detail. Thank You !
Thanks Gordon!!!
this is def one of your masterpieces of a video. and they are all incredible. can tell you love making the vids and sharing your experience. TIME STAMPS RULE!!! U RULE TOOO!
Wooohoooo ⚡⚡⚡⚡
Superb video explaining different types of valves used and method to remove/replace each type. One of the best how to DiY videos I have seen. No unnecessary drama/rant. Minimalistic approach but fully adequate. Thanks and add more videos for the DIY guys like me.
😇🙏
W
As an experienced DIY'er I thought I'd not learn a thing from this video. However, I never knew a ferrule removal tool existed! Thanks!
🙏🙏🙏
Thank you for these plumbing videos please keep them coming .I really enjoy them .
🤘🤘🤘
Great video! I usually replace multi turn stops with quarter turn
Yes 100%
Never knew anything about these valves. Thanks for sharing.
Thanks for this great video. You are so clear and so detailed. Much appreciated!
OMG THANK YOU FOR THIS CHANNEL! I’m a Maryland apprentice this is amazing thank you!
😇😇😇😇😇
Perfect video instructions! Just what I needed. Thank you!
Hey man sad that there are no new videos - just found your channel and as a german it is really interesting to see how you guys do stuff over there
Thanks for sharing the knowledge, so clear and neat.
Thanks for showing me how to remove the compression nut. You even impressed the folks at the local hardware store who wanted me to saw the pipe to get the nut off. That would have created even more headaches. 4:18
Very good and informative video. Thank you for putting this out there for your viewers.
There is another alternative to consider that I do in my own home. I have replaced these kind of shutoff valves with quarter turn FIP valves. These turn into a chrome pipe nipple which then turns into brass drop ear elbow that sits behind the wall. I prefer this installation as the elbow can be anchored behind the wall resulting in no movement when installing the pipe nipple and valve. In the event the valve goes bad, it is very easy to turn the old valve out and replace with a new one. If one is renovating any area that requires new shutoff valves, I would recommend this approach. It costs more to do it this way, but it does pays off down the road.
I always learn something new watching other professionals do their job #staymeek
I don't even have any leaking problems yet but I just enjoy watching and preparing this before I encounter one. You just make it so easy and doable! Thank you for these videos and I look forward to more to come from you!
Thank you so much!!!
In old houses expect it to get WAY more complicated fast. Not saying don't do it, but just have someone on call to help. Pay them well enough to pick up the phone in emergencies before you REALLY have one.
Exactly what I was searching for 👍
Thank You, Thank You...I always find your videos educational!! Keep up the good work!
🙏🙏🙏
Ur videos are so good please never stop making plumbing videos
Since the pipe on a compression type valve is normally "compressed" which can cause a problem trying to remove them damaging the pipe, when changing them I worry less about the ferrule's shape, since were talking about soft copper and brass, being soft metals they will "reform" when compressed to the new shape since that's what there designed to do. By applying a little white Teflon pipe dope over the whole ferrule before reinstalling the new valve body which takes care of any "misshaped" filling any micro minor void worries and reduces the potential for pipe damage if it leaks a quick 1/4 turn usually fixes the problem, worse case if it doesn't work you can always go back and try the puller and hopefully you wont damage the pipe, great video 🤜🤛👍
Heee hawww!!!
This is an excellent TH-cam of the How to Remove or Install show and we love it very much ! Thank you very much !!! 😍❤👌
🙏🙏🙏
I used some high potency vinegar to clean the copper tube out let just so that the copper ring would slide of. It took a few minutes..Thank u Lord cause I did not want to return to the hardware store to purchase a puller. The ring was loose between 2 millimeters but would not go up or slide done. Loose enough but maybe some very small particles was not letting it slide off. Thank u.
I hired a local tile company to demo and retile my second bathrooms. My first bathroom I did the demo and their install went great. The second not so great, another crew. One of the demo guys cut my copper pipe off to the remove a sink value. I told him "You shouldn't have cut the copper line, all you had to do was unscrew the fitting and slide it off. Plus I had told the tile company that I would take of the sink and toilet plumbing, as I did in their last tile job. They also tried to charge me for their plumbing issues. I guess a lot of people that don't know anything about construction are taken advantage of. I thought they knew that I did part time construction consulting and had worked with a home inspector.
Good tutorial, thanks for explaining the compression valve type.
🤘🤘🤘
another great video. I knew a lot of this but I always learn something from your videos!
😇😇😇
Great instruction video right to the point and easy to understand
Glad it was helpful!!!
Excellent! Thanks for making this video!
Very useful! Thanks big boss, I’m electrician but sometimes I need to fix some plumbing at my home.
🍻
Thank you, don't forget to share, it really helps the channel!
Hey G2L I have a bit of off-subject topic but I think you might find a kick out of it. Drum roll please … Removing Old Kitchen/Bath Faucet! To be more precise, how to undo nuts that hold faucet to the sink. And all of that as a replacement, as usually is, meaning - from underneath the existing sink. Too bulky basin wrench (ALL are) fits never, hand works once in a blue moon etc. and even then only on larger plastic nuts. Not to mention an under-sink spaghetti city of various pipes. On top of that, level of intensity depends on previous artisan installer from 1873. Any video online is filmed in 100% controlled environment with new faucets and shiny crisp nuts. LOL If you could find one and show a tricks and tips, internet gods will be grateful and you might end up in copper-heaven. Hope all is well with you. All the best and happy holidays. 👽
They've utilized evil now. 😈 They're inordinately hard to get to/remove/replace. I know there's a trick, but last time my back hurt 3 days.
Very explained!. Your tutoring how to do it very well illustrated and simple and direct.
I appreciate that!!!
Excellent presentation and informative!
Can I suggest a few topics for a future video? PVC fittings, how PVC sizes work (inc. schedule 40/80, etc) and how they compare with the DIY polypropylene crap home stores sell for DIY. I've found there is very little good information on these subjects available.
Great video, very informative, thanks! 👍👍
Très content, parce qu’un canadien français profite de YT pour instruire le monde. Bravo!
very clearly explained, Thank you very much for sharing.
You can also solder on a 1/2 male copper adapter and they make angle stop FIP
Super helpful and great explanation. Thanks!
I love your vids, so clear, well described, quick. It teaches me one thing , I'll pay the plumber, he's or she's worth it.
😇😇😇
I learn a lot with your videos Thank you for sharing your knowledge Walter to Argentina
👌👌👌
I've tried to use ferrule ring pullers, but some refused to budge and just dug into the pipe. I ended up getting a Dickie Dyer "Olive Splitter" and that makes quick work of it on any size piping. Though, I could only find such a tool in the UK, so there was the added shipping cost to the US.
Good explanation. God bless you.
Great video. I like using the Paso 4661 compression sleeve puller to pull off the compression ring. Just make sure to ream the inside of the copper pipe so that the nose goes inside the pipe easily. The only thing I don’t like about compression ring angle stops is if the previous installer tightened down the nut so tight that the compression ring won’t come off. Makes for more work to get it out.
Thanks for the info!
It’s Pasco 4661 Fully Machined Compression Sleeve Puller, not Paso. How is it better than one in this video?
:36 if leaking at the handle.. just hold the valve body and tighten the nut behind handle. Great tutorial
That's a good idea!!!
That's what I did also on the valve to my bathroom sink hot water line. Leak fixed!
Thank You so much for the link to this. THIS is the video I have been searching for!
Glad it was helpful!!!
Thank you, very well explained!
🤗🤗🤗🤘🤘🤘
Great video, thank you. I'm about to help do this at my Aunt's house. My worry is that it is a compression-type connection but also has some sort of sealant or solder keeping it in place as well. My worry is accidentally twisting the copper pipe in trying to remove valve. The two plier/wrench method looks like it will help me avoid this. Wish me luck. I'm really trying to get better with plumbing jobs. :)
🙏🙏🙏
EXCELLENT INFORMATIVE LANDSCAPE VIDEO.
The Ferrule blaster is the best tool to remove ferrule's, The olive puller is cool so are some of the other pullers but theyll either break or stretch the pipe when theyre really corroded on.
Thank you bro, i do cabinets and carpentry work. Time to time I have this ritual to damage a pipe on saturdays
😇😇😇
Man you Nailed IT! Thanks
Very useful information 👍🏻
Very informative. Thank you!
Thanks for the video! 👏🏻
Hey ill tell you what! Tomorrow I have to remove 6 compression valves to install new. This tool (Compression sleeve puller) that saw on the video would be my relief!! Thank you, Thank you, Thank you!!!!!!
You bet Vasilis!!!
Thank you for showing each step. Other videos skip how to remove the compression ring!!!
You are most welcome!
I pulled the ring off with my plyers. But the basic instructions were helpful.
Great video! I learn so much from this video. Thank you.
😇😇😇
I learned some thing new👍🏼
How in the heck did you know I needed to replace my toilet shut off valve!?! I never take my phone into the bathroom! Thank you for a great explanation of the repair!!!
Thanks buddy. I've learned a lot about plumbing and other tricks from watching your channel. Keep up the good work my friend👍
Great content, very good video and great information shared. Thanks.
Thank you for sharing and creating this content!
🙏
Flawless Instruction
Dude tell me your not done making new content. Great stuff here. Keep it coming!
Taking a long break 🙏🙏🙏
Excellent work!!!
Thanks a lot!!!!
Very helpful video 👍🏼👍🏼
Crystal clear
Great instructions
Like & Shared
Thank you so very much!!
Dude this was amazing! Thanks so much for the info!
🤘🤘🤘
Great to share this video. Thank you.
Thank you, well explained..
Very well explained but all ✨ distressingly difficult looking✨
Terrific video! Very informative.
Glad you enjoyed it!!
Can you replace soldered valve with compression valve? Our home is old and I need to replace a leaky valve which looks like a soldered valve by watching this video. Super awesome video!
Yes, but the pipe needs to be perfectly clean and free of solder or the ring won't go on, cheers!!!
very details guide. thank you very much
🤗🤗🤗
I did this for two compression valves last week. The old ones weren't shutting off completely anymore.
For one of the new valves I couldn't get it to stop leaking no matter how tight I compressed it. So I added Teflon tape around the ferrule/olive and it worked. No more leaks
Hi, which part is the ferrule/olive?
The small ring shaped item.
@@Got2Learn I couldn't bring myself to reply to that username
@@kb_100 🤣🤣🤣
@@kb_100 But you did so you should have just answered🤦♂️
Great video with some useful tips. Thanks
🙏🙏🙏😏
At 0:50 simply tighten the packing nut (located behind the valve handle) with a small adjustable wrench while holding the valve with a pair of channel locks or larger adjustable wrench. This is the first, most effective thing to try.
And do it again, and again....replace the rubber and be done.
@@GEOsustainable shouldn’t need to do it again and again if it’s tight enough. 40 years experience confirms this. If it were tight enough to begin with it wouldn’t have leaked
@@homemprovmentguy Minerals build up on the stem and when the valve is turned it scores the packing slightly causing a leak in a valve that didn't leak before, I turn the valve fully open, clean the stem with emery cloth, lubricate the stem with silicone grease, turn the valve all the way off, tighten the bonnet nut a quarter turn and open the valve all the way and check for leaks. If it still leaks and the nut won't tighten any further, turn the valve off, were assuming here the valve only leaks when on, unscrew the packing, wrap some graphite rope or Teflon tape around the stem and re tighten the packing nut, problem solved every time.
I just found your comment as I was looking to replace my leaky valve. Had no issues with leaking for the 2 years we’ve been in this house. Replacing the dishwasher and turned on/off the valve and noticed a new leak. Tightened the the nut behind the valve and not a drip. Thanks!!
good video very clear and understanding, thanks
🙏🙏🙏
Really helpful video!
Glad it was helpful!!!
Excellent content on this video……
Thanks
Thanks for the tips. What about Teflon thread seal tape?
Beautiful thank you
If leak is from handle stem (assuming it's not as old as the galv. pipe theat needs a good pezxing) leaking stems (this goes for hosebibs too) can be fixed by simply adjusting the packing nuts. P.N.Adjustment Board requires a permit pulled per packing. Which requires. Master P.N. Adjusters w/ current License. To perform any work on NUTTS