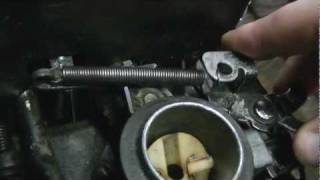
How to rebuild a Briggs and Stratton starter motor (replacing bottom end cap assembly)

ฝัง
- เผยแพร่เมื่อ 19 ต.ค. 2011
- In this video i am showing how to rebuild a briggs and stratton starter motor. I do it the easy way, just replacing the entire end cap, you can just replace brushes, just easier and faster to do it this way, plus you get a new bearing. Thanks for watching
- ยานยนต์และพาหนะ


This is exactly what I was looking for. I haven’t rebuilt a starter, but I am kind of mechanically inclined. You explained it and demonstrated this perfectly. Thank you so much!
Thank you ever so much!!
Thanks!!!
I was thinking I'd have to buy a new starter, but your video is convincing me that I can probably get away with a rebuild or just poking around inside my starter. Also, I appreciate your test at the end of the reassembly. I wasn't quite sure how to test it, but your video confirmed that mine is shot.
Thanks for the video. I didn't replace the cap but I was able to get it cleaned up and working after watching this. Mine was covered in dirt and oil so after disassembly I used engine degreaser to clean it up. I then rinsed everything off and allowed it to properly dry before reassembly. After many time of barely starting over the last couple of years, it was awesome to have it start in just a second. Thanks for the virtual assist.
After watching this very helpful and informative video, I decided to take the starter off my 16hp B&S engine to see what could be done (was working intermittently for the longest time then went down for the count). Initially after taking it apart, I was a bit discouraged, as mine didn't look as bad as yours, so I figured there'd be no fruit for my labor. I cleaned everything off with compressed air and then a rag. Hit the commutator with 220, then 500 by hand, and cleaned in between contacts. Found what appeared to be a spot where the windings were touching near the commutator and broke that connection. Lubed bearing surfaces, and to my surprise, not only did the starter come back to life, it works better than it has since I bought it used. Thank you very much!
Appreciate that! I hear ya! Some times a good cleaning is all it needs, and sometimes the brushes will stick and won't let it make good contact. Your welcome, glad to help out! Thanks for Watching!!!
Brilliant video - informative and exceptionally clear. Many thanks - I didn't realise it was important to clean out the gap on the commutator - that could be my problem. Many thanks !
Nice job. I've never rebuilt one so it's good to see what is involved. Keep em coming!
this is a great self teaching method. I was planning on replacing the brushes but I see that replacing the end cap is better and easier. thanks so much!!
LEGEND02545 Yeah I think its best to replace the whole end, makes it easier since the brushes are already tied back. Your welcome! Thanks for Watching!!!
Many thanks for this video. My starter didn't work and I had no clue. Untill I saw how wiring needs to be attached at the bottomplate. You saved me money and time!
Your welcome, Thanks for Watching!!!
If you have removed the brush holder and almost despaired as you tried to grow two extra fingers to hold all the four pesky carbon brushes and their springs in, and you do not want to buy a new end cover with brushes and the wire retainers in place...do not despair as I have found that if you compress the individual brushes and carefully insert a wooden tooth pick from the back it will retain them and it is easy peasy to get it over the commutator....
Wanted to say thanks for the video, very thorough and informative. You'll make me a handy man yet. Nice job!
Your welcome, glad to help out! Thanks for Watching!!!
These are a lot more simple than I thought they were lol. Thumbs up!
Thank you so much for posting this. Very helpful.
Your welcome, Thanks for Watching!!!
10 years later and still an excellent and relevant demo vid. Thank you. One question, what is the best place to find those end caps?
very good illustration damn good brother. thanks a lot. couldn't have been more simpler
Appreciate that, glad to help out! Thanks for Watching!!!
Bazzin' thanks. Very cear view of all the small brush parts and the contacts. Very helpful.
Rick.
your welcome! I tried to show as much detail as possible on this, there isn't to many videos on doing this. Thanks for Watching!!!
thanks. glad to help! thanks for watching!!!
if you replace the cap all the internal wires come already hooked up. theres one wire feeding each brush. thanks for watching!!!
Just did this to my starter. Literally an hour ago lol. Wish I had them brush holders. I used a bottle cap to hold them in place but it slipped and bow my brushes are chipped smh. Good video thanks for sharing.
Very professional video, well done and thankyou
Appreciate that! Your welcome, thanks for watching!!!
thanks for the video i was not sure of how too do it but its basically the same as a car starter rebuild,. cool thanks buddy.
You have been so much help to me. Thank You
Glad to help out, your welcome! Thanks for Watching!!!
Wow, you make me save time and money, realy appreciate!-) It was fun in the process!-)
Your welcome, glad to help out, yeah repair shops charge ridicules prices on the simplest repairs. it is fun working on starters, I made another video on starters recently (not uploaded yet) its on how to file brushes down so they reseat them selves, it will freshen up a starter as long as the brushes aren't worn down to far. Thanks for Watching!!!
@1972FordF150 i hear ya haha its hard if you have to tie or wire up the brushes, the 2 brush holders are a life saver. thanks man appreciate it!
haha i hear ya! no problem, glad to help out! thanks for watching!!!
Ill be adding this to my facebook..as "something we should all know and do" thanks for the breakdown..
sounds good! let me know when the video is up. no problem!
@NicksGarageDoor yeah that would be the best thing. you can buy the brushes separately but its easy this way, and don't forget to put a little grease on it like i did in the video. i'm the same way haha oh, i recommend getting the part from pats small engine.
no problem! heard that, i got a few that need rebuilt still. might do another one this summer sometime.
Thanks from the UK
Your welcome! Thanks for Watching!
Well done ! Thank you ! Very helpful !
thanks, your welcome and thanks for watching!
thank for the info... video helped me out.
Thanks Man ! Big Big Help. I appreciate it ! Thumbs up buddy !
Your welcome, glad to help out! Thanks for Watching!!!
Awesome Vid!
Kick ass! Thanks from Sweden. :)
Henke J Your welcome, thanks for watching!!!
thanks! your welcome, yeah it is because the grit that fills up in them is from the brushes so it conducts electricity putting resistance between them making it pull more amps. thanks for watching!!!
Thank you for this video!
your welcome, thanks for watching!!!
Very helpful Thank You !
Your welcome, Thanks for Watching!!!
Good vid! Thanx for your input
+Jasonx2011x Thanks, no problem! Thanks for Watching!!!
Good Vid, Mate Thanks for Your Time
Thanks for Watching!!!
Thank you, I have rescued some old Snapper mowers that had sat out in the weather that I'm sure the starters are toast, I will attempt this & HOPE I can get the end caps etc, BUT with seeing the B&S prices on individual parts escalate I would NOT be surprised if they made the end caps etc. OBSOLETE
Your welcome, as far as i know they are still available, been a year or 2 since I've ordered any, you may also want to consider a new aftermarket starter off ebay or amazon, pretty cheap, seem to be good, except for the gear that comes on them! Thanks for Watching!!!
informative and useful video. thanks
+Cherrie Prado Your welcome, Thanks for Watching!!!
no problem! yeah i got to see that haha let me know when its up and i'll check it out!
One of the best tutorials I have ever seen....you've got what it takes to make your site very popular, just don't change anything... you could have a following like Donyboy73.. (something like that).. Keep those vids coming, it's just a matter of time.
Well alright, thank you! I'll have to get a video of the starter!
thanks for your help
your welcome, Thanks for Watching!!!
awsome video thanks! what grit count sand paper did you use as well as what grease?
nice job thank !
@1972FordF150 yeah thats alright. Well thats good. I figured it would help it. When the stator gets corroded like that the brushes don't make a good connection and causes it to drag. Should last a good while too.
great video :)
Appreciate that, thanks for watching!!!
Hey bud, you mention that there is a "tying" method for holding the brushes at the end of the start in place? Care to elaborate on that a bit for me?
Fantastic video though man, I love your channel. You have basically taught me how to take care of my tractors.
Hey. Yeah, I did another video a few months ago on these starters: th-cam.com/video/CQRMVGye-pU/w-d-xo.html in it i show how to tie or wire up the brushes, if you have any more questions let me know, appreciate that, glad to hear my videos have helped you! Thanks for Watching!!!
THANKS THAT ANSWERED A LOT OF QUESTIONS ABOUT STARTERS JEFF WETUMPKA ALABAMA
Glad to help out, Thanks for Watching!!!
@fnaguitarplayer9 Ok, I did clean them up with a rag and brake cleaner though. The starter seems to sound quieter and it seems to turn a little bit faster now. Sanded the commutator armature, greased the bearings and it seems all good now. Before in cold weather like this the starter sounded horrible like it was grinding almost. Now it sounds really quiet and turns quite a bit better.
haha yeah, i would take it back to where you got it from and a get another one, i figured a few brushes must of gotten mixed up when it was assembled, i've heard of this happening before, pretty rare problem though haha
@1972FordF150 yeah i have a few like that. its probably the brushes starting to wear out. You can try taking it apart and cleaning the armature like i did in this video, and grease the upper and lower bearing might help it. If not replace the brushes or end cap.
I use a thin hacksaw blade and grind a hook on one end which fits nicely between the commutator contacts.
Thats a good idea. Thanks for Watching!!!
yeah thats under load, you could run one under a light load for several minutes. but when you rebuild one like i did in this video, its best to run it without load to break it in, letting the brushes seat in. thanks for watching!!!
real good vid
Thanks for Watching!!!
Clamp the Armature into a vertical drill press (or large hand held drill) with the Commutator down, turn it on and sand it gently.
Thank you sir.
Your welcome, Thanks for Watching!!!
sometimes they will jam up on the starter shaft, soak it down in penetrating oil and try to work it loose, if it loose, the teeth may be damaged and gear needs to be replaced. thanks for watching!
thats crazy! have you had the brushes out? if you did and got a couple of them mixed up, it would cause that, it would be same as switching polarity. thats really the only thing i can think of, i have to admit i've never heard of this happening before! could be a burnt winding causing it, i'd check the brushes first. hard to say.
thanks. that sucks. you mean on the armature/shaft, where the wires connect to the contacts/commutator? you can buy a aftermarket brand starter for these for 25 bucks plus shipping from pats small engine (online store), don't know how good they are but i'm sure there alright! thanks for watching!!!
wow thats crazy. ok i got one more idea, has it done this since you bought it, or has it just started? what i'm thinking is if its done this since you got it, it may be spinning the wrong direction (do to a mistake at the factory, wires hooked up wrong/brushes backwards) the starter should spin counter clockwise, from looking at it from above, looking down on the gear. if its spinning backwards the gear won't engage at all. thats really all i can think of!
Good video I sint even got a mower anymore I'm just into fixing and learning. 🤣
Thanks! Nothing wrong with that! Thanks for Watching!!!
Thank you sir
your welcome, thanks for watching!!!
@mrwiggles2 thanks. yeah there not really hard to do, unless you just replace the brushes. might run short of videos during the winter. i can't record videos in the winter. thanks for watching. and hope you and everyone else understands about winter videos.
Thank You ! I did a engine swap yesterday. At the time I did not notice until I had the engine installed, where the positive cable hooks to the starter, it is still attached but pulled out of the starter but it still works. So all I need is another end cap ?
Your welcome, Yes, the new end cap should be all you need. Thanks for Watching!!!
@1972FordF150 thats good glad it helped. haha yeah they get noisy haha i hate when the gears strip out. thats a pain. oh yeah, gojo or carb cleaner is about the only thing that will take the dust off your hands haha
We have an older 1980's Troy Bilt Roto-Tiller with a Briggs & Stratton 8hp I/C engine. The starter looks identical to yours here. Even the same bracket. Do you know a part number we can use to get replacement brushes? Thanks :)
@liangQ1 Thanks! no problem, thanks for watching!
i've never worked on a car starter before, i figured they were similar though. no problem! thanks for watching!!!
i bought the end cap and most of my small engine parts from pats small engine, if not them i get stuff from tulsa engine warehouse (both online stores). thanks for watching!!!
no the starter turns anti-clockwise, but the engine runs clockwise, (looking at the flywheel side) could be a connection corroded on one of the brushes
hmm. does the starter turn over fast? if one (even a new one) has something wrong with it, they can spin slower and may not kick the gear in. thats all i can think of
Hi, great video, wish I watched it before i did take apart my starter and bsically f***** it up. the copper coils, whch come off the brushes got torn, so I thought I'll extend them using a copper wiring from a cable, but it didn't work at all. eventually I'll go and buy a new starter, but was wondering if you could help before. other than that I did exactly the same as you in terms of greasing and sandpapering.
That is exactly what i was thinking! So its just a factory mistake?
chuck it in the drillmotor or cordless drill and support other end of the shaft then touch up with sandpaper
+jimsbix That works too, probably get a more even result. Thanks for Watching!!!
I am confounded. My Briggs and Stratton 14HP Vanguard (Model #261777, Type #0144-01) engine's starter turns over very slow or not at all when the starter is installed. I have checked valve adjustment. I turn off the gas when I turn it off so no gas can siphon into the crankcase.
When starter is removed, starter runs as should be expected. No binding or noises that I can detect. I disassembled the starter this past Saturday and cleaned up the brushes and armature. And lubed the end cap.
I'm very tempted to buy a new starter but have this feeling that I don't need a new starter...that I'm missing something.
Could a failure in the compression release mechanism/system be be the problem?
Do you have any advise/council?
Great video by the way.
@1972FordF150 don't sand the brushes, just sand on the commutator on the armature, and clean out the slots in between, the brushes will seat back in after its run for a few minutes
about 15 bucks plus shipping, from tulsa engine warehouse. thanks for watching!!!
I should make one on using a old growler and hack saw blade to check for short
Been doing it 62 years on same old tester
Nice job, I need to do the same. Parts dep told me there was no end cap available. Could I ask what the part number is please.
I usually order parts from tulsa engine warehouse, they have just about anything you need. thanks for watching!
Thank you for the video. I was going to buy a brand new starter for Dixon tractor, but with this was very helpful. I hope I can fin the end cap for my starter or where did you buy yours. Was that a 14 point gear on your starter?
49aggie Your welcome! I hear ya! I get most of my parts from tulsa engine warehouse ( tewarehouse.com ) great place to deal with, either there or off ebay. This was a 16 tooth gear on this particular briggs starter (older style) thanks for watching!
@NicksGarageDoor Its probably a broken spring or brush, you'll just have to take it apart like i did in this video and see whats going on. More than likely you'll be better off buying a end cap, and just do like i did in this video, its the cheapest and easiest method, but also keep in mind, you can buy a aftermarket brand starter (brand new) for 25 bucks plus shipping. whic h is a steal, if there any good, i hope try one out eventually. thanks for watching
Thank you for making this video. I have a B&B 5396361 that wont spin when hooked up. It sells for $200! So it’s definitely worth repairing. Will this fix my problem?
Please post a link for ordering end cap. Thanks
Your welcome, there is no guarantee that it will fix it, 80% of the time its whats wrong, but theres always a chance that the armature is burnt up. hanks for Watching!!!
What if the magnets are loose from steal cover they are in. Is the starter done or can I glue magnets back in their places
Thank You for part numbers
Lololo
it could be stuck on the cog (the spiral part) or it could be stripped out, its just plastic, soak it down in wd40 or pb blaster and try to work it loose until you can turn the gear on the cog. this happens alot, i always try to keep my oiled up so it won't. thanks for watching!!!
Hey want to ask you when i start the lawn mower up for cutting grass for like 30 mins whenever i need to take break time then when i go back to my lawn mower it wont let me start the mower up fast and my starter is trying to make it start the motor and i feel the starter is very hot so i have to let it cool it out then it will start the motor up so i have to get new retainer brush part for my starter or what? please let me know if you know what wrong with it
@fnaguitarplayer9 Looks like you could make those brush holders with some paper clips. No problem man!
the armature. alot of small things can cause this problem. hope this helps! thanks for watching!!!
could you tell me where to get the end cap replacement with the bushing most places have it without
thanks alot great vids subscribed
+guitar 2 die 4 Yeah, i get mine at tulsa engine warehouse (tewarehouse.com) great place
to deal with. Your welcome, appreciate that, thanks for subscribing and
watching!!!
i got white smoke coming from mine and it spits sparks sometimes from where you connect the wire to it. i broke the seal where the power wire connects to it. is this bad? it has a hard time starting
I've got a question. On my 12 HP starter even if I charge the battery all the way up the starter doesn't spin quite as fast as some I see. some I see sound like there cranking full blast as fast as it possibly can. Mine is always a little slow, is there a way how I can fix this? take the starter apart and clean it up?
@fnaguitarplayer9 Can I take some fine sand paper to the brushes and touch them up slightly? I think I'm gonna take mine apart tomorrow and clean it up a bit.
theres a few things that could be, one is dry bearings, does the motor turn free by hand? if not take it apart again (i know its a pain haha) and put grease on the upper and lower bearings. Well on all my briggs the engines run clockwise, facing the flywheel, so the starter should turn counter clockwise. it could also be worn brushes, you could try a new set or do like i did in this video just replace the whole end cap. could be weak magnets, which is rare, but possible. or a weak coil on...
it could be a couple of things, first thing comes to mind is vapor lock, not a common problem on newer engines, but on older ones it is. if thats what it is, there isn't really anything you can do about it, it could be the brushes, how well does it start cold, if it doesn't crank really fast cold its probably it. hard to say really! thanks for watching!!!
ohhh ok I got ya. you may be best to buy just the end cap like i did in this video. but like you say by the time you pay shipping might as well just replace it haha. no problem, anytime
Don't know if u will see this, but this little starter is minus one of its magnets from deterioration. If everything else is good, can it still function or does it need all (4) to be operational ?
It wouldn't have as much power and may not crank it over, depends. Thanks for Watching!!!