How to Picture Frame A Deck | Composite Decking Border

ฝัง
- เผยแพร่เมื่อ 22 ก.ย. 2021
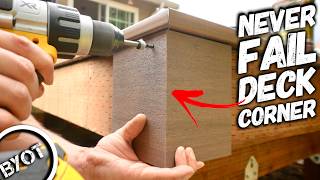
- In this video I show you how to make the edge of your deck look nicer by installing a picture frame border with composite decking. How do you think it turned out? Leave me a comment and let me know!
Full deck build time-lapse - • Tearing Out Old Concre...
• Subscribe on TH-cam: bit.ly/SubscribeToTheFixer
• Facebook: / thefixeronyoutube
• Instagram: / thefixeryoutube
• Website: www.thefixerhomerepair.com
• Patreon: / thefixer
• Amazon store: www.amazon.com/shop/thefixer
*As an amazon affiliate I earn commission on qualifying purchases
Need a plug cutter? - amzn.to/39x6Mrq
I use a program called TubeBuddy to optimize my videos in order to make it easier for people to find my content on TH-cam. Are you a content creator and would like to try it?
Sign up here - www.tubebuddy.com/TheFixer
DISCLAIMER:
This video and description contains affiliate links, which means that if you click on one of the product links and make a purchase, I will receive a small commission at no extra cost to you. This helps support this channel and allows me to continue to make videos like this. Thank you for your support!
Videos produced by The Fixer are provided for informational purposes only. All material provided within this video is for informational, educational, & entertainment purposes only. Some of these projects, materials, and techniques may not be appropriate for all ages or skill levels. Please use all safety precautions while following any instructions or concepts provided by this video. Viewers must be aware that by doing projects on their homes they are doing it at their own risk and The Fixer cannot be held liable if they cause any damage to their homes. It is the sole responsibility of the viewer to educate themselves on their local codes and regulations before undertaking any sort of project. Always have safety in mind and have fun! - แนวปฏิบัติและการใช้ชีวิต


Check out the entire deck build time-lapse here - th-cam.com/video/SehPijelC4g/w-d-xo.html
Thanks for watching! and don't forget to Subscribe to my channel! bit.ly/SubscribeToTheFixer
How did the expanding and contracting work out on the flush mitre corners of the decking?
+1 how did the expanding and contracting work over the last few months? Any substantial gaps?
How did the expanding and contracting work out on the flush mitre corners of the decking?
Nice to see LedgerLoks and ThruLoks on the deck. I work for the company that created it. Awesome work goes into it. Check out new MVP line for a general wood screw indoor/outdoor!
Your attention to detail is amazing! The deck is beautiful! I hope you're doing a video on the finishing touches!
Great job explaining it, the breakdown of the details and reasoning for it makes this video extra awesome. Keep up the great content, the little details definitely set you apart.
I use a biscuit joiner to cut the slots where needed after the rim board is attached. Quick and easy and no need to cut a full slot.
Thank you. Been building decks for a while but never had anyone ask for a picture frame until now and this was very, very helpful. Going to do the picture frame today and looking forward to seeing how it turns out!
I had this picture frame look done to my newly built deck but took it a step beyond! The "frame" was done in a different color filled in the center area with the solid other color. Looks quite elegant and VERY modern!
I'm having my deck replaced next year, so it was really nice to see the installation of a composite deck.
Nice! Happy you checked it out!
That's the prettiest deck I've ever seen.. Great job..hugs
😁 Thanks, Carolyn!
the attention to detail and the confidence really shows in every vid on your channel. And awesome results!
Just what I needed to see as I am about to build a huge deck for a client and they don't want any fasteners to show, the part of using a hole plug bit was pure genius!!
Its those kinds of pro tricks that make the end results amazing!
Thanks for sharing your skills with all of us!
Craftsmanship and attention to detail. Quite a combination. Great work sir! Thanks
I have been searching high and low for an actual HOW TO on picture framing. You are the ONLY one I have found! So thank you sir! And thank you for great content and making it easy to follow.
You can also put a skirt board around the deck. Meaning, if you use a 2x10 for your band boards, you then wrap that with a 2x12 to cover the edges of the decking.
16:13 Odd how the plug part was what amazed me the most. Very nicely done. Talk about attention to detail.
As always, your work is top notch! That includes your ability to explain things so clearly, while documenting it in a quality video as well! Thanks, Fixer....really enjoy your channel.
I appreciate you explaining what and why you're doing things like the flex tape...great idea for all your stated reasons!
I love the detail you put into your videos mate and you make it extremely easy to understand what you are doing. Alot of other channels should take notes. Thank you!
You did an awesome job! Your wife is blessed to have a man who knows how to work with his hands.
That looks awesome! I just built a 14x 40 deck on my house using that same decking! I also picture framed it, it turned out awesome and I love the look!
Awesome!
how did you join the picture frame boards on the 40 ft end. im facing that dilema now. thanks
So I live in the upper Midwest, and with that comes extreme cold in the winter and extreme heat in the summer. Composite decking is known for its expansion and contraction with temperature swings. At 40ft long, and the the decking I used being 16ft long, I have 2 seams in each row including the outer picture frame row. With that length, your not going to stop expansion and contraction causing the seams to open up during the colder months. However, one thing you can do to reduce it, and make sure that the seams look perfect when the temperature moderates, is find some color matched trim screws that match your decking pretty well, and screw the boards down about every 8 to 10 inches or so, that will help a lot. Hope this helps your Dilemma!
@Joe Powell temp swings = 1"+ of movement on composite fascia. The first job I did I butted the fascia, and it opened up 7/8", leaving a wide open gap.
Since then I started using a router and doing a half lap for running joints, so at least it has composite material in front of the wood structure.
@@alexfrederick9019 Not a bad idea! I might have to start doing that. Thanks for the tip!
Good Work Matt. Awesome and straight to it. Clean looking deck 💪
Hey! Thanks a lot! I really appreciate it!
That part about making the plugs to cover up the screws was great.!
Thanks Bill!
It looks really nice. Well done. Looking forward to seeing the end result.
Thank you so much! I learned so much from you. I am getting a composite deck built and I wanted to make sure it gets done properly!
One of the best videos of decking, lots of details. Thank you
Some great explanations on the miters, was never a fan of most synthetic products for the shrink and expansion issues.
Yeah, I get it. At least with PT it just dries up once and pretty much stays like that. (for the most part). Thanks for checking out the video, Wiley!
Thank you! I was stressing cutting the picture frame! You helped destress this for me!!🎉
That looks so much better than w/out the edge. Great job and thanks
Thank you for sharing all these information with us. It is greatly appreciated.
Cutting angles and over hang has always tripped me up and you just explained it in 5 seconds. Why has this been so hard for me!?!? Thanks buddy!
No problem! Thanks for watching!
Planning on replacing my decking with composite soon. This is a great idea. Thanks!
Great how-to, efficient, lots of good tips, fine craftsmanship. Thanks!
I love your teaching style. Great demeanor.
That’s coming out amazing, can’t wait to see the next video!!
It loooks great!!!! You’re very talented!! 👏🏻👏🏻👏🏻👏🏻
Awesome attention to detail, especially with the plugs. Going to start implementing that method instead of face screwing my mitres
Deck is coming along! Love it
That's the way you do it. A serious little deck!
Excellent forethought and prep. Really nice final result.
To the point. Nicely done. Love the home made plugs.
Water shed and dry out are critical to longevity, I try to add frame fillers and supports for bias boards on edge. Great to lock posts firm on three sides
That deck isn't going anywhere, solid work!
Very nice! Great attention to detail. I know lots of things wind up being preference. I’m not criticizing by no means. Very detailed and informative video.
Only thing I noticed in relation to the flex tape is, should have continued tape over the edge of joist onto both sides creating a complete seal on the top surface of joists.
Actually code in many municipalities.
Great video
You are so wonderfully in love with details. 🧡💜💙💚
Classy!!! I love your attention to detail
Very nice job, I really like the picture frame detail you used.
I like that you use Ryobi tools. My friends give me grief for owning Ryobi, but I've had nothing but good luck with them. Thanks for the vid. 👍🙂
I love Ryobi tools! I have remodeled my entire house with them and have no complaints. They get a bad rap for being… affordable I guess. 🤣🤷♂️. Thanks for watching!
That looks very awsome. Nice work.
I like how The Fixer explains exactly what he is doing.
Great job with the deck and the video! Thanks for sharing!
Good idea with the plugs to hide the screws. Plugcutter-sizes are a bit of a pain to match to holes. For my plugcutters I need to use odd drill sizes like 9.5mm and predrill but it works niceley.
You sir, are a man of excellence. Kudos.
I love how you nitpick I'm exactly like that the attention to details is awesome 👌
Best picture frame video I have seen, and I've looked at a lot.
Thanks so much. Really appreciate that!
Im preparing to build my deck and found in your video very hepful tips. Thanks for sharing them
I want you to build my deck! Your attention to detail is awesome!
Looks great! Nice color too!
Brother, you are a BEAST!!!!!!!
Very clean job!!!!!!
Excellent craftsmanship. I'd secure that miter saw.
It looks fu...ing good! I am a fan of you. Greetings from Germany!
Super helpful video! I am working on my deck right now, but I was worried about making the miter cuts for my picture frame.
I agree to a point. It does look nicer, but for me I deliberately left it with the ends of the composite decking going all the way to the end because it's easier to clean. Another one of my homes has a nice picture framed deck. It has pressure treated framing but it's rotting now because of the debris that falls down that you can't get out. Because I have oak trees that are near the deck I can pressure wash them off between the boards and all the way off to the end.
This was extremely informative and helpful! Thank You
Awesomeness video. Love your attention to detail!
- Another really awesome job ! ! ! Beautifully done. Thanx 4 sharing.
And thank you for watching! Hope the video helps!
Holy 🐄! That looks awesome!
😁 Thanks, Gregory!!
I've been doing this since before composite decking!
Super impressive work and great video! 👍
Very neat and professional job!
FYI, Sherwin Williams makes a product in sausage pack (no caulk tube) of fluid applied flashing, (goes on 60 mills thick, and can be recoated) great for goofy spots. It also can be left exposed to sun light, only down fall it only comes in grey currently but will be coming out in other colors I'm told....
Wow! I did a very similar door porch for my wheelchair, but your build was next level compared to mine. I have the ugly ends facing out. I'll have to figure something out. Maybe an apron? This is amazing!
Wow I'm thinking he has done that once or twice amazing deck detail was dead on beautiful deck
It’s a pretty deck! Love your videos!
Thanks, Carla!
Beautiful deck and work 👍🏽
Looks great!
Excellent job
Professionally done
I like the video you can tell you take pride in what you are doing 😉 nice job
Awesome job. I love the details.
That was pretty darn good, and did help answer questions, thanks.
Elite-level attention to detail on such a minuscule deck. Impressive. 💪🏻
Man that deck looks Sweet & clean looking 👌🏼👍🏼👍🏼
Thanks, Eddie! 😁
This helped solved my framing questions.. thanks
Beautiful 🤩
Beautiful job, clean, simple and easy to follow and understand! Thank you!
That looks really nice
Love the video. I wish you would’ve left a link for the counter sink bit like you did the plug cutter. Have had a terrible time finding the right one. Thanks for all the tips. Our deck is gorgeous.
Amazing DIY video bud cheers! Appreciate the Video!
Really good looking, Nice work.
great video all around and a bunch of good ideas for my install , thanks so much
Speechless great job
I love, love, love your videos.
A lot of nice little tips to help with my deck job. Like the plug cutting. I was going from the top and it was making a mess of the surface. Not sure how I can split a board since I do not have a table saw, but I can figure out something. I like the screw idea on the mitered corners too. When it comes to the picture frame, personally I think it's better to not cut the 45s at the house like you did. Too me it's a lot of work for very little esthetic value. Anyway well done and thanks for taking the time.
Hey man, very nice, I picture framed mine about 10 years ago, didn’t use the biscuits or screws in the ends of the corners, so now that will be on my mind on the next one 😂, on the side edges of the couple decks that I framed I cut blocking strips down the side of the joists allowing me to have water not sit where you on the other hand have solid blocking, but of course yours may have been a little faster also using the flex tape, which I used on the last deck stringers I did with picture frame, it’s a really nice look, nice video too.
such perfection!
i love this video very well explained 👏 ❤ur deck is really nice u do awesome work keep doing what ur doing 🎉
Awesome job! You gave GREAT instructions too.
Great to hear! Thanks for watching!
@@TheFixerHomeRepair You're welcome, it is a blessing to me.
Looks awesome👍
It looks great
Amazing !!! Thank you for sharing
Awesome job!!
Thank you for the video, very informative 👍🏻
Great tip at 13:30 about securing the 45 degree corners to minimise movement.