ULTIMATE SOLUTION for colors issues with camera FILTERS for astrophotography | Astronomik CLS filter

ฝัง
- เผยแพร่เมื่อ 10 ก.ย. 2024
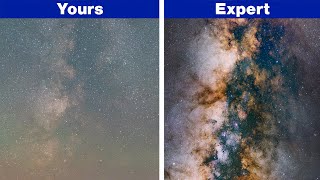
- In this video I present a solution for colors issues with camera filters for astrophotography like Astronomik CLS. The answer are custom color profiles so here I show how to use custom color profiles for Lightroom and how to create custom profile with colorchecker. If you don't have a colorchecker you can just use the profile that I created (link below) in order to be able to properly warm up your night sky photographs in Adobe Lightroom or Photoshop.
I show the entire process of calibrating the colors captured by a camera with the filter installed with the use of Adobe DNG Profile Editor. I also discuss what white balance for Milky Way should you choose but more on that on another video of mine: • Get NATURAL COLORS OF ...
Get the X-Rite ColorChecker Passport Photo 2 for yourself and create your own profiles! click here: amzn.to/3dA1Phh
--------------------------------------------------------------------
GEAR I USE (links affiliated):
► amzn.to/3dA1Phh - X-Rite ColorChecker Passport Photo 2
► amzn.to/2LlyKtP - Canon EOS R (I 100% recommend this camera for people both into photography and filmmaking)
► amzn.to/2SUKBmZ - Canon RF 35mm f/1.8 MACRO STM (my go-to lens for TH-cam videos, astrophotography and more!)
► amzn.to/2SU5FKo - Canon EF 24mm f/2.8 IS USM (underrated but excellent wide prime for vlogging and street or landscape photos)
► amzn.to/2STDhIn - Canon EF 70-300mm f/4-5.6L IS USM (excellent lens for moon photos, landscapes and deep sky astrophotography)
► amzn.to/2SX49Hj - Sky-Watcher Star Adventurer (astrophotography tracking mount)
► amzn.to/35Nc9zZ - Rode VideoMicro (excellent quality cheap shotgun microphone - perfect for vlogging and youtube)
► amzn.to/2SUHJX0 - Gorillapod 3K PRO (best gorillapod ever - with aluminum sockets that don't break!)
► amzn.to/3dzEtZ9 - Aputure MC (the best every tiny RGB LED video light with build-in battery
► amzn.to/2WldScs - DJI Mavic 2 Pro (legend in drones - foldable, reliable, produces a beautiful image)
► amzn.to/35NqcWe - Samsung T5 (excellent blazing fast, durable and tiny external SSD drive that I edit on)
► amzn.to/35WanfR - Aputure F7 (powerful LED bi-color video light)
► amzn.to/2SUCDKp - PolarPro 82mm Variable ND Filter (2 to 5 Stop)
► amzn.to/2zrjQQ8 - X-Rite ColorChecker Passport Video
► amzn.to/2SVP09d - Benro IB0 ballhead (excellent cheap ballhead with fricion control Arca Swiss standard - very precise and durable)
--------------------------------------------------------------------
LINK TO THE CUSTOM PROFILE FILE:
► bit.ly/Astrono...
Put the file inside:
[macOS]: ~/Library/Application Support/Adobe/CameraRaw/CameraProfiles
[Windows]: C:\ProgramData\Adobe\CameraRaw\CameraProfiles
---------------------------------------------------------
► Don't forget to SUBSCRIBE - new videos every week!
OTHER VIDEOS OF MINE:
► • How to edit MILKY WAY ... - How to EDIT IMAGES of the Milky Way - FULL WORKFLOW
► • How to photograph the ... - How to photograph the night sky and Milky Way - ALL CAMERA SETTINGS explained
► • Milky Way photography ... - How to photograph the Milky Way - all you need to know to get started: equipment, planning etc.
► • Best way to remove lig... - The EASIEST way to REMOVE LIGHT POLLUTION on night sky images
► • HOW CURVES ACTUALLY WO... - How the "CURVES" adjustment in Photoshop, Lightroom or Premiere Pro ACTUALLY WORKS
► • The science behind COL... - The science behind COLOR BALANCE in Photoshop
► • How to apply ANY LIGHT... - How to apply ANY LIGHTROOM ADJUSTMENT LOCALLY
► • Get NATURAL COLORS OF ... - How to process images of the night sky to get the best COLOR ACCURACY
LINKS TO SOFTWARE:
► adobe.ly/3adYt1A - Adobe DNG Profile Editor
► adobe.ly/2K80CRP - Adobe DNG Converter
LINKS TO THE ASTRONOMIK FILTER:
► bit.ly/2KbyCN4 - Astronomik CLS filter for Canon EOS R
MY SOCIALS:
► Instagram: / kamil_pekala
► Twitter: / kamilpekala
MUSIC BY:
► Epidemic Sound: epidemicsound.com


A stellar video and so generous with your time and enthusiasm for the subject. You deserve way more followers.
Thanks a lot!
Hi Kamil. I just tried accessing the profile via lightroom and camera raw and like some others below even tho lightroom says the profile has been downloaded I cannot see it? Is there a workaround for this do you know?
I haven’t figured it out yet. It may be a camera - specific profile that would work only on EOS R. I’m using it all the time and for my camera it works like a charm
@@kamilkp ah well ill make my own version following your steps and let you know!
After many repeated attempts, I cannot seem to get the .DCP file to work. Dropping it into the folder, the profile does not show up anywhere in lightroom or canon raw. If you try and do the the preset install through lightroom, it says that it has been installed but you are unable to locate and use the profile. It would appear that in the presets folders for the color profiles, they are saved as .XMP file. could this be the issue we are having?
Thanks!
Thanks!
@@kamilkp My pleasure... Any insight on my comment? I would be interested to see your view on it. If you have any time, any insight would be welcome... Best...
Many thanks Kamil for all your videos. I've installed your profile file ( under Mac OS), but LRC cannot see it like you do in your video. Could you help me in order to use your profile. Many thanks for all you do. Greatings from France.
Hi there ive just downloaded the colour profile, and put it into the correct folder, but either lightroom or lightroom classic are showing it in the profile browser, any tips/help will be most appreciated.
This is amazing Kamil. Was about to sell my cls filter but I'll give it another go with your custom profile!
You’re welcome! Let me know how it worked for you
@@kamilkp can't see the custom profile e camera raw. I saved it in the right folder but it doesn't appear in camera raw. Any sugestions? I only see the default adobe profiles on camera raw.
@@kamilkp camera raw in photoshop I mean
@@kamilkp from what I investigated this only works for the pictures from the same camera model that you used to create the profile. Mine is canon RP, so it doesn't work for the pictures I took with my camera.
Ah interesting. Maybe there is a way to export it as a generic profile. I’ll try to do some research
Can I use it without ps lightroom?
Wow, simply amazing video. Kamil, have always loved your simple explanations to things. I have an astromodified Canon 5D Mark II and I'm using the Astronomik CLS CCD filter. I will try this color balance technique you have taught here. What is your take on using Astronomik L-1/2/3 filters instead of the CLS CCD? In general what's your take on the clip-in filters? I can't seem to get focus on my 14mm. Perhaps need to go less wide, like 24mm I guess?
Hi Kamil,
I must be missing a point here but it looks to me you are reintroducing the light-pollution-yellow color you put the CLS filter in to eliminate in the first place.
I did perform your maneuver and I do get perfect colors with the CLS filter in which is quite promising for my next astro photoshoot!
Thanks a lot for your tips :)
The thing is that the filter cuts off yellowish light spectrum from both the stars/nebulae and light pollution. So the light pollution is reduced but the light from the stars and stuff is missing that yellowish component. So the manouver is meant to kind of bring it back in how the stars appear in your shot to make them look more natural. But it doesn’t bring back the light pollution because it’s been cut off. Hope that makes some sense 😄
@@kamilkp It all makes sense now ! Dziękuję bardzo!
@@kamilkp "because it's been cut off"
Yes, but the yellow light has also been cut off, so yellow light should be noisy and I guess this could be more noticeable, if digital gain is applied to yellow colors.
Should I be able to use your profile with my EOS 70D or do I need to do something to it first? I think I have it installed correctly, but I can't seem to get it to show up in Lightroom. Awesome video though! Thanks!
Good work, Kamil!
Awesome! Thanks for the comment - I appreciate it!
Soo cool video and perfect explanation! Thx :)
I didn’t know you were into astrophototography 😉 I recently took some actual Milky Way shots with this filter (and without for comparison). Video about my final verdict about this filter coming next week!
@@kamilkp currently not doing astrophotography but who knows maybe one day. Anyway really good chunk of knowhow :) Keep up!
Thanks! Custom color profiles can be quite helpful even for „normal” shooting scenarios. Some cameras don’t do so well with colors out of the box (Sony 🤫) 😄
Adobe DNG Profile Editor is Mac only ??
How are profiles created on Windows ?
You speak too slowly !! like that we dont miss any steps !
Thanks bro !
Just Excellent Kamil! I bought my CCD CLS filter from Astronomix and it was delivered in 2 days which I was pretty impressed with. In any event at 3 minutes into your video you show an image that you are trying to color correct, and I see the lens you used was the Canon RF 35mm f1.8 STM macro. This is very interesting to me as Astronomix specifically states that lens is not compatible at
www.astronomik.com/en/clip-filter/clip-filter-fur-canon-eos-r-eos-rp.html
Could you please confirm you used that lens? Did you have any issues with putting the lens on the camera with the filter in place?
Watch this: th-cam.com/video/sKcNDIe1JOI/w-d-xo.html
@@kamilkp Rats. I'm sure they sent me the original width. I'll check when I get the camera back (currently being converted to full spectrum). In any event, thanks so much for your response and your video.
lightroom shows it can't be installed
What can’t be installed? My color profile file? What’s the exact error/message?
Kamil Pekala when I copied the file under the folder following the instruction you have, but when I open Lightroom classic. It still show the default option for pre-set. I also tried to import the file via the “+” button under the pre-set browser , and it shows “can’t load the file”.
some thing here, instructions said to put in [macOS]: ~/Library/Application Support/Adobe/CameraRaw/CameraProfiles which is the camera raw folder, it is not there either. Tried with lightroom folder, nothing happens.
Hmm I will look into that. But it’s definitely not a preset like Kun tried. It’s a „color profile” which is a completely different thing. Putting the file in the appropriate folder should work though, I’ll see what might be the problem here Giovanni
This is an inspired solution and I *think* it will work, but like the few others here when I put it in the proper folder it does not appear in Lightroom for use. I tried taking it out and using the Import Develop Profiles from the File menu, thinking LR wanted some proper install. That didn't work, either. If you have a solution, I'd really like to try it out with all my Astronomik CLS blue cast data! Thanks for the solution!
This makes sense for Infrared photography, but not for Astrophotography. The color cast (color issues you talk about) caused by any LPS (light pollution filter) are easily removed in Photoshop by adjusting individual RGB channels with Level adjustments. Setting WB is not common in astrophotography post-processing workflows. Like other viewers here, I really didn't get the point of doing all this to take the image to look as if you shot it without the LPS, so it just sounds purely experimental to me.
Holly sh...t. Let me grab a cup of coffee and replay that at 0.75 speed. What did you say again ?.. Use to do the same thing for Infrared at first, but as with all things we don't practice enough, I need to refresh.
Speaking of which, wouldn't it be simpler to do as with IR, and just set up a custom White Balance in camera, for when we use the filter?
For example, for 720nm IR, you just custom white balance on some grass or green stuff to retrieve normal WB and remove the strong red color cast that you would get with daylight WB and this wavelength.
Sure, you can also do all the stuff you mention there to post fix this 720nm red cast if you didn't custom WB, but doesn't it become unnecessary if you use custom WB in the first place? Then LR or such would have enough WB correction range to refine this custom WB result, no?
And while I'm at it, I realize that to custom WB for the 720nm strong red cast, I'm actually custom WBalancing on green, which is the opposite color of red.
Would that mean that, orange being the opposite color of blue, I could be get a decent white balance with the CLS filter strong blue cast if I'd custom WB on something orange? I will have to test that...
But meanwhile, any insight welcome... And thank for the great video.
White balancing in orange - interesting. I have not thought of that. Let me know how it works if you get to try it!
@@kamilkp Hi Kamyl, thanks for your reply. I'll definitely keep you updated. Best...