etrailer | Trailer Hitch Installation - 2014 Jeep Patriot - Curt

ฝัง
- เผยแพร่เมื่อ 23 ธ.ค. 2015
- Click for more info and reviews of this CURT Trailer Hitch:
www.etrailer.com/Trailer-Hitc...
www.etrailer.com
Don’t forget to subscribe!
/ etrailertv
Full transcript: www.etrailer.com/tv-install-t...
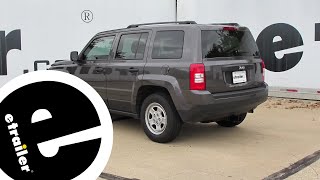
Today on our 2014 Jeep Patriot, we're going to take a look at and show you how to install the Curt Custom Fit Trailer Hitch Receiver. This is a Class 2, with an inch and a quarter opening, part number is C12057. Here you can see what the Curt Custom Fit Hitch is going to look like. There's very little of the hitch that's actually going to be visible. All your main structure is tucked up here behind, bolts into the side of the frame rails. The instructions look a little more intimidating than it really is to get the hitch installed.
The hardest part is going to be trimming the fascia here and there's not a lot to that. The inch and a quarter hitch itself, this is going to be rated for a 300 pound towing capacity or a 3,500 pound max trailer weight rating. You also want to look into the owner's manual on the Patriot and make sure your vehicle can handle that. If not, go off of which ever of those numbers is the lowest. With this being a Class 2 hitch, we are going to have the option of course, of using bike racks, light duty towing, but something that's going to set this apart from a standard Class 1 hitch, is that with a Class 2, you can actually use cargo carriers. There's not really a lot of Class 1 style cargo carriers that are out there available and the ones that are, are pretty tiny. This is going to give you the capability of using those larger cargo carriers, four bike racks, things of that nature.
Now also with this hitch, you're going to get hitch pin and clip. Go through there and help you hold any of your accessories in place and something else I like, you've got your light duty safety chain connections here, so those can help with the safety chains on our trailer or if you need to connect something in there to hold bikes or a bike rack or something like that. Now let's go over a couple measurements to make it easy in helping you select your ball mount, bike rack or maybe cargo carrier. From the ground to the inside top edge of the receiver tube opening, we're going to have about 14 inches of clearance. From the center of our hitch pin hole to the outermost edge of our bumper, we're looking at about 5 inches. To begin the installation, we're going to remove the six push pin fasteners that go across the rear fascia here. Typically just a screwdriver, get a little flat spot there you can work that in or if you have like a trim remover tool or even a small pick will help you to separate these.
Now we're going to remove the exhaust hangers that are located right here above the tailpipe, the one located just behind the muffler that goes across and also the one located right here in the middle of the car. Now before we do, you'll see I've got a strap here. We're just going to support this along the underside. That way we'll have a strap that will take up any of the slack, rather than putting excess strain on the system. It's a good idea to spray these down with a little bit of spray lubricant. Usually it makes it easier to come off there.
Now we'll just kind of pull these off and finally our one up here in the middle. Now with those removed, we'll put a little slack in our strap here and allow our exhaust to move right on down out of the way for us. Now we're going to remove the four fasteners that are holding our heat shield up in place. Now we're going to hold on to the heat shield and the fasteners. We're going to be putting this back up in just a little while. Now here on the very back of our passenger side frame rail, we're going to take one of our half inch hex bolts, put a flat washer on it. These are four inches long, and we're just going to slide them through just to where they almost come all the way through. We'll do it in both locations here on the passenger side and in the exact same spot on the driver's side. Now we're going to raise our hitch into position and we'll guide our rear-most bolt through the rear-most hole in our hitch. You will have to turn it slightly downward and kind of work it up and in. Then we'll line up those holes. As you can see there, our bolt's going to come through. That will support it for us slightly and then we'll start one of our half inch flange nuts on each of those bolts, don't need them too tight, just on there. We'll going to just kind of rotate our hitch up and we're going to mark kind of the outside here on both sides. Now we'll go right into the center of that and that's where we'll be able to start making our marks for where we're going to be trimming out our fascia. Now from each of our marks, we'll come in 3/16ths of an inch, make a little mark there on each side and we're going to trim up from those marks 2 1/4 inches. That's go - ยานยนต์และพาหนะ


Couldn't find a better video. Thank you
thank you. this really helped a lot
why did you take out the push pins. I didn,t see ya take off the bumper for more room
The instructions indicate to remove 4 of the plastic fasteners and 4 hex screws from the fascia. This gives more room to work and makes the installation easier.
awesome great video clean work
Thank you for the feedback! Check out more information about this hitch on our website in the following link.
www.etrailer.com/Trailer-Hitch/Curt/C12057.html