Bending Wood into a DIY Table & Other Woodworking Tips | Woodworking Project

ฝัง
- เผยแพร่เมื่อ 6 ก.ย. 2024
- Explore a wide variety of content in our carefully curated TH-cam playlist: • Binge-Worthy Content
If you’re enjoying this video, check out our other projects! Subscribe to our channel for woodturning, metalworking, restorations, remakes, epoxy resin projects and more. You name it, we do it!
Subscribe to our channel → / totallyhandy
Check our Shorts channel → / totallyhandyshorts
#totallyhandy
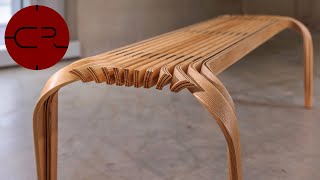


Cool idea. Definitely more decorative than functional. The legs should also be reinforced with something other than glue so they don't come apart especially if kept outdoors.
Would be beautiful if the gaps were filled with resin
I'm a model ship maker and many yacht repairs. I can't have a steamer where I work, so, I soak my wood in ammonia. 100% house hold ammonia . Let it soak overnight, pull it out wipe it with a rag real quick and put it in the jig. I can bend curves in a flat piece of wood without it buckling up on me, it stays flat with curves. If you clamp the wood you need to move the clamps often so it dries evenly. Same thing if you use tape to hold the wood in place while it dries. I put the wood strips in a PVC pipe with a cap on each end. Give it a try, its works! Yes you still have to work the wood into place but it's less likely to split.
@@criollitoification I havent actually tested equal pieces of wood soaked in water vs ammonia. I've always had good results using ammonia. I have laminated many boat frames with strips of white oak 3/8 thick 3 inches wide 10 feet long. Soak about 8 of them at a time, then the next day pull them out stack them and immediately clamp them in place. When they dry, un clamp them, glue each side and clamp them back in place. When that dries, un clamp the laminated frame, sand it nice and smooth cut the ends where you need to and you have a beautiful strong alternating woodgrain frame. I've never tried this method with anything over 2 inches thick. I bet it would work tho. The ammonia must soften the wood differently than just water? To bend wood sideways, you need a jig and you will still have to work the wood into place, using a longer piece of wood helps then just cut off what you dont need.
@@criollitoification Hoy mate, thank you and Merry Christmas to you also. This method works even better for model boats. I build some of the largest model ships in the world, fulltime every day 26.6 years now. May I recommend trying a couple of plastic models at first. Seriously, there are plenty of plastic models of square rigged ships available. Hand tie all of the rigging. DON'T use the shroudes/rat lines provided. Hand tie everything yourself. You will be amazed at how nice these models look. Ahhh the Americas cup yachts! I'm a big fan of the Americas Cup. There is a Italian company that makes wonderful kits of the Golden age of yacht racing, the 1930s. I built ....... 8 of them? If you want to see them, on TH-cam search, 'Jimmy Frost Master Shipwright.' It was supposed to be Master Model Shipwright but..... I did not know this video was going to be posted. Forgive my slow speech I'm trying to think of what to say while saying it. Also I got the scale of the 30 foot model of the Queen Elizabeth wrong, it's 1/32nd scale not 1/48. The giant 40 foot hull molds were built with the Ammonia trick. What you see in the video is fiberglass. I'm building several plastic model ships now and I love them. Check out the plastic kit of the "Vasa" Its on my shelf and I cant wait to get to it. The plastic kits will prepare you for wooden kits. They are smaller, easyer and look just as good if in some cases, they look better. Enjoy my friend.
@@criollitoification Thank you Sir, welcome aboard mate. I'm just the model maker. I invented the job, hired myself and I just showed up for work the next day! Oh I would love to visit the ships on your side. Of all my years of sailing. My favorite ship of all time is ..... The Golden Hind. I think that is the most well designed ship ever drawn and built. I love the proportions of that ship. I would love to visit the full size replica of it in England. Francis Drake sailed her around the World in 1577. When he returned, he was Knighted Sir Francis Drake. I'm putting the 1/72 plastic scale model of it together now. I love that little ship. Please consider some of the plastic models before taking on the aggravation of wooden kits. Some nice plastic models of the HMS Victory are available. So much I wish I could show you. Take care my friend. "Jimmyfrostmodelshipwright@yahoo.com "
Beautiful job. Amazing ❤
The table was cool... The magical bendy rope wood got you a subscription. Freaking incredible work
I'd give this table a year before it warps or breaks due to the construction and type of wood.
I have a question. Is there risk of warping with humidity or losing the round shape of the table? I love the idea!
Yes there is...but the table is somewhat of a disposable design. He didn't finish it, nor really cared about accuracy in the splayed legs (and the glued up slats aren't even aligned well). That said, there's nothing wrong with that! Sometimes, you just play with this stuff for a couple of hours and when the thing tears up, you just replace it with something else fun.
Of course, with some extra work and different materials, you could improve the design to make it longer lasting and of more heirloom in quality. I was impressed by the idea of the table myself...and I think the maker would have you take the spirit of what he did and maybe do a few things to make it your own, in whatever context you would use it.
mettre a top of'glace
@@jayballauer8353 this table will last far longer then us with three four doses
I love the techniques, but I didn't like the design of the table.
The flexibility wood after the table is really great.
Why would you center your router at 1:30 then change the depth.. 20 times instead of just spiraling around with 5 depth changes?
Incredible mind-blowing art
Os "profissionais" que não conseguiram instalar portas e janelas em minha residência deveriam assistir esse tutorial. É claro que ficariam sem entender e ou depressivos. Parabéns ao canal e seu conteúdo. 🇧🇷
😂👍
Puse «traducir al español» tu comentario, y tu bandera brasileña se convirtió en la estadounidense.
That was awesome.
Learned a lot.
Amazing Table!!!! Really a good craftsman only have such patience and creativity to built masterpiece
Those are works of art man. The only thing I would have done for function would have been put a piece of clear plexus glass on top to show the design and not worry about people spilling drinks and stuff. You’re wood working is 100x better than mine and in no way is that a criticism just my two cents to anyone who may want to try it. Thanks for a great video.
I'd add a piece of round tempered glass on the top and some metal caps on the bottom of the legs.
Artistry in every discipline: the woodwork, the music, lighting, and editing. Excellent all around!
It would be interesting to see what epoxy looks like between all of those slats. Great technique
Amazing work. Congratulations!
Simply I have to say super 👍
Thanks for sharing
Nice to see Donny van de Beek enjoying his time👍
A real fusion of Japanese and German wood working skills there. Lightweight standing drinks table really practical for entertaining. Had no idea how flexible wood could be. How do keep your shop so dust free?
This is incredible. Unbelievable.
Wow bravo! Awesome idea and beautiful work!
Merci infiniment Olivier encore 🙏💙🤍
Bonne Année à toi et à toute ta famille et Bonne Année à toute la famille info--libre.Beaucoup beaucoup d'amour à tous.❤❤❤❤❤❤
The Later art works are noticeable 👍🏻
That must be so cool to have your twin work in a woodshop with you!
Would be cool to do the same idea but make the circles continuous(spiral)
Wood* be cool
@@sudopenguin definitely possible just a bit more difficult to make a spiral cutting jig. It's just like drawing a spiral with a compass and putting a router in place of pencil
Look up drawing a spiral on TH-cam and make a similar jig for the router
@@seaotter52 You’re so right!
Simpel dan sederhana, tetapi dengan hasil yg luar biasa, ide ide yg sangat kreatife dan unik, sukses selalu
Wow...Amazing skill,I like it 👍👍👍
😊😊👍
Circles look a bit wonky at the end, is there a way to keep them consistent by putting small wood blocks between the circles?
*Thanks a lot for the video.*
*It was very interesting to hear about new woodworking techniques.*
*Best regards, Alexander CHEST'ER*
Qq
I thoroughly enjoyed your video. I enjoyed how talented you are - you have very clearly out a lot into understanding this trade.. Good luck and stay blessed. ❤️❤️❤️
A similar design, with more solid wood on the top and less rings would be awesome and maybe more practical.
99% of people don't have tools or motivation.. But fun to watch for entertainment..
So handsome. 😍🥰 ...and what a unique build.
Where's the the top maybe some glass, epoxy, or plastic at the very least.
Завораживают! Люблю работы с деревом. Это прекрасно!
Good afternoon my friend I just discovered your channel. You have amazing skills. After watching this video I became a fan. subscribed.
👍🏻👍🏻👍🏻
8 Woodworking Tips to Boost Your Efficiency
Posting
We’ve all heard the adage: work smarter, not harder. It makes good sense, so here are eight woodworking tips to make your shop work easier and more efficient:
1 - Sanding made easier
Sanding woodwork by hand may seem like a chore, but with special tools and high-quality sandpaper, you’ll get excellent results that often outshine a power sander. Besides, it’s quieter, doesn’t produce clouds of dust, and may get into places power sanders can’t.
Use a sanding block for faster, more efficient results. It distributes sanding pressure more evenly and maintains a flatter surface than merely folding a piece of sandpaper. Also, change sandpaper often.
Sand with the grain of the wood, especially for the final grits. To remove deep scratches and stains, angle across the grain up to about 45º for the first sanding. Before moving to the next finer grit, sand with the grain to remove all cross-grain scratches.
For sanding painted surfaces, buy clog-resistant sandpaper. The paint will build up slower than on standard sandpaper.
2 - Avoid drywall screws for woodworking
When screwing two pieces of wood together, use the traditional wood screw over the drywall screw for better results.
A drywall screw is threaded the full length. Since the top threads tend to grip the first board it enters, this can force two pieces of wood apart slightly because you have threads in both boards.
The top part of a wood screw, on the other hand, has a smooth shank that won’t grip the first board. This makes it easier to clamp two pieces of wood together.
There’s another reason to avoid drywall screws: The hardened, brittle steel shafts of drywall screws will often break during installation, especially when screwed into hardwoods. Removing them from a finished material is nearly impossible and getting them out damages the surface.
Wood screws are made of thicker, softer metal, so they’re break-resistant.
Wood screws do, however, require you drill:
A pilot hole for the threads
A wider counterbore hole the length of the non-threaded shaft
A countersink hole for setting the head
However, you can easily handle all three drilling chores by buying a set of three countersinking bits. They handle most common screw sizes.
3 - Know your wood’s moisture content
When building with wood, you must know the correct moisture content of each piece of wood.
Too dry, and the finished product may swell or crack. Too moist, and the end product may shrink or warp. It’s no wonder experts say incorrect moisture causes 80% of all woodworking problems.
Therefore, it’s critical to know the moisture content of each piece of wood before it is used. For instance, if you’re planning an inlay job using two different species of wood, you’ll need to know the moisture content of each type so that your inlay glue joints stay intact.
A failsafe way to avoid a ruined project is to use a moisture meter.
4 - Prevent excess glue stains
To eliminate stains caused by oozing glue along joints, clamp the pieces together without glue. Apply masking tape over the joint and then cut it with a utility knife.
Next, separate the pieces, apply the glue, and clamp them together again. The glue will ooze onto the tape, not the wood. Remove the tape before the glue dries.
5 - Measure with a drafting square
Make accurate measuring and marking layouts on boards faster and easier with a drafting square - available at any art supply store.
When you need an accurate square in the 2- to 3-foot range, drafting squares beat the cumbersome drywall squares for accuracy and eliminate the hassle of hooking up a carpenter square.
6 - Keep a clean, orderly workspace
Achieving efficiency in your shop can sometimes be as simple as clearing clutter from your work area. A disorderly work area can hinder your productivity.
Another tip: Only keep out items that you use daily. Everything else should be put in designated areas so they’re quickly retrievable when needed.
7 - Keep a well-lit shop
Pay special attention to lighting. You should have consistent and ample illumination on all work areas so you can work from any angle without casting shadows. This ensures safety and productivity.
Consider:
Overhead lighting
Focused lighting
On-tool lights
Painting walls and the ceiling white can help diffuse the light.
8 - Keep your blades sharp
Dull tools such as chisels, blades, planes, scrapers and gouges don’t cut cleanly. They tear at the wood fibers resulting in a fuzzy, uneven, unprofessional look.
Tools that have been chipped or nicked require grinding. A bench grinder, wet grinder, or even a belt sander can be used.
Avoid letting your tool get too hot when using a bench grinder or belt sander to prevent it from losing temper. Dipping it in a pan of cool water every few seconds will help.
After grinding, proceed to honing using either a flat wet stone or oil stone. A wet stone is preferred when doing fine woodworking.
The final step is polishing using a fine wet stone, a stropping wheel or leather.
Tools with sharper blades make woodworking easier, more efficient, and safer.
Closing comments…
Achieving efficiency in your shop won’t just improve your productivity and help you work faster and easier, it’ll also make you feel accomplished and more satisfied.
kamelohy90.systeme.io/1567d1b8
Beautiful work and beautiful video
You are an artist 👍
Greetings from Morocco
Thank you for sharing
Super awesome 👏
Top
Channel name total handy 🤟 but without machine you never got anything 😁😁😁
Those measurements have to be precise.... great job
WOW! So much to take in! The bendy wood snakes are awesome. Table was great but maybe a shame you didn't clamp wood either side of the X when routing to stop the breakout... but hey, it's an out door table! Awesome though - thank you!
Wow! Impressive wood bending. So exact with those cuts
INCREÍBLE 🤩..Sobre todo el final .👍
مافي احلا من شغل النجارة وانا بعشق هل مصلحه
Очень здорово, ВО👍🏻✌🏻. Привет из Иркутска. Приезжайте к нам на Байкал.
Pretty cool
It needed 8 checkpoints to make them perfectly rounded
amazing what you did .your fan from syria.
Excellent!!!
For how long do I have to carry the wood in hot steam so I can shape it? And also at what temperature?
I straight up subscribed bc you cleaned up after yourself
I like the little trick with the water spray which caused the wood to curl on itself to turn into the cylinder. Might try that one on my 2 year old and watch him freak out as he thinks the wood is coming alive and will probably call it a worm 😂😂
Beautiful job super super !
Wow nice. 👍 I would've filled the holes in the table with some nice epoxy.
Epoxy? Lol...Cheers! Epoxy is some cool stuff with wood!
@@J-dizzle2021 Fixed it. Better now?
Creativity flowing at maximum rate
Very impressive. 👍
Комментарий в поддержку канала и ролика, а также труда мастера.
Six days ago, 1M!😳😮👏👏👏
Wonderful work! God bless you!
Excelente work
A great video which I stummbled across by mistake but am glad I did, thank you for sharing your ideas on how to bend wood and so I have now subscribed to your channel and given you a thumbs up as well
Glen 👍
Sukses kawan . Salam sehat selalu 👍👍👍
Még egy üveg lap a tetejére, keményolaj és tökéletes.
Cool stuff guys! Much enjoyed and thanks for sharing. Been wood working for almost 35 years now. The smart guys can always learn more without an ego. Lol. Just found your channel and I'm subscribed! Cheers and Happy New Year to all! 👍
Very good Ideas ...
아이디어가 너무 좋습니다.
Beautiful job 😍😍😍😍😍😍
Awesome skills.
Cool designs, IMO.
Nice.....👍
Nice video
Absolutely fascinating. 😍
Have you added detail of how you steamer works? It's clearly underground grade plastic pipework just wondering about the rest. Tia
This. I want to learn how to make one
Nice work done
I love this
Amazing!
Now that looks like a real shop not a studio
Beautiful work, beautiful video
Labour/Workmanship OVERKILL!
Super kreatif sukses selalu GBU
An idea could be taking that table top and filling in the gaps with clear resin?
i love it
good job
So awesome
Nice Art
It is cool .. to see bending wood.. 👌👌
I want to make one of those hoop tables , and add resin for the table top.
Super!
Best wishes for the best vedio
The creative job)
Awesome craftsmanship
th-cam.com/channels/-aVmT4DjlnYeS22AL1xZ5Q.html
ух! кайфова, прям супер! концовка отличная!
I love watching your work! Amazing ❤️
Some interesting saw techniques but honestly I just can't think of what to say about the table except, wow that was a lot of work for a table that seems impractical and is more Art than function.
Very cool.
What a awesome video..love it
Great video!
Really great skills thanks bro