Ryan, this is great! All the features in photoshop you presented, and about which I had no clue, look extremely valuable. And I realized something by the end of the video, which is that I have felt guilty about not doing everything in PixInsight. I will now feel much more comfortable with the following workflow: (1) Stacking and gradient removal in APP > (2) Initial processing in Pixinsight (SPCC, BlurX, StarX, NoiseX, Stretching) > (3) Final processing in Photoshop along the lines presented in this video. Thank you again.
Yeah that’s very similar to what I do and many great astrophotographers use programs other than Pixinsite. Even with some of the features having the same name like “curves” they just work better in Photoshop like how you’re able to drag the bottom or top over and just completely eliminate some of the color and certain areas And then, of course, all of the features that simply aren’t available in Pixinsight Processing to me is cleaning the data and removing all the issues, post processing is where we really bring out what we have refined.
I think Sasha over at View into Space makes the same distinction between processing and post processing, and I think that is a good way to conceptualize it. Saw your recent team-up/crossover with Sasha, and enjoyed it.
@@ABCMO-bl5pi yeah we feel the same way and spoke about it. Makes it easy to differentiate the two when talking about it with other people. If somebody says they’re having a problem with post processing, I know they’re talking about the final steps versus processing, which is more of a fundamental issue. I don’t know if it’s official vernacular yet lol but we’re trying to make it happen 😂
I've been a very accomplished user of photoshop yet never ever used colourlookup but will now add it to my workflow, awesome. Just a time saver if you want to change brush size in real time use the square brackets to change size
That’s awesome. I’m glad you were able to pick something up. I figured if advanced guys could get at least one take away it would be worth it. I don’t know why, but this one didn’t get a lot of views. I was going to do a secondary video and go over more of the shortcuts and stuff like that using the brush size one and others is very helpful, especially zooming in on the image, vs manually changing the %
Excellent video Ryan !! Hue, saturation and luminance sliders in camera raw are indeed very powerful. The only other option I sometimes use are the masking tools in camera raw which allow you to be very precise. I've never used colour look up so definitely will give that a try.....there's always something new to learn in this hobby. Anyway very informative, clear and well presented video 👍
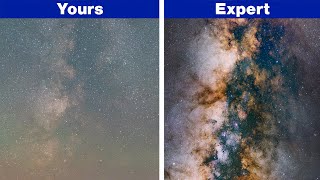
Color lookup is very powerful for getting nebula that seemed hidden to pop up especially oranges and yellows in emission nebula this wasn’t the best example for it but if there’s any signal hiding Selective Color will bring it out. Side note after making this using “white” in the drop down is a great way to fix star color for narrowband images you can easily remove Magenta and add any Blue or Yellow you want


Appreciate the content again. Great job. Also double click on a slider it will reset to default or 0
Ryan, this is great! All the features in photoshop you presented, and about which I had no clue, look extremely valuable. And I realized something by the end of the video, which is that I have felt guilty about not doing everything in PixInsight. I will now feel much more comfortable with the following workflow: (1) Stacking and gradient removal in APP > (2) Initial processing in Pixinsight (SPCC, BlurX, StarX, NoiseX, Stretching) > (3) Final processing in Photoshop along the lines presented in this video. Thank you again.
Yeah that’s very similar to what I do and many great astrophotographers use programs other than Pixinsite.
Even with some of the features having the same name like “curves” they just work better in Photoshop like how you’re able to drag the bottom or top over and just completely eliminate some of the color and certain areas
And then, of course, all of the features that simply aren’t available in Pixinsight
Processing to me is cleaning the data and removing all the issues, post processing is where we really bring out what we have refined.
I think Sasha over at View into Space makes the same distinction between processing and post processing, and I think that is a good way to conceptualize it. Saw your recent team-up/crossover with Sasha, and enjoyed it.
@@ABCMO-bl5pi yeah we feel the same way and spoke about it. Makes it easy to differentiate the two when talking about it with other people. If somebody says they’re having a problem with post processing, I know they’re talking about the final steps versus processing, which is more of a fundamental issue.
I don’t know if it’s official vernacular yet lol but we’re trying to make it happen 😂
Ryan thank you!!! This is exactly what I needed to finish my clam image. Thank you soo much for all your help.
Absolutely this one was a long time coming!
Awesome work, thanks for sharing Ryan.
Who doesn't love a bit of camera raw filter. Great video, Ryan 💯
I've been a very accomplished user of photoshop yet never ever used colourlookup but will now add it to my workflow, awesome. Just a time saver if you want to change brush size in real time use the square brackets to change size
That’s awesome. I’m glad you were able to pick something up. I figured if advanced guys could get at least one take away it would be worth it.
I don’t know why, but this one didn’t get a lot of views. I was going to do a secondary video and go over more of the shortcuts and stuff like that using the brush size one and others is very helpful, especially zooming in on the image, vs manually changing the %
Excellent video Ryan !! Hue, saturation and luminance sliders in camera raw are indeed very powerful. The only other option I sometimes use are the masking tools in camera raw which allow you to be very precise. I've never used colour look up so definitely will give that a try.....there's always something new to learn in this hobby. Anyway very informative, clear and well presented video 👍
Color lookup is very powerful for getting nebula that seemed hidden to pop up especially oranges and yellows in emission nebula this wasn’t the best example for it but if there’s any signal hiding Selective Color will bring it out.
Side note after making this using “white” in the drop down is a great way to fix star color for narrowband images you can easily remove Magenta and add any Blue or Yellow you want
Thank you.
Thank you for watching and checking out the channel hope it helps!
Loving this Ryan, can’t wait to try it with the data kindly donated by telescope live!!
Cheers
Si
Thanks for the kind words as always Simon! Let me know if you have any access using it
I must be in the 40% :) Thanks Ryan
It’s appreciated! I would lie if I said, I made it to the end of every video as well from other TH-camrs ;)
Black conceals, white reveals :) Great video! Watched it all. Thanks :)
Great video as always!
I appreciate that. Thank you very much.