Not impossible, but listening back it sounds like the right side might just be a little louder. I didn't really hear any hollow or phase artifacts, but the left side did sound a little quieter in headphones.
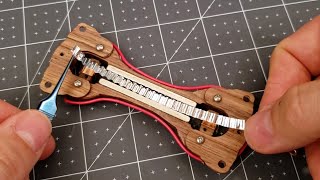
i noticed you've changed your design for your crimper. i would be interested in more info on how you built it. Did you make the rollers yourself, or source them somewhere? i would also like to know more about how exactly you feed test tones into your mics (obviously not something you did in this video), for resonance testing. Having that process explained would be informative. Finally, are you open to providing the Cricut files you used for these projects? These projects are awesome, and i appreciate you making these videos to share your processes and creativity! Thanks!
Thanks for checking out the vid! I designed the crimper around a couple of gears I got from ebay. They are technically RC car gears. The old jig was so ugly, I forced myself to design and make a new one(cricut also) for the RCA 44 video. That's the one I'm using here. The exact gear dimensions don't matter that much as long as they are aligned straight and allow a tiny gap so the foil isn't pinched or cut as it goes through. One note here, however- I've used that toothpaste tube wringer with some success, but to me the gear teeth were just too big. Also, if you hold it too tightly, you'll chop the ribbon in half! Beyond that, it was hard to set the tension with such large corrugations. That's why i just bout the gears and made my jigs. Plastic gears should be about $20US or less. The test tone process is tricky because I do it a little differently than the factories might. I use a signal gen in my DAW and hook it directly up to my heaphone outputs. My Headphone output is 30 ohm, so it's an ok match. Basically, you run a few sweeps at a low level(just enough to see it move, so you don't blow the ribbon) from about 0hz to 15K, and as you tension the ribbon, you can visually see where the ribbon cuts off the low end. On a short ribbon, cutoff might be around 50hz. On a long ribbon, you might shoot for 10hz-20hz. Alternatively, you can tap on the finished microphone and monitor/see the cutoff in real time in your DAW EQ. If it's too tight, you can loosen the ribbon, or vice versa. As far as sharing the files, I'm not quite sure what to do here. Some files, such as the 44 are very complex, and I have 100+ hours of design involved(probably more). I've considered selling the files for a small fee on ebay or etsy, however, I tend to improvise a little as I assemble, so I feel an assembly guide might be required if selling. I guess this small ribbon is easy enough that I could just give it away as is, with no tech support. Anyway, I'd be interested to hear peoples thoughts on the file sharing topic. Hope some of this helps!
@@FrankOlsonTwins great explanation! Thank you for taking the time to reply. Personally, my interest in the files would be more for easier visualization of the forces and overall shape, since i can't physically hold it in my hands and measure. i don't have a Cricut, either, although i have thought about getting one for some other projects. Some folks might be able to adapt the files for use on a 3D printer, but i don't have one of those. i have a couple CNC machines, but i would probably just cut the pieces by hand, since i have a good amount of woodworking experience (plus a lot of tools). Having the files available would tempt me to get a Cricut, but probably just to cut paper templates, since the wood i would use is thicker than veneer (luthiery cut-offs). The electronics/soldering should be a breeze for me, since i have done that professionally for decades. The real challenge for me is going to be shaping that ribbon. Your mics sound really great, and i know that comes down mostly to your ribbons and your choice of transformer. You posted elsewhere a list of various transformer brands, but can you tell me what the specs/ratio is on the ones you use? And, if there's any way you could provide an eBay link or specific search terms for those gears, that'd be incredibly helpful. If you're looking for another topic for a video, walking us through the construction of that ribbon crimper would get a certain "like" from me! Thanks again for the quick reply and for the great content! You've sparked my creativity, for sure! i have a small mic collection, and am a HUGE fan of vintage mics (especially ribbon mics), but have never really had the budget for a ribbon mic. Being a creative sort already (who enjoys woodworking, electronics, and music), this video is nothing short of pure inspiration for me.
Wow, fascinating. Man, I've probably got all the bits I'd need to make one of these, except...what's the foil you cut the ribbon from? [EDIT: okay, just found some online. looks to be around a tenth the thickness of typical kitchen foil, so possibly not something you could hack together with bits from round the home ;) ] I'm imagining one could use Lego cogs to do the corrugation, at least for a first attempt.
Sure, any gears will get you started! Also, for this mic ribbon i used Sign writer's leaf, also known as imitation silver foil(99.8% aluminum) it's very thin, about .6 micron. You can find 1.8u or 2.5u thicknesses online, which is great for most ribbons, but this short one does petty well with the thin stuff. But try whatever you can find!
Thanks! I've been using a Cricut cutter, but if they start enforcing a subscription fee for usage I'll start using something else. The wood is single ply walnut veneer, I've used lots of different one veneers though. They're the cutoff samples from Amazon- usually a pretty good deal and high quality but you get a lot of different woods, some not very useful ones. The foil is sign writers leaf, aka imitation silver foil. It's about .6 micron thick, but if you weight the sheets you can find the thickest ones of the bunch which are about .8 or 1 micron thick. If the foil is too thin, it won't really make it out of the crimper. You get a feel for it after you do it a dozen times or so. Good luck!
Very nice. I just had my B+O BM5 upgraded and reribboned. Now you make we want to build one of my own. How did you come up with the plans of wood cutouts?
Start by making a long ribbon, like this diy 44: th-cam.com/video/1DsqWRe4nMc/w-d-xo.html It has a much hotter output, and a better signal-to-noise ratio.
I started researching ribbon headphones. They look interesting. I'll have to try to make a pair. I don't think they require a transformer. The microphone uses 1:28 transformer.
@@FrankOlsonTwins трансформатор нужен для согласования сопротивления. На наших форумах писали про 1:5 вроде. А ещё один почтенный господин утверждал, что такая конструкция не восприимчива к акустическому оформлению (открытые/закрытые), но амбушюры АЧХ меняют. Он собирал драйверы в корпусе защитных наушников для строителей.
Any relatively new ribbon transformer will work for this, provided the ratio is 1:28 or higher. The one I'm using is 1:35. Edcor, Lundahl, Cinemag, Sowter all make good mic transformers. I think this is a Shinhom? It's from a cascade fathead mic. Generally speaking, the better the transformer- the better the sound. The more expensive transformers usually have a nicer top end.
I'm looking to make my ribbon microphone. but I don't know which transformer to use. could you tell me which transformer you used? what is its specification?
The transformer is a b-stock one, removed from a cascade microphone. I think it's called a Shinhom. Basically, any 1:37 (a little higher or lower is fine, some are 1:28 for example) ratio step up transformer will work. Edcor, Lundahl and Cinemag all make new ones. Maybe Sowter too? If you shop online, just look up "Ribbon Microphone Transfomer" and you'll get lots of options.
I recorded a few not very scientific frequency sweeps(no anechoic chamber here!) but at 6 inches from the source its pretty flat from 50hz to 18K aside from a 3 db boost around 100hz-200hz and a 2-3 db drop above 12khz. At 3 inches, the proximity effect increases with about a 4-5 db boost below 200hz.
I've made these with and without metal chassis. If you get the "Shield/humbucker" wired correctly, hum and buzz is not an issue- with or without a metal chassis. If you get the shield wrong, or a bad solder joint- it won't matter what the chassis is made of, you'll get hum buzz and lots of weird noise.
At 3:53 in the video you can see the humbucking wire loop I'm describing. It surrounds the magnets and kills hum and buzz. If you omit it, you'll definitely know- You'll get directional noise where ever you point it. To clarify, I'm not suggesting some sort of metal enclosure is not ideal. I'm just trying to show people what's possible. The final design of this mic has a brass enclosure and mesh windscreen. I do think the requirement of a metal chassis for the ribbon motor is a bit overstated, however. The strength of the magnets gives a solid output without the added "flux path" offered by a ferrous frame. However, anyone with the time/patience/budget/skillset for metal work should certainly try their hand at a metal chassis. Also, I prefer to use transformers with a MuMetal canister to eliminate hum or buzz entering through the transformer, which is quite helpful. Good luck!
@@FrankOlsonTwins Great info about the humbucking wire loop! I am designing my own DIY ribbon and plan on 3d printing the motor housing and mic body as that's one of my top choices for DIY construction. It's great to hear the metal body isn't necessary, I was worried that the plastic body would result in too much noise. Now I know to design some wire channels right into the motor body and hopefully that will be enough. If not, I've thought about using conductive paint on the mic body and grounding that to the xlr plug. Not sure how effective that would be though.
You'll want a shorter ribbon(2" or less), less than a quarter inch wide. You can tune it so that the resonant frequency is up around 40 or 50. That way, you won't get too much proximity effect(bass) in the mic at close range. I just posted a video showing an RCA 77 clone that I built, which is a classic for horns and woodwinds. Very thin ribbon, needs a fair amount of gain, but it's not an issue above conversational levels.
@@FrankOlsonTwins I guess I could build that, but i was looking for a challenge, not some easy beginner stuff, probably build a stereo pair just cause it looks so easy.🤔
😅 Lol, I kind of want to make a second one, but who knows if I have time to build another one! Actually, I would shoot for something with magnets around 1.5" long and space them about .24" apart. That will give you plenty of output signal. That's in the same league of Royers and Cascades. It doesn't *really* matter what the motor shape is. Just give it something for the magnets to hold onto without breaking. If you can make it out of steel, it will have a slightly higher output, but whatever. If it works for what you need, then use it! Obviously, a labyrinth isn't needed if you don't mind figure-of-8 polar pattern. 99% of ribbon mics are figure of 8!
@@FrankOlsonTwins Thank you Frank, you are an absolute wonder! FWIW i really heart emoji the wood aesthetic and have a silhouette cameo, so your design is actually pretty viable, but maybe easier to 3d print it, even with my terrible design skills, cuz it can be done with booleans.
Approximately 1:35. There are many suitable ribbon mic transformers available, but if you're making a ribbon mic, I'd say go for a longer ribbon. These short ribbons are only really suitable for loud sources like drums or electric guitar.
from the video is not clear the electrical part. the red wire sorrounding the whole body deceipted me into thinking you are shorting the 2 sides of the band.
The wire loop connects from one side of the ribbon to one wire of the transformer. The other end of the ribbon goes to the other wire of the transformer. I have several other videos describing the humbucking wire loop as well.


![จบจนได้ ! | Black Myth: Wukong #007 [ตอนจบ?]](http://i.ytimg.com/vi/DSqvWndF0sw/mqdefault.jpg)


It sounds way better than many mics I've worked with
Thanks! I've made many ribbon mics at this point, some better than others. This is one of my faves: th-cam.com/video/1DsqWRe4nMc/w-d-xo.html
What an interesting project! Out of curiosity have you ever explored adding some sort of adjustable tensioning method to allow for fine tuning?
I've considered putting tensioning screws on one end, but it's a complicated endeavor...
Sounds amazing! I'm listening on studio monitors by the way. You haven't happened to record a frequency response analysis of this mic have you?
You know I have always wanted to know how to make a ribbon mic. Thanks for this video. Subbed
Awesome, thanks!
Left and right sounded out of phase on the drum demo?
Not impossible, but listening back it sounds like the right side might just be a little louder. I didn't really hear any hollow or phase artifacts, but the left side did sound a little quieter in headphones.
Perfect
This is amazing.
Thanks!!
Nice! Is it possible to order one or a matched pair of the ribbon "motor" from you!?
Sure, I have a couple available. Do you have a preferred email or contact? (I'll delete your comment once posted)
i noticed you've changed your design for your crimper. i would be interested in more info on how you built it. Did you make the rollers yourself, or source them somewhere?
i would also like to know more about how exactly you feed test tones into your mics (obviously not something you did in this video), for resonance testing. Having that process explained would be informative.
Finally, are you open to providing the Cricut files you used for these projects?
These projects are awesome, and i appreciate you making these videos to share your processes and creativity! Thanks!
Thanks for checking out the vid!
I designed the crimper around a couple of gears I got from ebay. They are technically RC car gears. The old jig was so ugly, I forced myself to design and make a new one(cricut also) for the RCA 44 video. That's the one I'm using here. The exact gear dimensions don't matter that much as long as they are aligned straight and allow a tiny gap so the foil isn't pinched or cut as it goes through. One note here, however- I've used that toothpaste tube wringer with some success, but to me the gear teeth were just too big. Also, if you hold it too tightly, you'll chop the ribbon in half! Beyond that, it was hard to set the tension with such large corrugations. That's why i just bout the gears and made my jigs. Plastic gears should be about $20US or less.
The test tone process is tricky because I do it a little differently than the factories might. I use a signal gen in my DAW and hook it directly up to my heaphone outputs. My Headphone output is 30 ohm, so it's an ok match. Basically, you run a few sweeps at a low level(just enough to see it move, so you don't blow the ribbon) from about 0hz to 15K, and as you tension the ribbon, you can visually see where the ribbon cuts off the low end. On a short ribbon, cutoff might be around 50hz. On a long ribbon, you might shoot for 10hz-20hz.
Alternatively, you can tap on the finished microphone and monitor/see the cutoff in real time in your DAW EQ. If it's too tight, you can loosen the ribbon, or vice versa.
As far as sharing the files, I'm not quite sure what to do here. Some files, such as the 44 are very complex, and I have 100+ hours of design involved(probably more). I've considered selling the files for a small fee on ebay or etsy, however, I tend to improvise a little as I assemble, so I feel an assembly guide might be required if selling. I guess this small ribbon is easy enough that I could just give it away as is, with no tech support.
Anyway, I'd be interested to hear peoples thoughts on the file sharing topic.
Hope some of this helps!
@@FrankOlsonTwins great explanation! Thank you for taking the time to reply. Personally, my interest in the files would be more for easier visualization of the forces and overall shape, since i can't physically hold it in my hands and measure. i don't have a Cricut, either, although i have thought about getting one for some other projects. Some folks might be able to adapt the files for use on a 3D printer, but i don't have one of those. i have a couple CNC machines, but i would probably just cut the pieces by hand, since i have a good amount of woodworking experience (plus a lot of tools). Having the files available would tempt me to get a Cricut, but probably just to cut paper templates, since the wood i would use is thicker than veneer (luthiery cut-offs). The electronics/soldering should be a breeze for me, since i have done that professionally for decades. The real challenge for me is going to be shaping that ribbon. Your mics sound really great, and i know that comes down mostly to your ribbons and your choice of transformer. You posted elsewhere a list of various transformer brands, but can you tell me what the specs/ratio is on the ones you use? And, if there's any way you could provide an eBay link or specific search terms for those gears, that'd be incredibly helpful. If you're looking for another topic for a video, walking us through the construction of that ribbon crimper would get a certain "like" from me!
Thanks again for the quick reply and for the great content! You've sparked my creativity, for sure! i have a small mic collection, and am a HUGE fan of vintage mics (especially ribbon mics), but have never really had the budget for a ribbon mic. Being a creative sort already (who enjoys woodworking, electronics, and music), this video is nothing short of pure inspiration for me.
Wow, fascinating. Man, I've probably got all the bits I'd need to make one of these, except...what's the foil you cut the ribbon from? [EDIT: okay, just found some online. looks to be around a tenth the thickness of typical kitchen foil, so possibly not something you could hack together with bits from round the home ;) ] I'm imagining one could use Lego cogs to do the corrugation, at least for a first attempt.
Sure, any gears will get you started! Also, for this mic ribbon i used Sign writer's leaf, also known as imitation silver foil(99.8% aluminum) it's very thin, about .6 micron.
You can find 1.8u or 2.5u thicknesses online, which is great for most ribbons, but this short one does petty well with the thin stuff. But try whatever you can find!
Very cool. I would love to try to make one also. What kind of plotter, wood and aluminum foil do you use?
Thanks! I've been using a Cricut cutter, but if they start enforcing a subscription fee for usage I'll start using something else. The wood is single ply walnut veneer, I've used lots of different one veneers though. They're the cutoff samples from Amazon- usually a pretty good deal and high quality but you get a lot of different woods, some not very useful ones.
The foil is sign writers leaf, aka imitation silver foil. It's about .6 micron thick, but if you weight the sheets you can find the thickest ones of the bunch which are about .8 or 1 micron thick. If the foil is too thin, it won't really make it out of the crimper. You get a feel for it after you do it a dozen times or so.
Good luck!
I have a Silhouette Cameo 4. The bonus is you don’t need a subscription. Excellent work on the matched pair they sound great.
Very nice. I just had my B+O BM5 upgraded and reribboned. Now you make we want to build one of my own. How did you come up with the plans of wood cutouts?
I designed the cutouts in photoshop. They are sort of a refinement of another version I've made of metal.
It sounds great… except for a noticeable background noise. Is that something I should expect if I make my own? Are there any easy fixes for it?
Start by making a long ribbon, like this diy 44: th-cam.com/video/1DsqWRe4nMc/w-d-xo.html
It has a much hotter output, and a better signal-to-noise ratio.
Был бы ты столь любезен сделать так же и наушники / гарнитуру? Там другие соотношения обмоток на трансформаторах.
I started researching ribbon headphones. They look interesting. I'll have to try to make a pair. I don't think they require a transformer.
The microphone uses 1:28 transformer.
@@FrankOlsonTwins трансформатор нужен для согласования сопротивления. На наших форумах писали про 1:5 вроде.
А ещё один почтенный господин утверждал, что такая конструкция не восприимчива к акустическому оформлению (открытые/закрытые), но амбушюры АЧХ меняют. Он собирал драйверы в корпусе защитных наушников для строителей.
Any recommendations for the transformer?
Any relatively new ribbon transformer will work for this, provided the ratio is 1:28 or higher. The one I'm using is 1:35. Edcor, Lundahl, Cinemag, Sowter all make good mic transformers. I think this is a Shinhom? It's from a cascade fathead mic. Generally speaking, the better the transformer- the better the sound. The more expensive transformers usually have a nicer top end.
I'm looking to make my ribbon microphone. but I don't know which transformer to use. could you tell me which transformer you used? what is its specification?
The transformer is a b-stock one, removed from a cascade microphone. I think it's called a Shinhom. Basically, any 1:37 (a little higher or lower is fine, some are 1:28 for example) ratio step up transformer will work. Edcor, Lundahl and Cinemag all make new ones. Maybe Sowter too? If you shop online, just look up "Ribbon Microphone Transfomer" and you'll get lots of options.
@@FrankOlsonTwins thanks a lot for your attention man!
What is the frequency range?
I recorded a few not very scientific frequency sweeps(no anechoic chamber here!) but at 6 inches from the source its pretty flat from 50hz to 18K aside from a 3 db boost around 100hz-200hz and a 2-3 db drop above 12khz.
At 3 inches, the proximity effect increases with about a 4-5 db boost below 200hz.
how do you deal with hum and noise if you don,t have a metal chassis?
I've made these with and without metal chassis. If you get the "Shield/humbucker" wired correctly, hum and buzz is not an issue- with or without a metal chassis. If you get the shield wrong, or a bad solder joint- it won't matter what the chassis is made of, you'll get hum buzz and lots of weird noise.
@@FrankOlsonTwins thanks, wen you say shielding/humbucker, do you refer to Transformer humbucking wiring bobins or what?
At 3:53 in the video you can see the humbucking wire loop I'm describing. It surrounds the magnets and kills hum and buzz. If you omit it, you'll definitely know- You'll get directional noise where ever you point it.
To clarify, I'm not suggesting some sort of metal enclosure is not ideal. I'm just trying to show people what's possible. The final design of this mic has a brass enclosure and mesh windscreen.
I do think the requirement of a metal chassis for the ribbon motor is a bit overstated, however. The strength of the magnets gives a solid output without the added "flux path" offered by a ferrous frame. However, anyone with the time/patience/budget/skillset for metal work should certainly try their hand at a metal chassis.
Also, I prefer to use transformers with a MuMetal canister to eliminate hum or buzz entering through the transformer, which is quite helpful.
Good luck!
@@FrankOlsonTwins Great info about the humbucking wire loop! I am designing my own DIY ribbon and plan on 3d printing the motor housing and mic body as that's one of my top choices for DIY construction. It's great to hear the metal body isn't necessary, I was worried that the plastic body would result in too much noise. Now I know to design some wire channels right into the motor body and hopefully that will be enough. If not, I've thought about using conductive paint on the mic body and grounding that to the xlr plug. Not sure how effective that would be though.
I wanna make a mic for tenor and alto sax, what size ribbon element would be best ?
You'll want a shorter ribbon(2" or less), less than a quarter inch wide. You can tune it so that the resonant frequency is up around 40 or 50. That way, you won't get too much proximity effect(bass) in the mic at close range. I just posted a video showing an RCA 77 clone that I built, which is a classic for horns and woodwinds. Very thin ribbon, needs a fair amount of gain, but it's not an issue above conversational levels.
@@FrankOlsonTwins I guess I could build that, but i was looking for a challenge, not some easy beginner stuff, probably build a stereo pair just cause it looks so easy.🤔
😅 Lol, I kind of want to make a second one, but who knows if I have time to build another one! Actually, I would shoot for something with magnets around 1.5" long and space them about .24" apart. That will give you plenty of output signal. That's in the same league of Royers and Cascades. It doesn't *really* matter what the motor shape is. Just give it something for the magnets to hold onto without breaking. If you can make it out of steel, it will have a slightly higher output, but whatever. If it works for what you need, then use it! Obviously, a labyrinth isn't needed if you don't mind figure-of-8 polar pattern. 99% of ribbon mics are figure of 8!
@@FrankOlsonTwins Thank you Frank, you are an absolute wonder! FWIW i really heart emoji the wood aesthetic and have a silhouette cameo, so your design is actually pretty viable, but maybe easier to 3d print it, even with my terrible design skills, cuz it can be done with booleans.
then I just want to rip apart my broken Ampex MM-1200 and make a mic preamp😅oh well 1 impossible task at a time👍
I forgot to ask what the turns ration on the transformer?
Approximately 1:35. There are many suitable ribbon mic transformers available, but if you're making a ribbon mic, I'd say go for a longer ribbon. These short ribbons are only really suitable for loud sources like drums or electric guitar.
from the video is not clear the electrical part. the red wire sorrounding the whole body deceipted me into thinking you are shorting the 2 sides of the band.
The wire loop connects from one side of the ribbon to one wire of the transformer. The other end of the ribbon goes to the other wire of the transformer. I have several other videos describing the humbucking wire loop as well.
qual a especificação do transformador?
1:35 step up transformador