How To Make a DIY Ribbon Mic!

ฝัง
- เผยแพร่เมื่อ 13 ก.ย. 2024
- I found this mic in a junk bin at my favorite music store (www.ostaneksmus.... When I asked about it they said it was shot so I took it home and decided to use the housing to make a ribbon mic. This video is a documentary/tutorial on how I did it. Enjoy!
www.freddysfret...


![[[OFFICIAL MV]] เอิ้นขวัญให้อ้าย- อ๊ะอาย สกุณาพร | ค่ายเพลงเป็นหนึ่ง](http://i.ytimg.com/vi/83x6L3X3qh0/mqdefault.jpg)


OK, I can't believe I am the only person in the world who appreciates this video! I saw it 5 years ago, 3 years ago and then reviewed all ribbon mic videos on youtube during this year's vacation. I still think this video demonstrates the greatest attention to detail on construction. Well done! I hope to post one with ribbon tuning and resonant frequency. I will reference this excellent video as prior art!
Nice reveal at the end ;-). Great video.
Instablaster
omg what a twist at the end haha ! love the vid
Yeah, it is crazy how good it sounds!
I think you did an outstanding job demonstrating that ribbon mics are simple and components are relatively cheap, yet the sound is all about skill of the builder with attention to detail. Well done! Thanks you for doing this!
That is a nice sounding mic
+Declan Duff Thanks for the comment!
sell me one for really cheap please
+Declan Duff haha....make it yourself....I know of a youtube video that shows you how!
+FreddysFrets touchè im not so good at crafting stuff though, unless it involves a guitar
Your a genius with your mind and hands ... and a giant with your generosity in sharing your talents
you are a true artist; an art is a science with more than seven variables!!!!absolutely perfect!!!
Making stuff is always cool.... and satisfying.
didnt expect it to sound that good!
I tuned the ribbon tension using a frequency generator. Resonance target = 30hz.
Oh dude, you gotta make a vid showing us how you did that! Puh puh pleeeeeease? lol
I know this was 4 years ago, and I'll scan your vids for something like that if you've already made one, but if not, I think a lot of folks would get a kick out of learning from it! I love this stuff!
Thank you Freddy for this detailed manufacturing explanation! I noticed an important part was not referred to - the glass of Labatts Blue. I dig your ingenious 'crinkler' for the ribbon - great! You touched on and fully explained all aspects of the project - but was surprised you didn't use an f.e.t. amp. Presumably with a 1:37 step-up Xfmr this isn't necessary - and neither is phantom power! I admire your craftmanship and your voice-over explanation. To mis-quote Oscar Wilde: "To make one ribbon mic is splendid - to make two looks like sheer Stereo" Many thanks for this video!!
Wow...I love the "O'Henry" ending. So cool. An amazing video by an obvious inventor of skill and promise.
Your planning and design are wonderfully impressive, as well as the video itself. I'm partway through building a similar mic and am so glad I ran into your video. I happened to do several bits the same, right down to the notches in the plexiglass but you've taken some of the scare out of laying in the ribbon. Now I'm ready to proceed. Many thanks.
It's a ribbon mic. They require no power. But you do need a mic preamp with lots of clean gain because ribbons typically have a very low output.
22 dB Clean
And that's why transformers are so important ❤️
Yes! Me too...about a minute before, I thought "wouldn't it be cool if..." and then, knowing Freddy, figured that he'd do it that way.
Awesome vid and great sound from the mic. Freddy, you keep telling people that you're no genius, but then prove yourself a liar by doing such amazing work all the time!
Thanks. The mic pre was the only other thing in the chain before it hit the A/D conversion.
And that was a tube mic pre that I built, I have a video of it here on my channel...the "VP8"
That was probably the best thing iv'e seen all week.
Awesome! This video had a better twist than MIB3.
What a great sounding mic, and absolutely beautiful craftsmanship.
Although this isn't really DIY - with the tools and skill you have, you might as well be a manufacturer lol.
so cool... I'm guessing the quality of the materials and precise construction,
reflects the quality of the sound...
sounds Great...
Nice instructional video. Concise and well done. Microphone
sounds great.
This is really brilliant! Well done! And the video itself was perfect!
+Curt Vincent Thanks for the comment!
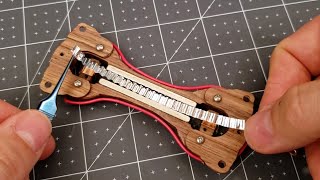
At the 5:37 mark the ribbon is clamped in. It's done with a small strips of fibreglass PC board material and two bolts on each end.
You are beyond clever! The design, skill in making and the quality of the explanation. AND you play guitar.
I just knew when video was coming to an end that freddy recorded all the audio with it. man your designs are so smooth and clean. just love it! this video deserves a double like
Excellent presentation, fun to watch !
I made a ribbon mic. like this back in the early 1970s I used transistor radio output transformer, 3.2 ohms into 500 ohms, it worked great !
Bill P.
That was absolutely amazing. I imagine that the mic tensioning bit requires some trial and error for those not experienced making these. I doubt I could make one as good as yours, but I know I have some old broken mics that I may attempt experimenting with as this definitely looks like a very fun and doable project even for a beginner.
Fascinating build and a beautifully well-crafted mic. Nicely done. Excellent fit and finish and good warm tone. Didn't see a lot of electrical measurement, but I'd find it hard to believe this your first ribbon mic build and that you eyeballed it.
I was listening to this on my DIY Ribbon tweeter
Thanks to everyone for the positive comments! I had a lot of fun with this project.
Great DIY work! Nice job!
I got the same build plans called AUSTIN Ribbon Microphone from rick wilkinson (rickshawrecords at yahoo) years ago. It's a fun build with some challenges. Namely, your own breath when working with the aluminum leaf. I had to pull my shirt up over my nose for that step until I had the motor safely installed in the housing. Pop filters ar critical to keep from blowing out the ribbon. Back then, donor bodies were harder to come by, so the plans described the entire build including the body made from brass pipe, cap and brass mesh. Fastening the motor needed brass screws to stop the risk of having the screw pulled into the motor during assembly by those strong magnets. Also other ferrus metals in the body may affect the magnetic field and possibly color the sound. Nice build.
Good point about the brass screws!!
Woa, the twist at the end was great haha
and I'm loving the Rush Sector box set in the background ;)
Had a feeling that the end would be as I suspected. Good work!
It's a downright beautiful and caring build! And your Twist At the end Makes the Video all the more worthwhile
What a twist!
Thanks! You could try reranch spray cans. I use them sometimes and you can get totally pro results with them.
Keep em coming Freddy, especially the handcraft ones, and I'll keep watching em and thumbing them up! :-)
sounds very good! I wonder how would it sound with different spacing and/or materials.
Thanks for the video.
Oh man, that´s very, very good indeed. I only recently bought a pair of ribbon mics for my studio ( sE X1R) and got the best sound ever on my guitar amps (Fender HotRod Deluxe and Vox AC30) If I´d known you were making them I would have ordered them from you, hahaha! God Bless
Dude! You’re the plot-twist king! Great video man!
Graham, you are very kind with your comment. Thank you!
That's one serious DIY. Looks like you have accumulated a lot of helpful tools along your journey.
Although I'm not listening with a pro set of speakers; that sounded great to me; perhaps a bit light on the highs, but hard to tell with just spoken words. I would have enjoyed listen to is compared to other mics. I've been experimenting with the 25 cent Electret Microphones, they are so sensitive it's scary! They pick up my voice across the room whispering.
THE BEST GUITAR/AUDIO/MUSIC VIDEOS!!! thx fred
I have heard that metal film from capacitors will work but I guess it depends on how thick it is.
One of the best tutes i've seen, for a sophisticated device. Well done!
Great video. The sound quality is actually very, very nice. Nice rounded tone that's not too bass mid or high heavy. Do you recommend any particular videos that show how to make this in a little more detail? thanks.
"I tuned the ribbon tension using a frequency generator. Resonance target = 30hz."
Could you please explain that a bit more?
obvs the answer is "no".
Set a tone generator, tighten the foil to raise, or loosen it up to lower tone. Try and match the tone generator. Be careful to not touch the foil to the magnets while plugged in. Seems like a process. Plug in, check, unplug, tighten, plug in test etc.
The human ear can only detect from 20hz to 20,000hz sounds. By tuning it to this frequency, i think... I THINK... it leaves some "breathing room" for the mic to give reasonable voltage output at low frequency, which is of course 20hz.
Man.! This is awesome.! The mic sounds very nice, with presence and bright, nice middles and very clear voice and not humming
This is so cool! I love ribbon mics and yours sounds amazing. And this is just fun to watch!
Great mic. And a surprise at the end too.
wow its bloomin' amazing sounding i'm very surprised at the outcome, well done brother!
What an incredible build and the plot twist at the end was amazing. Keep it up!
Thank you for sharing this! Very explicit tutorial. I may try now after seeing the video. I was thinking about doing it a long time ago but I thought that it's going to be very hard. Now you made a BIG light in my hed :D.
Wow ! I'm amazed and impressed ! How about a smaller stereo ribbon mic for D5100.... mmmm wonder would that work ?
What else is in your signal chain, sir? This is an impressive build, and the sound of the mic is wonderfully clean. Usually when I think "ribbon", I think "dark"; that doesn't seem the case with your mic at all. Well done.
Sweet job. I've modded cheap Nady RSM-1 and RSM-4 ribbon mics in a similar way and am very happy with the results.
Outstanding!
really dope build! Where did you purchase the mic transformer from and is their a schematic for wiring everything up? what was the thickness of the plexiglass?
nice video, well done. I learned a lot about ribbon mics! Keep up the great work!
Fantastic mate ! I am going to try and build one.The reason is I had a really old RCA mic , the ribbon looked like silk ? I really want that tone again.The old rca got sold and then given to a pop star.
Ha! I liked the little surprise at the end! I didn't expect the quality to be that good! Well made :)
I am impressed with the sound quality of this mic! Good work!
i used to thrilled when you said how it sound then you told me that the rest video use this as voice-over. Amazing!!!!
Freddy, you never fail to impress me with your videos. I truly enjoyed this one. You should be hired to build gadgets for the next 007 movie....
Great video! What kind of wire / gauge do you use to wire the transformer? Thanks!
Excellent editing and presentation. No dead time.
Man, you kinda blew my mind. I was thinking the whole time during this video, "what will it sound like? What would it sound like on an acoustic guitar? nice job.
i got pretty excited when i saw this DIY project,then i saw the price tag for the parts and i almost had a heart attack,dude that is whicked!!!
parts ? it only has that transformer you have to buy , everything else you can make(except the donor mic body) Shoot go to the dollar store that cheap aluminum foil is soo freaking thin , I bet its close to the thickness he used here
Dude that was awesome. I would have never guessed
The home made cogs to crinkle the ribbon is mindblowing. How do you judge the tension? Thanks for such an inspiring video.
a good transformer like the Lundahl you used is realy the key of good sound, it's suppres all the noise, Cinemag also do good transformer for that kind, we can also found good 3D print stuff for making the magnet support, im thinking about doing myself that kind of mic.
Wow! The video recordings from the actual mic? It's great quality! I thought it was a condenser mic or something!
So beautiful! I love the sound! Amazing!
hahah i knew that the mic was used before you said it. great project, great results!
High frequency response is really superb!
Thanks! It is directly related to the thickness of the foil. The thinner it is, the faster transients, more output and more high end.
@@FreddysFrets That's apparently not the whole story. The reason why your high frequency response is so good is that you have holes next to your magnets in the frame which allows a front to back wave to take the shortcut. www.diyaudiocomponents.com/diy-ribbon-mic-frequency-response explains. As a result you have hit on a top rate design.
@@unequally-tempered yes that too. And I was able to see that effect change when I made another mic, but this time with 1/4" thick magnets instead of the 1/8" thick ones in this video. Because the high freqs had a little more travel time to get around those magnets the high end was different.
Great ability you have there and a very natural sounding mic at the end of it. Sounds as nice as my se1's, well played sir! Subscribed.
Sounds very good too.
Where did you get this foil?
Great job man, and great tutorial. Amazing what you did with this home project.
Very cool ! All yours vids are a pleasure to watch. Greetings from France !
Super job, man! I had a feeling you were going to say it was the mic you were using. Ha! Niiiice! Sounds very good. I should add that you voice over chops are really good as well.
You are the coolest dude on the YT!
This was really awesome. :) Thanks for showing this. Dunno if I could make one (since I lack a lot of the tools that you used), but the first chance I get: I'm going to try. Cool video, cool outcome, just--cool!
You are amazing and smart person with excellent engineer thinking, thanks! :)
Excellent video - you've assumed your viewers have intelligence and pitched the level accordingly. This is better than today's science TV. Thank you!
Awesome work! Sounds great too, thanks for sharing!
Oh microphonesmith!
You are my new hero.
Excellent video
Great vid! It sounds like the mic has a very natural and flat frequency response.
Excellent, you are a very talented......everything! Cheers from Mexico.
Hey, I assume the magnets are there to generate a magnetic field, instead of hoping on luck that the ribbon doesn't touch the magnets, (which since it's coregated, if it sags over time I'd imagine it has a good chance of touching) could you use a thin piece of paper to insulate the magnets? What would it sound like?
Woooow, that's really amazing! Also it sounds really nice! Wonderful work!
very good video....well made....great sound on the mic
Of course this is true. I never build these things to save money. I do it for the sake of doing it and learning. Perhaps even to build something better than what is commercially available (which I have done many times BTW)
Nice job... I like the plot twist at the end...
Neodymium magnets are always fun, I have a couple 1x1x1 cubes that I can barely separate. How does the strength of the magnets affect the sound of a mic like this?
Nice Fred!
How did you put the tension on the ribbon?
Great info and video., well done. Awesome job with the mic, sounds GREAT!
Hey Freddy, thank you very much on this fantastic instructional video!
Very thorough.
Happy new year to you Sir!
Mark G
This is sweet, where did you get the magnets?