2 Great Planer Upgrades & 1 Bad One!

ฝัง
- เผยแพร่เมื่อ 11 ก.ย. 2024
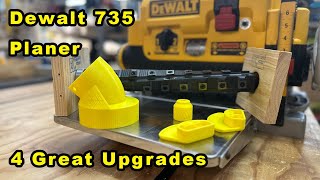
- For my Dewalt 735 Thickness Planer I wanted to add precision measuring with the Wixy Digital Planer Readout, eliminate snipe by adding a passthrough bed supported by torsion boxes and then modularity by mounting it all to a hydraulic motorcycle jack. Unfortunately one of these upgrades was a fail…
Sponsored By Sunday - @getsunday #Sundaypartner
www.getsunday.com/BITNER
Use Code BITNER30 For 30% off custom lawn plans!
We are a new channel and would eternally appreciate if you like our content to like and subscribe so we can continue to make great content for you! You can subscribe at / bitnerbuiltwoodworking
Items From This Video
Wixey Digital Planer Readout - amzn.to/3xV7XAb
Motorcycle Jack - amzn.to/4b8fjzf
FIND ALL MY TOOLS HERE! My amazon Influencer store! #Commissions Earned
www.amazon.com...
As an Amazon Influencer, I earn from qualifying purchases
Contact us for business inquiries at: Justin@bitnerbuilt.com
Like us on Facebook at / bitnerbuilt
Now On Threads @Bitnerbuilt


1. If the floor has a slope, level the workbench.
2. to avoid wiggling, make a mechanism to temporarily buckle the cart to the workbench
👍
For the slope issue, there are adjustable casters that you could put on the bottom of the assembly table legs, then adjust the far end up, keeping the planer end down low.
Good idea! I actually just use those in my very last build. Another person also suggested that I just throw some shims under the torsion box which would also fix the slope.
@@BitnerBuilt Tables should always be leveled. Co-planer sounds good, but if there is more than one surface to deal with, level takes a bunch of variables out of the equations. Though it sounds like it's more work, leveling everything makes things so much simpler down the road.
@@kwilliams2239 you’re absolutely not wrong at all, and all of my wall-mounted work surfaces are leveled, the issue comes to play that all of my middle of the room surfaces are on casters. They do not stay in the same location and the floor is uneven so outside of marking an exact spot that they need to place something inthere’s no way for me to consistently always have 100% level all the time to warn it into this particular build
I did something similar a few years ago for the same planer. Your torsion boxes are under the planer, at the infeed and the outfeed. I have one removable torsion box that slides into and sits on the bed of the planer. The dimensions are 48” x 13” x 3”. I never use the full height of the planer so I don’t mind losing that functionality. My torsion box is 3/4” ply with a 3/4” MDF top. I added a 1/4” HDPE surface to the MDF and recessed the screws. I can slide the single surface infeed/outfeed torsion box in an out as needed for storage and mobility.
Oh very cool!
1. the lift is not structured for side force.2. Presto has a light weight lift that would do 1000 lbs. 3. hydraulics will drift. 4. there is a kid out there that made his own version of a scissor lift out of wood which would be really easy to do with a CNC. Love the work, you getting there.
Hmm that wooden lift I will have to take a look at!
I believe the wooden lift was from Marius Hornberger.
Most motorcycle Jack's have a lockout that will not allow losing height. Even most of the cheap ones, although they aren't capable of minute adjustments. Because they are cheap, it is an absolute given that relying solely on the hydraulics to hold it in place is a recipe for self removal.
@rogerwhoareyou yes, that is Marius, and he is an engineer now I believe. I watched him take a running jump to sit on the lift in the max up position and it didn't budge. If you want something SOLID, you can't get better than him. Check out his other builds as well, they are outstanding
I thought I was alone to store and raise my planer on this exact type of lift! I want to testify: 1- the lift is plenty strong, and if you align the infeed and outlet with the lift, there is no lateral movement at all; 2- the lift is provided with a lock bar that will maintain the desired hight; 3- it couldn’t be simpler to use any surface to expand the outlet. Overall, one of my favorite update trickery.
I used the HAUL-MASTER 1000 lb. Capacity Hydraulic Table Cart from Harbor Freight with the same planer and didn't experience excessive movement. I've since upgraded my planer, but I still find lots of uses for the cart.
Very cool! I actually went to Harbor freight yesterday and they only have the smaller one on display. I’m guessing the 500 pound and it does have wobble when you extend it up, I’ll have to take a look at the thousand pound one!
For the outfeed support I'd suggest adding some kind of keying system that mates to a feature on your assembly table. That will enable you to easily align it to be coplanar every time you bring the planer out. This will both help with the non-level floor and make it easier to get to the exact right height every time.
Then something like the swing-down legs you proposed with quick-adjust leveling feet so it's supported nice and snug, but the key means less checking back against a straight edge and lets you put a little tension in the supports without being pushed out of flat.
Excellent idea, I thought about adding a piece that peruses under and then clamping but I like the key idea better
Suggest level you our large work table. Should be level no matter how unlevel your floor. :)
👍
Great video and I really like the table! Here are a couple of suggestions to improve stability and alignment:
1. To prevent the cart from wobbling, perhaps you could build a connector that stabilizes it with your outfeed table?
2. For the slope issue, consider adding a heavy-duty shim or washers between the planer and the top of the torsion box to align with the slope of your table.
All great ideas thank you!
I haven't read all of the replies so this may have been suggested. Forget the workbench. Make a new, longer torsion box as an extension that can easily be fixed to the end of the existing torsion box. Add a couple of folding, extendable legs to the end of the new torsion box for extra support. You may find it better to put two more at the front end of the new torsion box as well. It should easily be removed, collapsed, and stored.
For stability, you may try a similar idea, adding side wings that are removable with extendable legs but adding cross supports to reduce lateral movement. Again, design to easily remove, collapse, and store.
Mine doesn't collapse like yours with the scissors lift. I've built a tray with wheels that I've put the planer and stand on (it was easier than just adding wheels to the stand). I move it out of the garage onto the driveway to use. I do have some snipe but it's not as much a problem for the kind of work that I do. Saying that, I might look into something to reduce the snipe (just in case I need to at some point). Thanks for your ideas.
👍
With that table, it has holes in the base where the scissor lift slides. There is supposed to be a bar that goes across the frame to secure the lift from coming down under accidental release conditions which is held by a hairpin. If you lower the lift back down to that point, it becomes more stable; I have the orange vevor(I think) version and it works great. As an idea to keep it flush with a table, you could actually make an assembly out of that heavy square unistrut that would hold the planer square to the table when it is lowered down onto it. Make a pair of receiver hitches basically that accept tubes from the planer side; when you drive the planer up and take the pressure off from the stand, it should ride with the torsion box and float together (if that makes sense. I am thinking like a forklift holds a load basically, but your outfeed table is the forklift
oh very cool idea! yea with the bar when it rested it was too low (but I could increase the platform height to compensate. I like the forklift idea and of course that would be in line with the tilt of the assembly table!
@@BitnerBuilt you can also put a different set of holes in the base or make another stop of some sort. The forklift reference was to get your creative juices flowing; it isn’t an exact match but it’s definitely an idea worth pursuing
2:48 That planer has a built in feature that measures how much you are taking off with the current pass. It's the red indicator on metal panel on the front of the machine
Yes it does however it is not super precise like you would find on a digital gauge
If it were me, I would level out the workbench. You can get machine levelers for a reasonable price that would allow you to plane it out easily and still have a rock solid bench. This also gives you a LEVEL surface as well as it being a FLAT surface. While not totally necessary for a lot of woodworking projects, if you plan on doing any epoxy pours, or any projects including liquids, concrete, etc. a level surface becomes extremely important. It also gives you a nice reference surface to build other projects on, or to. Anything else you plan for in the shop, if built to a level reference, should plane out to the bench.
Why try to cure the symptom when you can fix the actual cause?
As for the lift being wobbly, I see 2 options:
1. Add some fold out adjustable wings at the base to stabilize the base, or remake the base wider to gain stability
2. Eliminate that mini lift, and go buy a lift CART that performs the same function but has better stability.
Thanks for all the tips! I do have a leveled flat resin workbench on the other side of the shop. 👍The big bench is on castors and needs to be moved frequently for the attic pulldown stairs so as some of the others suggested I’m going to shim the planers torsion box to match the slope of the table, going to do a mounting plate /assembly to attach it to the table when in use for stability and ease of setup. And then some fold out outriggers for back side stability
Great video, I appreciate your efforts and brevity in not showing endless minutes od doldrum sanding, cutting, moving stock, etc. In so far as your issue with the sideways motion of your jack, if you haven't resolved it already, I would suggest 2-4 swing away outriggers, at least on the non0-operator side. You could do both sides, but then they would get in the way of your movements. I'm not sure that the movement will affect the final product as the bed should be stable relative to the planer, if the concern, is tipping, then maybe 100lb. lead plate on the bottom of the jack might help out. Thanks again for the professional video and the time you take to keep the shop clean and presentable during your takes.
Thanks! great ideas! I think me solution im going to try is adding a mounting plate to the assembly table so they clamp together when in use, will give it a lot of stability. and shimming the planers box with adjustable feet to meet the pitch of the table (table is on castors and moves so pitch changes)
Great project even if it didn’t work as expected, appreciate you sharing your trial and error work. My solution since you got the lift and it’s handy for what you need it for, is to make a sliding tray that you can push your unit unto your perfectly flat bench. Then when you’re done, slide it back without lifting it each time. Otherwise the other solution I’m looking at is a spin type cart, the unit flips under, either sharing the cart with a sander or just a flat top table.
Ah new unique idea! Thanks! I think I decided on a mounting plate affixing it to the table with outrigger legs that fold for storage
Once you get the outfeed table problem solved, you could set up the outfeed table with a set of bolts and threaded inserts to align n
both tables with repa\eatability! That should remove a LOt of the movement you're getting from the scissor lift/motorcycle lift.
Definitely! I have decided to put a mounting plate on the table so I can attach them easily each time, if needed I will be making two foldable legs at the infeed side. Shimming the box on the planer to match the table
What about a hydraulic table cart? They look like an oversized, less wobbly version of the one you used. I do like your idea. I may pursue something similar. Excellent video too!
That’s definitely a good idea. I’m gonna have to look into those especially with a wider wheelbase to keep it stable!
If you added fold down legs with leveling feet under your torsion box, then when you raise the planer and put it in position you could let the legs down which would do two things - first, it would stabilize the whole thing so it won’t tip over (or move in any direction). Second, you could adjust both legs and the start of the indeed table to create the little slope you need to match the outfeed.
Great ideas!
Here’s my thought:
The lift is doing what you want, but it’s unstable when at height on lateral force, outfeed table(workbench) needs a docking area for the setup. That back leg can have a flip up wing with a leg and 2 (I can’t remember what they’re called) hooking clamps to secure lift setup to solid wing. I can picture it in my head. I’ve been using a melamine bed but still getting snipe and I’m guessing it’s because I need a torsion box like this.
Great video.
Thanks and great idea, will be implementing it
Limit the function of the motorcycle jack to lifting, the main reason you obtained it in the first place. Remove the torsion box from the planer. Unbolt the planer from the jack. Bolt a piece of 3/4" melamine (identical in thickness to the board previously on top of the planer bed ) to the bottom of the planer, and store the planer on the jack without attaching it with fasteners. Build a second torsion box, identical in height to the one you've already built. You can now store the planer on the lowered jack as before, but it will take up much less space than previously. You can store the two identical torsion boxes under the bench, right next to the planer on its jack, or on a wall. When you need to operate the planer, raise it using the jack to the height of your torsion box work table and easily slide it from jack to a position in the middle of the table. To support long pieces requiring outboard support, place the two identical torsion boxes on top of the table, one in front and one behind the planer. You will be making use of the flatness of the torsion box table as the foundation of your extended planer bed, a foundation that will provide aligned support regardless of unlevel floor conditions. The positions of planer and extension torsion boxes can be established for repeated setup on the table , if desired, by using (or adding) indexing holes and pins, or by bolts into nuts captured in T-slots in the table. So long as the heights of the torsion boxes and planer bed are accurately matched, such fixing of the torsion box and planer positions upon the table may be unnecessary. This structure, in which a main flat bed supports smaller parallel elements, emulates the construction principle of early massive jointers as produced by Oliver, Crescent, et. al.
Excellent ideas!
I just got this planer. It didn’t come with outfeed plates so the sled part of the build was very interesting to me. Thank you. Most of all…thank you for being genuine and honest re the stand. I’ve already picked up the planer a couple of times before watching this and had some idea of the weight. I’d be uncomfortable using in like that due to that shifting. If possible please post an update to the vid and share what solution you decided on.
Thanks yes once I figure out the good solution I’ll put it up because yeah I agree. The Jack definitely did not meet safety expectations.
I believe you have to buy the 735X to get the plates (plus an extra set of blades).
First thing level your table. Second HarborFreight has a lift cart that looks like it is the same size as your torsion box feed and out ramp it is very steady and stable you won’t have the tipping issue. I know I own one and love be it.
Is that the 500lb or 1,000?- I stopped at harbor freight after someone else Recomended but the 500lb on display wobbled when extended
Mr. Bitner, I’m late to this video but I have a recommendation for fixing both of your issues: create a vertical extension on the out feed side of the planer that is fitted with the top side of a French cleat. Mount the receiver of the French cleat to the side of your workbench so that when the extension cleat engages the work bench the tops of the workbench and planer bed are coplanar. Then use F-clamps to cinch the top of the extension to the top of the workbench. The clamping will draw the torsion box into alignment perpendicular to the legs of your workbench. Shims may be needed if you workbench’s sides are not 90 to the surface. Finally to use, you jack up the planer and lower it into the cleat and hold it fast to the bench with the clamps, pump slightly on the hydraulic base to make it extra ridged. This should give you both a sturdy and flat connection between the two surfaces. I hope this explanation is clear enough to understand.
Oh very cool idea! Yes I totally understand what you’re explaining, very creative! I had already decided to do some sort of “mounting plate” on the table and that could be a great fit!
After working as a Mechanical Engineer in steel, I know the stiffest machine tables have diagonal (X) bracing rather than orthogonal (H) bracing. In this application, you could use a Rossiyan (Ж) approach if your geopolitical opinion allows. For most woodworkers, this adds fitting complexity, but for me, switching to woodworking in retirement, it means more practice cutting table saw bevels.
Ooo thanks for the engineering perspective! I will see what I can figure out in X or *
I ordered the Wixey planer gauge today based on the install in your video. The depth stop on the Ridgid R4331 is a little spongy which is why I’m adding Wixey (plus consistent easy to read measurements)
cool! yea that is a very nice upgrade honestly, love being able to see easy to read decimals so I know what im exactly doing
If you have the space? Maybe build another torsion box that you could mount the lift on less the wheels. The new box could be made wider than the current wheel spacing. The wheels to be mounted on the box itself thus giving more stability. Cheers
👍
If your floors slope isn’t very extreme then a set of ratcheting leveling caster on the workbench would probably solve it. Amazon has sets of 4 for under $100 that will hold 2 tons. I’ve had a set on my welding table for the last 5 years and they are great. Mounting a set of trailer levels to the bottom of the bench would help to set it up quickly anytime you need to move it. I think others already mentioned it but for the Jack I’d keep that one and just design a way to quickly attach it to the work bench so it draws its stability from that. A set of hd toggle latches may be all that is needed to lock them together. Or you could go more elaborate with a set of rods on the planer torsion box that could be extended to fit into tubes on the work bench.
All good suggestions!
for side way wobble I would bolt a piece of steel plate through the caster holes then move the castors to the outside edge of your steel plate which will act as a down rigger The steel plate could stick out beyond the legs as far as you want.
Very good idea!
Gluing wood to melamine with wood glue is a recipe for failure. (I tried this on my miter saw station). Titebond makes a Melamine Wood Glue specifically for this.
Regarding the leveling, it’s a good idea to level every work surface in your shop, to avoid this kind of problem at the end. A 48” + level and shims (or leveling feet) are all you need.
Last tip, don’t be afraid of using aluminum or steel strut in shop fixtures. It is always straight, very strong, and often lighter, cheaper and less labor intensive than wood. You can get it at Lowe’s, Home Depot, etc.
Thanks for all the great tips!
Great build that simply needs a base widener/ stabilizer that could easily be made retractable or folding and it would eliminate top load pitching yet still allow under counter storage.
👍✌️
In my experience scissor lifts are never perfectly stable unless you buy really expensive ones. The better option would be to use an interlocking wedge under your two table tops. You would have a small piece protruding from the bottom of each table, but it only needs to be enough to catch the bottom of the opposite table. The wedge is placed on one table and two pieces are fastened on the opposite table so they are tight against the sides of the wedge when the tables are clamped together. Use two of those cam locks like you use on window sashes to lock the tables together. It’s simple and strong and accurate every time. Then I would level the longer table, but it is up to you which table to align with the other. By having the wedge be four parts you can spread it to the width of the out feed side of your planer table so that it is locked in all the way across. I’ve used this to lock together modular systems where a perfectly smooth transition is needed between modules with great success.
Wow very good idea! 👍
couple ideas..
add hinged stabilization arms (like a crane) to the jack.
reweld the jack frame with new stable size.
add a plate above the casters, moving casters to new corners.
👍
I have been thinking of doing something similar with my DW734. I plan to add an extension to my 2’x4’ workbench so the planer bed can sit level with it. I thought of maybe having heavy duty hinges so it could fold down if I needed it out of the way.
My idea for micro adjustment is to use 1/2” Allthread Rod with nuts and washers to raise and lower either the planer itself or the top part of the planer extension wing.
Mounting directly to the end of the workbench should eliminate that sloping issue you encountered having 2 separate items butted together.
Very cool idea! Let me know how it works out!
Mount some swing down adjustable legs to both ends of your torsion box. Once you get it jacked to height swing the legs down and slide the adjustable legs to height that levels the table. 4 legs will eliminate side to side stability issue as well.
Thanks! Yea I think that’s one of the solutions I’m going to play with!
Use a straightedge to make the planer bed and table’s slopes match, then add some over center latches to attach the planer to the table and keep the two surfaces aligned- the extra width of the the table should help with the stability of the planer side to side, but perhaps a different lift is needed since you indicated it was already breaking/ wearing out. Appreciate you sharing your experience/ issues along the way- hopefully you will find an easy fix
I like the latch idea, yea bummer it’s progressively getting worse but I think we are on the right track!
Great build. One tip for the threaded feet if you didnt want to use the plastic you can drill the wood the right size and cut threads with a regular tap. Threads in wood are surprisingly strong and resilient.
Great tip!
Pat Warner (my mentor) wrote an article in Fine Woodworking about tapping wood.
Where the wheels connect to the motorcycle jack, tack a wider piece of ply (possibly another torsion box) and extend your wheels. Now you don’t have to raise it as high and you have additional storage.
great idea!
Folding legs on the cart that you drop once the lift is fully extended. My planer is on a shopmade steel cart. It's not height adjustable, but is at the same height as my workbench for outfeed. I made cupboards underneath for storage.
That’s cool! Yea thinking mounting plate on the outfeed to attach to the table and then 2 folding legs on the infeed side to stabalize
i would say take a shot every time you say torsion box but i think people might get alcohol poisoning! Great video
I see your torsion box game and raise you a drink when they say AI in a tech video 😜
"Sometimes, your experiment doesn't work..." Truer words were never spoken, and something I tell my grad students ALL the time.
More constructively, I wonder if rotating the planner ninety degrees on the jack would improve stability at all; I have my doubts, but I think it's worth a try as long as it would not require an excessive amount of modification to the substructure. The second thing I am wondering about is if you could add some sort of stabilizing feet to the sides to absorb some of the rocking (think the feet on a bucket truck that are used when the cherry picker is extended). Those are my two immediate thoughts on how you might modify the existing jack rather than resorting to a new product outright. Best of luck!
Thanks! Rotating it is definitely worth a try, I think my solution I will be trying is adding a mounting plate to the assembly table so it will “attach” giving it a lot of stability, by rotating it would put the unstable direction towards the table and the plate would then fix that! Additionally shimming the box to match the table and if needed two foldable stabilizer legs
@@BitnerBuilt That is a method that has a lot of promise. My shop is fairly long and narrow, and most of my tools are attached to my bench/outfeed table already, so I have considered constructing movable cabinet that bring the wings up to the same height as the outfeed table. I know that's more shop furniture, but what are you gonna do 🤔
That's just brilliant, dude! It may be wobbly, but it's a fantastic idea! 😃
Now, to fix this issue, I'd say you have 2 options. First is to replace the jack, as people suggested already (and there are also those hight adjustable tables that should work)... Or to make a wooden structure around it, to reinforce it. Which isn't going to be easy... But it's definitely doable. You know?
I don't know, perhaps with drawer's sleds and things like that.
Either way, looking forward to see how you fix it. 😊
Stay safe there with your family! 🖖😊
Thanks! Yea I went to HF already and looked at the adjustable table lifts they have, same wobble problem. I think with what’s been said so far, shims under the torsion box for coplane and then fold down adjustable legs for stability
I saw one at anothers person shop. They did the same. But they used a heavy duty motorcycle scissors jack. I plan on doing the same build. Also available from Amazon. It has minimal side from side sway.
Oh cool let me know how it turns out. Decided to make a mounting plate for it to attach to the table, will make it stable
remove the wheels/casters, add a plate (plywood?) and add to bottom, get better casters and just make a slightly wider support at the base? You could build in the lean to match the bench at the same time
Good thoughts! Yes, somebody recommended shims under the torsion box so I match the slope but removing the casters and building a wider more stable platform would definitely be good to
As far as adding stability and removing the side to side movement, why not add a couple clamping spots to the table and cart and clamp it to table when you get it to the desired height? Also, just level your assembly table with some shims. Problem solved. Great video brother!
👍 great ideas
Build a modular mount off the end of your work table. Use the jack only to transfer the tools from storage to the mount and back.
Each tool would require a baseplate that fits the modular mount. The baseplates can be fitted to drawer slides that hold them in storage high enough to use the jack. Slide tool out of storage, lift with jack, install to table mount. Done.
Great idea!
@@BitnerBuilt I have designed my miter saw station (future build) to store all my occasional-use tools, like scroll saw, spindle sander, surface planer, etc. I had the modular concept in mind to make use of the table at one end of my cabinet saw. What I had not thought of was using a lift to xfer the heavy tools back and forth. As soon as I saw you using the jack, I had a solution!
I had this idea too earlier this year. I decided against it since I figured it would wobble like shown on your video. My idea would have it locked down to your bigger workbench when its the same height. Maybe with with nuts and bolt. I hope that makes sense with my current description.
Yes that’s a good idea, I think we will be shimming the planers torsion box to equal the table, bolt and then fold down legs at the infeed to lock it down
Why not level your assembly table? Add leveling feet to the table and it would work properly as an out feed table for your planer.
My assembly tables is 500 pounds and on casters. I have to move it out-of-the-way in order to get to my attic pulldown ladder so it won’t work there, but somebody did recommend that I use shims under the torsion box to put it to the same pitch as the table, which seem like a good idea.
Or you could use the caster feet that are levelable and you can “drop” them, but then pick engage the feet to move when needed.
@@dominiquebrewer139 Exactly. 500lbs. isn't a lot of weight for these sorts of casters. Many tools are over 500lbs.
I'd also suggest marking the table's location on the floor, so it's put back exactly where it was. It should be level at this point. I have the same problem with my table saw. i have a ceiling hoist right above it (the only place I could add a beam), so have to move the saw to lift heavy things, like stationary tools.
I’d definitely just shim the workbench so that it’s level. Way less hassle.
As for your tippy-cart… another short but wide torsion box on the underside of the motorcycle jack and move the casters to the further-spread-out corners. Making it wider at the base should help with your stability as long as the scissor portion is strong. This would of course increase its minimum height in the fully collapsed configuration, so only possible if you’ve got a few inches of clearance under the cupboard you want to park it under.
All great ideas!, The area that’s really causing the wobble is from the scissor mechanism itself not from the base so an increased base size would help with tip over stability, it’s still going to wobble. I think I’m going to add fold down legs to the side of it and shim under the torsion box to the degree of slope on the floor. My assembly table is 500 pounds on casters and I have to move it regularly for an attic pulldown ladder so pitching the planner seems like the better option.
Using adjustable stabilizer legs that swing down from each side of the torsion box. When not in use, they can swing back up for storage.
Great idea!
If your outfeed table doesn't move around your shop, you could add shims under you low side of the table.
Thanks so much for the idea, unfortunately it does. It’s on casters and I have to move it to get the attic full down ladder extended. I think I’m gonna shim under the torsion box of the planer to make it the same pitch as the assembly table.
I have the same issue with slope on my floor. For my build table, I used short pieces of 1" iron pipe going into iron floor flanges. I had to use different lengths of short pipe as my floor is ridiculously sloped. Basically a heavy duty version of the legs on your infeed/outfeed torsion box.
Ah cool solution!
Buy some Unistrut it comes in 7/8 and 1 1/2 depths take the wheels off the bottom use the Unistrut to bolt into the place where you took the wheels out of then widen the cart by way of the uninstall The Wheels on the Unistrut it will give you a wider base so it doesn't tip over
Great idea! So the issue is actually in the thin sizzle metal used to raise the top, a lot of the flex is coming from there, I think one of the items I’m going to do is a mounting plate on the table so it’s clamped to it when use and that will add a ton of stability and the additional outriggers if needed
Add weight to the bottom of the cart. That should help offset being top heavy
Ooo good idea!
Justin, some great ideas here. I wouldn't toss out the jack acting as the base, at least not yet. When the planer is raised and in position to operate, would it not be possible to attach legs to your platform, thereby temporarily turning it into an extended and fairly stable workbench? You could create legs in any number of ways; my thought would be to do so using 3/4 ply in an L or T shape, and with adjustable feet screwed to the bottoms, to allow to fully stabilise the whole unit -- but you're a creative guy, and can certainly come up with your own solution. And, as for the slope of your main bench, given that (I believe) it is there for the long term, it might just be worth your while to level it out, even roughly, thereby eliminating most or all of the outfeed slope challenge. Always look forward. to what you come up with. All the best from Canada.
Thanks so much! Yes, I do think outrigger legs are going to be the best option. I’m thinking some legs that can fold up along the torsion box when it’s in the down position and then pivot into place when it’s raised. Another person had also recommended making an attachment assembly on the table so that it will inserted self into the same place every time at the correct height, and then shim under the torsion box to place it at the correct angle with the assembly table. Unfortunately, for me, I can’t level the assembly table for this purpose at the same pitch as my table saw for outfeed, so I don’t want to change that, I also have to move regularly for my attic stairs to come down, and it’s 500 pounds! ✌️🇨🇦
2:40 just came to mind,
Something Norm might have done with a bench too tool.
The tool lives under the center of the table, you remove a cover plate
Crank the planer up from below
2 or 4 arms fold out to lock the tool in place so the work area is flush
And its in the center of your bench.
Depending on length of the bench
You have a 3 to 6' both sides.
It lifts on a crank screw drive system when the tool reaches the top 2 to 4 arms like a door hasp pop out on the sides to lock its table into perfect position because
Its bolted to this it can't move.
Very cool idea!
For the outfield, add shims between the lift and torsion box to bring it to the same slope as the assembly table.. As long as you intend to position at the same end of the assembly table every time, should solve that concern.
Yes, that’s an excellent idea!
Perhaps add a couple of draw latch sets to the underside of the planer outfeed and the table to align and connect the planer securely when in use - think of the way a removable leaf is secured to a table. I think this would stabilize the unit and simplify getting it to the right height each time.
great idea, I had thought about adding a plate underneath that overextends and then could be clamped but latches sound better!
Great video. Vervor builds using a cheap metal/plastic alloy. Caution, there quality is questionable at best. I'm thinking some sort of solid legs that drop down once its cranked up and then stabilizing it with some sort of bracket attachments to the bench. Im seeing some kind of telescoping legs that stay in contacts with the ground as you are bringing it up but if the lift fails, a mechanism that prevents them retracting for safety.
It sounds better in my head.
Great ideas!
Well since you already built it you might as well add side stamps like those mobile cranes use to stabilize their footprint. That would solve the side rocking issue.
For the out feed table I would raise one side to make it level (assuming it wasn't level).
Thanks for the tips! Yeah, I think that’s my choice is I’m going to be adding two fold out outriggers for the infeed side and then mounting the outfield side, directly to the table using a bracket. Going to increase the angle on the planer with shims I have a level table for resin and what not there’s issues with me, leveling the big table and it’s oncasters and frequently moves
The issue you have with the lift is its only rated to 300. The planer plus added stuff is already 60% capacity then you add the weight of the Wood your planing then you potentially over the 300. Also it's designed for stationary no movement
Yep your right, looking for another good solution for it now
Perhaps the wood base. Stabilize by creating latches on mobile base to secure to stationary base. Or you could create outriggers or “training wheels”. Just a couple thoughts.
👍 great ideas
You could either use shims on the lower end of the workbench to level it better or you could put extender feet on the mobile base to make it more stable, as they do with mobile cranes, just an idea or make the base bigger.
Thanks for the ideas! The wobble in the jack is really coming from the scissor area not from the base, I think I need to put some fold down outriggers on the sides of the torsion box to give it stability and then also to adjust the pitch if needed
Build a set of foldable outriggers to the base of the jack..
Good idea!
I agree. Like large lifting cranes they come out from the side at the base.
Maybe fixed braces on the sides of the motorcycle lift secured with possibly wingnuts for easy removal.
Great idea! 👍
what about adding ratcheting feet onto the bottom of your outfeed table to make it level. The ones I have on my table have wheels but you can lower them all the way and they will sit on rubber feet. My outfeed table is so big that it is very stable even on the wheels. Another option would be to build a table to place on top of your outfeed table that will be level. It would essentially look like a big wedge. This might be difficult to build and hard to store but it would solve your issue.
Some good ideas!
Don't know what your ceiling is...would a hoist work? Lose the stand, threaded inserts into the planer base...lower the planer a bit, screw in adj legs, lower the planer down to the floor. You will gain alot of storage space but you will be using the planer in the same space always. For the outfeed table...loosen where the top is attached to the base and shim to a laser line that goes across the planer bed and the outfeed table.
now that's some good outside thinking! so I already have a ceiling mounted hoist wood storage and workbench that can come down with a remote (have a video on it) my only concern there is this thing is just so heavy and I already have that system weighed down so if I put it on there, wouldn't pe able to store as much wood with the weight on the ceiling joists. but still great idea.
I have mine on a cart. It has storage under. Dust collection cart that Rockler gives free plans on their site associated with the chip separator kit. I like low carts and carts that stack another tool above. Good candidate for a cart with planer under a sander.
I had it on a low cart prior in a 40in wide opening under my miter station, I wanted the bigger in and outfeed so being able to raise it to the assembly table was the big push there. But yea can’t beat a stable cart
I did the exact same thing with the moe ped lift years ago... it really changed things.
oh cool, yea its close to what I want... we will get it figured out!
I'm not sure but this seems like a lot of work for minimal return. Am I missing something? I'm new to woodworking so take this comment as me just not understanding the benefit of so much work and expense. I do think the digital readout is a great idea and will add one to my dewalt planer. Thanks for showing us/me that sometimes things just don't work out even though there is a truckload of planning and execution. Keep up the great videos as I'm a big fan of your channel, thanks for passing on all your knowledge...
Thanks! So the big thing with benchtop planers is they have small wings on the in and out and often they aren’t at the correct angle. This makes snipe super common and if your doing something like when I make a sign in the CNC machine and then spend a day filling it in with resin, I could either sand it for an hour or I could put it through the planer for 10 seconds to remove all the extra resin. However, if it decides to snipe my workpiece after several hours of working on it, that’s bad 😖 so adding the pass through bed makes a single long flat surface that helps prevent that (and if you make it longer the better) if snipe happens at the beginning of a project and you account for it, ok no biggie but later on it’s the worst so doing these upgrades will hopefully save me some future heartbreak!
You can also make to saw horse and lower the planner onto both on it will be side to side sturdy.
Then shim far side of finish table
👍
As someone else mentioned latching it to your assembly table I would suggest adding alignment pins
Yes I think this is a great option
I really like the collapsible stand idea, as I have a small garage shop. Please look into this some more. Maybe a larger stand. great Idea.
so I think the solution I am going with is a mounting plate on the assembly table so when I use it, it attaches at the same spot and it will lock on to give it a ton of stability. Additionally if needed I will add two folding legs to the indeed size if needed and will shim the torsion box to match the tables pitch, Will put out a follow up video once I can get it on the schedule.
Can’t help you on the shakey cart other than beef it up or buy a better one. But your torsion assembly table should be shimmed dead level. You want that to be not only dead flat, but also a REFERENCE surface for level. Having that in any shop is a game changer.
👍
Really neat idea with the jack. I think Marius Hornberger made his own. The other thing you could try is, putting leveling feet on your torsion table.
Oh cool I’ll have to check his out. See what he did. Somebody suggested shims under the torsion box so it matches the angle. That way I can still screw it down and keep it stable.
Sliding frame built around a scissor jack that people raise and lower with a drill seems to be a common method.
👍
Hi , great job on video. I just wanted you to know I used a 500lb hydronic lift cart I purchased from Princess Auto and it works great. I modified the handle height and changes the wheels so they all can lock and swivel. I would send a picture if you like.
Sure would love to see you very cool idea, Justin@bitnerbuilt.com
@25:25. You can make a caster extensions and move the wheels farther out.
Good tip!
Harbor feight has a lift cart than can go very low to the ground but it also lifts higher than a pickup truck bed.
Thanks! Yea I went and took a look at it in the store, when raised seemed wobbly as well
Hubbie has a similar jack and was concerned about how stable it would be.
Maybe add a set of telescoping legs, think photography monopods to little swing arms.
Love the upgrades you share…I have the same Delta saw.
Oh cool good ideas! 👍
Look into a Harbor Freight lift table, I use mine for lots of different things, and it seems very stable.
I went to Harbor freight yesterday after people had suggested that and looked at the 500 pound one when I extended it up there was wobble. They didn’t have the thousand pound one on display. I’m guessing that’s the one you have?
Could you attach two sliding bars - 1 to each side of your torsion box or stand - that slides out and attaches to your bench to give it rigidity in the top position? Something like bedrail clips to quickly attach the bars to your outfeed table and then detach them and slide them back for storage.
Yes, that’s a great idea and somewhat what I think I’m doing, I’m gonna do some sort of mounting plates so that they will attach together at the same spot every time and that should give it a lot more stability
Try putting screw type levelers on the legs of your larger torsion table. You can level up your out-feed table. Problem solved!
Good idea 👍
Cool idea. Saw this coming having built table saw outfeeds. Felder FAT tables are awesome but $1600. Just be safe. Those motorcycle jacks aren’t really designed to go that high.
Yea it’s progressively getting worse which was a surprise. Will have to look at the felder if anything for ideas
I had the same idea. I ordered one of the jacks off of Amazon (same type and color) I didn’t like the stability as well and changed direction. Looking at the harbor freight 500lb lift table
After people recommended that harbor freight lift, I went and looked at it. There’s a 500 and 1000 pound one. They had the 501 on display so I cranked it up and it also wobbles it appears the weakness is in the thin metal of the scissor.
Justin, just a quick what about adding some out riggers like you see on cranes for stability
Great idea, think I’m going with adding a mounting plate to the table so I can clamp them together when in use, should add a lot of stability. Then either outriggers or 2 foldable legs at the infeed if needed for more stability, adjustable shim for incline
Adding screw down leveling feet to the cart would solve both problems. Stabilizing your cart nd adding the ability to lift the back end to match the slope of the outfeed table. Or level the outfeed table and add a way to lock the two platforms together.
That’s a great idea, I just actually used those in my previous video. That would solve the leveling issue with the table however, the instability of the cart is actually from the accordion metal pieces swing back-and-forth not from the base so unfortunately it wouldn’t solve that issue.
Add some shims on the infeed side betwee the jack and torsion box.
Excellent idea sometimes the simplest things are the easiest to overlook!
what about a ramp type setup (wedge) on your big table to match the drop so you don't have to level the table or raise the back end of the planer. Also was thinking of a few of those bench top type rollers that have adjustable height's, usually used on temp chop saw setups. You could mount them to a board or clamp them on your big table and just raise them separately to match the stock as it comes out of the planer. Good luck, and great idea!
That’s a very good idea! Ignore the table all together and have a set of slide on rollers that can be leveled to give support
Would shimming the assembly table be an option to consider. You might also be able to make the assembly table legs longer.
Unfortunately, the assembly tables on casters and moves around a lot so shimming wouldn’t stay accurate, I’m thinking of putting some sort of adjustable shim under the planer so that it will match it
Change the casters to those longer liftaway casters and mount them to the side that allows the shaking
👍
I did the jack upgrade about two years ago great addition.
👍
Great idea, even if the result still needs tweaking. Instead of un-leveling the cart, can you level the workbench? Also, Harbor Freight sells a pretty affordable hydraulic cart that would be more stable, although I don't know how well you can finetune the height.
Thanks for the suggestions! So the workbench is 500lb and I move it often so hard to level that one. I looked at the harbor freight cart today after someone Recomended it, it wobbles too but definitely more stable, lots of options to think about!
Harbor Freight has a hydraulic table that is super sturdy in all directions and isn't too hard on the budget. I have a $21,000.00 Laser Welder on it and there is no movement whatsoever.
Cool thanks for the tip - so they have 2, I went in person today and the smaller one that they had on display wiggled when risen, maybe it’s the bigger one?
Level the big table itself!
✌️
Leveling the table seems Easiest and maybe some locking latches to eliminate the wobbling
👍
This is going to sound a bit odd, by maybe look into 'server lift carts'. They are used in the computer industry to help lift big computer servers to mount into 'computer shelving' aka server racks. They are a larger platform, but might be a little more stable since they are designed to lift a lot higher than the bike lift.
Cool idea! I’ll take a look. I actually just stopped at Harbor freight to look at their larger hydraulic lifting tables, but unfortunately, that was also shaky.
I was going to suggest leveling your bench to solve the problem. Seemed obvious, until I remembered that you share space with (ugh), a car. So it wouldn’t be in the same spot every time.
As to the lift, is if a lift quality issue? I’d think that lifting a motorcycle for work would require a stable platform. That looks pretty rickety.
Yea I have to move the table for access to my attic stairs too. Was thinking shimming (with ability to adjust) the planers torsion box.
It’s coming from the thin metal scissor pieces in the middle, they just aren’t Bridget enough. I think going forward the idea is to treat the Jack as just a method to raise it and then I’m gonna make a plate at the end of the table and then two outrigger legs in the back to stabilize it.
The motorcycle jack idea is earth-staggering brilliant. So now you have a problem. How to stabilize the motorcycle jack. Bolt it to your work table in place when its used. Unbolt it to tuck it away.
I had thought about clamps but your easy bolt answer is great! Sometimes those obvious ones slip your mind, good job!
@@BitnerBuilt Let us know if it works out. I like your ideas, and I think I would like to build mine like that when I get around to it.
@@Electrichead64will do I will prob make a quick video on it next month on the final result, (this months packed)
Maybe I am oversimplifing this a missing something but putting leveling feet under the planner or wood shims between the planner and torsion box and then bolting the planner down instead of using screws . The bolts going through the torsion box and the mobile table.
Level your table,
What about some sliding tubes that come out of the bottom of your table and extend to both sides of your planer so it can’t move in the side directions?
Great idea on the tubes I will look at that. Table will be harder as it’s 500lb and I move it often so better to look at options for the planer
I would add 4 adjustable legs on the jack platform not on the planer torsion box.
👍
I made a similar item with a 30 x 18" SS wire cart and a RV stabilizer jack.
Cool! Does it work well?
Works very well, how can I send you pictures ??
justin@bitnerbuilt.com@@johnbaker1263