Make your own 10x10 LED Matrix

ฝัง
- เผยแพร่เมื่อ 18 มิ.ย. 2016
- Previous video: • HACKED!: Microwave Tra...
Facebook: / greatscottlab
Twitter: / greatscottlab
Support me for more videos: www.patreon.com/GreatScott?ty=h
More project information (code, pictures,....) on Instructables: www.instructables.com/id/Make-...
Parts list (affiliate links):
Aliexpress:
WS2812B LEDs: s.click.aliexpress.com/e/_dYB...
5V 4A Power Supply: s.click.aliexpress.com/e/_dT2...
DC Jack: s.click.aliexpress.com/e/_d9F...
Arduino Nano: s.click.aliexpress.com/e/_dUL...
Ebay:
WS2812B LEDs: rover.ebay.com/rover/1/711-532...
5V 4A Power Supply: rover.ebay.com/rover/1/711-532...
DC Jack: rover.ebay.com/rover/1/711-532...
Arduino Nano: rover.ebay.com/rover/1/711-532...
Amazon.de:
WS2812B LEDs: amzn.to/28IM7Qt
5V 4A Power Supply: amzn.to/21tIke1
DC Jack: amzn.to/1NtXgmx
Arduino Nano: amzn.to/1Nigytq
Foam Board: amzn.to/1YANoOH
Home Improvement Store:
4mm beech plywood
2.5mm opal acrylic glass
stiff 1.5mm^2 wire
flexible 0.75mm^2 wire
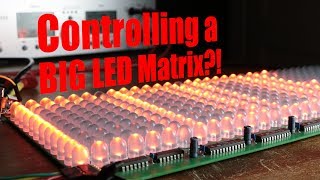
In this project I will show you how to combine commonly available WS2812B RGB LEDs with an Arduino Nano in order to create a colorful 10x10 LED Matrix.
Music:
2011 Lookalike by Bartlebeats - วิทยาศาสตร์และเทคโนโลยี


zentimeters
centimeters
senttiä
I always measure the inner pieces with zentimeters
I heard that too...
Zen....... timeters
(As a lazy man, I'd really want to make these in a grid size that is exactly matched to the spacing of the led strip. Holy reduction in soldering, batman!)
Very easy, just buy the stripe with the fewer LEDs/metre and thats it.
why not just use pre-wired led strings
I had the same thought 30 LEDs/m would probably work fine with just some solderings between different strips
Ya wow, I have no idea why he did so much extra work. Low density (addressable) led strip then cover with a grid like he did....same result
@@shiftyjesusfish right? It’s what I’ll be doing 😎
Nice looking display. I admire the amount of effort you put into building the matrix and its enclosure
The more I watch you videos the more I understand how it's important to have a proper tools to create such beautiful things
Hey GreatScott! Your previous led matrix bar inspired me to make a similar project that will look very similar to this when its finished! Keep up the amazing work cuz you do some great projects for electronics beginners (such as myself)!
I still miss the "Lets get started" line in the intro :(
Now it's "Let's get started with the build" :) Almost the same
+michalpajor but it's still not the same D:
+KaienSander10 Everytime he says "let's get started!" it puts a grin on my face. This time it was not the same
Et's get zdarded.
KaienSander10
There is no way i can make this.The amount of patience this man has is incredible.
awesome build! I never thought of using the foam board to make the square shapes.. brilliant and simple :) I've been mulling somethig like this over for awhile. Thanks for the video!
Idea: if the acrylic was raised slightly away from the underlying grid, allowing a little bit of light to escape through, the light bleed could mask the dark spots caused where the grid is touching the acrylic. The distance between the grid and the acrylic could be adjusted so that a balance is found where the light bleeds enough to cover the gap between "pixels", but not so much that it bleeds significantly into the next pixel over.
This is my favorite video/project you've done. I'll definitely be making one of these in the future. Great Job :)
Thanks
i just finished my 8x8 grid of random blinking lights. this is labor intensice, respect brother
I've been watching your videos for a while now. Love what you do and the creativity. Your videos inspired me to go out buy a few things come home and build a portable phone charging box. Since the first version I'm already planning on adding a on board charger (had removable recharge able NIMH battery's), a volt meter, and a few others. Keep up the amazing creativity, cant wait to see it in the next video!
love how you pronounce things like "zentimeter"!
A tetris game on this matrix would be awesome
I thought the exact same thing as soon as the video started!
My professor made that and oh boy is it awesome.
@@Shaggyfauvorite how?
Arduino, bluetooth and a bit of brain magic
it could be turned into a looping animation.
I found your TH-cam channel a few weeks ago , your work is great! I 'm studying industrial engineering and I love eletctricity and electronic . Furthermore, I come from Belgium , so watch videos in English is so good for my English , your accent is neutral and perfect understanding. Keep on going! :)
I'm working on a similar project at the moment using nodemcu, allowing you to switch between patterns by curling a URL. This looks great and has inspired me more!
good explanation, thank you, Saludos amigo.
3:33 my inner perfectionist is happy 😍
i started my led matrix project today, right on time!
wow. tons of ellbow grease. i love the led projects.
thabk you,Scott.
Try to Build 1920x1080 LED screen
Edit after 2 yrs:
Thx for likes!
oof
it would need like 300kw
1.21 Gigawatts to be exact.
@@69Accord69 When a typical screen is just tens of watts...
@@zUltraXO Back to the future... nothing?...
my next projet!!! xD cheers
you added extra effort to the video .... salute to you. !!
keep making videos scott.
Wow, that is beautiful. I did a small solder job tonight after not soldering for the best part of 20 years and I think I did well. Wouldn't it be beautiful if there was 100 of these, all on one wall in a house! Imagine that in a games room, or a room with a nice stereo.. Or better still, under the floor with a clear Perspex floor omg that would be amazing. So it's settled. When I'm super rich, I'm having LED matrix floors. Sweet project man, very very cool.
haha, I made one of these out of wood and RGB LED strips for my High School Final Project it was 13x13 leds and a LOT more big and heavy. Nice video man btw
I was making a desk using frosted glass and a matrix like this underneath, using wood as the dividing material and I ran into that weight issue, too.
sounds cool. did you finish it?
I finished the structural portion and dividers of the top and wiring up the LED matrix, but I moved from Germany back to the US and still have the rest of the portion on hold while I get settled in. SMD LEDs were not the way to go and took way too long to wire up.
Good job, but what about the programming side? Didn't you mention something at the beginning about showing us how easy it is to use? If not, what did you use to program the light patterns featured in this video?
I think it's the same software used in his video of a large scale one
FastLED. I think he shows how to use it in the large scale LED matrix video..
He used the arduino IDE(whatever it's called) with a library for the LEDs. There is a download on instructables.
Yess, I was going to make one of these this summer. You're the best! Thanks for the vid
Great video scott. Thanks for slowing down a bit with the explanation. Much more clear now
Hey Scott, you covered the basic (passive) components in your videos, but will we see tutorials with active components i.e. (photo)transistors?
Soon
Nice
does it work with arduino uno
?
okay,
@@sem8776 I'm aware it's been 6yrs since you asked this, but yes it should work.
You'd have much brighter and vastly more diffuse "pixels" if you'd used white separators.
killerdalek i was wondering about the same thing but do you really think it makes that much of difference?
Awesome video Scott! I literally was just researching this exact project last night for a wall mounted spectrum analyzer to put above my computer monitors. :D
There is a really nice startup that creates these cubes aswell, but theirs can do a lot of really cool stuff, like showing notifications and stuff, add that, would be awesome.
You always surprise me with a nice idea. Do you still have many of them in to do list?
Yes, too many.
"afterwards i drilled 400 holes" fml, xD
thanks for the great work you put in ur videos!
nervenjere i work at my led matrix with 1152 holes xD 24x12 led matrix if you want i could make a video
This project is so awesome. I want to start with this project in a few weeks.
This is something i might try in the future although i have not done any electronics type stuff since i was in high school
I love how you took time to install each individual LED, but wouldn't it be easier if you kept the rows of 10 LEDs (instead of cutting single ones) and wired each row to the next one?
Or does that make the LEDs look too tightly spaced?
Exactly what I was thinking...
My thinking was that he might not be able to control them individually if they were attached together still.
no he would. All he did was cut them up and remake the connections with wires
THey're all connected the same in the row as they are in the matrix. He showed that when he did the test to control the spool of LEDs. ;
Zentimeters : ^)
Just wow, Appreciated your overwhelming efforts man.
kudos✌
a real PRO instruction video - you should moderate a DIY show on the TV!
thx a lot
Now convert that into a audio spectrum analyzer.
Good Idea, but how to do that ?
@@bharata101 idk but he knows anything
Akshay Patel add the proper code and a microphone. Actually pretty simple
Zentimeters!
genau :)
You make it sound so easy!
really good project! the result is very pretty
Now make it run pong :D
Omg.
Pong? On a 100 Pixel matrix?
Ja... neee... is klar!
+Dirk Mader oder tetris =)
yesssss
Funny, I was thinking Tetris!
Do you have a Video explaining the software part?
I might do a video on how to create a simple game with such a matrix.
GreatScott! Nice.
Could you tell me how to do animations as shown in a nutshell?
Nicolai Weitkemper
Visit the FastLED website. There are plenty of information.
+GreatScott!
Hi Scott,
whenever i See at my Phone New Form great scott, Nothing is more important then watching your Video
great Job 👍
Steve
+Stefan Bramel me too ;) greatscoot is the only channel that i have notifications turned on ;)
i currently make because of your video a led matrix with 24x12 :) will look awesome i hope, got the leds today but already drilled 1800 holes :D
It is so nice to see this kind of videos in milimeters!!!
how much leds can you connect on the arduino, I'm planning to do 240 leds. Is that possible?
Yes
long story short :D ... After a quick test i can say that the connection of up to 65 LEDs is no big problem. But you have to take care of how bright you want them to be and which color!!
You can do any amount of LEDs(well not really, but a lot) it's the power supply that needs to be beefier the more LEDs you have, not the arduino which is just data.
LucasMoviesmaker yes
I don't think you can use an Arduino Uno for that many LEDs. You'd have to get a higher Arduino model.
How is it controlling 100 leds with so many colors, on just one single data pin?
Asynchronous Serial Data
xubor But there doesn't appear to be any for of microcontroller to read the Serial Data and convert it?
0:18, why would you "read" Serial Data? That makes no sense at all.
+Rasmus Tollund There is chip inside the LED itself. Lookup WS2812.
Daniel Astbury Ah okay, thanks a lot!
Always a great project. I suggest to make the frame and also the divisions using MDF cutting by CNC laser. Thumb up👍
for the acrylic glass I usually just go through ally ways in my neighborhood until I find a flat screen TV. Plenty of useful parts, and a pretty big sheet of acrylic.
"zenitmeter" xD no hate
What are the expected costs?
Around 60-70$
+GreatScott! thx for the fastest response EVER 😅
+Nicolai Weitkemper next you have to make 1920x1080 size matrics
+CatKitty matrix
+CatKitty you mean +GreatScott! ?
wauw! this is amazing looking. your work is great and inspiring! thanks. im gonna try this one to.
I’m new to Arduino, this really excited me!
Also, why slice them up? couldn't you achieve the same result by cutting 10 strips with 10 on them and connecting the strips data in to the next strips data out? ( And power of course)
claydioactive it'd be harder to isolate the LEDs into 'pixels' that way
That's what I was wondering as I watched this... using strips is a *LOT* easier. The only drawback to using strips is the LED per meter density is what sets the size of your 'pixels' as the spacing is preset... still, saves a *ton* of time and it really isn't hard to figure out... this seemed way overly complicated.
wouldn't it still get the pixel effect with strips if he just separated them using that foam matrix? seems like it could to me
Are you from Germany?
Yes
+GreatScott! Ich wusste es! :) wo in Deutschland wohnst du?
+_who_cares_ klar die stehen dann vor jedem Haus im gesamten Bundesland....
+GreatScott! OMG Wien das raushört xD 😂
+Mats Pager wie*
Scott, this was an awesome video! Cool matrix!
Just finished my own one, looks awesome :D.
diy launchpad pls
oh yes pls
YES
reading the comments makes me feel really stupid
thank you scott for your fantastic video.
You make it simple....great work.
I want to Tetris on that shit
Nochmal auf deutsch und mit mindestens 1080p60fps wäre besser, nech.
you are very demanding
@@finnthefrog4354
"you are very demanding"
Yes, I am, sometimes, but in a good way!
TH-cam damysticalone87
Your project is awesome, i love it!!
yeey new led matrix... they are awesome! I was looking for these LEDs like week ago.. It's great that you have made video of that.. ;)
you didnt show the programming
I might do it in another video
please do
thats hell of a work
OMG, your work is an inspiration to me. I am 14 years old and I want to get into computer programming and electrical engineering. All I have to say is stay creative!
This is Electronics.
It's not electrical engineering or computer science.
Great videos. Really liking the good video quality and clear steps. Learning tons of magical circuit things. :)
I just finished my GCSE's and I have10 weeks to actually make all this stuff!
I noticed that you are getting better in woodworking and I like it nice work :)
Fabulously done man
Amazing build, just what I'm looking to do too
This is actually pretty cool! You should get one of those cheap 40 watts 400$ laser cutters. I got one a couple of month ago and it cuts 6mm MDF and Acrylic and stuff with a very good ventilation and a custom air support that you need to add yourself.
Hey Scott! Me and my brother got a Raspberry pi 3 and made your matrix board, we did however make it a 10x20 grid and programmed it so we played tetris. Pretty cool huh? The most tedious process was the hole drilling by far. The wiring got to the point of just being a routine and we took turns making it. It was totaly worth it and we really like your projects. Good luck with future plans
If you use 30 LED/m LED strip, you can just drill holes in the backing material for the LEDs to show through and use strip for each row, only requiring soldering for the row connections. In your case, this would reduce the number of solder joints by a factor of 20.
Nice precision work!
Simply GREAT, SCOTT!
Amazing work! Talent!
Ah I can't wait to try this!
Cool project , i think i will do this one myself .
another great project
I just ordered the parts... finally time for me to take a plunge into the arduino. I'v been fearing that device for to long >:)
You always have awesome little projects :) Keep it up! :D
I really like your video and detail explanation!!
Great Scott!! That was awesome!
You're someone's new hero!
Wow, nice. I must make it myself!
Very nicely done!
@1:22 interesting to see the ground from the external power supply shared with the ground on the Uno to provide the data pin from the Arduino with a common reference ground. I thought this would be more involved, eg MOSFETs to relay the data pin, but if this works then it gets over the hurdle of finding 43w+ to drive those LEDs.
Very genius and hard work you are . 👍😁
I like your led board which you solder in starting of every video
great proyect!
Spetacular!!!!! Great Project!!
Very nice project.
i absolutely love your Zentimeters
That was nice and I’m gonna try it,someday!!
This is art