Wood Gas Stove Science!! Vortex V5.4 Build!!

ฝัง
- เผยแพร่เมื่อ 23 เม.ย. 2015
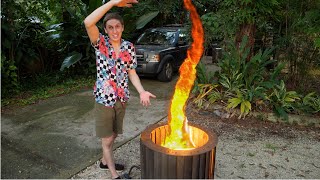
- Watch me build the Vortex V5.4 Wood Gas Stove! This Wood Gas Stove will reach 1500F and boil 2 cups of water in 6 minutes. This is made from recycled cans. Beans and Chili!!!
~-~~-~~~-~~-~
Please watch: "2 Minute Side Mirror Replacement for Your Car"
• Mirror Replacement 200...
~-~~-~~~-~~-~ - วิทยาศาสตร์และเทคโนโลยี


Thank you for putting so much effort in sharing your knowledge. I built a wood gasifier cook stove and put the results on a video on my channel but I am coming to your videos and starting over. I will make sure and give credit to you and your channel. Can't wait to work on this and use it.
Can't wait to make this stove. Thanks for instructions
Ric Komarek Good luck with the buil and let me know how it goes!
Beautiful Vid,Tutorial, End Product!!! Thanks
My search for mini wood gas stove has ended! I think this is the most detailed (measurement specs), clear, & concise DIY wood gas stove build. Very much appreciate you doing all the testing/engineering. I do have mini alcohol stoves but also want very compact wood gas stove. I am not a hardcore survival prepper or bushcrafter. Just want few mini stoves for occasional solo camping & emergencies to have in car & house. Thanks!
Thanks for the comments!
i highly approved this message. Thank You Very Much!
This is brilliant thank you for putting it on video for everyone.
Thanks for the comment
Very nice build thank for posting
Great
idea with the Vortex, i was thinking a time about to get vortexdynamics in to a wood gas stove but your idea with bending rhe holes is the most sublime. I thought about an eggshaped burning chamber.
Thanks for the comment!
awesome. thank you for the precise information, backed up with some real science and experimentation
Thanks for the comments!
I was thinking of ways to make a vortex inside a wood-gas stove, and your simple idea makes such a nice concentrated, combined and steady flame, that I will try something similar to this. I thought the holes would have to be shaped even more directional than this to work, but obviously not as I see in your video.
Anthony Colbourne great! Good luck and let me know how it works!
I built version 4 ... Thanks, perfection !!
Julian Canon Happy to help!!!
Thanks for a great video. Very informative and I successfully created my own 5.4 today. My jets aren't as strong so I'm not sure where I went wrong. I made the holes in my outer can 1/2 inch because I didn't have a 3/8 bit. I'm not sure if that's my problem or it's my fuel, I'm using sticks scavenged from the ground. Either way thank you for this great video and all of your informative videos.
Great tutorial Heath!...
aztiger1 Thanks, Hopefully it helps!
Clear and precise video, thanks !
+gaetanproductions Thanks, Glad you liked it!! Thanks for the comment!
Thanks a lot! Nice instructions!
Thanks!
Impressive design and excellent cut to the chase presentation with no hemming and hawing.
Thank you for sharing that.
+Bevin Chu Thanks for the comment!
+Heath Putnam
Thanks for the tightly scripted presentation that didn't waste my time rambling aimlessly!
Much appreciated!
This is the best build, I am going to make one tomorrow, cheers buddy 👍
Awesome, let me know how it goes. If you have issues with jet power enlarge the holes in the outer can a little! Some people have had this problem, and that fixed it!
I made this stove last night, it's brilliant! Isn't the point of this stove to get an efficient, clean burning, light weight stove that requires no fuel other than the sticks and twigs that are so abundant? Alcohol and other fuels in my other stoves are great and all, but the stove is useless to me when the fuel runs out. This stove is not only fun to build, mesmerizing to watch, it is also practical. Perfect for my emergency preparedness kit. Thanks again for all your videos!
+Greg McGary Thanks for the comment! You hit the nail right on the head. I'm glad it worked out for you!
Oh, at long last! I've been waiting for this for so long that I even bought a chineese clone of wild wood gas stove! :)
Dmitry Olyenyov Sorry it took so long, hopefully you can throw your clone in the back of your closet now! :) Let me know if you build one of these, I'd like to hear your results.
Thanks for the Tutorial, Excllent videos!
Eduardo Hernandez Thanks, Glad you liked them!
Very good ! I believe this is one of the best & simplest demos clearing up some daubts & ???? .
How cool a vortex fire pattern :)))
Thanks for the comment!
Great tutorial! Thank you
Thanks for watching!
Hurricanes and tornadoes rotate counter-clockwise in the N. Hemisphere. Bending the air holes to cause the same rotation may help with the air/gas flows.
I have built them either way and it does not seem to make a difference. It would have been cool if it did. Thanks for the comment!
That is great man, thanks
Thanks for the comment!
Have you considered using a wire mesh like a cooling tray from baking for the underside of the inner can instead of it's base with holes drilled? Is there any benefit to restricting the air to the chamber for the primary burn?
the video is great.. i can wait to try by my self..
laventier hope it works well for you! If you have any problems post them here and I'll try to help you!👍🏼
Heath Putnam okay.. ill asking here if i meet some trouble.
but im gonna used the biscuit can. its a larger than the beans can. all i need now is find the smaller one for the middle area..
Great video.. Thank u
Thanks for the comment!
I built one based on your design (more slapdash) and took it on my recent trip along the Lost Coast Trail. It fit perfectly in my msr pot and worked like a charm burning driftwood twigs. Pictures to follow.
Keith Alexander that's awesome! Send pictures! Thanks for the comment!
aerohobbiesgames.com/images/IMG_1755.JPG
aerohobbiesgames.com/images/IMG_1756.JPG
Keith Alexander can i ask you something?
what device that you use to capture those pict? its look real nice in my eyes
laventier my friend took these with either an iPod or iPhone. He had both on the trip.
Keith Alexander its look great clear shot man ☺️.
btw in where did that pict take? the background is seems nice for adventuring
(sorry im not to good in english spell )
Did you ever do a pot stand 3.0 build video, or is there a pot stand you'd recommend for the stove? Also do you think the insulating material on the outside of a "Jetboil" would work on this stove? Thanks for your quick response!!
+Greg McGary I have not done a pot stand video yet. I'll try to get one done this weekend. The insulation may work when it is very cold. I did an experiment with insulation and it did not make a significant difference, but try it and let me know how it works! Thanks for the comments!
well done.
+Jerkabobber Thanks man!
The only difference between this and the normal wood gas stove design is that you used a tool to put a twist in the hole to direct the air in a circular flow.
OK?
Genius.
I really have to hand it to you Heath, the vortex is really cool to look at. Was wondering if you could do the same to a rocket stove ??? Thanks too.
It could be done with the secondary burn in a rocket stove! Thanks for the comment!
@@heathputnam9524 Could you be so kind and explain how this would be done ??? Thanks
As your rocket stove burns the hot gasses are rising in your “chimney” if you introduce fresh air part way up (secondary air) the remaining unburnt gasses will ignite in the chimney. If that (secondary) air is introduced at an angle it will produce a vortex type flame. It will require some experimenting on the placement and size of the secondary air inlets that will depend on your particular rocket stove. Thanks for watching!
Hey there Heath Putnam. I'm trying to make a bigger version of these with a stainless steel pot. One is a 19 litre pot and the other one doesn't quite say its litre measurements. Now, I dunno if I should make the holes bigger or keep them the same size as per the cans on your video so that it doesn't mess up the air current effect its supposed to have. Could you please give me some advice?
I find it strange that your 6 outer inlet holes have less than half (40%) of the area compared to the 41 primary holes. Should the intake not offer enough area for primary and secondary combined?
Boiled in 6 minutes? Not bad. I just made a copy of a stove called Ranger Mk II or something like that. Boiled me two cups of water in only 25 minutes.
Lol! Not a great time! Thanks for the comment!
@@heathputnam9524 the amount of holes in the can just didn't seem right. I even told the dog there's no way it could work. Sixteen 1/4" on top and thirty-two 1/8" on bottom. I didn't do the math but it must be close to 1:1. Sure, it burned over an hour but who wants to wait 30 minutes for Ramen?
Have your dog watch again! Haha! The 16 secondary holes are 3/16 inch diameter and then there are 25 holes in the bottom and 16 around the bottom sides. This is a total of 41 primary holes and they are 1/4 inch in diameter. If you follow the instructions carefully you will boil water in as little as 6 minutes! Good luck!
Rick, I just reread your second comment… was it about your stove or the Vortex 5.4? Sorry if I misunderstood!
@@heathputnam9524 it was the other one. And just like in one of your videos, there was a thick, sticky goop on the bottom of my pot. In fact, it was stuck to the pot stand and pulled it off when I tried to remove the pot.
From your videos the vortex looks counterclockwise, but in the build the angled holes seems to point clockwise. What is the best angle direction?
Nicola Chiesa I have built left and right twist versions. It makes no difference. Thanks for the comment!
Thank you for a great build video! The entire Wood Gas Stove Science
playlist is a joy to watch. I'm having a go at V5.4 and wanted to ask how
snugly the lid of your outer can fits after you've removed it with the side cutting opener. From the
video it seems that it snaps into place to make an airtight fit and that your cutter automagically makes some sort of special edge on the can to make that fit possible. My opener makes a clean cut but that only allows the lid to lie on top of the can with something like a 0,5mm gap in a couple of places. What brand and model is your opener? My concern is what an imperfect fit will do to the draft and the potentially less elegant solution of using solder or pushing the inner can through the lid while it it still attached.
My side cutter can opener is nothing special. I think I got it from Bed Bath and Beyond. It cuts a groove in the outer lip of the can, so it can be just pushed back in place. It seals up nicely. I have had several people comment they were not getting a good burn when they built the 5.4 but I just had them add another hole to the outer can or make the holes slightly larger. It only happens some times, I think it may be an altitude thing. Thanks for the comment.
A little confusing on size and numbers of holes. From what I can gather, the final was: OUTSIDE CAN - 3 7/16 dia x 5 3/4 tall 8 - 3/8 dia holes 3/4 up from bottom INSIDE CAN - 3 dia x 4 1/2 tall 24 - 1/4 dia holes 1/2 up from bottom and 17 - 1/4 dia holes on the bottom and 16 - 3/16 dia holes 1/2 inch down from top
I think you have it! Thanks for watching!
Heath,
I just built my first Vortex 5.4. I did not get your results. The secondary ports were weak. At some times they would quit, and the wood would just burn in the chamber. If I gave the can a little shake the secondary ports would start up again. Other stats: I tested outside in a light snow storm with a light wind. I don't have any wood pellets so I used hickory chips (they lay flat in the burn chamber I don't know if this affected gas flow or not.) Please comment so I can see this thing roar. Also can you provide the build specs for the pot holder I think this would help. Thanks.
+Troy Belanger Try making the holes on the outside can a little larger or add one. Let me know if that helps.
+Heath Putnam I increased the intake holes to 1/2". Then I read about the 5:1 ratio of the inner can, so I increased eight holes from 1/4" to 5/16" (every other one on the side of the can). I switched fuel to pellets (from chips) and ran a burn test. Results: gasification started at 3min. mark, and ran until the 24min. mark. At that point I blew into the top, it reignited, and finished at the 34min. mark. Flame was very impressive.
Next test, I will increase the eight air intake holes (of the outer can) from 1/2" to 5/8". Then the air intake holes of the outer can will be greater than the holes of the inner can (as mentioned in your comments). Have you tried this test yet?
Glad the comments helped. I generally only open the outer can holes enough to get a good burn because if the holes are too big the flame can be effected more by wind. I like to here my videos helped people build and enjoy wood gas stoves!
Thanks for the comments!
+Heath Putnam Can you provide the specs of your pot holder 3.0. I think this will help to improve my flame. thanks for the videos.
Yea its called a pressurized stove.the one I have was used in Vietnam,and is still going strong.the pressurized system burns almost ant liqued fuel,including gasoline.pluss it doubles as a wood burning stove.google the svea 123, you'll figure it out.
Put it this way,I don't use those weak pop can stoves.i useualy get around three hours on one load of alcahol,haven't tryed all the other fuels I can use yet,exept Zippo fuel.its bout the same.as far as temp goes,the brass burner glows bright cherry red every time.
🤯🤩 how beautiful mind blowing! You're such a cheater on your math lol to get the holes I'll just so. Gorgeous workmanship one slight problem you missed mentioning about the topper or whatever it is you call what you put your little pot on perhaps a potholder. Fabulous workmanship thank you for sharing
Becky Spindler thanks for the comments😁
Becky Spindler I do have a video on the pot stand. Thanks again!
@@heathputnam9524 What if the pot stand had much smaller holes and all bent in the direction of the vortex?
Really appreciate the detail. I've made at least three from your info and all looks well until I put a pan on and then comes the smoke. Played around with bigger holes outer can and inner secondary and with your pan stand almost get there but still the jets are almost all yellow. In UK we don't seem to use the taller size outer can so limited to one only a cm bigger than the inner so can't experiment with that very much. Haven't cut the bottom off completely as in my commercial gasifier but it's possibly the next thing. Have you anything to offer on tuning for blue jets? Even the yellow aren't really strong. Thanks.
I'm using wood pellets btw.
I would not change the secondary (top holes on inner can) hole size, but increasing the size of the primary( lower holes on inner can) hole size slightly. Also try increasing the hole size on the outer can slightly. Some optimization is needed on these stoves depending on elevation and other weather conditions. Another factor to help reduce smoke could be pot stand. If you used my design from my pot stand video... Try making one with one more hole around the bottom. Let me know if this helps! Thanks for the question!
Thanks for your prompt response...It was a comment from Joe Marques who made a lovely looking stainless stove and the only person I have found who commented on the smoke issue saying (at about 12 mins in. th-cam.com/video/67_-INx2iEY/w-d-xo.html) that you should increase the size of the secondary air holes...so I tried that. Number four tmrw (I'm trying to find an outlet for selling grapefruit pieces in plastic bags...that's the tin I have to use for the outer..though I may have more success with the ready peeled potatoes!). Am getting quicker now but couldn't try stainless if I can't get this right. Let you know
Jeff Lynn the Jets will lose power with larger holes in the top of the inner can. You mentioned weak jets of flame... I found I lost a lot of power when I increased the size of the holes to 6mm or larger. 4.5 - 5mm was what I found optimal.
Yes that's just what I found. First build was best till I found the smoke later...impressive flame and jets but I drilled out the secondaries slightly and found exactly that. Already on with number four since my first post. My drills are metric and don't transpose directly to your 3/16 and 1/4 so I've chosen lesser equivalent on this build. Back to basics. Thanks for the help...it's become a mission.
hi sorry i'm late but what is your secret for having clean holes when your drill the can? build my very first tin can TLUD yesterday :). thanks BR
Drill slowly and use a file after. Thanks for watching!
i'm imagining you could use similar cans right? say a 28oz can of tomatoes and a 14.5oz can of tomatoes that isn't a flip top? dimensions of the can are slightly off but i don't see it affecting the performance of the stove any also on the outer can would it matter if you didn't keep the bottom on? don't the ashes fall through the bottom holes of the inner can? how do you get those out?
Yes you can use other cans. Things to beware of...
*about 1/4 inch between the inner and outer can. More will not properly heat the air, less will obstruct airflow
*keep the primary/secondary air ratio as close to 5:1 as possible
*as little air leakage around the top of the cans as possible.
*best performance comes from precise hole placement.
*if your stove does not perform at first, try enlarging the fresh air inlet holes slightly
Hope this helps. Thanks for the comments!
I like to keep the bottom on the can so it doesn't start a fire. I store my pot stand in between the two cans by taking the top off the stove, sliding the pot stand over the bottom of the inner can and then putting the top back on the stove. When I do this I just dump out the ashes.
You can use different cans just keep the air ratio similar and make sure you have enough airflow between the two cans up to the secondary air holes. Good luck! Thanks for the comment!
Can you build thisstove using a quart paint can as well? It's my favourite size for a stove.
There is a video. Thanks for watching!
Have you tried using flaps in instead of the twisted holes?
Yes, but getting the correct air ratios are more tedious. Thanks for watching
Have you ever tried one large hole in the bottom instead of the many small ones?
I am working with ratios to fully understand the science behind the stove so the holes are important for the area calculation. Too much primary air volume and the stove will not develop a proper pyrolysis zone and will Not be efficient. Thanks for the question.
super
Thanks!
And by no means am i knocking your stove.its actually really well made.but I think I our quest to gain compleat combustion,chaseing the blue flame basicly,we steped off the path we need to be on.a small stove that can burn at 500 degrees for two hours is way beter than one that burns @ 1500 degrees for 15 minutes.this type of stove has one job.to cook food.and a longer burn time on small amounts of fuel is desired here.for example,we made a similar stove that you set a sweedish tourch into.same can disign basicly,just a difrant way to build and burn the fire.45 minutes burn time,and we used a very small log,small enough to fit in a soup can.id like to see longer burn times reached,but few people are working on this.
+Richard Peterson My mission during my Wood Gas Stove Science series was to learn the science behind wood gas stoves. Another personal goal of my work was/is to learn how to make a lightweight, clean burning, backpack stove for cooking a quick meal or hot beverage while on the trail. The Vortex 5.4 seems to suit that goal. While hiking I do not really want to stop trail side and spend the afternoon cooking. You can tailor your burn time with this design from about 15 minutes to 40 minutes with the amount of wood pellets/fuel you add. If you need really long cook times a different design is for you. Thanks for the comments! :)
If I wanted to build a larger version, would the hole diameters etc. just scale up as well? For example if the cans were twice the size of the ones in the video, would the size and number of holes change? And is the space between the inner and outer can important?
+Tothe Point The bottom holes are actually considered the primary air intakes. The problem is probably the ratio of primary to secondary air intakes. Through my experimentation I found that if you can get close to 5 times the amount of primary (bottom) hole area than the secondary (Top) hole area you will get a much cleaner burn.
To figure the total area of the top holes divide the size of the top holes by 2 (that's the radius). Multiply the radius by the radius then multiply by PI (3.14) then multiply that by the number of holes. Take the number you got for the total area of the top holes and multiply that by 5. That is the total area you will need for the bottom holes.
Divide the size of the bottom holes by 2 (that's the radius). Multiply the radius of the bottom holes by the radius then by PI (3.14). That gives you the area of each bottom hole.
Divide the total area you need for the bottom holes by the are of each bottom hole. This will give you the number of bottom holes you need.
Hopefully I didn't make this too confusing.
Anyway, get your ratio correct first then try to burn the stove. Let me know your results. If that does not work, build my V5.4 and give that a try.
Good luck!!!
Heath Putnam Thanks, I'll try and figure out the areas and see what I can do. I don't eat a lot of canned goods so optimal cans to work on might take some time, but I'll try and get something before cold weather sets in. Thanks again.
If you have trouble send me the size and number of the top holes and the size of the bottom holes and I can give you some more guidance.
Heath Putnam Thanks again, man. I have a busy weekend but will get back to you soon as I get a chance to work on it.
OK offer stands whenever your ready
Small note: The bean can used here is 28 ounce, not 26 ounce. Looking forward to making and testing this stove with actual foraged fuel.
👍👍🇧🇷 Parabéns
Thanks for watching!
I don't mean to be a bother, but I've just built two 5.4 stoves to spec, clean holes, meticulously executed. The cans are the same size as the cans you recommended. One cup of wood pellets, and a splash of heat from a yellow bottle. The flame after 15 minutes looks and feels similar to when I first lit the pellets, only an occasional weak vortex flame spurt. Never finished burning the pellets before the flame finally went out at about 25 min. Outside temp 40 degrees, no wind. Any ideas!? Thanks for all your help!
+Greg McGary Verify the inner can has at least 1/4 inch clear space below it so the air can flow between the inner and outer can. Verify you have at least 1/8 inch gap between the sides of the two cans so the air can flow up to the secondary (top) air holes. It sounds like restricted air flow to the secondary air holes. you may want to try to add or enlarge the fresh air holes on the bottom of the outside can. Did this look like your burn test? th-cam.com/video/OnukiLba3bk/w-d-xo.html
+Greg McGary I replied to your comment but it included a link so it may have gone into spam folder.
+Heath Putnam I increased the outside cans air hole size to 1/2" it's working awesome! Thanks for the link, and all your help!
Awesome! you should be able to cover one of the outer holes without effecting the jets. If you cover a hole with your finger and the flame dies a little, you may want to give it a tiny bit more fresh air. Glad it works for you! Thanks for the comments!
Heath Putnam i
Great vídeo. Inspired on your work and the work from others I am making a bigger version to heat ourselves in our factory with "dirty" wood product rests without the toxic smoking of a normal hobo burner. I put a vídeo in my channel in case you are interested to see it. Cheers.
Just out of curiosity,is that temp realm necessary?most of all back packing stoves average that time in boiling two cups of water,including a dakotota fire hole and a sweedish fire torch.and if its burning that hot,how long will you really get in burn time?I agree we need an efficient stove,with minimal smoke,and we need to reduce cook times,but anything above 450 degrees is excessive.all food can cook at or below this temp.what we need more than insane temp is long burn times on small fuel supply.master this and ill be impressed
I built this gasified and I only got 25 minutes burn on one cup of pellets? So I went back and watched the video 4 times. To make sure I had everything right. I still only get 24 to 26 minutes of burn time on one cup of pellets?
I am using softwood pellets, they may burn a little longer than yours. If you want a longer burn time, you can cover a few of the primary holes in the bottom of the inner can.
Heath Putnam thank you, I will try that . Which softwood pellets are you using?
Good 🌹🌹🌹🌹🙏🙏🙏❤️❤️❤️❤️
Thanks for watching!
Tothe Point**** Unfortunately you have your comments turned off so I can not respond directly to you. If you want to make a bigger stove, the hole size should remain the same you will require more of them though. Keep the spacing between the holes and the distance from the top or bottom of the can the same. The ratio should be close to 5:1 area of primary air holes to secondary air holes. The size of the outer can does matter. If the outer can is too small the air will not flow freely up to the secondary air holes and if it is too large the air be super heated and the strength or the burn will suffer. My rule of thumb is outer can is not more than 1 inch bigger than the inner can. You will have to experiment a little to get it perfect. Check out my other videos for the science behind wood gas stoves!
Heath Putnam Thanks for the quick reply. (I don't know how to turn comments on, will try and find out, sorry.) Great explanation, as always. Thanks!
涡轮原理都来了
+海邱
是的涡轮增压效果稳定火焰。谢谢观赏
Yes, the turbo effect stabilizes the flame. Thanks for watching
So if you can beat Swedish tech,go for it.ill buy the first one that trumps them all.
+Richard Peterson You got a deal... I'll let you know! Haha!
Heath Putnam I need you to make wood gas stoves for me in Pakistan. You are genius. Your designs are superbly perfect. Can you explain what is vortex wood gas stove? I like to hire you in my company in which you will be handed the duty of manager and I will be ceo we will together make millions of money.Can you help me plz? i would be very glad if you are ready for this service to mankind.
I'd rather not move to Pakistan! Thanks for watching!
Hey Heath, thanks for your videos, I really like the optimization video as well. I have watched about 20 builds of this stove but yours is the one I will be making.. I found from about 8:00 to 9:00 of the video a little confusing. It looks like the outer can sits upright. You use the cut off top to make that right that goes around the inner can. However that ring just kind of sits there with gravity. Many other builds have the outer can sitting upside down with the open end on the bottom. They then cut a hole in the bottom the size of the inner can and squeeze the inner can in. It seems to me that with your method, the ring isn't air tight. Does that mess with the 1/5 ratio? If I did it upside down as mentioned, would that mess with the 1/5 ratio? Thanks!
The side cutting can openers I use cuts the can in a way that the top sort of pops back on relatively tightly. **This method requires side cutting can opener!** Warning! these stoves get so hot that an open bottom can will burn whatever it is sitting on! You can follow anyone's instructions you would like and will have mixed results. Possibly better, possibly worse than mine. I do not think using an open bottom stove with the can flipped over will hinder the operation or mess with the 5:1 ratio. Whatever you do, have fun and be safe!
I have planned to make few of these with my scout patrol but I struggle to understand how does bigger can's top hold smaller can still. I also ponder what kind of can opener should I use to success. I only have this army style opener bit.ly/1UC94oc and it doesn't make a clean cut but do the job.
+Joona Halinen I use a side cutter to remove the top of the large can. This allows the top to be put back on the can easily. Pause the video at the :08 mark to see a good view of the can opener. After removing the top of the large can you will cut a hole in it just big enough for the small can to push in but tight enough so the rim on the top of the small can dose not go through the hole. Watch the video from 7:50 to 8:40 in slow motion if you have to. If you can not get the right can opener you can flip the big can over and cut hole in the bottom of the big can. It makes making the Vortex Tweak tougher, but the stove will work very good without the vortex. The open bottom of the large can will allow the ground underneath to get very hot so use it on a rock or something so you don't start the ground on fire. Hope this helps. Make sure to like the video and subscribe if you like.
+Heath Putnam I actually found proper opener today so I'll build one this week. What kind of paint did you use in your own? Some kind of heat resistant carpaint? Paint has to manage over 1400 farenheit! How has your paint react to use?
+Joona Halinen 2000 degree spray paint off amazon. The outer can is still holding up very good, the inner can still has all the paint but turned white. Good luck!
Can you make me one?
I can
order one for me from Korea. Oh South Korea.
USA! Thanks for watching!
And really I have nothing against wood gas tech.i feel it has beter off grid fuctions,such as running a generator,but they eat wood way to fast.best one I made had four walls,and was very close to compleat combustion,but it still didn't stack up against my expidition stove.and where I camp,there is no room for error.i don't do weekend hikes.rocket stoves fall I the same park here.i made some really good ones,even from clay,but its to hot and burns the wood to fast.think about it,you induceing fourced air into a fire,its gona burn like a forge for a few minutes and then its done.its all we are doing here.creating a strong draft.our ancestors did this with a Dakota fire hole a long time ago.for the weight and space,the Swiss and sweedish army stoves are the best route,and if we can make a small fuel puck that burns hot and for a long time,we got a solution to the apocalypse.sawdust and used oil works great but its messy.paper alown isn't volital enough for compressed pellets.long way to go befor we solve this problem
Ok I should be sleeping, but I'm geeking out on this! I just watched a build on a wood stove. The stove itself is beautiful, and stainless, but I'm wondering if I can apply your ratios and principles to the other stoves materials? Would you mind watching the video and tell me if and how I can make his stove into your 5.4 version? th-cam.com/video/67_-INx2iEY/w-d-xo.html you are the man!!
+Greg McGary You should be able to apply the same principles. The air ratio for the Vortex V5.4 is 5:1 primary air (bottom of can) to secondary air (top of the can) holes. Keep your secondary (top) holes at 3/16 inch diameter just make more of them. If you go to large with the secondary air hole size you will lose air velocity and the "jets" may not extend to the middle of the stove. You want the flame to cap off the top of the stove or you will not get the pyrolysis (oxygen free) zone above your fuel. Make sure your fresh air inlet (outside can) volume is greater than the total volume of your primary and secondary air holes combined. Hope this helps!! Thanks for the comments!
You could have just measured and divided...would have been quicker. The demo flame did not look like an efficient burn....yellow, really?
Too small. I use the bean can as my inner can and a Beef can (slightly taller and wider) as outer can.
CIGARETTE LIGHTER CAN
Just watch your eyebrows!
All I'm saying is its cute,but until I find a stove that can beat my sigg,I'm not going to be impressed.by the way,I just ran a two cup water boil test on my sigg,four minutes.and I used many a tablespoon of alcohol in the stove and actually still have fuel left over.there was a reason why this stove was a champion on expeditions all over the globe,to the most remote areas possible.it burns anything,consrvitive on all fuels,and cranks out the btus.it beats my gas stove in my house.we can stop trying to build a good stove.Sweden beat you to it.fuel is a diffrant story.with a stove you can burn anything in,we can explore more options like fire dough and biomass briquettes.
+Richard Peterson So... How hot does your alcohol stove burn? I bet at least 1800F to boil water that fast.
i agree alcohol stoves are pretty sweet, but I'll keep working on my wood gas experiments. Thanks for the comments!
neetly made. Just like some japanese's alcohol stove.
coldiceEVO Thanks :)
How many times can you say "I" and "ME" in one bloody video
Well, I'm not sure. Let me count! Thanks for watching.