Use PCBs to Make Awesome Modular Panels - Part 1 The Passive Multiple

ฝัง
- เผยแพร่เมื่อ 1 มิ.ย. 2024
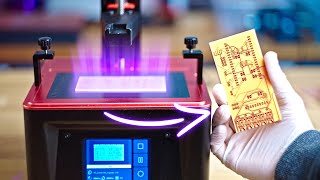
- Using a passive multiple as an example, I show how I make great looking front panels out of PCB boards and they're very inexpensive!
Part 2, Front panel design, graphics, and layout - • Modular PCB Front Pane...
Part 3, Module circuit board layout - • How to Make Great Look...
Thonkiconn jacks or equivalent:
Thonk site (UK) part # PJ398SM - www.thonk.co.uk/shop/thonkiconn/
Ebay - (US vendor) - www.ebay.com/itm/233302087475
Affiliate link:
Beginner soldering iron kit - amzn.to/3cRY4qf
Doepfer Eurorack standards - www.doepfer.de/a100_man/a100m_...
KiCad Software (PC design, board layout) - kicad.org/
Inkscape (vector graphics design) - inkscape.org/
svg2shenzhen (Inkscape plugin to convert to Kicad) - github.com/badgeek/svg2shenzhen
JLCPCB (manufacturer) - jlcpcb.com/
00:00 Intro
02:20 What is a passive multiple?
03:30 Patch cables
03:57 Jacks and how they work
04:59 Module wiring
06:02 PC board stack up
10:04 Module dimensions
15:50 Please watch parts 2 & 3!
16:16 Preparing files for manufacturing
20:55 Ordering information
30:03 Outro


JLPCB does aluminium pcbs now. So you can select the Aluminum option and get a metal panel :)
timestamps would be a nice addition, but great video none the less.
Added! I was wondering if people would find them useful for something like this. It sounds like it!
Great beginner guide!
I figured Thonkiconn was pronounced like Donkey Kong
Thank You!
just what I was looking for!
keep em coming man, this is great.
Since I have only just started to create music myself with the phenomenal possibilities of the Eurorack format and at the same time am just starting to develop my own module ideas, I have to say that this video (or rather this series) is extremely helpful. THANKS!
Good luck with your channel. As a hobbyist, I've done a lot of digital electronics, but could never break into analog electronics until i heard how you synth guys explain it.
Sweet vid man. Exactly what I was looking for. Thanks
Exactly what I was looking for! I hope there's more on the topic of designing and building modules 🙏
Man this is great, thank you for the effort you put into this series!
Using PCBs for panels is a brilliant idea. I was trying to figure out how to cut aluminum and transfer paper print but forget that. These are cheaper and look nicer. Thanks!
Thank you, this is extremely helpful!
Hey. I came across your channel today and left a sub. This is exactly the video series I was looking for! Very helpful and well done. Thank you!
I Love your video!!! All of it!!! Thank you so much!!!
Just found your channel and It is out of this world. Video production and quality is great. Very useful information too. Bests of luck with the channel. Thank you for sharing the knowledge. :)
I’ve just stumbled across this and have to say thank you for what you are doing .. great pace, great resource, instant sub 😁
keep up the great work
This was extremely helpfull! Thank you so much for spending your time making this.
Just an incredible video! So grateful for all these insights!
Thanks for making these! Super helpful.
Brian, thanks so much for this introduction! Hope the following parts will take me through the design process in KiCad. As I am used to working with illustrator I hope I can use (converted) SVG files.
Wow, exactly what I was looking for! Thanks for all the work you put into this!
PS: A video that would be really helpful would be one that explains how to design the power section of a module so that plugging in the power cable the wrong way doesn’t result in a fried board. I love boards that have “either way” power, but I haven’t really seen a clear explanation of how the circuit works!
@@LillySchwartz Hmm. I'm not sure how you'd do either-way power for a Eurorack module given the pinout configuration. Because I make all my own modules, I make all of my board power connectors shrouded which includes a key so that I can only plug cables in one way. As long as I've put my connectors on right and have cables that are wired correctly I should never have a problem plugging my cables in incorrectly.
When bringing up a module for the first time it's good to check that the power and ground connections look to be hooked up to chips and the rest of the board correctly with a continuity check like on a multimeter. I had switched positive and negative supply voltages on a board I'd had manufactured and noticed it with a continuity check before I ever plugged it in and fortunately was able to correct it before anything was ruined!
@@eurorackDIY yeah, I definitely only want to put keyed connectors on my modules, but I think the either way power is really cool too. I will link an open source pcb version of mutable instruments peaks that has either way power on the board. Since I’m still a beginner at all this DIY electronics stuff I’m not quite sure I really understand the circuit! And power is not something I want to mess up 😅 maybe you have better luck at figuring it out than I had so far and find it interesting too!
@@LillySchwartz I had a look at the Peaks schematic to see what you were talking about (and, how awesome is it that Mutable Instruments open sources all their stuff - I've learned so much about how things are done from their schematics and source code!). I may have misunderstood the original question: it looks to me like there is protection for if you plug in the cable backwards (properly oriented protection diodes) but the board won't still work if plugged in wrong (what I interpreted your question to be).
That said, yeah, I'll definitely cover some of the best practices I've seen on module power supply protection and filtering when I get to videos that have powered modules in them.
@@eurorackDIY Oh here I found some info: www.tips.modularparts.net/either-way-modular-eurorack-power-cable-orientation/ Seems there is a rectifier IC on the board that outputs the correct polarity. It's cheap too, so that would make for absolutely foolproof modules! This was the info I was missing, I was only looking at the diodes and couldn't figure out what was different about it than what's on other boards. Turns out the IC does all the magic! Cool!
Wonderful content, really appreciate the work
Really enjoyed this video. Thanks for sharing your knowledge.
just found your channel - thank you for the effort you put into this. stoked to follow, and learn along the way.
Thanks Man this is awesome
Just found this and really appreciate the channel & the content. Subbed.
Thanks for making these videos! I'm going to use them to make a legit front panel from my Wiggler synth
Can't wait to order my first pcb! Now for all the stuff that comes before that :/
thank you so much :)
great series! I think the second half of this video should have been its own video though... thanks for this great information!
Yeah, the organization of that first series wasn't great. This is a learning process for all of us!
great channel, you got my sub!
Hello! Because I am very new to eurorack I would appreciate if you would give me a link where to find the standard dimensions for the mounting holes of the modules. Or where I can find horizontal bars with threaded holes to buy. Thank you!
The generally accepted standard is by Doepfer: www.doepfer.de/a100_man/a100m_e.htm. There are several suppliers for the mounting rails. For my DIY case I bought them from Synthrotek: store.synthrotek.com/Eurorack-Rails_p_379.html (with slide nuts to bolt the modules in.
Yeessss !!
18:10 you mention that nothing will be drilled on the front panel. What about the screw- and jack holes? What do you need to do to get these drilled?
I probably should have clarified what I meant there. I was under the impression that the size of the holes on the front panel were such that the manufacturer wouldn't use drill bits large enough to make the bigger holes. In that case I presume they'd route the holes, meaning they'd use a small spinning bit and trace the outline of the hole (what they do to create the outline of the board) rather than a bit of the exact size that they plunge into the material one time to make the hole. I came to this conclusion looking at the manufacturer's capabilities and thinking they didn't list drill sizes any bigger than 1mm. However, I just now checked JLCPCB and see that they list drill sizes up to 6.3mm. Regardless, we need to provide the drill file and so far I've always received back boards exactly as I expected.
what is the height of these panels
They are standard Eurorack module height: 128.5mm
How to do multiple colors on a front panel ?
Using manufactured PC boards as I've described here you're limited pretty much by the color of solder mask available from the manufacturer you choose. From there, you also get a silk screen color (set by the manufacturer) and the exposed surface of the PC board copper traces - but that usually has a surface over it, usually shiny silver or gold. In the series I show how to use those three colors for your design.
@@eurorackDIY I’m looking at modules from the likes of Intellijel and Mutable Instruments which all appear to have 3 or 4 colors. I’m guessing they’re not PCBs right ?
@@symbiat0 I don't have access to those modules but I assume you're correct that they aren't PCBs. The Eurorack standard says that the panels should be 2mm thick aluminum and I'd guess that's what they are. I imagine you could find services to print aluminum panels and machine the needed holes and such but I've never seen one that could get you the same kind of small batch runs at a low price. If anyone does know of a source like that, please let me know!
vám you help me please