eBay clock kit. Full build and setting guide.

ฝัง
- เผยแพร่เมื่อ 28 ก.ย. 2024
- Full assembly of a typical eBay digital clock kit with case.
This is a nice kit to build. It's a very good example of circuitry that can be powered by a common 5V USB power supply, and even has a proper dedicated clock chip with battery backup.
There's a slight blip in the video where the power connector is soldered on, because I didn't realise that I'd reached a file size/video length limit and the camera stopped and restarted automatically.
Here's a general purpose link to find various similar clock kits on eBay:-
www.ebay.com/sc...
If you enjoy these videos you can help support the channel with a dollar for coffee, cookies and random gadgets for disassembly at:-
www.bigclive.co...


The Joy of Soldering with Big Clive
This is the exact same type of calming thing to watch as Bob Ross. I honestly didn't expect an hour-long video of soldering to keep my attention, but you've nailed it.
I just commented the Bob Ross thing then started reading comments and here you are! Lol.
Please do more kit building videos. They are fun to listen to you explaining random things as you go. Very therapeutic.
It's very relaxing watching Clive... something about his voice and gently explanations... Even as a professional electronics technician I find it interesting.
He's the Bob Ross of electronics.
By chance, do you live in North America? I need an inverter repaired,, and have not been able to find an electronics repair person.
I can solder, but I do not know the proper names and ratings of the components to order.
Please let me know if you can help.
I'm glad you mentioned that the background noise was a lawn mower because I thought it was a helicopter at first and we were watching you build a kit in a 52 minute stand-off with the police. I suppose they would need a trail of dodgy electronics to tempt you out in that situation...
did he have lots of round tubes painted red with wires coming out the top :O
next we will hear people are washing their car, i will think clive lives in the 1950's but then, perhaps the isle of man is like that..
John Howard was cutting grass myself today, I am down south tho.
you can barely call this winter, no snow, hardly any frost, temps in double figures most of the time
I have more than half a metre of snow! It's winter, alright?
Hey Clive. I built this clock some time ago, and found out that you can short pins 6,7 and 14 on the bigger IC.
This will prevent the clock from cycling all those display functions, and will stick to one (you can cycle manually using the button). So you can have it display time all the... well, time :)
MasterBata .. do you short all three pins together?
Yes. If you don't want to solder them permanent, you can just run a thin wire from 6 to 7 and 7 to 14. Just press the wire into slot together with IC pin.
DISPLAY ALL THE TIME! 😃
Are those pins shared with the buttons or will you loose some functionality while doing so?
Check the schematic and you'll see P3 (a 2-pin connector) is pins 6-7 of the STC, also P1 (a 4-pin connector) has connections for +5v, ground as well as the two lines which are on the switches. These connectors are not populated in the original kit build, however I decided to insert header pins there in case these turned out to be useful. I only wish I hadn't fully assembled the case before reading these comments, now I want to do this mod but hate the hassle of disassembling the darn thing!
Can’t stress enough how glad I am that I found this channel.
Clive is the man!
Better late than never!
Me to. Clive is our hero
That stands for all of us
It'd be cool to give everyone some advanced warning on what kit you're going to build give us time to get one as well and the build it live so we could build along.
You could just order it off ebay and then watch the video when the kit arrives. :)
hahahahah!
he said live. We need a livestream build!
yep!
There is no way I can solder as fast as that, I have to keep stopping to calm the jitters.
This setup is definitely better than the ipad now. I listen with headphones and the audio sounds very good. Nice build too!
hifromrich I think that there is some noticeable echo that I don't like.
hifromrich it's much better video wise, the audio quality is about the same which I don't care as long as it's not too echoey or sensitive.
sounds fine to me, but i have no frame of reference for what he sounds like in person
video is artificially sharpened with a bit of white crush
i'd rate it overall a little higher than the ipad
Tru dat
31:08 Might have been a head collision! Bearing in mind that it's a mid tier smartphone it's very good.
We could do with some zoom ability, I wonder if the digital zoom is useable?
I’ve watched this video a few times now. I love how all the parts' purpose is explained and who doesn’t enjoy watching Clive solder? Somewhere I’ve got a clock-radio kit what I’ve lost the instructions for, but I think they’ll be online somewhere. I've been inspired to give it a go.
My in-laws had a major house fire from a Dyson vacuum that hadn’t been emptied. A couple of years later I was on fire training through work and the fire person who facilitated the course said it’s not an uncommon cause. Yet have to emptied them after every use.
I can solder, but I still watched this video from start to finish to see how an expert does it.
This is a good video.... especially for those who have never built kits before.
Split10 I too am very comfortable soldering, and I too watched it completely and managed to pick up a few things. Though I mostly was laying in bed trying to fall asleep.
thank you for explaining how to set the damn thing, just made this kit and the manual had me scratching my head..
Watching you and listening to the bloke cut his lawn, very relaxing. I'm buying one of these, very interesting and good practice for my soldering. Thanks mate2
More Kits Please!!! I'm getting ready to order a bunch of kits to help me get practice soldering and I could use some recommendations on which kits to get.
I have already learned a lot from watching your builds and tear downs but one thing that I can't seem to get is taking schematics & moving to building the kit on a breadboard instead of the included PCB. I would greatly appreciate if you could make a simple kit with a breadboard instead of the PCB.
Why is it so fun to watch you disassemble and assemble stuff?
Please do more DIY kit videos! They are great!
I never thought I'd enjoy watching a 1hr kit build but you have a knack for entertaining chat throughout so it flew by!
I have built so many clock kits. I find it relaxing, fun and rewarding when someone comments, " hey that is a nice clock where did you buy it?" I tell them it comes in a bag of parts and I built it. I have had people want to buy them, so I sold a few.
These kit projects are always so fun. I love through-hole components for soldering. It takes me back to how just about everything was when I was a kid. I don't much care for the surface mount stuff. You're so right about soldering work being therapeutic!
Having been screwed over by Maplin 30+ years ago when they broke their mantra of "we always use the same resistor coding" but changed it without telling anyone. I gave up electronics. You and Julian inspired me and I have build a little bench power supply and am completing my DSO oscilloscope kit. The perspex cases are futtery as you suggest but I got there with little instruction but common sense.
One thing I learned recently that kinda blew up my view of electricity was learning the fact that the actual speed of electron motion was extremely slow, on the order of mm/s at best. I always used to believe the speed of current was the speed of electron motion.
Current flow (electron displacement) happens at almost the speed of light, but the actual flow of electrons through a conductor is extraordinarily slow.
bigclivedotcom Yeah my prof made it click when he made the comparison to an atmospheric shockwave.
We get into the really nitty gritty of electron collision next week. :)
+ElectricAvain Mine used the analogy of ping-pong balls in a pipe.
Graham Langley Which is a good analogy, and what I was considering doing.
+bigclivedotcom Consider no more - it was over 40 years ago so it's stood the test of time 8-)
After watching this, I actually just ordered one. I've realized that for all the time I've spent tinkering with electronics, I've never really built anything like this, so could be fun. Thanks for the video.
Such grace in handling those components. Like the ballet dancer of assembly.
I would love to see you do a rewrite of the software for this clock kit... You have the finesse and knowledge to make this function far better, like adding the option of: 12/24hr, ºF/ºC, seconds display, better clock setting functionality and I'm sure other fine BigClivities! (pretty please!) Thank you for your kind consideration!
Software?
I thought it uses a specialized chip that is not programmable.
@@louistournas120 It is actually using a programmable microcontroller. See zerog2k/stc_diyclock on GitHub for replacement firmware.
Several years ago, my mother and I built one of those electronic cricket kits together. I learned a lot about soldering, and it made for a nice memory.
It's not because lead free solder is hazardous in the process of soldering, it's because what happens with it in the waste process. It's just part of a wider initiative to reduce the amount of lead used in production overall. The big problem of lead is that is a very useful metal, and it has several applications where alternatives aren't readily available. It seems to me soldering was a relatively easy target. After all, lead water pipes were already banned ;)
I thought the justification was to keep lead out of landfills, because while it is reasonably harmless to us, it's not harmless when it leaches into ground water, but isn't the EU mandatory electronics recycling supposed to do that? Then again, recycling is probably one of the least effectively implementable mandates, as opposed to RoHS, which can be and is implemented quite thoroughly. Anyway I have been pretty certain that justifications are usually just that, chances are some people in the industry were disappointed that things weren't breaking often enough, so not enough things are thrown away and bought anew, and lead free solder introduces a stress failure point, a pretty smart one at that, that it won't usually trigger too quickly, rarely within warranty, and one that goods from all manufacturers would be subject to, so none of the manufacturers can be blamed for low quality, brilliant!
Lead seeping into the water supply... Gee, wonder where we get lead in the first place.... oh right, out of the ground!
well in the last two wars we chucked about a fair bit of lead !
Take a look at Guiyu, China or Agbogbloshie, Ghana. Electronic waste is an immense problem that is shifted onto the developing world.
"Lead seeping into the water supply... Gee, wonder where we get lead in the first place.... oh right, out of the ground!"
Exactly what I was thinking.
Enjoyed the video. I was glad to see I'm not the only one who worries about putting resistors in the right way.
"Cool clock, Clive. Want to bring it to the White House?"
Cory in the house? No
Clive in the house? Yes
thechosendude LOL
Congratulations! Your comment has reached 100 likes!
Thanks. I am now the proud owner of half a dozen or so digital clocks. I absolutely love my Yihua 8786D, "cheap, generic" soldering station.
You should speak in audio books. Yet another great video. Thanks
I bought one before Christmas on the back of this video and finally got round to building it today. The electronics are a delight to put together, but dear god that case is a pain. Thanks!
. . . nearly an hour long ! time for a snooze.
Don't forget a wee dram! ;-)
ralfystuff you could use one to remind you to take a sip every few minutes haha
How about a dare: review some 'white lightning', sure it will have to be about a 2005 vintage by now, but well worth finding the original 8.5%
you watch your brothers vids ? :)
Maico
I love the things you do on your channel, Clive. This was especially helpful since I just built this kit and couldn't figure out why they had thrown in a diode. Then I scratched my head wondering how the thing gets temperature data and why the temps were so wonky. The instructions weren't very clear, but your video rescued me. Keep tearing down and building up.
Now THAT is clearly a homemade clock, not clock internals shoved into a case that looks like a bomb
yep, where is clives free trip to the whitehouse and a free xbox?
nice
That was 2015, get over it already ;)
never!
still funny
I think this is another good kit (including YOUR kits!) for those of us dipping our toes into electronics and getting our feet wet.Thanks again Clive!
I really liked assembling this kit a while back, it is a stylish little clock.
Soldering - if it smells like chicken, you're doing it wrong.
SandyStarchild
If your chicken smells like solder ! You are really doing something wrong!
@@jamest.5001 Rosin fried chicken 😋
As long as it doesn't taste like fish
I bought this kit and assembled it. It was a nice kit to put together, not overly difficult at all for this beginning solderer. It was an enjoyable 90 minutes or so. The clock is now in the bedroom :)
More kits please
Built one today and was looking for chip details afterward- and I saw this- You review. ! Yes, you couldnt buy the bits separately for the price of this kit. And it works!
Just bought one of these kits. It will either be here next week or the end of next month, but when it does get here, I look forward to putting it together.
OOOH you could replace the LEDs in the display for different colours!
Callum Burns I was thinking that. Every segment could be a different colour.
Cool idea!
Every segment in a different color would be really hard to read, compared to being in the same color.
Color changing LEDs in everything. It's only sensible.
yadabub Interesting idea. I'm not sure how it would look though, since every segment naturally has to have its own light box.
Great videos, decided to get and build the kit. Slight update is that the temp sensor now has a clear way of mounting which helps its accuracy, also since I use it in the shed I thought to let others know it takes about 0.1A so low power. And in the depths of winter the temp display actually display negative values. Well worth the effort
More kits please.
What you were saying about switching it on and then maybe having to do an autopsy , reminded me how I learned how to program computers. Way back in thecBBC days, I used to get magazines that had computer programs (usually a simple game) . After hours of typing there was inevitably a typing error, and the learning came by trying to debug the error.
Great stuff. Just don't take it to school in a briefcase for show and tell. Joke, ref: "Clock-Boy" . Thanks
ancient stuff dude :)
2 years ago makes it ancient...lol wtf. Are we all meant to forget the kid that took a digital clock apart and stuck it in a case causing everyone to panic thinking it was a bomb. Turned out well for him in the end, he got all future college and uni fees paid for iirc.
It's ok, America won't be scared of him because he's not Muslim.
I dunno... That beard.
Cut the blue wire...
After watching the build I sent for one. Finished this morning and I'll be blowed it works. Not bad for a relative newbie. And keep up the good work Clive.
I've just spent the entirety of this video looking at various kits on ebay trying to figure out if I could combine some of the audio ones to make some kind of bluetooth stereo with VU meters / graphic equalizer.
Thanks for bringing these to my attention Clive. I'll probably not be thanking you once I check my bank account and realise how much I've spent on these things.
Have you seen Julian Ilett's vocoder videos? He has bought/included some modules you may be interested in.
Purchased two of these in different colors. They DID come with the battery but all the instructions are totally in Chinese. Glad your video had a nice view of the english instructions.
I love putting together these kits. I have built dozens of them. You should do more of these.
When it comes to big clive fandom, length is a limiting factor at first, but after some time, you appreciate the longer ones more.
I soldered like Clive for decades, then I made a mini-lectern from scrap timber and it's now vanishingly rare for me to hear that hiss of burning flesh followed by searing pain. The wee lectern sits on my bench and places PCBs at a few inches below eye height. No more stiff neck either after long soldering sessions. Best thing I ever threw together.
Thank you, Clive, for showing this - I just ordered one for a fiver. I was looking for a clock/thermometer for my bedroom anyway. I sometimes wonder what other interesting things float around on eBay that I'd instantly buy if I were aware of their existence. What I like the most about is is that the firmware seems hackable, which I am definitely planning to do, as the default one seems to be shite.
Damn Clive u bending those resistor leads was smooth, like the back of a spoon! Gave me a little shiver.
Where government is concerned...their "solution" to a problem (that they themselves created) is usually worse than the original issue.
Like R134a refrigerant being so horribly under-performing compared to the original R12...which means your electricity and/or fuel bills will be much higher.
Which then causes exponentially higher greenhouse gasses from having to produce more electricity or more fuel to run your engines harder to make up for the shitty refrigerant not working as well.
Your government at work.
Great, my first real soldering project in 35 years and it worked! I found that soaking the case in warm soapy water makes the paper peel off easier. Partial smd for my next one, if i can decipher the chinese instructions!
Just ordered one, going to give it a go. I know zero about circuits or electronics. You've inspired me to give it a whirl, looks like a fun hobby. This outta be a challenge as I have little patience, you appear to have hoarded it all from the rest of us. Ha!
By the way, I am thoroughly enjoying your videos. Thanks for the content
i went and bought this clock kit and finished it just there today. I must say it really is quite a nice little build, considering it's so cheap
Just built one following your video. Without i would have never figured out the glass diode as a thermistor.
Bigclive, been a fan and subscriber for a while. What you mentioned about lead solder and odd standards by people who don't know anything is spot on. Thanks for the vids and having a mind of your own.
djtecthreat why should they know anything if they are thoroughly lobbied? No lead means more unreliable throwaway products, so I bet the industry rejoiced when the regulation was introduced.
I made one of these last year, although I got it from Banggood. It's surprisingly accurate - hasn't gained or lost any noticeable time in the 6 months it's been running in my garage. The temperature reading seems to be vaguely accurate, but I'm not worried about that. It's a great little clock and good soldering practice.
Hey Clive, thanks for suggesting this one - I bought one and it was a really super, lazy Sunday afternoon build...
Excellent audio quality now, Clive!! It even sounds like there is a lawn mower in the background. I'd kill to have lawn mowing temps right now. Actually the last two days in PA have seen nearly 80F for daytime temps. I shouldn't complain.
I ordered 2 of these the day after you posted the video. I finally got them last week and built them. Very nice kit had no problems with either of mine beyond the led modules having some loose pins, but they are easy to fix.
Ah you mentioning the crystal...well mine is running at about 2hrs for every 12 and as I remember taking too long with soldering it I think you are quite right. Ordered some today in the hope that will fix it. Thanks again Clive.
Thanks for the vid.
I Bought myself a similar kit and it worked 1st time.
Soldering was the easy bit. The case is like a 3D puzzle and the instructions are something else!
I had no soldering experience and I did a clock kit that has the 4 digit and 60 leds that goes around it. When you push one of the buttons you can make the leds do different circular designs.
Thank you, just got one of these clock kits thru eBaY. Very informative, keep broadcasting!!
You inspired me to pick up a soldering iron (not the best) and solder this kit first time. Thanks Clive
Hey Clive, this was a pretty enjoyable video. I'm pretty new to electronics, and your explanatory/hand-holding videos like these help give me a foundation and some (possibly false) confidence.
Cool! I also built this thing some time ago! Exactly this kit!
And my chips were actually dead. They sent them again without hesitating, though! Also quite fast!
Standards.... the good thing about standards is there are so many of them! Good build Clive. Might get one myself.
Subscribed, after watching your videos for months, I found it the least I could do.
Hi Clive, First time caller but long time listener. I just had a quick look and there is no EU restriction on the sale of lead based solder. RoHS does restrict its use in newly manufactured products and there are still exclusions for some industries (even then it seems individual countries still have the option of applying exemptions.) Don't expect lead solder to go out of production or be banned to home gamers any time soon.
I love to listen to you talk about all this. A wealth of information! AWESOME. Do i retain any of it??! Most likely NO. But that's what's great about YT. I can re-watch to my hearts content. 😃
has some nice functions for a cheap clock kit, and it's also a good kit for soldering practice
This was pretty cool, seeing someone who know what he is doing building a kit like this.
Learned some stuff, so many many thanks, awesome watch, nice kit too.
Hi Clive,
I just want to say, love your videos and love hearing you talk about stuff.
It's really weird it just feels like a conversation
Anyway, thanks for the videos they are brilliant.
22:08 For the photoresistor and thermistor: There are holes in the top of the case that these two things can stick up through, so leave a fair bit of lead on them so you can make 90 degree turns upward out of the case... Serving Suggestion here: images-na.ssl-images-amazon.com/images/I/61LqwfYQLFL._AC_SL1000_.jpg
Grand daughter tried this one... Our lower toggle switch would not engage even after reflowing the solder. Going to try to get a replacement. Thanks for sharing this!
Cool clock, Clive. Want to bring it to the white house?
I love these kit building videos though. Almost as relaxing as building something yourself. Thanks Clive.
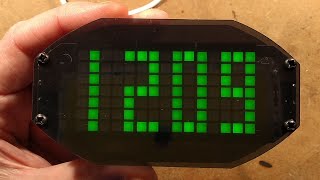
I built this kit, I bought it from banggood. They also had another one with dot matrix displays that used SMD components which I also built. What I did find is that there was a voltage present at the battery terminals and after some research I found that the clock chip has a charging function which must be enabled in the firmware written to the supplied MCU. Mine came with a CR1220 battery (not rechargeable) so I didn't install it. I will put a super cap in its place. I did test the current at the battery terminals too and found it was limited to just a few milliamperes. This didn't happen with the dot matrix kit. I like the dot matrix kit because the displays use unusual square pixel displays that look quite cool. It also has less annoying firmware.
Re. Maplin's IC packaging: There was a time they were shipping CMOS ICs individually in a small PET(?) bubble sealed with a foil-laminated bit of card. The result was a large number would be dead out of the box or fail in a very short time.
The probable cause was fairly obvious. The IC's pins weren't held in contact with the foil so it was possible for them to build up a triboelectric charge as they jiggled around in the post, which then could discharge to the foil. Repeat several times and you'll have one dead or damaged IC.
Excellent idea using tape to hold in components while soldering! I've never thought of doing that.
Interesting technique trivia: In the Alcatel microwave radio service manual they strongly recommend trimming the leads of a crystal using scissors rather than the usual wire cutters. The reasoning is that scissors slice through the lead without the shock that happens when common wire cutters snap together.
Fantastic mic Clive. Please keep it and the phone cam - great quality.
Yes more! This was so relaxing to watch. I've ordered the same kit (hopefully I do as good a job)
As a a long retired Tech Develpment Mgr of an electronics company, I must say that Clive's presentation is beyond excellent. he should,I feel, be making VIDEOS of the many aspects of electronic gmanufacturing. His visual presentations and chat are so good and technically correct, no waffle,his vocal delivery is perfect.Fabulous stuff
I really like your focus card, it really ties the recording together.
Looked for these kits on eBay. Noticed upon close inspection of the eBay photos of the finished kits, apparently the LDR and temperature sensor are designed to extend off the edge of the circuit board. The upper top piece of the case has an oblong cutout to allow the LDR and temperature sensor to extend vertically, through the case and into ambient air.
I bend the leads slightly to hold them down, they stay down well and one can insert many components before soldering!
Thanks for this one, Big Clive. I bought this kit off Ebay and your video made all the difference. 🤙
Clive, ive allways hated those blue resistors, glad im not the only one :-)
It just needs a right angled power plug, so the cable is out of the way.
Nice kit :-D
I build these little kits for solder practice and settle my nerves before I work on really expensive stuff. I tend to give them to friends and customers as gifts. I have thought about building a display out of LED neon and use one of these to drive them for a nice wall art display.
I got a variant of that kit just recently from banggood. Works nicely, had the battery you were missing (cr1230 or some strange thing like that, all my other stuff with those coin cells are cr2032) and a so-called prototyping area. There were also six transistors instead of just four, in addition to the four display drivers there was one to drive the beeper and one in connection with the "prototyping area" (which was left unpopulated). But yes, a very nice kit, easy to build even with the double-sided stuff and the fiddly case. The idea to use USB power is really good for my use as an office clock and above all thermometer. Now I know the temperature at the office rises from about 19 degrees to 24 degrees over one work day; thanks, passive-house :/
Big Clive, the Bob Ross of electronics.
Wow I am glad you are doing this because I have just ordered a green one.
Thank you Clive.
It does help a great deal. I did some soldering when I was a kid, but electronics is a more exacting world then toy models. Watching you go through the whole thing puts it all into context, and now I can have a bit of confidence in deciding how to approach a problem. Many thanks!
Soldering anecdote.when my daughter was very young, I walked away from my worktop with a hot iron on it. This was before I used a soldering station, and the iron was just on a wire cradle. She thought it looked interesting and grabbed the metal shaft. Nobody was happy. I don’t think she still has scars, but I’m sure she still remembers.
Tip for getting plastic/paper/etc of laser cut plastic/etc, bit of strong tape over the corner, press down hard and peel in towards the middle of the part. Saves you scratching it up with a screwdriver/stanley knife.
Now that is weird! I built the same clock on sunday! I spent most of the vid unsoldering the flipped display bit! also like you said, it was a a pain to get off and i destroyed it.
thanks for the vid, it was nice to play along at home it was as you say nice kit to solder!
Thankyou made my clock a year ago and didn't know what I did but hourly chime started 12 until 0:00 and couldn't find how to turn it off and instructions are long gone I managed to set it just to go off for one hour after you explained but I couldn't turn mine on and off I did the two button reset and set it up from the start now it all work ok again just thought it I would add this problem to your well explained video so if you can't turn alarm on and off and hourly chime do the two button reset and start again worked for me
I built one of these a couple months ago. There was a problem with the socket for the led controller, so only half the leds lit up. I fiddled with it and got it working intermittently and realized that was the issue. Would have been a pain to disassemble again, so just decided to buy another and start over.