Mini 4WD Trophy Truck Project - Part 3

ฝัง
- เผยแพร่เมื่อ 31 ธ.ค. 2022
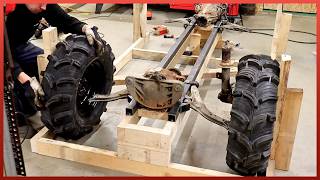
- Today we are starting a new chain driven 4WD project. In this video we get everything laid out and start working on building the frame. we get the front A-arms built and tacked into place and also decide where the seats are going to go.
ArcDroid CNC Plasma Cutter Affiliate Link:
bit.ly/3B6G7Px
rogue fabrication VersaNotcher link:
www.roguefab.com/product/vers...
Check out the welder I used in this video:
PrimeWeld.com
bit.ly/2xGIfke
TIG225X AC DC TIG Welder
bit.ly/2ywcgTJ
ratherBwelding merchandise
bit.ly/2PF21Vf
Follow me on Instagram rather_bwel...
help support me on Patreon - / ratherbwelding
#fabrication #buggy #machine
Music by Epidemic Sound (www.epidemicsound.com) - บันเทิง


![Best of kartcross [16.000 rpm] | Asturacing](/img/n.gif)
Last video you guys where asking about the seats I'm using for this project so here is a link for them on amazon
a.co/d/hvVlpAu
Glad you mentioned those T90 Jeep Transmissions been trying to figure out something for a drive train in a creation I want to build... found 3 on ebay under 800 bucks with the twin stick transfercase
If you need parts for this transmission you can get literally any part from Kaiser willys last time I checked
Their parts are more expensive but higher quality.
Sorry but no way the other cart has 18 to 19 inch's of suspension travel you would need 19 inches or more of ground clearance in order to have that much suspension travel...
I'm thinking about getting into building karts where can I learn how to build karts
I was super hyped about this build all the way up till you started placing the bars for the sides and roof and then I realized you were going to build a high top conversion van. You've got the roof bars a foot+ over your head to make room to get in because you've made the side bars tall enough to make it a 2 story interior.
Lay your seat backs down some, drop the side bar height and roof line way down. That will help 2 things, 1st will be top heavy issues and 2nd will be support for your spine. Taking a beating sitting upright is the worst thing you can do to your body. That's why all off-road builds have a short roof and a leaned back drivers seat. It keeps you from jamming your spine together if you hit hard bumps/jumps.
One thing he could do is go out to any 70-95 pickup and measure seat to door window height those are the years that you can role the window down and rest your arm on the window frame comfortably back before ac was standardized to vehicles and often trucks weren't optioned with ac... Once ac was standardized the window heights went up as rolling down the window was thought to only be necessary for drive thru windows as well as to better retain an occupant in a side impact
lmaooo hightop conversion fan
Nice build. As for the suspension travel, no one ever considers rotating the outer ball joints 90 degrees. This will give you infinite vertical articulation. Imagine the outer ball joints in the smae orientation as the inner ball joints. You don't need to spin the tire around 360 degrees. So why have the most freedom of motion dedicated to the wheel turn radius? Use high offset bushings and next size up if you want more wheel turn, but you probably don't need it.
You can even just do it for the upper one in this case and get the travel he needs
Your question intrigues me.
I've looked at my catalogues and manuals and it turns out ball joints are meant for load parallel to their axis (vertical load, vertical joint).
Surely it's not a matter of the bolt being weak... a big fat high resistance bolt is several times stronger than the sheet metal it's bolted to.
Vehicles and cars are the same: I really can't understand why ball joints are not used in the other direction.
@@Morannar well actual ball joints are different, these are heim joints. With a heim joint, you can use a through bolt grade 8 and when supported on both sides it is way strong enough for this light vehicle.
@@TheChicagOP might as well do both. The inboard joints are mounted with horizontal bolts, why not do the out board joints the same?
LIMITED TO CV AXLES OPERATING ANGLE REGARDLESS, AND THE STEERING ANGLE LIMITED TO MATCH SO YOU DONT OVER ANGLE THE CVS
Dude, your vids are awesome. Seriously, from your fabrication talents, to your out of the box ideas and solutions, to your incredible editing and shooting, I'm truly impressed everytime I see one of your videos
Agreed. I've been watching this kid since he started. If you go back and look through the progression of projects you can see the growth... It's impressive.
He makes me feel like a lazy piece of crap. I can't complain about lack of tools and stuff... The tools I don't have I know I can make. It's more motivation than anything else...
Браво! Ты - настоящий мастер. Приятно смотреть на работу!
Chris,
Firstly, HAPPY NEW YEAR!!!
Secondly, I know you seem to prefer building your projects with chain drive systems, but I hope you create a purely shaft driven 4wd project some time in the future. Heck, I would LOVE to see you create something similar to this or even convert this project to a shaft drive rather than chain drive system...
Maybe there's a reason you don't like shaft drives or something, but if you do, I'd love to know the reason
G
That was brilliant you can create these mad vehicles from scratch but struggled measuring the suspension travel lol. Love the content and keep it up
Looking forward to seeing this jumping and climbing in 2023 but I'm also looking for my own welder and stuff to start building stuff myself because watching your videos gives me so much motivation to build something.... It's just cool to see you build these awesome vehicles by yourself and that's most likely what I'll be doing, I think I'd have better success doing it alone. Thanks for the video and I can't wait to see what you build in 2023.... 😁👍
Dude that's actually a pretty ingenious way to hold tubing in place for fabrication. Thanks for the great idea.
Here is what is going to happen, as ive said 3 other times on this project, you will complete this, it will look amazing. Youll ride it around your neighborhood and be amazed, then take it to one of those off road parks and overheat it and/or smoke the clutch trying to push that 1 ton vehicle and LARGE tires when that bike engine was meant to push a 300 or 400 lb bike. Wish you would consider using honda k motors in these bigger projects. that being said if you want more visibility out front try building your front shocks like an indy car with belcranks and run the shocks in the middle in line with the chassis.. That would be different and cool to see
The hyabusa weighed almost 800 pounds, it’s a big bike and could support over 400lbz of riders
@@relentlessgaming4453 OP is right. 800lbs is closer to 400lbs than it is to 2000 lbs.
And the Busa turns much lighter tires, which is another way of saying much lighter tires exert forces on the drivetrain, those big tires are exponentially harder to turn
@@relentlessgaming4453 a hyabusa is nearer 600 pounds.
@@relentlessgaming4453 hayabusa is 586lbs. but although it is a very capable engine it's the size of the clutch and lack of torque that limits it ability in a heavy vehicle not to mention the extra rolling resistance caused by the much larger tyres and being 4wd
That engine is way powerful enough to push that vehicle around. He Has always said He enjoyes doing Things differet than other people. I mean He is making it chain drive!
I have that exact same angle finder. I absolutely love it. I use mine for everything. Scratch building model car parts. Building things with wood and metal. It's so handy.
That demonstration of the suspension travel was so smooth. Amazing work.
I cant believe how many subscribers you have now!!! When i started watching you, you barely had any and now look at you! You deserve it, brother!
One good thing about working in a cold shop is, no big ass spiders crawling around.
thanks for telling us about the t-90 tramission, most likely will use them for some of my projects so thanks.
great video yet again, im loving this whole project.
The craziest part about this whole build is that this dude can’t do simple addition and subtraction. But decides to build a death trap 😂. I love it!!
I was thinking the same thing
You can always put in pins to be able to remove that side bar to allow access into the vehicle.
Additional safety feature you might consider is the window nets to help keep arms and hands inside the enclosed area as people have a tendency to lose control of their arms as the vehicle rolls over.
Just a precautionary addition since you are increasing the speeds at which your traveling, and better to be safe than sorry I believe.
PS
You have the easiest calculator in the world in your hands.
Simply line up the end of the tape measure with the number that you want to add or subtract from.
Then say you want to add 6" to say 31", just slide the tape end past 31" until you get the 6" mark inline and look at the end of the tape measure.
Should equal to the total of the two combined numbers. Just the opposite to subtract, but instead of moving the tape forward past the whole number.
Simply look to see where the number you are taking away lines up on the tape measure, and that's your correct answer.
Basically using the tape measure as a old fashion slide rule, something akin to what the Chinese used when they invented mathematics counting devices.
Dont bother. this dude cant even count to 12 wtf rly and you never measure "full" travel as the "full" travel lol. in those ENDPOINT angles you will immediately destroy youre cv or something else when it binds up. one needs atleast 2 inches safe margin on top and bottom travel to not bind the axles.. if you need more travel you need longer a arms and will end up with a wider vehicle..
hearing u say how cold it is then imediatly seeing you on your knees on that frozen floor ... you are a trooper !!! keep up the great work man LOVE LOVE LOVE your stuff
I watched the cbr 1000 build twice. Once myself and once with my dad. Its mesmerizing what this guy is able to do. Love the content. Dont change a thing.
Man, I love the background music...it has a very 90s alternative feel to it
Thanks for filming Chris! 👍😁
The golden ratio of 1 to 1.618 will almost always let you fabricate out of thin air but finish with a project that is pleasing to the eye.
You show the marking of genius some times. I’m not kidding. Ability to adapt is most important. 25:51
Amazing work - especially trying to think, build, design, film, etc. in such low temperatures. 👍👍
Do you have a tube bender? You should do a rolled tube just behind the front tires, give it some flare! Keep up the good work!
Been loving this build series! You show some very good techniques in your videos!
Your absolutely knocking this thing out! Congrats
Love watching your videos of you building toy's for yourself right from scratch.
Right from the bottom and up.
Keep up with the awesome work 👏 ✌️
Couldn’t wait to get off work once I got the alert. Only way to start the new year off. 😎 because Rather B Welding is one of the best fabricator on TH-cam, no fancy lathe or millers just straight old fashioned fabrications.
Chris, make some doors for it. That is looking to be a large project and doors would make it so much easier to get in and out.
Great project man. I still wanna see you build something capable and road legal though!
it took me all summer to make a minibike frame...and you do this stuff...just amazing
Dude I am so glad I subscribed to your channel. This project is right up my alley. I am building something similar and you’re really helping me out with mock-up and planning. 🤘🏼cheers
I watched almost the while thing and realized he's welding in a wood floor shed. Brave man.
Glad i stumbled upon the series, bummed that the latest part was released 2 days ago... now i have to wait :) For me, as electrical engineer, this is all new territory. Ive for a while wondered how structures like this was built, the thought process, tools and tricks. Might invest in a welder and start with learning that, maybe I can make myself some sort of toy in the future. Good video.
Biggest thing with shock travel. Build the entire thing at full bump, then limit the down travel with the straps. With many of your previous builds you run much too large of shocks which case the chassis' to be taller than required and most of the shock travel is unused
exactly 100% correct. love the creativity from this guy but sometimes it just takes a bit of researching and you will end up with a way better build. building from bump height is the best thing to do when building anything.
Happy new year my dude! You are literally a freaking genius 👏
On most long travel setups you'd run uniballs vertically on the spindles. You'd gain a lot more travel in the arms. For the axles you can go in and make some clearance to gain a bit more before they bind.
Try mounting top A-arm brackets to the top of the tube and bottom A-arm brackets to the bottom of the tube. You want to get the driveshafts as parallel to the ground as possible at normal ride height with you in the vehicle. You have very little compression at the moment with most of the suspension travel on droop at that driveshaft angle.
Great video as always, have a wonderful new year building.
SICK!
Great video as always, and awesome work. I do want to comment on the front suspension and shock set up though... I love how you build everything !
Though it may seem wonderful that you only have 5" of shock travel and 12" of wheel travel, this means you have over a 2 to one ratio. This isn't necessarily bad, but on this type of vehicle it isn't good. For example, if you have 12" travel and 12" shock you have a one to one ratio and the load that is on the wheel is the same as what it is on the shock. If you have 12" travel and 6" shock, your spring rate and damper take twice as much load. In a long travel vehicle the suspension is going to take a thrashing. The spring needs to be twice as stiff to support the vehicle, so the damper also needs to resist twice as hard to stop bouncing... this means the shocks get really really hot. They will work worse as the day goes on, as they get hot, and they will wear out much quicker. It is also much harder to tune the suspension. All of this to say, that if you're going to use this ratio, make sure that you have really good shocks. Lots of trophy trucks will have two dampers and one spring, and at least one damper will have a piggyback reservoir to try to keep the oil cool.
it seems to me like you should consider changing the angle of the heim joints in the control arms so that you can maximize travel. You can do this without bending anything. It's going to be a pain, but the end of the hemi joint doesn't have to go into the control arm... Meaning you can notch the end of the control arm at the desired angle and weld the threaded insert on 👍
Nice build! Like always, interesting! Thanks
Looking good Chris.
Recommendation for a heater, get a diesel fuel heater from Harbor freight it will heat up that shop in an instant it does wonders for my big 20x40 shop with just one
Brr 🥶
Tweek (bend the upper a arm to clear the joint bind)
Love the vids bro been here sinc the beginning . Keep it up
Please take a trip up trail 1a at brown mountain with this thing. I would love to see that video. I’m local to brown mountain also, trail 1a to trail 2 to trail 9 is a crazy technical ride.
Nice work as usual 👌 from Canada 🇨🇦
You want more than 12” of wheel travel if your calling a trophy truck type build. Aim for half the tire ratio 30 tire 15” min. Bend you links at the ends to center your rod ends to get more up travel or rotate them 90 deg. Less turn but more travel up and down. Love your builds.
Man 4wd is wild. Your on par with grind hard plumbing
new in box rebuilt and painted those T90s are only $686 right now 😱...definitely gonna have to get one for my r1 engine project. those reverse boxes are ridiculously overpriced
Awesome bud keep up the good work can’t wait to see it finished 😄
Commenting while watching.. Happy New Years 🎉BTW.. but that holder was genius!,
If you put a bend in the a arms where the Himes joint is limited you won’t have to change the mounts on the hubs. I love the project so far.
Awesome work man!!! Love watching these vids
I Iike to be like you at another life. In this one, I feal like I already messed up and won't be able to do a change. You are awesome!
Never to late. Don't ever convince yourself of that. Change happens now if you want it do it. If you don't try you will regret it. Not trying is failure. Trying and not succeeding is learning.
the best part ¨I can´t do that kinda math¨
by the way, great work there man. looks good.
Use a fan to circulate the warm air :) or maybe insulate the door a touch by adding plywood to the inside to have trapped air? As climate changes and the years pass, we must adapt and overcome! A good sentiment to the years ahead! Cheers and all the best to your new year!
😂
Selamat tahun 2023 boss👍👍✌️✌️✅ part4 👌👌👍
Always enjoy when you’ve got the next video sure bets regular TV and I learn from you which I won’t use cause I’m Retired and enjoy your content keep up the great work
turn the heim joints all vertical and use bump stops for the up travel and limit straps for down travel
Not sure if it would be helpful or not but maybe setting up a laser line to get everything lined up correctly 🤷🏼
As usual like what I’m seeing 👍🏻 didn’t think it got that cold in your area, stay warm and happy new year 🎉
Love your builds and your unhealthy liking of chain drive. Subbed!
You can make your own gasket by rubbing a bit of clear silicon.
this thing is seriously awesome!
Chris, maybe consider making the roll cage shorter and using a "Gull Wing" door that hinges at top and swings down to strengthen and become a part of the cage.
FWIW,, a Muncey 4 speed is aluminum cased and so much lighter than the toploader.. it also uses shifter rods so easy to move the shifter around. Great channel.. :)
I've gotta say I really would like to see what you could build with all automotive parts. Axles, motor,transmission ect. Bet you could build and bad ass crawler!
I love this build!
Happy New Years bro, cant wait to see this thing when its done! Also really want to see the electric dirt bike rip on a trail, makes me want to build one every time I see that thing!
Hi! Im new to the channel and i love the hands on approach 👍
Since i've studied some vehicle dynamics and the impact it has on the handling of the car, i would really recommend spending a few hours reading up on camber, castor, kingpin, ackerman and bumpsteer and the dynamic effects on the vehicle of that since that is bound by the position of the joints. It is true what you say about being able to adjust the camber etc afterwards, but only in a static case. You cant adjust the angle for the full range of motion the wheel makes. Maybe you have already considered this but if you havent, spend a few hours on google (or keep in touch and i might be able to send some recommendations) so that you dont have to relocate the joints later and find that the shock/spring is not fitting anymore. And by the way, if the travel at the spring is only half of what the wheel is, the force in to the spring (its joints, attachment points etc) will be doubled of that at the wheel.
Hope to see more on the electric dirtbike soon, keep up the good work 👍
I admire your work, happy new year!
Nice build! You really should put a diff in the front! Doing turns in this thing will be difficult.
Awesome work mate. Im also building a new toy here in new Zealand your videos help heaps
@electronsmove is right. Instead of using heim joints though I would use Uniballs on the outer joints. A little redesign on your spindles and arms and it looks like you could get another 3”+ in up travel.
Guys i m very short of word to say it's amazing or beyond amazing i learned a lot from you wel done
Flip your Heim joints sideways and use the pivot of the Heim for steering. Then you have unlimited up and down travel, or at least whatever your CV joints and tie rods can handle.
You can probably machine suitable spacers to obtain additional angle at a heim joint. Extreme angles on the top link may not matter but for the lower joint it may compromise the load carrying capacity in the orientation that you are using. Also .. I think you will need diffs .. maybe three .. and locking, Maybe include some spacers in the front final drive to provide additional dimension so you can add a diff later without having to change the axles. Spur-gear diffs might be easier to make when chain driven, and using concentric axles on the lay shaft.
I agree with you on the spacers for sure! Also, I wonder if he could just use the front diff out of a RZR 1000 for the front and rear. Then he will have a lockable diff vs a chain driven spool!
I’m waiting for the day this dude probably makes his pickup truck
I am a follower from Morocco, you are really very cool, thank you very much
Projeto extraordinário!
That's a cool tool you made for angles 😎
Hey man,
greetings from germany :) I really enjoy your videos everey sunday. I just wanted to say thanks for your awesome content. Keep up the good work! :) I am really looking forward to see this project coming together.
thanks for the videos
I’m chomping at the bit to build similar builds. I really wanna show my designs instead of talking about them so people will see the originality behind it. I like this current 4wd build specifically❗️
Man you should really strat with something like a small hatchback or a pickup cab and put all this engine and suspension in it, that way youll have a good interior space and crazy capability and maybe road legal
More bloopers at the end of your videos please? Nice work btw.
I'd think you'd want the tires ahead of the bumper for a better approach angle.
Asme uno aki enla casa 🏡🏠 58
Maravilha o projeto amigo!!!
Feliz Ano Novo a todo com muita saúde e paz e realizações!!!
Lovin' It !!
You need to build the spindles with your heim joints vertical. That will give you unlimited travel. The only limitations would be the axle. Make some center mounted a arms to get more travel.
Our Polaris pro r has 22” of wheel travel.
IDEA!!
If you are just looking for reverse.
Why not look at snowmobiles.
They run on a chain. And it's very simple systems to operate.
If you don't need extra needs that is for future. Can fine machines cheap all the time.
Newer systems with push button found on yamahas and arctic cats.
Sick project BTW.
Your going to need some limiting straps to keep the suspension from dropping and breaking ujoints and/or busting the center link up front
Oh yeah for sure if they leave the ground they are gonna slam down and tear everything apart lol.
You are the man. That thing is looking great !
awsome.. love shop briefs..
I enjoy that u complete these crazy projects with zero CAD edit: just got to 15:40 but still no cad for where the engine goes, frame design, drive, ect
Build a removeable tarp roof and removable glass and doors . Cool to have a heater core
Excellent ! ☮️
Nice work,