etrailer | B&W 5th Wheel Trailer Hitches Base Rails Kit Installation - 2016 GMC Sierra 1500

ฝัง
- เผยแพร่เมื่อ 4 ต.ค. 2024
- Click for more info and reviews of this B and W 5th Wheel Hitch Rails:
www.etrailer.c...
www.etrailer.com
Don’t forget to subscribe!
/ etrailertv
Full transcript: www.etrailer.c...
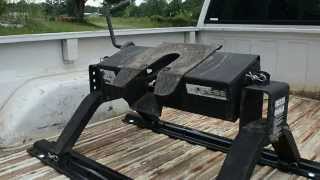
Hello neighbors, it's Brad here at etrailer and today we're taking a look and installing the B & W Fifth Wheel Rail Kit on a 2016 GMC Sierra 1500. This kit's gonna allow you to have industry standard rails in your bed. That way you can drop in your fifth wheel head and hit the road. Installation's pretty easy overall because these are universal. The brackets underneath the truck are actually custom fit so there's no real drilling except for the holes to pass the carriage bolts down. The rest of it uses just normal holes and hardware in the frame already and then we just kind of bolt it all together.
So, overall, it's a pretty quick and easy way to get a fifth wheel towing of a camper or a trailer with your Sierra. Now, because it's standard size rails, it's gonna allow you to drop in a number of different fifth wheels. So if you plan on changing it out later on or you already have one, no worries. It's gonna work with that fifth wheel. Overall, installation's not too terribly bad.
It is custom fit brackets. There's a few spots that are gonna be pretty tight and when you're doing your drilling, you do need to take caution because there is the potential for damage of wiring. But as long as you take your time and follow along with the instructions, we'll get yours installed. So, let's take a look at that. To begin our installation, we're gonna go ahead and get our spare tire lowered down and out of the way.
It's gonna just kind of open it up a little bit as far as real estate and working on the vehicle. Now, another little pro tip, if your vehicle, if you drive down dusty or dirty roads, this whole installation is gonna be underneath the truck. So you might run it through a power washer or a car wash, something along those lines. Kind of knock some of that down. It's just gonna make it a little bit easier for you not only to see, but also not get stuff in your eyes while working on it.
So, get your tire lowered down and out of the way. Now, our bracket's that's going to mount up to the frame. We're gonna need to create a little bit of space here and we have a bracket that holds these brake lines in and it's bolted in with two 13-millimeter screws that go from the top on the frame. We're gonna wanna take those out and that way we can mount up our bracket here. It's gonna extend it out a little bit, giving us that clearance. So just gotta go up here. I have a ratcheting 13-millimeter wrench and you'll find the two bolts are kind of offset from one another. Just go ahead and get those removed. Once we get that other 13 out, our bracket should be loose. Now, sometimes there is a little bit of wire loom with the plastic clip that kind of snaps in the frame. If you need to pry that outta the way, you can use a flathead. It'll just give you a little bit more space. But our bracket, we can kind of bring this out. Now, if there's zip ties or anything that are attaching it, you can see the wire loom's pretty tight here. Our bracket's gonna push this out and when we mount it up, we're gonna want this notch where those factory thirteens were that we just removed. And then our bracket's gonna bolt here using our new hardware. So, I'm gonna cut back some of our zip ties that are holding this in place and then we can get this mounted up. So, our bracket, I tightened down up top with those thirteens and then I dropped in our bolt and then our crush washer as well as our 13-millimeter nut here. I got that kind of tight, just kind of in place. Now I did pop off some of the clips that attaches the hard lines as well as some of this wire loom and that allowed me to kind of pull this back. Now you gotta be careful because these are, you know, hard lines. You don't want to damage 'em. But I was able to kind of pull this back enough to get that other one dropped through. And then I just went back with a 13-millimeter. And you may need to put a wrench up top and a socket on the bottom, but go ahead and tighten that down. Now we're ready to get the rear rail laid out and this is gonna be the basis for measuring for our front. So, take your time here, make sure you measure it twice and you're just gonna want to take your time here, make sure it's centered up. Now depending on your bed length, that's where you're going to be measuring from the rear, right here on the edge, not the tailgate. And that's gonna go to the rail, or the front part of this rail, here. Now if you have a longer bed, it's gonna be different. Just refer to your instruction manual in order to get the proper distance. So, I have a chalk mar