I saw many videos, related this topic but the way of your explanation is awsome and you covered all the details about raspberry pi, gpio pins, breadboard, register. Really good job man I like it.
thanks, 3 years after, this was just what I needed, that the breadboard is a long row for power and short columns for putting stuff and to connect the GPIO into the power. That's what I wanted and that's what I got!
Is there any way to do this without using a male-to-male cable? I only have male-to-female. Asking regarding the thing you did in 9:28. Help is greatly appreciated
Is there an upgrade raspberry pi model that is also compatible with this breadboard? Maybe another video link you can send me so I can get the newest and best? Thanks!
So if i understand your initial explanation of the rows correct, you don't actually have to put the resister in the same hole as the led right? just the same row. Thank you for making this video
My birthday is in 2 months I have been coding for 3 years now and I am going to get the raspberry Pi to make a diy NAS can I use to that for this project too?
There are full size and half size depending on the number of pinholes. The holes and numbered rows are tiny regardless of the size of the breadboard. I have the same problem, I have a large square magnifying glass I use constantly and even then sometimes it's a challenge. I use large flat tip tweezers or needle nose pliers a lot to put those little wires in. Sometimes when my circuits don't work I get out the magnifying glass and find I'm a hole off. Hope this helps. :)
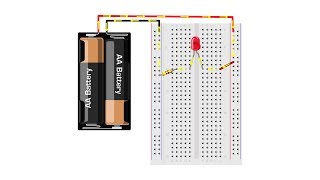
10:15 The resistor value was too high (generally a value between 220 - 250 is good) so its difficult to see the LED. Remember the more resistance the less current
Hey sorry for off topic as this is a video for raspberry but are you going to do a tutorial on the written digit recognition application on neural networks? Would be awesome
Tim, check out the particle photon its really nice the way it uses wifi to flash ur code without the need to connect ur device back to the pc to update the code!!! looking forward for more vids like this good luck
Dev I doubt you still need this but it should come on the sd card with your RP. If not you can use an sd card reader and another computer to install it on the Sd card.
Usually you don't want to remove the resister. The resister is protecting the led from high voltage, if the current has too much voltage the led can burn out. You were only able to do it here because the led was able to handle the small current flowing through it. I'm only saying this because you were acting as if assuming people didn't know how electricy worked, so i don't want new people to try this with regular voltage on another project and fall into the same hole i did were i broke like 15 leds til i realized the importance of resisters. They limit the currents the led can handle it, any new people should look into ohm's law to know what value resister they should use.
bro you did a mistake , use said that the shorter leg of the LED should be connected to the ground or "Positive" , which is actually negative.....................


Hope you're all as excited for this one as I am :)
Try making a smart mirror 🙌
Ur awesome.... Thx
Can u make a video on raspberry pi set up
This vid was helpful thx!
Of course! I'm pretty sure I'm even more excited than you are!
Damn, there is basically everything on your channel, many useful things, love that man.
;)
I saw many videos, related this topic but the way of your explanation is awsome and you covered all the details about raspberry pi, gpio pins, breadboard, register.
Really good job man I like it.
OMG, been looking for these sort of videos for a while. Thank you for this series!
thanks, 3 years after, this was just what I needed, that the breadboard is a long row for power and short columns for putting stuff and to connect the GPIO into the power. That's what I wanted and that's what I got!
Thanks man! I look forward to more tutorials, I've had a pi for a few months but haven't been able to use it. This really helped!
Glad to see it helped!!
Finally yes! I got my LED working and it was due to the problem with the library I was using. But you cleared this up. Thank you!
You teach almost everything, Thank you for your wonderful tuitorials
Actually I'm an electronics student and I used to hate raspberry pi , but u made it quite interesting for me ... Thanks
Just got mine running today, impeccable timing
Congrats on the 1mil subs my man. :)
Great video, thank you for taking the time to record that! 💯
Thanks Tim. You've helped me build my first electrical circuit :)
You are getting updated so fast I realy like it
i've been coding for years - this is the first time i've ever written code that affects the physical world
Thanks for this great content. It's really helpful
Thank you for the video. It was very helpful!
could you do the same things using java?
I love this video thanks
thank you very much 😊
Great video man, new sub here 👋
good video. i encourage you to do more videos on your raspberry playlist
Excellent video...thank you
Is there any way to do this without using a male-to-male cable? I only have male-to-female. Asking regarding the thing you did in 9:28.
Help is greatly appreciated
THANK YOU. I was super close to fry my pi 4
Wow this is awesome sir, thank you..., thanks for making this easy to understand. This is exciting sir..
Yay!!! I have been waiting for a raspberry pi series I've had one for about 6 months they are so cool!
Is there an upgrade raspberry pi model that is also compatible with this breadboard? Maybe another video link you can send me so I can get the newest and best? Thanks!
i know this sounds dumb but how do you use enter in IDLE? i need to go down a line but when i press enter it runs the code
So if i understand your initial explanation of the rows correct, you don't actually have to put the resister in the same hole as the led right? just the same row.
Thank you for making this video
My birthday is in 2 months I have been coding for 3 years now and I am going to get the raspberry Pi to make a diy NAS can I use to that for this project too?
Would the TI breadboard pack work with the Pi
My light has 4 wires coming out of it. How do I wire that?
Thanks a lot it's perfect ! Tried the 5V without the resistor and burned the led ahah
Very nice, thank you. Can you recommend a manufacturer for a beginner breadboard, not too tiny for my middle-aged eyes?
There are full size and half size depending on the number of pinholes. The holes and numbered rows are tiny regardless of the size of the breadboard.
I have the same problem, I have a large square magnifying glass I use constantly and even then sometimes it's a challenge. I use large flat tip tweezers or needle nose pliers a lot to put those little wires in.
Sometimes when my circuits don't work I get out the magnifying glass and find I'm a hole off.
Hope this helps. :)
where can i find the pinout for raspberry pi model 3b+ (2017)
Quick question will this work with a raspberry pi 4
10:15 The resistor value was too high (generally a value between 220 - 250 is good) so its difficult to see the LED. Remember the more resistance the less current
Does this actually works with Raspberry Pi 4?
Hey sorry for off topic as this is a video for raspberry but are you going to do a tutorial on the written digit recognition application on neural networks? Would be awesome
How do I get idle python?
Tim, check out the particle photon its really nice the way it uses wifi to flash ur code without the need to connect ur device back to the pc to update the code!!! looking forward for more vids like this good luck
omNS
Bro, please reply to me.
from where u learn this all module or library please tell me
10/10 niceeee
I don't have a raspberry pi but would you recommend getting one ?
Ya it’s awesome! You can do some really cool stuff with it and it works as a Linux server
I didn't used resistor. My LED fused up
can you make a video for the installation of raspbian OS?
Dev I doubt you still need this but it should come on the sd card with your RP. If not you can use an sd card reader and another computer to install it on the Sd card.
Hi Tim, if you put your hand behind the object your camara will focus on the hand and the object.
Thanks!
Awesome!
You should do a raspberry pi video on the RFID sensor
does this work on aurduino?
Yaqoob Tech yes
hello my friend i have a question for you and it's the following: can i build a simple android app using python?
Yes, you can use kivy he has tutorials for that too
❤️
thanks.
Heed this man's warnings and use a resistor! I didn't and it burned out the light I had.
Usually you don't want to remove the resister. The resister is protecting the led from high voltage, if the current has too much voltage the led can burn out. You were only able to do it here because the led was able to handle the small current flowing through it.
I'm only saying this because you were acting as if assuming people didn't know how electricy worked, so i don't want new people to try this with regular voltage on another project and fall into the same hole i did were i broke like 15 leds til i realized the importance of resisters. They limit the currents the led can handle it, any new people should look into ohm's law to know what value resister they should use.
bro you did a mistake , use said that the shorter leg of the LED should be connected to the ground or "Positive" , which is actually negative.....................
I noticed that too.
Try making a smart mirror 🙌
Grammerly sees your title:
Grammerly wants to know your location
What’s wrong with it 😂
@@TechWithTim Oh wait, nevermind I just pronounced LED like lead instead of L-E-D
bro i watchedthis on my rspberry pi
I have an arduino )
Transfor it into heat ???
Those are LEDs🙃
thanks