DIY Samsung A23 Screen Replacement Guide!

ฝัง
- เผยแพร่เมื่อ 3 ต.ค. 2024
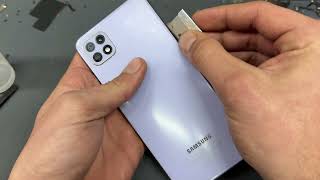
- 📱 Is your Samsung A23 screen cracked or malfunctioning? Look no further! Welcome to our ultimate Samsung A23 Screen Replacement guide - your go-to solution to refresh your display like a pro using this easy DIY guide! Don't let a damaged screen hold you back when you can become your own repair expert.
This step-by-step tutorial is designed for simplicity and effectiveness, providing you with expert guidance to seamlessly replace your Samsung A23 screen. Whether you're a newcomer to phone repairs or a seasoned DIY enthusiast, our comprehensive guide ensures a hassle-free fix right from the comfort of your home.
⚒️ Dive into the world of DIY phone repair and witness firsthand how a little guidance can transform your device. Our tutorial caters to various skill levels, making it accessible for everyone to restore their Samsung A23's screen to its pristine condition.
Join the league of satisfied viewers who've revitalized their Samsung A23 screens and rediscovered the joy of a flawless display. Don't miss this opportunity to take control and bid farewell to cracked screens!
Watch now to learn how to replace your Samsung A23 screen like a pro. Remember to like, share, and subscribe for more empowering DIY tech tutorials to keep your devices looking and performing their best. Let's refresh that screen together!


Bought my screen on amazon for 27+tax and it came with everthing including glue. Following u was so easy and way better then the paper my phone came with. I did have trouble at first finding the 2 of 9 screws at the top but that was because my camera piece didnt come off with the back of the phone and i had 2 fight 2 get that piece off. Other then that u made it so easy for me and helped me not feel so nervous about doing it myself. Phone works like new again. Thank u!!!!!!
Hello, purchased a module through Amazon. First time ever. Had a bit of a fight with one screw inside. Complety stuck. Took a while but I won. Followed your instructions and works perfectly now. Feels good to do it yourself. Thank you.
You’re welcome, I’m glad our video helped! ❤️
Good video, first time doing this and everything works well after replacing the screen. I bought a $20.00 aftermarket Kuert screen on eBay. I had to transfer the volume control ribbon wire and speaker. Screen came with tools, but the suction cup was worthless, had another in my toolbox that worked along with some careful prying. I am glad I saved myself some money by doing myself!
Thank you so much for helping me get that bezle off. I used a screen without a frame and I have to say that it's a bit more noob friendly. Once the side bezle is removed, you can simply unplug the old screen and plug a new one in. Sure you have to glue the new screen in place, but it's always good to have a use for the contents of my bookcase.
If you are reading this it worked.
Hi! Thanks for the video it helps.🙏 but now how you get that glue you used?
Hey, my charging port did not function as it should be. Cleaning did not help. I changed the subpanel. This problem was solved. Since this time i have another problem. People who call me say they hear themselves (echo). Is the problem the speaker on the top? Could it be that it lost adhesion and the sound from the speaker comes to the noice cancelation microphone inside the phone? Or is the problem somewhere else?
Greatings from Germany
Where is the link..
Mine came with all the tools I need, & the glass & only the glass for the screen ...... All the replacement videos I've watched didn't replace the glass they're all literally just swapping out phones, & moving over the battery
I don't see the link foe the replacement screen
tankis bro
I just tried replacing mine. However, the screen did not come on but I felt and heard the vibration. So I know the phone came on. Help please
Mine is a failure
I've replaced the screen but unfortunately is not charging .
More than likely the charging port was disconnected. I would double check all the connections and that should fix it.
I had the same issue@@rickjames5684
You asked me to let you know how I got on, so: I purchased a replacement screen that didn't have the volume buttons, so of course I broke them pulling them off of the old screen. So I returned that screen and purchased another one that cost 5 bucks more but had the volume buttons. That one came with better tools as well. The screen functions fully and I have some B-7000 glue I'm about to use to attach the back plate.
Thanks. Do you have a link to the screen that you bought?
On applying the bottom tesa tape and cutting it with a blade don't go too deep or you could cut the flex cables.....
Is there a way of heating the front screen and removing it from the front or is this the only way