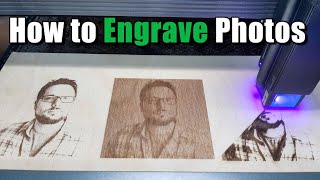
Quickly Preparing Photos for Laser Engraving - The EASY way! | LIT Tutorials

ฝัง
- เผยแพร่เมื่อ 15 พ.ค. 2024
- In this video, I show you how to quickly edit and prepare a photo for laser engraving. No software downloads needed. Everything is done online through Imag-R.
IMAG-R Website:
www.imag-r.com/
SUPPORT IMAG-R by purchasing their design packages here:
design-gecko.com/
Facebook: Laser Illusions Technology
Instagram: @laserillusionstech
DM me for any questions :)


Awesome advice mate. Has made a huge difference to my engraving-Thank you-Especially dpi settings and clicking pass through on lightburn
Thanks for the information. Great video. Can’t wait to try this site out.
Thanks man, hope the engraving turns out great!
Thanks so much for this. It helped me tremendously 😁
this was awesome! thank you!
Great info! Thanks!
Thank you. Was already using ImagR but hadn't realised about the double dithering!
I just have a 5w output power blue diode laser. I painted a pane of glass with white as first coat and black as second coat. Could you at least tell me a ballpark area of where I might start with adjusting my speed and power settings? Thanks. I really enjoy your videos and plan on checking them all out.
This helped a lot…… thank you very much
Hi, first thanks for your great videos. Well. I'm new to laser engraving and I've tried to run some engraving procedures in order to engrave on an acrylic plate, meaning playing with the speed and power, using BMP and PNG files, inverting them (by using PHOTOSHOP) and so on. I've took the acrylic plate and put it on top of an aluminum plate that I've first painted with gray premier. But nothing helps. Can you provide some details of the settings? Of manipulating the files. I will appreciate any help. Thanks, and be blessed.
I'm glad to be you r#1000 awesome simple plain and helpful video thanks and way to give it up for the ads
Thank you for this. This was VERY helpful. Now off to the laser I go to practice. Lol
Glad I could help you in any way :)
Can you please tell me what are good settings for this for glowforge??
thank you man, this same tutorial can work leaves?
Can the imag-r online program be used for fiber laser engraving?
thank you bro
Thank you
thanks for video bro
hi could this be used to make h d stencils for airbrushing?
Hello,
I use ImgaR. Gimp, blows my mind, I just don't understand it. My question to you (if I may ask) I do all the steps, but when I upload to light burn, disable passthur then I adjust the size because in a L.B (lightburn) hmmmmm, I just realized why I get bands in my images.
Great video. Id like to try using this method but on a yeti cup. There is no painted metal or similar option in materials. Do you have any recomendations?
You need a product called Ceramark to engrave on a non power coated steel mug (like a Yeti)
Hi Everyone! For Lightburn users, I forgot to mention that you have to keep your minimum and maximum power the same or else you will have inconsistent engraving. Only have different min and max when using grayscale mode on lightburn.
Trying this now, I’ve had a nightmare with image being terrible sometimes non existent, I have set it up as you have done but on slate thabks in advance I’ll let you know 👍🙏💥
Interesting
@@mikesayer2537so how’d u do?
Would you have any slate photos with images r and lightburn. Have trouble with getting going. Thanks.
what material do you choose if you are doing it on white gold or precious metals? It doesn't offer any metals.
I just downloaded the software bought a license for a month, but when I open the software the screen is black and you can hardly see the image at all. Have any ideas what might cause this?
I cant get my image to upload using any time of web browser. Do you have any suggestions?
How to select metrial photo engraving sliver & Gold
Is it possible to show us the outcome from this tutuorial. A lot of us know how to go through the steps, but don't seem to get the image the way we want it. Also, I noticed your speed was 200 and power was 16.5% Were those the final numbers. If so, what laser do you have? Thanks for putting this together.
For sure! Ill do a video of the advance feature in the near future and show results next time. For acrylic, I keep my speed a tad bit faster than for wood, and I use around 12.5% on a 60W laser (dont mind the power and speed in the video as everyone will have different settings, thats why I didnt bother explaining it in this video). For clear acrylic, the trick is to have the lowest power possible while still being able to see your engraving. The laser machine I am using is built by me :) I might do a video of that in the future as well. Stay tuned!
@@laserillusionstech I hope you do that video soon, would relly like to see it, and the settings
Super
Thank you!
Thank you for doing this example. When I follow your steps the file comes in as a fill not an image. How do I get image as an option on my mode?
If you convert your image to png it will load as an image, at least on lightburn.
does this vector the image? I am new to this. I just bought a anycubic mega pro with laser engraver and when I try to engrave it does nothing. What step did I miss? It take the BMP files.
Is your machine a Diode laser? Im using a CO2 machine and my settings are optimized for CO2. This does not create a vector image. It just dithers the image for you (creates it into thousands of little dots that can be engraved - ie: laser power is either on or off).
Now I understand why I have to turn on the pass thought, let’s see if I get a better results 😊, thanks, next time show your finish product
What about metal?
Tq
First, after cropping my image with rounded corners, the next screen was blank (nothing but ads, and the options to "upload", "crop", etc). So I tried it without rounded corners. And it worked. Then when I tried to edit the size, same thing. The next screen doesn't show my image. After trying 4 times with no success, I think I'm gonna give up.
Hello! Are you using Google Chrome, or another Web browser?
What if the photo is black and white?
how come when I do this it says it will take 5 hours to complete?
I wanted to pay to use and on check out the amount was typed as $5,00 will it charge me the 5 dollars it cost or will it charge 500 or 5000 usually a 5 dollar charge would be 5.00 and this one was 5,00
It will charge you $5.00. The developer of imagr is from Austria. They use "," instead of "." in most parts of Europe (like Austria) to seperate the integral with the decimal.
@@laserillusionstech thanks for the reply I will purchase. Fast and easy to use site
Can we see the finished engraving?
Love this, but when I tried to choose a material the boxes were empty.
Hmmm interesting. Are you using google chrome as your web browser? Also, make sure to do everything in order.
Try tapping the empty box, and it should show up
My image in preview comes out all white and my project all grey
I've gone to this page but it looks nothing like the video (using Chrome). It is super slow, doesn't do a great job converting the image to give detail and after 1 hr 45 minutes waiting for it to download the image, I finally gave up.
@tammy This is an old video. Imag-r looks completely different now. Are you downloading as svg or bmp? Downloading as svg from imag-r does not work, that might be why its taking so long to download. Lightburn has actually added a new feature that will enable you to edit your image on the spot, and I would recommend that feature now as opposed to using imag-r since there is no "1 setting" for an image. Ill try to do a video on this Lightburn feature soon :) Ive just been very busy with life lately :)
PLEASE NOTE THAT THIS VIDEO IS OUTDATED AND IMAG-R LOOKS COMPLETELY DIFFERENT NOW. I WILL RELEASE AN UPDATE VIDEO ON PREPARING PHOTOS FOR LASER ENGRAVING SOON. PLEASE SUBSCRIBE TO GET NOTIFIED. THANKS!
Please can you do a update. I use to do it without any issues but now since the updates with the site it’s weird and funky and a bit confusing
Dear
Why my laser dont go to home it just miss and go near home and hapens bad noice grrrrrrr
Double Dither 😂
hello, now it is only paid version :-(
Not anymore!
Please make your videos when you are not sick
haha that made me laugh :) Thanks Ill try not to be sick next time.
Lightburn , haha , that shity software with arrogant owner. Anyway , where is the result boss, is all what matter at the end , right ?
You said something that I have not heard anyone else say and that was to save the file as a BMP for lightburn I will have try that. I have the paid version of imag-r and I have not been impressed. This maybe the answer. And yes I do have pass through turned on. Nice video thanks 😁🛫
Did bmp workout better for u?
Useless bs
As I said in pinned comment, this video is 3 years old and is outdated. I made this video when lightburn did not have a great way of editing photos for engraving and imag-r was the easiest choice for people that did not have photo editing experience.
Thank you