
ฝัง
- เผยแพร่เมื่อ 29 พ.ค. 2024
- You can watch the detailed video: • Kitchen Lithography (D...
Colorful Kitchen Lithography: • Colorful Kitchen Litho...
*Altyazıyı açmayı unutmayın. / Don't forget to turn on the subtitle.
Required Materials:
• Plastic or metal sheet for stretching the aluminum folio: The acetates sold in stationery stores in 0.45 micron are the most ideal sheet to stretch the aluminum folio. It is easy to cut acetates, and they are not heavy.
• Aluminum folio in the form of roll that will be used as mould and on which the work will be drawn. These types of folios are easily available in many markets, and the ones that are thicker are stronger and endurable. For this reason, the mould-type aluminum folio should be preferred.
• There are many alternatives for drawing. The oil pen, acetate pen or the eyeliner used in Lithography are the ideal drawing tools. Aside from these, wax, pieces of soap and oil pastel may also be used for drawing.
• Instead of nitric acid, coke is used as corrosive. The cokes that include phosphoric acid should be preferred.
• A rolling pin with medium-hardness to apply the paint onto the drawing.
• Printing ink or oil paint.
• Two pieces of natural sponge to moisten the surface of the sheet.
• A wooden spoon that will be used to transfer the work to paper.
• A paper towel that will be used to increase the pressure when transferring the work onto paper.
• A spatula that will be used to mix the paint.
• Powder that will be used to decrease the stickiness of the paint.
• Adhesive tape to fix the aluminum folio to the surface.
For more details: dergipark.org.tr/en/download/...
Daha fazla detay için: dergipark.org.tr/en/download/...
1- 00:00 - Preparation of the plate ( Plakanın hazırlanması )
2- 03:21 - Drawing ( Çizim )
3- 05:30 - Preparation of ink ( Boyanın hazırlanması )
4- 06:40 - Coke bath ( Kola Banyosu )
5- 07:30 - Rinsing with water ( Durulama )
6- 08:55 - Drying the Plate (Plakanın Kurutulması )
7- 09:30 - Wiping the plate with water ( Plakanın su ile silinmesi)
8- 10:25 - Inking the plate ( Boya verme aşaması )
9- 11:15 - Printing stage ( Baskı aşaması )
10- 12:05 - Second edition ( İkinci Baskı )
11- 13:55 - Result ( Sonuç )
French Émilie Aizier started to try and develop this technique in 2009. In 2011, Émilie was accepted as the inventor of this technique, and named this technique as “Kitchen Lithography”.
"Kitchen lithography" is one of the new (alternative) printmaking techniques. Kitchen lithography is alternative to traditional lithography. It is seen that unlike the traditional lithography, kitchen lithography can be applied without harmful chemicals (acid, thinner types, etc.). Compared to traditional lithography in this technique results are received faster and students or artists doesn't have to work in a specifically arranged studio.
"Kitchen Litografi " bu yeni (alternatif) baskı tekniklerinden biridir. Kitchen litografi, geleneksel litografiye bir alternatiftir. Geleneksel litografiden farklı olarak Kitchen litografi zararlı kimyasallar (asit, tiner çeşitleri vb.) olmadan uygulanabilmektedir. Bu teknikte geleneksel litografi ile karşılaştırıldığında sonuçlar daha hızlı alınır ve öğrencilerin veya sanatçıların özel olarak düzenlenmiş bir stüdyoda çalışmaları gerekmez.


![เปิดบ้าน เปิด Supercar อั๋นโอกิ เคยเอา rolls Royce เเลกพระ องค์ละ 100 ล้าน l [Nickynachat]](http://i.ytimg.com/vi/FeGwJwXauZ0/mqdefault.jpg)

![Mirrr x BUS5 - กี่เหตุผล (1000REASONS) [Live Session]](http://i.ytimg.com/vi/6Ta00hFr2qU/mqdefault.jpg)

While I was at the Academy of fine arts and that was from 1994.-1999. we didn't know about this. Lithography was the only graphic technique that I've never done. We had a big (a few of them) stone and a big press (a few of them) for making it (all kinds of prints). I am not sure if you get the same quality of print, but this is really really cool. I wish I had made a few drawings on a stone that I haven't, but now I might use this for fun. If I had this procedure back then, I think I would make thousands of prints :)
Thanks for showing it! Is the pencil you are using oily ? Cheers!
@@ArtBahar Cool, thanks! Cheers!
I learned traditional lithography in the late 80s and we ued stones and aluminum plates. But this makes the process accessible again for me.
Yes, it's a very specific type of limestone block. Lithograph literally means "stone print". The stone version is a little more durable for larger quantities of printing and if you can afford a stone and press, you can print with a lot of fidelity. I haven't touched one of those limestone tablets since art school and i miss it, but this is a far more accessible version of litho.
Hello, I am writing again as my comments have been deleted. There are many alternatives for drawing. The oil pen, acetate pen or the eyeliner used in Lithography are the ideal drawing tools. Aside from these, wax, pieces of soap and oil pastel may also be used for drawing. Thanks :)
Excellent demonstration of the technique! I studied traditional lithography in college and haven’t found a way to practice the craft without the stones and press. Your video shows how it can be done, simply and without intense chemicals. Thank you!
Thank you very much :)
Merci de ce partage. Moi qui ai tant galéré avec les produits chimiques, j'aurais jamais pensé au coka
Thanks :)
I use to work in the printing industry. The internet and home print machines crashed the business. We had so many beautiful papers. All gone now. Business cards look cheap and feel thin. A lithographer was on my delivery route.
What a gift you have given me!! Thank you! I’m on it !!!
Thank you :) You can find answers to your questions in the detailed video: th-cam.com/video/-XMy2w1xReo/w-d-xo.html
In this video, I explained the technique in more detail with the materials.
Когда-то давным-давно когда учился в художественной школе, освоил несколько техник декоративно - прикладного искусства, но литографию не преподавали, спасибо, что показали интересную технику искусства!!!
Спасибо. Для подробного объяснения вы можете посмотреть это видео. th-cam.com/video/-XMy2w1xReo/w-d-xo.html
bellissimo video! in un primo momento non avevo capito quando e come utilizzavi l'inchiostro grasso, poi ho pesato che, giustamente lo raccoglievi con il rullo e lo stendevi rullando, aderiva sulle parti idrorepellenti quelle disegnate!!! perfetto...
Grazie :)
Wonderful to watch you at work: a really positive result...
Thank you
Thank you :)
En este caso, “coque” es la Coca Cola? Algún tipo especial? Gracias por responder
The brand doesn't matter. It must have phosphoric acid in it. In fact, it also happens with some types of vinegar. Thanks :)
Thank you very much, really enlightening about the method!
Thanks :)
For make a lots of copies Excellent
simple, précis, c'est rare, merci et bravo pour la démo !
Thank you :)
Thank you, very interesting and easily in budgets for the creative soul.
I am from İstanbul -Türkiye . Thank you ! 🥰
Rica ederim :)
Thanks for your reply, it makes this technique much more understandable for me.
You're welcome :)
Thank you, inspiration for flat printing methods using affordable alternative media.
Thanks :)
Én is köszönöm a videót! Ez egy csodálatos technika! További minden jót és sok sikert!
Thank you :)
Thank you for sharing this method 🙂
You're welcome :)
Excellent video. Thank you so much!!!!!
You're welcome :)
Muhteşemmm…paylaştığınız için çok teşekkürler😍🙏
Rica ederim :)
Very good vídeo, thank you so much for sharing this technique! Best regards from Chile✨🙏🐦
Thank you. Best regards from Turkey.
Muito bom!!! Excelente trabalho. Parabéns
Obrigado :)
Excelente video 👍👏👏
Thanks :)
When I did my Senior Under Graduate Art Show, I used some of my Kitchen Litho Graphs. It looks easy, but it took me experimenting all summer to get satisfying prints. I have now taught it in a class setting. I love this method. I have yet to try the mukilteo wood lithograph-- Have you tried this? i usually do wood block cuts.
Yes, it takes long trials. I had tried the mokulito technique. But I didn't work on it much.
@Roderick McDonald do you have your own channel? I'd be interested in learning.
Thank you: great work. I am inspired to try this!
Thank you :)
Lithographic and letterpress printer here. You could just use a wax pen on the acetate, though an acetate with a rough surface would be best. This holds the water. The wax pen doesn't accept the water but accepts the ink. The blank bits vice versa. You could use straight up frosted glass to put the image on. Not sure about the coke bath doing anything.
Detailed video: th-cam.com/video/-XMy2w1xReo/w-d-xo.html
In this video, I explained the technique in more detail with the materials. Coke replaces nitric acid in the classical technique. It provides water retention by eroding the areas outside the drawing. Thanks :)
@@ArtBahar yes, I watched the other video and the length of time you left it in the coke was less than a minute.. Doubt that would do much as the acid content of coke is around 0.055%.
yes, it's short but it works. You can see the reaction in the foil when you put it in the coke.
Hi there, thanks a lot for this technique, sure I will try it. I have a couple questions: 1. How do you storage the plate/aluminium after used? 2. Paper, do you wet the paper or not? It seams to me you don't and, it is clear if I use rice paper but, If I used thicker paper than this should I wet it? Thanks a lot, and greetings from Costa Rica
After using the aluminum, you can put it between a clean sheet of paper and store it. I do not wet the paper. But you will get better results if you wet the paper. Thanks :)
Excellent video. Thanks
You're welcome :)
Hi there from Australia. This was just wonderful and very informative. I downloaded the academic paper as well and this answered some of my questions :) Well done
Thank you :)
Very nice technique. I must try.
Thank you :)
Muito massa a tua leitura.
Obrigado.
Thanks :)
Thanks!! Really works 👍
Thanks :)
Exellent 👍🏼
Thanks :)
Thank you for these instructions. I’ve only been able to find printing inks that say they are water based, such as Akua and Speedball. Would these work?
No water-based paint is used. It must be oil-based paint. Because the feature of the technique is that oil and water repel each other.
Very nice, but I have a question. When you are rolling the brayer over the plate, is the brayer inked? I assume it must be, but I don't see any excess ink at all adhering to the aluminum plate. Is this because the wetted aluminum rejects the ink everywhere but where the where drawn image appears?
Thanks :). The feature of the technique is that oil and water repel each other. You can find answers to your questions in the detailed video: th-cam.com/video/-XMy2w1xReo/w-d-xo.html
In this video, I explained the technique in more detail with the materials.
How many prints can you get out of this?
20-30 prints can be made. Maybe more. Detailed video: th-cam.com/video/-XMy2w1xReo/w-d-xo.html
In this video, I explained the technique in more detail with the materials. Thanks :)
surprised. You can make a lithograph with aluminum foil and cola. I used to make lithographs when I was in art college, so I thought I'd give it a try for the first time in a while.
Hello! Loved the video! I have two questions: is it possible to print using metal engraving/ printing paint or it only works with oil and the powder mixture? And what type of paper did you use? Thank you in advance :)
Hi, you can use printing ink. You can use powder to reduce the stickiness of the paint. You can use plain paper(non pattern). Thanks :)
Detailed video: th-cam.com/video/-XMy2w1xReo/w-d-xo.html
In this video, I explained the technique in more detail with the materials. Thanks :)
Thanks for the video!
You're welcome :)
Just wonderful, all this information. Thanks so much.
Thank you :)
Good work n technique, I like
Thank you :)
Thank you for such a great instructional video. I have never seen this process. Would it work printing on to a wood block.
If you do the pressure well, there will be print on the wooden plate. Thanks :)
Thanks for a fantastic video and explanation with subtitles. I had 2 questions I was hoping you could help with- What can I use as a base instead of thick acetate? And can acrylic paints be used instead of oil based printing ink when using this method with kids? Thanks!
Hello, any flat and hard material can be used instead of thick acetate. Oil-based paint must be used. Acrylic paint is not used in this technique. Thanks :)
Can't use water base as you need water for the non-image areas. The oil ink won't adhere to the wet bits. The water won't adhere to the image but the ink will.
What type of charcoal pencil can be used please ? Any other sugestions hor a drawing tool that works good other than a litography pencil ? Thank you for a grest videp
There are many alternatives for drawing. The oil pen, acetate pen or the eyeliner used in Lithography are the ideal drawing tools. Aside from these, wax, pieces of soap and oil pastel may also be used for drawing. Thanks :)
very smart way to paint
Thank you :)
Миллион лайков!!!
Миллион лайков!!!!
Миллион лайков!!!
Thank you for sharing
You're welcome :)
This is fantastic. Thank you I can now certainly utilise your knowledge demonstrated with my homeschooling art class this first term. Thank you. :)
You're welcome :)
When do you use paint mixed with talc?
Greetings from Hungary
I use this paint during the painting stage with the roller. You can also check out my other video: th-cam.com/video/-XMy2w1xReo/w-d-xo.html Thanks :)
Very nice! I did a bit of lithography in my college days.
A few questions:
Would a grease pencil work (regular litho pencil, china pencil, etc.)? Could one use a pen with the right kind of ink?
The cola acts to etch the surface slightly, or am I wrong?
How many impressions can you get off a plate? Is there a practical size limit for a plate?
Would a grease pencil work (regular litho pencil, china pencil, etc.)?
There are many alternatives for drawing. The oil pen, acetate pen or the eyeliner used in Lithography are the ideal drawing tools. Aside from these, wax, pieces of soap and oil pastel may also be used for drawing.
Could one use a pen with the right kind of ink?
Yes it can be used.
The cola acts to etch the surface slightly, or am I wrong?
Yes true.
How many impressions can you get off a plate?
15-20 prints can be made. Maybe more.
Is there a practical size limit for a plate?
No, it is possible to print as much as the size of the foil.
You can find answers to your questions in the detailed video: th-cam.com/video/-XMy2w1xReo/w-d-xo.html
In this video, I explained the technique in more detail with the materials.
Thank you very much!
You're welcome :)
What pencil did u use when drawing?
There are many alternatives for drawing. The oil pen, acetate pen or the eyeliner used in Lithography are the ideal drawing tools. Aside from these, wax, pieces of soap and oil pastel may also be used for drawing.
In this video, I used Grease Wax Pen (string marker pen).
Thank you for the excellent video! What kind of paper are you using, and is it wet? I looks like dry printer paper in the video...
Yes, I used dry printer paper. You can get a better result if you use wet paper.
Merhaba cahilliğimi mazur görün bu teknik tişört baskısı için de kullanılabilir mi acaba? Uzun zamandır denemek istediğim bir teknikti fakat malzemelerin komplike olmasından dolayı hep erteledim. Bu kadar basit mutfak malzemeleriyle yapılabildiğini öğrenmek beni mest etti ciddi manada üstüne üstlük bir de Türkçe anlatım görünce inanılmaz mutlu oldum. Cevabınız için şimdiden teşekkür ederim 🖤
Evet kumaş üzerine baskı yapılabiliyor. Matbaa mürekkebi ile çalıştayda bir deneme yapmıştım instagram.com/p/Cl3x-3hosJu/
Güzel sonuçlar elde ettik. Teşekkürler :)
はじめまして。素晴らしいアイディアの共有に感謝します。ありがとう❤
ちょうど、自分でオリジナルのスタンプを作るための方法を探していました。
早速、試してみたいと思います。
ところで、drawingするためのoilpenは、油性のボールペンや、油性のnamepen(copic・pen)も使用できますか?
@@ArtBahar 様
早速の、ご解答に感謝します♡ありがとうございます✨
Thank you :) You can find answers to your questions in the detailed video: th-cam.com/video/-XMy2w1xReo/w-d-xo.html
In this video, I explained the technique in more detail with the materials.
Can you please explain what's the need of cola here ?
Cola is used as an abrasive. Detailed video: th-cam.com/video/-XMy2w1xReo/w-d-xo.html
In this video, I explained the technique in more detail with the materials. Thanks :)
Hi, great video.
Do you have any idea to transfer a b/w laser printout to the Aluminium foil?
Hi, you can copy the laser output onto the foil with the help of acetone. I had made a few attempts. I got results in a few tries. Thanks :)
hello! do you think this would work with fabric paint instead of ink and fabric instead of paper?
It can be printed on fabric. I did an experiment with printing ink at the workshop : instagram.com/p/Cl3x-3hosJu/?hl=tr
But I haven't tried fabric ink. The paint used must be oil-based.
Fascinating!
:)
GREAT VIDEO!!! Thank you.
Are you applying ink? Why doesn’t it stain the empty spaces of the foil?
Thanks again!
Thanks :) Detailed explanation in this video: th-cam.com/video/-XMy2w1xReo/w-d-xo.html
very nice ❤❤❤❤ new subscriber
Thanks :)
This was helpfull thank you
You're welcome :)
Why don't you use a brayer?
Because the roller is not making enough pressure. Therefore, a spoon or similar tool should be used. Better results are obtained if there is a printing press.
Que tipo de pintura….? Amílica?
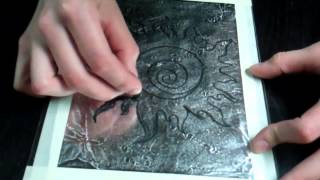
This is an abstract printmaking work. Made with Kitchen lithography technique.
So you are using a chinagraph pencil? And what was the powder that you added to the ink? I was also wondering why when you rolled the brayer with the black ink on it, onto the plate, that the whole plate isn't covered with black ink. Is it because of the coke treatment, that somehow the ink only sticks to the chinagraph pencil marks and not the aluminium foil? Oh I've just scrolled down and all my questions have been answered!!
You can find answers to your questions in the detailed video: th-cam.com/video/-XMy2w1xReo/w-d-xo.html
In this video, I explained the technique in more detail with the materials.
Whew, waaay toooo complicated for an old lady like me, but thanks for sharing!
Hello, dear, can this ink for printing be replaced with artistic oil paint, previously degreased with a newspaper, and also add talcum powder or shaving cream to it?
Yes, you can use oil paint. You can add talcum powder.
Yöntemden videoya, cekimden müzige ve baski kalitesinden esere dört dörtlük mükemmel! cok cok tesekkürler. Tebrik ederim, ellerinize saglik
Çok teşekkürler :)
Lovely video. I did find that the info disappeared too quickly also more details about the paint would be good.
Hi, you can find answers to your questions in the detailed video: th-cam.com/video/-XMy2w1xReo/w-d-xo.html
In this video, I explained the technique in more detail with the materials. Thanks :)
Hi, thanks for this tutorial, its inspiring. I wonder, what kind of talcum should be used?
@@ArtBaharOhh, Thank you :) ammm, and what Is the purpuse of It? I finally usted the ink only
The powder reduces the stickiness of the paint. Normal talcum powder. You can print more with a thicker foil. You can find answers to your questions in the detailed video: th-cam.com/video/-XMy2w1xReo/w-d-xo.html
In this video, I explained the technique in more detail with the materials. Thanks :)
Nice process . Is it necessary to remove the glass marker color if i want take print with different colors?
Yes you need to clean the drawing with vegetable oil. Detailed explanation in this video: th-cam.com/video/-XMy2w1xReo/w-d-xo.html
You missed out how the ink was applied? Rosie Hoy New Zealand
It's not on the screen. But in this work, I used printing ink. Please watch this video for more details. Thanks :)
th-cam.com/video/-XMy2w1xReo/w-d-xo.html
thank you so much
You're welcome :)
How thick is the acetate you use please? Many thanks
Acetate 0.45 micron thick. For details: th-cam.com/video/-XMy2w1xReo/w-d-xo.html Thanks :)
Ellerinize sağlık.
Yaptığınız yöntem ile evde üç-dört yıl önce bir deneme baskı yapmıştık.
Sabırla tüm aşamalar takip edildiğinde güzel sonuç alınıyor.
Güzel video
Çoğu özgün baskıresim ile videolarınıza baktım. Yönteminizi beğendim
Özgün baskıresim konusunda iyi düzeyde çok az kanal var. Kanalınızı takibe alıyorum.
İyi çalışmalar diliyorum
@@ArtBahar Öğretmen olmanıza sevindim. Sizin gibi ben de uzaktan eğitimde özgün baskıresim tekniklerini anlatmanın zorluğunu aşmak için hem sizin gibi kanallara hem de evde oluşturduğum videolara başvurdum. Keşke kanalınızı daha önce farketseydim.
İyi çalışmalar
Bu videoları özellikle pandemi nedeniyle uzaktan yaptığımız derslere öğrencilerime yardımcı olması için çektim. Teşekkür ederim. İyi çalışmalar dilerim
Teşekkür ederim. İyi çalışmalar
@@ArtBahar Bahar hocam pandemi süresince özgün baskıresim tekniklerini vermek zordu gerçekten. Üç-dört haftalık süreci kapsayan bazı teknikleri gösterebilmenin yolunu videolar oluşturarak çözmüştüm sizin gibi.
Güzel çalışmalarınız var zaman buldukça bakıyorum.
Sağlık diliyorum.
Hi! I loved the video but i have a question:Can I use something different rather than acetate? If so whats the name?
Any flat and hard material can be used to protect the foil. For details: th-cam.com/video/-XMy2w1xReo/w-d-xo.html
In other videos some use vegetal oil. Theres any difference? Thanks!
The method with vegetable oil is the same. Detailed video: th-cam.com/video/-XMy2w1xReo/w-d-xo.html
In this video, I explained the technique in more detail with the materials. Thanks :)
How long do the plates last and can you get a better result if you use a thicker foil?
It depends on the foil you use, but you can get 20-30 prints on average. You can print more with a thicker foil. You can find answers to your questions in the detailed video: th-cam.com/video/-XMy2w1xReo/w-d-xo.html
In this video, I explained the technique in more detail with the materials. Thanks :)
Wow! love it!!
Thank you :)
Thank you for the demonstration. Can I ask about how much time it needs to stay in the coke?
Tesekkür ederim. 🌷
Thanks :) It is enough to stay in the coke for 10-15 seconds. You can find answers to your questions in the detailed video: th-cam.com/video/-XMy2w1xReo/w-d-xo.html
In this video, I explained the technique in more detail with the materials.
Why did you prepare the ink if you never used this ink in the prpcess?
I am using ink. I apply the paint with a roller.
Can you use citric acid chrystals diuted in water instead of the cola? Carol UK
Hi, I have never used it. But you can also use white vinegar instead of cola.
What ya dip it in prior to h20?
Thanks for sharing. Could you please expain the roles of cola and talcum poder in the process. Appreciated.
@@ArtBahar Your link contains an aberrant “%26” at the end, which, when removed, will be correct to the paper
Detailed video: th-cam.com/video/-XMy2w1xReo/w-d-xo.html
In this video, I explained the technique in more detail with the materials. Thanks :)
BRAVO!.. Eğer yöntemi kendiniz geliştirdiyseniz: Bravo!
DEğilse de paylaştığınız için çok teşekkür ederim... Bildiğin OfSet'i evimize taşıdınız... Çok zekice bir çözümleme.. Yağlı kalem kolaya karşı koruyor.. kolanın indirgemesi yüzeyi pütürleştiriyor.... Pütürler suyu tutuyor.. Su boyayı red ediyor (Ki kola yağlı kalemin etkisini aşmışsa bile bölge yağlı boyayı kabul ediyor...
Sanki resmen litografi ama ne düz baskı denebilir.. Ne gravür ne de yüksek baskı.. Hepsi gerdeğe girse ve çocukları olsa bu olurdu.
Şahane bir seyirdi. Çok teşekkür ederim.
Bu arada: Talc eklemediğinizde mukavemeti yetersiz mi kalıyor boyanın uygulamada
Merhaba, Fransız Émilie Aizier bu tekniği 2009 yılında denemeye ve geliştirmeye başladı. 2011 yılında Émilie bu tekniğin mucidi olarak kabul edildi ve bu tekniğe “Mutfak Litografisi” adını verdi. Bende 2012 yılında ilk denemeler başladım. Fakat malzeme farklılıklarından dolayı ilk başta sonuç alamadım. Uzun denemelerden ve farklı malzeme denemelerimden sonra sonuç alabildim. Teknikte asıl malzemelere sadık kalmamla birlikte farklı yöntem ve malzemeler kullanıyorum. Dediğiniz gibi ofsetin ev evde yapılanı :). Tekniği daha ayrıntılı olarak anlattığım videoyu izleyebilirsiniz: th-cam.com/video/-XMy2w1xReo/w-d-xo.html
Not: Pudra boyanın yapışkanlığını azaltıyor bu nedenle ekliyorum.
Can’t figure out how to turn on the subtitles! Nonetheless, excellent video.
It is on the right under the video. Thanks :)
Is the foil made of aluminum? what kind of ink should we use for printing? Can we use anything plane instead of glass?
Yes, aluminum foil. Detailed video: th-cam.com/video/-XMy2w1xReo/w-d-xo.html
In this video, I explained the technique in more detail with the materials. Thanks :)
Thats magic :)))
:)
Hi, very interesting and clear video , would like to try,
Why we need to rub wet when rolling the paint on the design?
Thank you
The principle of the technique: Oil and water repel each other. Wet areas repel paint. the scratched placeker takes the paint. You can watch the detailed video: th-cam.com/video/-XMy2w1xReo/w-d-xo.html
Wow, great video!
I scrolled through the comments to see if any asked this, but can you use vinegar instead of coke? Also can you use oil paint (thinned down a bit with linseed oil) instead of oil based ink?
I only ask because this is what I have on hand now.
Thank you
Thank you :). you can also use oil paint. But oil paint is not as solid as printing ink. For this reason, you can try adding powder to oil paint.
@@ArtBahar Oh, I thought that printing ink was thin. Do you think corn starch would be good for the powder?
I've never tried starch, but it could be. You can find answers to your questions in the detailed video: th-cam.com/video/-XMy2w1xReo/w-d-xo.html
In this video, I explained the technique in more detail with the materials.
Hallo, trank you fit the Video. I just could not understand how the ink got onto the painting, ist was not shown. You prepared the transparent sheet with ink, but afterwards you continued immediately with the Coke Bath. When and how did the ink got onto the aluminium painting?
Hi, you can find answers to your questions in the detailed video: th-cam.com/video/-XMy2w1xReo/w-d-xo.html
In this video, I explained the technique in more detail with the materials. Thanks :)
What? oh my! I have to try this, it is bonkers...what are you using.. apart from kitchen foil...the pencil? what is it?, the liquid, what is it?...love it...
Thanks :) You can find answers to your questions in the detailed video: th-cam.com/video/-XMy2w1xReo/w-d-xo.html
In this video, I explained the technique in more detail with the materials.
I love it!!!
Thanks :)
Hi Tezcan! Thanks a lot for your video! What kind of printing color do you use? And what did you mix into it? (an why ;-)?) Most tutorials reverse the drawing before applying the oil color/ printing color. Why you don't?
@@ArtBahar Thanks a lot for your answer and all your experimental knowledge you are sharing! (Actually after first frustrating trials and first successes, I still do not have the final simple and 100% easy working solution for my kids-workshops...) With powder you mean talcum powder or what kind of?
@@ArtBahar Cool idea! I will have a trial. Thanks so much!
Hi, I used printing ink (Oil based). I added powder into the paint because it reduces its stickiness. I apply paint on the drawing without erasing it. Because when I wipe it with oil, the drawing is distorted. I've done a lot of experiments. I got the best result this way :-). This first video sequel will come. I make videos about color printing.
Yes, a simple talcum powder :-)
Hi Bahar!! I really appreciate your sharing this process of home lithography with us! Former art student here ❤. I fell in love with printmaking and black and white photography as well. I have done mostly lino cut and some silk screening but ALWAYS wanted to try my hand at lithography. You are such a gem to outline your process so clearly in a easy to follow format. I am a part time freelance art teacher now and love the process of sharing art with my students. My 16 year old is discovering photography and he really enjoys it. Going to definately try this with both my 16 and 11year old❤ again just wanted to thank you so much for sharing! Warm wishes from Singapore!
Gracias
You're welcome :)
what kind of pencil is used?
I use oil based pencil.
Cool video but i wish you had included text descriptions of what u did at each step for us beginners. Like what was that white powder u used in the ink?
Hi, you can watch my other videos. There are detailed explanations. The white powder is talk powder. I used it to reduce the stickiness of the ink. Thanks :)
@@ArtBahar i already did! Great channel! Thanks - i want to try it out sometime
Thanks 👍🏻🙂
I apologize for asking what is a basic question, but my knowledge of lithography is limited. I have read the comments and questions, so I "think" I understand, but to be sure- the oil pen acts as a mask to protect the lines of the drawing, and the coke eats away at the foil, to a degree, so the lines of the drawing are raised enough to make a print? I enjoyed this video, find the technique fascinating and appealing. Thank you, and I have subscribed, so I look forward to seeing more is your videos!
Thank you :) The feature of the technique is that oil and water repel each other. You can find answers to your questions in the detailed video: th-cam.com/video/-XMy2w1xReo/w-d-xo.html
In this video, I explained the technique in more detail with the materials.
Thanks for a great video. I am not very successful with this technique. I can only get 1 or 2 prints from a plate as the build up of paint on the pencil marks get bolder. Once the pencil marks are gone I do not have any grease on the plate to accept the paint. What am I doing wrong?
I just got a similar effect. Lines get thicker only after two prints.
Please follow the instructions in this video: th-cam.com/video/-XMy2w1xReo/w-d-xo.html I explained the technique in more detail with the materials. Thanks :)
Detailed video: th-cam.com/video/-XMy2w1xReo/w-d-xo.html
In this video, I explained the technique in more detail with the materials. Thanks :)
Why? Isn't it quicker to do a lino print?
In linoleum printing, we have to work much harder to make the plate. You can make details faster and easier with this technique.