Very well thought out and well constructed benchwork. The led lighting under is a novel idea and will make working under the layout so much easier. Looking forward to seeing the layout above begin. Thanks for sharing 👍😊
Hi Sean, Great video and bench work. Appreciate the updates. Please keep us posted. I too have limited space Tinplate. Trains. Therefore, I wanted to make you aware of 5 rail tinplate track. It allows for operation of O gauge sorry Std Gauge trains. The center rail is the same for both gauges, however you add two additional rails, and ogauge ties to allow for o gauge operation. These additional rails can be obtained from USA Track, by contacting Kirk, via email. Here is a pic of my track
Great work Sean. You gave me a lot of ideas for when I construct my own benchwork. My only suggestion is to reinforce the whole Lionel sign above what would be the Glenn Snyder shelving. I just have a feeling that someone will accidentally bump into it and damage it. Keep up the good work and I'm looking forward to additional video's.
Very good construction tutorial, Sean. Thanks a lot for all the things one should think when starting a new layout. I especially like the lighting placement. It makes the future work much easier. Very smart! Have a happy, healthy and prosperous 2022!
Of course cleaned and checked the wires in your Lionel clock. You’re a careful, detailed person and it shows in everything you do. I put up Maine Benchwork last year but your videos are always interesting and entertaining so I watch everything you do. Hope you had a helper with the thick plywood regardless of its size. Happy New Year.
Happy New Year Sean too you and your family. Great video love all the updates and all you do for the model train hobby. So informative your work is great. Can’t wait to see it done. Hope to here from you soon.
Great video Sean! As always lots of great information! I'm new to the hobby so you are a great help for me! Thanks for sharing! Have a great and awesome day! Happy New Year!
It’s great to see you move through the creation of another layout. I’ve seen all your videos from the first layout and appreciate some of the tips and tutorials. I’m looking forward to the next episode in this series!
Very nice Sean. Very solid. Looks like your layout is probably more solid then the floor underneath it. Looking forward to watching your new layout grow. Happy new year!
I stumbled across Mianne about a year ago. I weigh over 300 lbs and wonder if it's still strong enough in case I need to get on top. I bet the plywood you used really adds strength!
It depends. The thing about Mianne is they use a lot of cross braces to support the top, but no legs directly underneath (to allow space to work underneath). You saw in my design it has no legs in the middle back area. For me its ok since I put on 2 layers of 3/4 ply and screwed it all together. I only weigh 120 pounds so no issue. But all you have to do is call Tim and tell him your concerns and he can make any combination (including more legs) because it's like an erector set. All the pieces can be joined any which way and he can customize any kit if needed. It really is a totally hassle and mess free system.
Very nice Sean! Did you do your own work around your house? Everything looks real nice. I like the lighting for the shelving. The sign is a nice touch! Happy New Year! Looking forward to the installment.
Hey Sean, happy new year, you are looking fine today. Can you do a video of the Polar Express, the Hogwarts Express, and the Mystery Machine running on your O gauge train layout at the same time please.
Yeah, it was July 2020, right during the middle of all the world events. Nightmare, lol. Luckily the O gauge layout was mostly spared (water damage) and only required a month of repairs.
Excellent video Sean! I'm looking to get some bench work in the next month or so. I saw how you screwed the 2 layers of plywood together, how did you secure the plywood to the bench work? I didn't see any connections/fastners when you showed the underside of the bench work. Thanks!
I used those same constructions screws and screwed directly into the leg posts or the I-Beams. However, Mianne does supply the kit with corners fasteners to fasten the tabletop to benchwork. I just did not use them. Reason is I did not want any flex and they are plastic. Plus, they are kind of meant for layouts you won't walk on.
20:22 how did you install the light switch method under the bench work that powers the entire layout and what is the terminology called in model railroading??
Basic Electrical. Got 2 - 14-gauge appliance cords and 2 Power strips (not surge protectors), just strips. Wired them in an electrical box with the switch in between the hot wires. So, it turns off all power to the 2 power strips. That way I don't have to turn off individual things. But if you are not familiar with electricity, do NOT attempt, have a qualified person do it for you.


Very well thought out and well constructed benchwork. The led lighting under is a novel idea and will make working under the layout so much easier.
Looking forward to seeing the layout above begin.
Thanks for sharing 👍😊
Happy New Year! Great video, Great Layout Foundation. Thanks, Russ from Oregon
Looking good 👍. Nice job very nice table
Great layout progress on the new layout. It is going to look great.
Sean, Also thanks for the great tip on LED Lighting under bencheork. Buying two for myself!! 👍
Great step by step video as usual. I agree Mianne benchwork is the best
Hi Sean, Great video and bench work. Appreciate the updates. Please keep us posted. I too have limited space Tinplate. Trains. Therefore, I wanted to make you aware of 5 rail tinplate track. It allows for operation of O gauge sorry Std Gauge trains. The center rail is the same for both gauges, however you add two additional rails, and ogauge ties to allow for o gauge operation.
These additional rails can be obtained from USA Track, by contacting Kirk, via email. Here is a pic of my track
Great work Sean. You gave me a lot of ideas for when I construct my own benchwork. My only suggestion is to reinforce the whole Lionel sign above what would be the Glenn Snyder shelving. I just have a feeling that someone will accidentally bump into it and damage it. Keep up the good work and I'm looking forward to additional video's.
It's solid steel, so should be ok, but thanks!
Very good construction tutorial, Sean. Thanks a lot for all the things one should think when starting a new layout. I especially like the lighting placement. It makes the future work much easier. Very smart! Have a happy, healthy and prosperous 2022!
Of course cleaned and checked the wires in your Lionel clock. You’re a careful, detailed person and it shows in everything you do. I put up Maine Benchwork last year but your videos are always interesting and entertaining so I watch everything you do. Hope you had a helper with the thick plywood regardless of its size. Happy New Year.
Happy New Year Sean too you and your family. Great video love all the updates and all you do for the model train hobby. So informative your work is great. Can’t wait to see it done. Hope to here from you soon.
Thank you Sean. Came great the bench and the finish is awesome, wish you the best for 2022.
Great video Sean! As always lots of great information! I'm new to the hobby so you are a great help for me! Thanks for sharing! Have a great and awesome day! Happy New Year!
It’s great to see you move through the creation of another layout. I’ve seen all your videos from the first layout and appreciate some of the tips and tutorials.
I’m looking forward to the next episode in this series!
Thanks Carl! I am always afraid I am boring the pants off everyone, lol.
Can't wait to see the track plan. Happy new year
You should fill the space under the table with sound foam to quiet it down.
Very nice Sean. Very solid. Looks like your layout is probably more solid then the floor underneath it. Looking forward to watching your new layout grow. Happy new year!
HAHA, probably true.
I stumbled across Mianne about a year ago. I weigh over 300 lbs and wonder if it's still strong enough in case I need to get on top. I bet the plywood you used really adds strength!
It depends. The thing about Mianne is they use a lot of cross braces to support the top, but no legs directly underneath (to allow space to work underneath). You saw in my design it has no legs in the middle back area. For me its ok since I put on 2 layers of 3/4 ply and screwed it all together. I only weigh 120 pounds so no issue. But all you have to do is call Tim and tell him your concerns and he can make any combination (including more legs) because it's like an erector set. All the pieces can be joined any which way and he can customize any kit if needed. It really is a totally hassle and mess free system.
Very nice Sean! Did you do your own work around your house? Everything looks real nice. I like the lighting for the shelving. The sign is a nice touch! Happy New Year! Looking forward to the installment.
Hey Sean, happy new year, you are looking fine today. Can you do a video of the Polar Express, the Hogwarts Express, and the Mystery Machine running on your O gauge train layout at the same time please.
Fantastic. Looks really nice. I didn't know you had a fire. Was that a long time ago?
Yeah, it was July 2020, right during the middle of all the world events. Nightmare, lol. Luckily the O gauge layout was mostly spared (water damage) and only required a month of repairs.
Excellent video Sean! I'm looking to get some bench work in the next month or so. I saw how you screwed the 2 layers of plywood together, how did you secure the plywood to the bench work? I didn't see any connections/fastners when you showed the underside of the bench work. Thanks!
I used those same constructions screws and screwed directly into the leg posts or the I-Beams. However, Mianne does supply the kit with corners fasteners to fasten the tabletop to benchwork. I just did not use them. Reason is I did not want any flex and they are plastic. Plus, they are kind of meant for layouts you won't walk on.
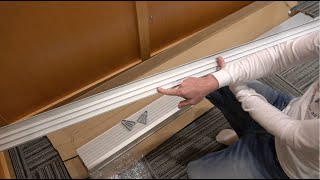
Really good ideas. What did you use for the trim around the table?
It's just 1x3 Red Oak trim.
20:22 how did you install the light switch method under the bench work that powers the entire layout and what is the terminology called in model railroading??
Basic Electrical. Got 2 - 14-gauge appliance cords and 2 Power strips (not surge protectors), just strips. Wired them in an electrical box with the switch in between the hot wires. So, it turns off all power to the 2 power strips. That way I don't have to turn off individual things. But if you are not familiar with electricity, do NOT attempt, have a qualified person do it for you.
@@seanstraindepot BTW, can you do a video demonstrating how you got it set up but in a safe and controlled environment??
How does this bench work compare to the "L" Girder design in cost do you think? I have an 8' x 12' L Girder Style Table
Sorry I would not know as I don't know much about that design.
@@seanstraindepot Yours looks really clean. Will look like a piece of furniture when done. Thanks for sharing. You always make it look easy!