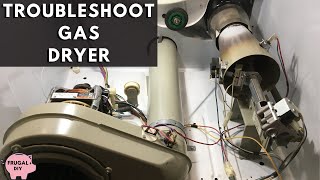
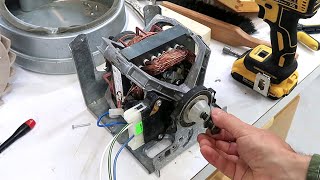
Replace Dryer Motor | Kenmore 90 Series | Dryer Squealing, Grinding, Humming Noise, Won't Start

แชร์
ฝัง
  • เผยแพร่เมื่อ 13 ก.ย. 2024
  • If your dryer makes a squealing noise, a grinding noise, a humming noise or won't start, the motor may need to be replaced. I'll show you how to replace a dryer motor and how to remove and maintenance the dryer idler pulley and rollers.
    OEM Replacement Motor 279787: amzn.to/35kF6XC
    NOTE: I recommend you purchase an OEM (Original Equipment Manufacturer) replacement motor because aftermarket motors may not have the same configurations--specifically, shaft length and electrical--as the original dryer motor. Whirlpool makes Kenmore dryers so the replacement motor for your dryer is made by Whirlpool.
    //DISCLAIMER: Links included in this description area contain affiliate links. If you click on one of the links and purchase a product, I will receive a small commission.

ความคิดเห็น • 100

  • @pastorkev777
    @pastorkev777 2 ปีที่แล้ว +13

    You did a phenomenal job with this video, I'm very appreciative of how detailed and clear everything was both visually and instructionally.

    • @frugaldiy1
      @frugaldiy1  2 ปีที่แล้ว +3

      pastorkev777, your kind and supportive words brought tears to my eyes. I'm an old sap that cries at the drop of a hat. Your words mean a great deal to me. I deeply appreciate your comment.

  • @utuberagain18
    @utuberagain18 ปีที่แล้ว +8

    This is probably this best DIY video I've ever watched. I can tell you put in to the time to plan it out beforehand and followed through with very clear and well-documented instructions. You did a fantastic job. I'm sure you helped a lot of people with this repair, and they saved money in the process. Thanks!

    • @frugaldiy1
      @frugaldiy1  ปีที่แล้ว +3

      What a nice thing to say, mcrider 18. Thank you for taking the time to write such a thoughtful comment. It means a great deal to me--truly. I enjoyed doing that project, learned a lot and wanted to pass it on to other folks, like you. I'm all about saving my hard-earned money and am trying to encourage others to do the same. I'm working on rehabing a 45-year-old shower pan right now with some muriatic acid. Corporations and contractors are going to have to pry my money from my cold, dead hands. ;)

    • @listcheck
      @listcheck 8 หลายเดือนก่อน

      awe u did tht hun@@frugaldiy1

  • @baseballmomism
    @baseballmomism 6 หลายเดือนก่อน +4

    This was by far the best DIY video I have ever used!! Many thanks!! True expert at teaching, explaining, doing, editing, lighting, etc!

    • @frugaldiy1
      @frugaldiy1  6 หลายเดือนก่อน

      Thank you for your thoughtful comment and encouraging comment. I appreciate that--truly. ;)

  • @speedygarage264
    @speedygarage264 ปีที่แล้ว +7

    Just wanted to tell you that this is a great DIY video - good pacing, well-explained, clear camera angles, no fluff. Excellent work!

    • @frugaldiy1
      @frugaldiy1  ปีที่แล้ว +2

      Thank you, Speedy Garage. That means a lot to me, and I appreciate that you took the time to say it. Merry Christmas!

  • @robertkacmarynski2141
    @robertkacmarynski2141 ปีที่แล้ว +3

    I have never left a comment on TH-cam, but this video is exceptionally well done. Thanks!!

    • @frugaldiy1
      @frugaldiy1  ปีที่แล้ว

      Robert, that's such a kind comment to leave me. Thank you--truly. It warms my DIY heart that you felt my video deserved you leaving a comment. ;)

  • @davidb2438
    @davidb2438 ปีที่แล้ว +4

    That was the best DIY video that I have ever seen on TH-cam. I wrote manufacturing instructions on an assembly line for a couple of decades, and I couldn’t have done any better. It was detailed, cautionary statements, and perfect camera shots. Kudos!!!!

    • @frugaldiy1
      @frugaldiy1  ปีที่แล้ว +2

      Thank you, David, for your thoughtful comment. It means a lot to me. ;)

  • @richardhartford7272
    @richardhartford7272 ปีที่แล้ว +3

    I'm a very mechanical and adept type of guy!!! This is maybe THE BEST DIY repair video's I've seen. The skill and presentation leaves me with no apprehension that I can complete this project.. Thank you very much. Rich Hartford, Brunswick Maine

    • @frugaldiy1
      @frugaldiy1  ปีที่แล้ว +1

      That's such a nice thing to say, Richard. Thank you for your thoughtful and supportive words. I have no doubt you can change the dryer motor. ;)

  • @user-zz7rh6sm5l
    @user-zz7rh6sm5l ปีที่แล้ว +3

    I watched your (Frugal DIY) video on the Kenmore 90 series dryer on replacing the motor, belt and rollers. Thank you for your simple, clear and complete instructions. My wife was thrilled.

    • @frugaldiy1
      @frugaldiy1  ปีที่แล้ว

      That's wonderful to hear that my videos helped you and that your wife is trilled! You're certainly welcome, and thank you for the wonderful comment you left. It means a lot to me. ;)

  • @DiegoRamirez-wy3yz
    @DiegoRamirez-wy3yz 7 หลายเดือนก่อน +1

    One of the best videos ive seen in a long time! Thank you for the instruction!! Replaced motor, belt, pulley, and wheels.

    • @frugaldiy1
      @frugaldiy1  7 หลายเดือนก่อน

      Well thank you. I appreciate that you took the time to leave me such a nice comment. I'm proud of you for replacing all of those parts and fixing your dryer. Well done!

  • @brandonbirt4637
    @brandonbirt4637 ปีที่แล้ว +2

    Thank you , this is the most thorough video I have seen thus far . Very detailed! I feel very confident with every procedure even though I’m a newb. Thanks

    • @frugaldiy1
      @frugaldiy1  ปีที่แล้ว

      You're welcome, Brandon, and thank you. I'm thrilled to hear you mustered the confidence to change the motor. It's truly not that difficult. You'll blow through it like a pro! ;)

  • @graysonevans4496
    @graysonevans4496 2 ปีที่แล้ว +8

    I seldom leave comments, but this is certainly one of the best DIY videos on TH-cam. You took the time to get the camera angle correct so everything is very visible, the tools were thought out in advance, and your voice recording is very clear. The pace is also very good. Bravo. You convinced me I can do this! Gonna try it. Make more!

    • @frugaldiy1
      @frugaldiy1  2 ปีที่แล้ว +1

      Grayson, I can't thank you enough for the thoughtful, kind and supportive comment you left me. Your encouraging words mean a great deal to me! You CAN change the dryer motor. If you take photos as you go, or even video, it may help you. Once you've done it one time, you'll feel like a pro! ;)

  • @michaelturaninjr1239
    @michaelturaninjr1239 2 ปีที่แล้ว +4

    Fantastic camera work! I have that exact dryer. The motor just failed. I'm going to replace it as soon as replacement arrives. Thank you for this video! It eased my anxiety about doing it.

    • @frugaldiy1
      @frugaldiy1  2 ปีที่แล้ว

      You're welcome, Michael. Thank you for your kind words. Yes, please don't feel anxious about replacing the motor; it's not a tough job at all. I hope you have great success. Happy DIYing!

  • @petersargent3780
    @petersargent3780 2 ปีที่แล้ว +4

    Thank you so much for this - perfectly explained and very concise. Able to fix my dryer in an evening.

    • @frugaldiy1
      @frugaldiy1  2 ปีที่แล้ว

      That's great to hear, Peter. Good job! And, thank you for the nice comment.

  • @Springerpop
    @Springerpop 7 หลายเดือนก่อน +1

    Soooo glad you mentioned the switch at the belt tensioner that disables the dryer when it senses a broken belt!!

  • @GEOMYSTIC23
    @GEOMYSTIC23 ปีที่แล้ว

    Thanks from Mali this! Helped me to clean a cruddy motor and get my machine back up and running !

  • @earthsciteach
    @earthsciteach ปีที่แล้ว +1

    Thanks for the video! I replace the motor in my Kenmore series 90 dryer today. Really well done video.

    • @frugaldiy1
      @frugaldiy1  ปีที่แล้ว

      You're welcome, Patrick. Job well done! Thank you for the nice comment. It's always great to hear that one of my videos helped someone.

  • @David-rx6bk
    @David-rx6bk 20 วันที่ผ่านมา

    Excellent video. I was able to replace the motor. The biggest problem I had was installing the belt. It is a tight space. Just remember to install the belt on the pully first and then on the motor shaft as you raise the spring pully shaft.

  • @glenberthel431
    @glenberthel431 ปีที่แล้ว +2

    What can I say other than excellent DIY video !!!
    Wish they were all this clear and informative.

    • @frugaldiy1
      @frugaldiy1  ปีที่แล้ว

      Thank you, Glen. You're words mean a lot to me.

  • @Oak690
    @Oak690 ปีที่แล้ว +2

    Thank you for making this video. I just replaced the motor in my 90 series electric dryer and this was EXTREMELY helpful!

    • @frugaldiy1
      @frugaldiy1  ปีที่แล้ว +1

      You're welcome, Oak1998.

  • @jefflin2893
    @jefflin2893 7 หลายเดือนก่อน

    This is an amazingly clear and well-done video. I never leave comments but this is superb!

    • @frugaldiy1
      @frugaldiy1  7 หลายเดือนก่อน

      Thank you, Jeff. I appreciate that you took the time to leave such a thoughtful comment. ;)

  • @Johnbaum13
    @Johnbaum13 ปีที่แล้ว

    Thank you! This video saved me hours of headache. Very clear and detailed 👌

    • @frugaldiy1
      @frugaldiy1  ปีที่แล้ว

      You're welcome, Johnbaum13. Thank you for taking the time to write such a nice comment. ;)

  • @RMDK22
    @RMDK22 5 หลายเดือนก่อน

    amazing angles. you made this look so simple. unfortunately i found this video after taking it apart all sorts of ways. tmrw ill give it another try

    • @RMDK22
      @RMDK22 5 หลายเดือนก่อน

      i gave it another try (since other dryers u had to hit em from the back). disassembly/assembly 100% easier. thank you

  • @anseleratorsostherope2349
    @anseleratorsostherope2349 ปีที่แล้ว

    This is beautiful work. The details are great. Excellent tips. Wire marking is great move. I truly have no questions regarding the work shown in this video. I have the exact same model, and have done a little work on the front, this fills in my answers for getting beyond the front. Even has the whistling bypass!!

    • @frugaldiy1
      @frugaldiy1  ปีที่แล้ว

      Thank you kindly for your nice comment. ;)

  • @analytics2go177
    @analytics2go177 2 ปีที่แล้ว +1

    Fantastic video...thank you! I may even be more impressed with the camera work to show the belt and the tension pulley before you removed it! Other videos did not go into that detail. Thanks again.

    • @frugaldiy1
      @frugaldiy1  2 ปีที่แล้ว

      You're welcome, Analytics2Go, and thank you for taking the time to leave such a nice comment.

  • @corysturgis6660
    @corysturgis6660 11 หลายเดือนก่อน +1

    This is a great video. Thank you. I can tell your a very talented individual.your great.

  • @SteveN-gt2ur
    @SteveN-gt2ur 2 ปีที่แล้ว

    I have the same Kenmore and it looks like the motor has finally given up after 22 years of service. Thank you very much for a super video.

    • @frugaldiy1
      @frugaldiy1  2 ปีที่แล้ว

      You're welcome, Steve. I have great affinity for my stalwart Kenmore 90 Series and will do whatever I can to keep her going.

  • @PE-vo7iq
    @PE-vo7iq ปีที่แล้ว +1

    Great video, very detailed, nothing was left out. I'm up and running, thx!!
    Do you have any videos on how to fix my spouse. 🤣

    • @frugaldiy1
      @frugaldiy1  ปีที่แล้ว

      LOL! Turn him or her in for a new model. That's what I did. ;) And, thank you from the bottom on my DIY heart for your thoughtful comment. It means a great deal to me--truly.

  • @mikegruenthal3957
    @mikegruenthal3957 2 ปีที่แล้ว +1

    Awesome video. Made the job simple. Thank you.

    • @frugaldiy1
      @frugaldiy1  2 ปีที่แล้ว

      You're welcome, Mike, and thank you for taking the time to leave such a nice comment. It means a lot to me.

  • @jimgastelum6947
    @jimgastelum6947 2 ปีที่แล้ว +1

    I agree with Michael's comment above: Absolutely superb video. Exceptional lighting and visual clarity. Bravo! 👏
    Made it to the 7:48 mark in my teardown, and then the plastic fan cracked along the square 1/2 inch mating surface before unscrewing. I'm guessing it may have melted to the threads due to age and possible overheating. If I can't find a replacement, I'll just replace that entire lint-trap section, I guess. (...and yes: I was turning said fan clockwise as directed.)
    [ To be continued... ] 😎👍

    • @frugaldiy1
      @frugaldiy1  2 ปีที่แล้ว +1

      Thank you, Jim, for your thoughtful and kind words. I truly appreciate that you took the time to convey them. Regarding the fan, yes, they can crack with age as they become brittle or if they are put on too tight. You can look on eBay for a replacement fan/wheel. Just type the model of your dryer into Google and get the part number. Then, head to eBay and look for a pre-owned or new one from a highly-rated seller.

  • @marcosleiva482
    @marcosleiva482 6 หลายเดือนก่อน

    Thank you so much, you are a great instructor!

    • @frugaldiy1
      @frugaldiy1  6 หลายเดือนก่อน

      You're welcome, and thank you so much for the lovely comment you left me. Warms my DIY heart. ;)

  • @nashwanmalo4832
    @nashwanmalo4832 2 ปีที่แล้ว +1

    U did great job and easy to explain to make every one happy

    • @frugaldiy1
      @frugaldiy1  2 ปีที่แล้ว +1

      Well thank you, Nashwan. That's so kind of you to say. I'm glad you liked my video, and I hope it helped you.

  • @buddylove4882
    @buddylove4882 ปีที่แล้ว +1

    Maam you are1000000000000% awesome! Who taught you and how long did it take to become a master tech?

    • @frugaldiy1
      @frugaldiy1  ปีที่แล้ว

      Buddy, that's so kind of you to say. Thank you for taking the time to leave such a nice comment. It means a lot to me. I'm just a DIYer, love working on projects and learn as I go. I'm frugal and don't like to pay someone to fix something I can figure out and fix myself. ;)

  • @mikethompson3534
    @mikethompson3534 ปีที่แล้ว

    Very clear instructions Thank you

  • @miguelmunoz171
    @miguelmunoz171 ปีที่แล้ว +1

    Hello frugal DIY thank you for your awesome video very clear and well explained also great camera footage
    Now my question is can someone please post a link where I can get a new motor replacement mine just went down
    and since those dryers are so old is kinda hard to find parts
    I apréciate thank you 🙏🏼

    • @frugaldiy1
      @frugaldiy1  ปีที่แล้ว

      Thank you, miguel, for your thoughtful comment. It's much appreciated.
      OEM Replacement Motor 279787: amzn.to/35kF6XC

  • @mannyfilmsinc
    @mannyfilmsinc 11 หลายเดือนก่อน

    This was an awesome video. I really appreciate you . Thank you so much

  • @Singulitarian
    @Singulitarian ปีที่แล้ว +1

    Excellent video.

    • @frugaldiy1
      @frugaldiy1  ปีที่แล้ว +1

      Thank you, Singulitarian.

  • @jimbowling8528
    @jimbowling8528 4 หลายเดือนก่อน

    Very very good video. Thanks!

  • @Daniel-RunToRoyal
    @Daniel-RunToRoyal 2 ปีที่แล้ว

    Thank you!! You're the best!! Greatly appreciate it!!

    • @frugaldiy1
      @frugaldiy1  2 ปีที่แล้ว

      You're welcome, Daniel, and thank you from the bottom of my DIY heart for your wonderful comment. It too is greatly appreciated. ;)

  • @piotrnowak2609
    @piotrnowak2609 8 หลายเดือนก่อน

    Beautiful job! Thank you!

    • @frugaldiy1
      @frugaldiy1  8 หลายเดือนก่อน

      Thank you. That means a lot to me. ;)

  • @EricCasini-ew3cy
    @EricCasini-ew3cy ปีที่แล้ว +1

    Well done on the video. On point

  • @nitromax5150
    @nitromax5150 2 ปีที่แล้ว +1

    dang lady you went all into it !! nice!!

    • @frugaldiy1
      @frugaldiy1  2 ปีที่แล้ว

      Thank you, Nitro Max. Your comment means a lot to me.

  • @jesusduenez9457
    @jesusduenez9457 ปีที่แล้ว +1

    Thanks alot for the detailed video! I have the same Kenmore 90 Series dryer(but electric,not gas) will the OEM replacement motor 279787 from Amazon fit my dryer? My motor bracket is exactly like yours.

    • @frugaldiy1
      @frugaldiy1  ปีที่แล้ว +1

      Hi, Jesus, and thank you. I don't know. I'd type the model number of your dryer motor in online and see what motor is recommended. Good luck on your project.

  • @FruitfulEden
    @FruitfulEden 2 ปีที่แล้ว +1

    Thank you so much for a very detailed video that was very clear and easy to understand. I have the same dryer except mine is electric not gas. How did you know that it was the motor that was bad? I believe my motor is bad because I turned off the heat on my dryer just to make sure it wasn't the temperature thermostat that was bad. Ran the dryer on air and after a few minutes it stopped running. It also does make a humming sound when I push the start button and I need to hold it down for the dryer to start. After it turns off I need to wait for about a half an hour before I can start it again and then the same thing happens after a few minutes.

    • @frugaldiy1
      @frugaldiy1  2 ปีที่แล้ว +1

      Hi Laura. You're welcome, and thank you for your lovely comment. As to the issue with my dryer motor, the issues you describe are the same issues I had with my motor. Additionally, I had intermittent heat at times. After several weeks of the dryer have wonky problems, I heard an intermittent squealing noise in the dryer and put my ear down on the lower front panel and could hear the motor was squealing. I then knew the motor had to be replaced. But, the "humming" you describe was the indicator to me that the motor was the issue.
      Some of the issues you describe can also be the result of one of a few of the cycling components failing or being faulty. I will be doing a video on how to troubleshoot and replace the cycling components within the next 2 weeks. Please let me know if you need more help.
      FYI: Let add this--if you purchase a new motor, I highly recommend that you don't get an aftermarket motor because they have issues with the motor shaft being too long which causes the blower wheel to rub and damages it. Also, there are issues with the electrical configuration. You will find the manufacturer part number in the video description.

    • @FruitfulEden
      @FruitfulEden 2 ปีที่แล้ว +1

      @@frugaldiy1 yes I was looking at the parts that were available to buy and if it was a cheaper part that was aftermarket seems that they tend to fail quite quickly. I'm going to check with the local appliance shop first. But maybe I should also check the cycling component? That's probably a cheaper part.

    • @frugaldiy1
      @frugaldiy1  2 ปีที่แล้ว +1

      Yes, cycling components are cheaper. If you buy an OEM motor, sellers on eBay have the best prices.

  • @94jimmy5
    @94jimmy5 ปีที่แล้ว

    Excellent video. Thanks.

    • @frugaldiy1
      @frugaldiy1  ปีที่แล้ว

      You're welcome, 94jimmy5, and thank you.

  • @alainapotaduh
    @alainapotaduh 7 หลายเดือนก่อน

    This is a great video! Now I'm stuck because the blower wheel won't come off, and now it's stripped, the ratchet just spins inside the fan. Now I'm not sure what to do. I think I have to break the fan off in pieces and get a new one?

    • @frugaldiy1
      @frugaldiy1  7 หลายเดือนก่อน

      Thank you. Re the spinning fan, I'd have to see it to know exactly how I'd remove it. I'm a big fan of Vice Grips when I have something that's stripped.

    • @alainapotaduh
      @alainapotaduh 7 หลายเดือนก่อน

      @@frugaldiy1 I did end up having to break it off with a hammer and chisel! It was fused to the motor shaft too and I had to chip away at it once the big pieces were off to pull the motor out through the small hole. There was no other way. It was crazy! But it was so satisfying once I turned it on and it worked again.
      Thank you so so much for helping me save my dryer. I love my 90 series set, and I have made many repairs on them. This was the most complicated one yet though. As long as there are parts, I will keep them forever!

  • @alekmartin9999
    @alekmartin9999 9 หลายเดือนก่อน

    Nice excellent 👌 PhD level details in video

    • @frugaldiy1
      @frugaldiy1  9 หลายเดือนก่อน

      You're too kind, Alek. Thank you.

  • @alekmartin9999
    @alekmartin9999 9 หลายเดือนก่อน

    Detailed. Bravo

    • @frugaldiy1
      @frugaldiy1  9 หลายเดือนก่อน

      Thank you, Alek. ;)

  • @MarkSWest
    @MarkSWest ปีที่แล้ว

    GREAT job!

  • @michaelmatthew550
    @michaelmatthew550 2 ปีที่แล้ว +1

    Excellent

    • @frugaldiy1
      @frugaldiy1  2 ปีที่แล้ว

      Thank you, michael.

  • @sammyt555
    @sammyt555 ปีที่แล้ว

    How old is too old to replace a motor? Mines from '98 and wont spin, rollers and belt are fine. Should I spend ~130-150 on a motor or replace the dryer?

  • @Meat4389
    @Meat4389 4 หลายเดือนก่อน

    A+ video

  • @wasgonnasdontcount
    @wasgonnasdontcount ปีที่แล้ว

    Without warning, my older Kenmore clothes dryer motor wouldn't start (motor # 690870). When the start button is pressed the motor turns about 1/4 inch and stops and hums, if I spin the drum by hand it starts going and completes its cycle, indicating that lubrication isn't the issue. The motor shaft spins freely both with and without the belt attached and as soon as I hit the power switch and spin it the motor takes off and the centrifugal switch kicks in and moves to the proper position. So the motor runs when nudged, the power switch and door switches work, it just won't start spinning without an assist although it gives a little wiggle movement when the power switch is pressed. Is there a start-up circuit in the motor that may be defective? Or?? Thanks in advance for your thoughts.

    • @frugaldiy1
      @frugaldiy1  ปีที่แล้ว

      Michael, I suspect the belt needs to be changed. Over time, the belt surface becomes cracked and worn, so it can't "grab" the drum to turn it. In your case, when you assist the drum and turn it, as the dryer/belt heats up, the belt expands and is able to grab the drum and turn it. Here's my video on replacing the dryer belt: th-cam.com/video/ijdcNI1gDrM/w-d-xo.html

  • @jedibusiness789
    @jedibusiness789 2 ปีที่แล้ว

    You in the market for a boyfriend?

    • @frugaldiy1
      @frugaldiy1  2 ปีที่แล้ว

      M K, thank you for asking and that's so flattering, but I'm not.