Great video Marty as usual! In my humble opinion, and after having using photoshop since about 3 decades, your amazing teacher capabilities, videos and your channel are just the best! I hope that now your health is 100% good! Greetings from Mexico City!
Your brilliant way of teaching different photoshop techniques is incredibly satisfying and educational. It is with great anticipation that I look forward to the next tutorial
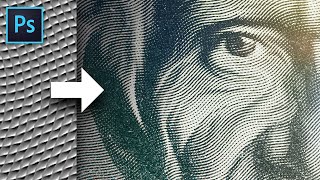
I enjoy your tutorials and sometimes follow along on my own example to familiarise myself with the techniques What I did find in this one was that the Filter Gallery was greyed out ~ resolved by converting the image down to 8 bit!
Thanks for this, works exactly as shown, but I still have an issue: After doing this, whenever I try to use "Filter Gallery" on a different project/image, the "halftone"and "torn edges" are still there. I can delete on of them, but not both of them...
@@BLTV_Photoshop Correct. I can delete either the Halftone or the Torn edges filter, but as soon as I delete one, the trash icon greys out, making it impossible to delete the other.
Hi Marty, nice tutorial, I have a question, could you upload this psd project?? I will try to change the photo via smart object and see the result, I use this technique in my project and only needed a few adjustments Thank you Greetings form Spain


This is so much easier than the previous methods. Thank you.
A fun effect. I will have to give it a try with one of my own images. Enjoy your videos. Thanks.
Seriously, the best tutorials on the web. I wasn't even interested in something like that but I will do it just because it's so cool.
Great video Marty as usual! In my humble opinion, and after having using photoshop since about 3 decades, your amazing teacher capabilities, videos and your channel are just the best! I hope that now your health is 100% good! Greetings from Mexico City!
Thank you! 🙏
Another masterpiece. Just outstanding.
Your brilliant way of teaching different photoshop techniques is incredibly satisfying and educational. It is with great anticipation that I look forward to the next tutorial
Thank you so much 😀
Wonderful effect - you do Magic with filters. Marty! Thanks a lot!
Thank you, Roger!
I enjoy your tutorials and sometimes follow along on my own example to familiarise myself with the techniques
What I did find in this one was that the Filter Gallery was greyed out ~ resolved by converting the image down to 8 bit!
Yes, always make sure the image is 8 bits and RGB color. Many filters don't work at 16 bits.
Nice work. Thanks for sharing!
Been working with Photoshop since forever, but much if this is new. We all have our ways of banging out our projects...
he didnt use any new features
Been looking for exactly this!! Thank you!😊😊
You are a Great Teacher , Thanks
Sensational! Great tutorial.
Fantastic sir ❤
Youre a legend man
beautiful video
beautiful
Marvelous.
This is fun to learn
great
Great!
nice, thx
Thanks for this, works exactly as shown, but I still have an issue:
After doing this, whenever I try to use "Filter Gallery" on a different project/image, the "halftone"and "torn edges" are still there.
I can delete on of them, but not both of them...
When you click the trash can icon at the lower, right corner of Filter Gallery, the filter doesn't get deleted? 🤔
@@BLTV_Photoshop Correct. I can delete either the Halftone or the Torn edges filter, but as soon as I delete one, the trash icon greys out, making it impossible to delete the other.
Hi Marty, nice tutorial, I have a question, could you upload this psd project?? I will try to change the photo via smart object and see the result, I use this technique in my project and only needed a few adjustments
Thank you
Greetings form Spain
At 1:20 in the video, the photo is converted into a Smart Object.
@@BLTV_Photoshop I know, but if you could upload to anywhere the psd project to check it please...
Hi Martin, how to make a multicolored engraving effect please?
Thanks for your suggestion. I'll look into it.
❤🎉❤
Marty is AI person or real person??
lol. Real.