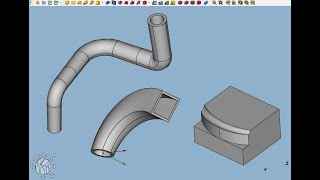
absolutely brilliant the idea to use boxes to create the sweep path. I was thinking something nice to create a 3D cable along a chassis and PCB board shapes. and this idea matches the purpose. Bravo!
When I followed the procedure to design the path of the 3 d poly-line, the orientation deviated from the edges of the solid in such a way I had to readjust the Euler angles & position of the 3 d poly-line.
Hi Mads as you know for people with poor eye sight it is very hard to follow a fast moving LITTLE black or white pointer. Would be wonderful if you could make it red with a yellow hue on the outside AND increase the default size. Well it is possible. Check this site sites.google.com/view/catnip5/mouse-highlight?authuser=0 Thanks a lot.
it is not easy to make the corser bigger you can not see the tool tip text on icons if you do so and you haft to chances corser from time to time what about getting a bigger screen bg. mads😁🇩🇰 the strimming program i use is difficult to change mouse pointer you can not chance windows pointer


absolutely brilliant the idea to use boxes to create the sweep path. I was thinking something nice to create a 3D cable along a chassis and PCB board shapes. and this idea matches the purpose. Bravo!
Your video presentation skills, and your english, are both improving rapidly! Well done!
Brilliant technique to use 2 boxes as helper geometries!
I sincerely appreciate your videos.
i am doing it as goot as i can. if I could make it more precise I would have done it thanks😁🇩🇰
Great video thanks for showing a really useful technique.
Very cool video. I think it's one of the most important things in FreeCAD
When I followed the procedure to design the path of the 3 d poly-line, the orientation deviated from the edges of the solid in such a way I had to readjust the Euler angles & position of the 3 d poly-line.
I learnt a lot, thank you very much!
thanks for your lesson!!
Thank you very much for your knowledge
Excellent
Imagine what the world would be like if the morning news taught good skills, instead of reminding daily of the worst of humanity.
Interesting! Thanks!
How smart way it is !!!
excellent !
8:08 try draw style "Wireframe (V, 3)" from the main menu View -> Draw style . It allows you to select edges quite easy providing best visibility.
thanks it take a long time to lean evil things👍🇩🇰
Hi Mads as you know for people with poor eye sight it is very hard to follow a fast moving LITTLE black or white pointer. Would be wonderful if you could make it red with a yellow hue on the outside AND increase the default size. Well it is possible.
Check this site sites.google.com/view/catnip5/mouse-highlight?authuser=0
Thanks a lot.
it is not easy to make the corser bigger you can not see the tool tip text on icons if you do so and you haft to chances corser from time to time what about getting a bigger screen bg. mads😁🇩🇰 the strimming program i use is difficult to change mouse pointer you can not chance windows pointer