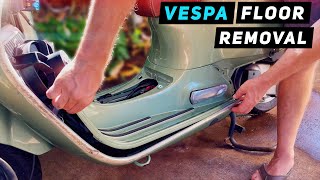
After removing the rubber bands on the bottom panel, there are 3 screws under them on each side. At the rear there is a bolt that unscrews. The steps and moldings are dismantled. The panel can then be removed.
At 02:35 how hard must you pull to separate them? I have removed the screws and mirrors but the plastic parts will not separate. Are there any risk of braking some parts of the plastic by using force?
Carefully detach the plastic of the headlight. The newer Vespa GTS have plastic ears that hold the front and rear plastic of the headlight from above. To disconnect them, press lightly with a thin screwdriver.


Akrapovic exhaust battle in 3 Vespa GTS 300: th-cam.com/video/oAZv-eUOqoY/w-d-xo.html
Thank you so much! Now I can paint my vespa .
Thanks for video! A lot of things became clear to me during the dissasembly of Vespa GTS Hpe.
How to remove the lower side panels was very helpful. Thanks!!!
After removing the rubber bands on the bottom panel, there are 3 screws under them on each side. At the rear there is a bolt that unscrews. The steps and moldings are dismantled. The panel can then be removed.
Thanks again!! @@fitness-fishing-s.kovachev
At 02:35 how hard must you pull to separate them? I have removed the screws and mirrors but the plastic parts will not separate. Are there any risk of braking some parts of the plastic by using force?
Carefully detach the plastic of the headlight. The newer Vespa GTS have plastic ears that hold the front and rear plastic of the headlight from above. To disconnect them, press lightly with a thin screwdriver.
@@fitness-fishing-s.kovachev Thank you! Keep up the good work! Like when removing the Piaggio emblem.
Thank you brother.
thanks for sharing, very usefull.
Bonjour , peux tu me dire ou est le régul
ateur de tension? please
Dónde podré encontrar la moldura cromada lateral derecha
You can check Sip-scooter shop.
πολύ χρήσιμο βίντεο ευχαριστώ, very useful video thanks
Thanks, friend!
Thanks bro
Tysm
Good
Hubiera quedado excelente si quitas el sonido .
skipping a lot of steps...
@@valmir144 Everything steps I show. Step by step to assembly Vespa GtS plastics.