Looking good. Instead of sanding to remove the stain or to create lighter areas, use either a little white spirit on a rag (if the stain was oil based), meths if spirit based or water if the stain was water based. You should use a larger cloth too, and when removing stain a lighter coloured one so you can judge how much stain you're removing. If that removes too much, use some dry fine wire wool instead. I dont think you need to worry about shielding humbuckers unlike single coil pickups (as mentioned below).
Thank you for sharing your experience with everyone much appreciated. Regarding shielding the jack area, it is recommended not to shield it because when wiring the jack and when plugin the wire in there is a risk of certain issues and leading to failure to have the best sound or even no sound possibility as been highlighted by one of our specialised colleague who deals a lot with tone and produce one of the excellent quality pickups, Dylan Pickups, and on his channel Dylan talks tone on TH-cam. Hope this is been useful and it would be appreciated to hear your inputs. Thank you again for your great work and please do accept our gratitude and appreciation for sharing your experience with everyone. Kind regards from ENGLAND UK 🇬🇧 👍🎸
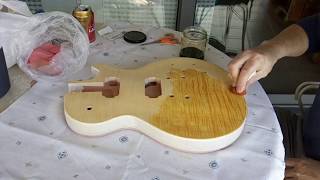
Fellow kit-builder here. While preparing for my first, some thirty-odd projects ago, I was guided by the StewMac book 'Guitar Finishing Step by Step,' and there it was suggested that you never use sandpaper finer than 320-grit on wood, because past that point you're not sanding, you're polishing. I've bent that guideline as far as 400-grit at times, but I think a large part of your 'happy surprise' is how little wood (and dye) 800-grit removes. For sanding back a grain-popping black, in my experience, even 220 is fine enough but I'll generally give it a once-over with 320 after, anyway.
I'm very much in agreement, having done what I've done here. If I do another kit I'll be looking for one with an actual top, rather than a vaneer so I don't have to worry about blowing through it as much. Enjoying the learning process loads in the meantime!
@@cpcmotorsportmedia The trouble with factory-applied veneers is that you have no idea how much sanding they've done at the factory, as well as the detail that factories tend to prefer fast, labor-saving tools like power sanders that leave the veneer dangerously thin. Veneers become more useful and reliable once you start applying them yourself, giving you the full 1/42" to work with. These days I use a vacuum bag/pump that I got used from a leather worker, but it's also possible to do a decent veneer with just a clothes iron (the 'trick' there being the glues; use specialty heat-lock veneer glue for the main join, but a heat-resistant variant of Titebond for gluing up the initial bookmatch), and either one can stand up to a full grit-range regimen of sanding without a factory stealing the thickness.
“Young emo me” 🤣🤣🤣 love it. Where did you get fine grit sandpaper, can’t find it in local DIY shops. And where was the dye from? I’m starting a Les Paul style kit soon!
Hey Andy, have a look for 'wet and dry' paper. If your local DIY places won't do it, ask a local motor factors. The dye came from the same place at the kit, they sell finishing kits as well as the instruments, pop Guitar Kit Fabric into your favourite search engine :) Good luck with the LP build!
I would have sanded a bit more after the red applications that would of lightened it up a bit more,the point of making it your own is all that matters . Great job
Indeed. The wafer thin veneer of this kit was a little limiting on the top. If it had a proper top on it I agree, I would have probably done some more. That said, the dye was sold as 'wine red' and I did fancy quite a deep colour. Cheers for the nice comment!
Not from where this kit came from, seems those guys only do veneers. I've seen a few with tops on ebay from China, can't comment in the quality though! Part 1 explains where this kit came from, cheers for watching!


Looking good. Instead of sanding to remove the stain or to create lighter areas, use either a little white spirit on a rag (if the stain was oil based), meths if spirit based or water if the stain was water based. You should use a larger cloth too, and when removing stain a lighter coloured one so you can judge how much stain you're removing. If that removes too much, use some dry fine wire wool instead. I dont think you need to worry about shielding humbuckers unlike single coil pickups (as mentioned below).
Thank you for sharing your experience with everyone much appreciated. Regarding shielding the jack area, it is recommended not to shield it because when wiring the jack and when plugin the wire in there is a risk of certain issues and leading to failure to have the best sound or even no sound possibility as been highlighted by one of our specialised colleague who deals a lot with tone and produce one of the excellent quality pickups, Dylan Pickups, and on his channel Dylan talks tone on TH-cam. Hope this is been useful and it would be appreciated to hear your inputs. Thank you again for your great work and please do accept our gratitude and appreciation for sharing your experience with everyone. Kind regards from ENGLAND UK 🇬🇧 👍🎸
Thanks Zain, good to know. Greetings also from the UK!
Fellow kit-builder here. While preparing for my first, some thirty-odd projects ago, I was guided by the StewMac book 'Guitar Finishing Step by Step,' and there it was suggested that you never use sandpaper finer than 320-grit on wood, because past that point you're not sanding, you're polishing. I've bent that guideline as far as 400-grit at times, but I think a large part of your 'happy surprise' is how little wood (and dye) 800-grit removes. For sanding back a grain-popping black, in my experience, even 220 is fine enough but I'll generally give it a once-over with 320 after, anyway.
I'm very much in agreement, having done what I've done here. If I do another kit I'll be looking for one with an actual top, rather than a vaneer so I don't have to worry about blowing through it as much. Enjoying the learning process loads in the meantime!
@@cpcmotorsportmedia The trouble with factory-applied veneers is that you have no idea how much sanding they've done at the factory, as well as the detail that factories tend to prefer fast, labor-saving tools like power sanders that leave the veneer dangerously thin. Veneers become more useful and reliable once you start applying them yourself, giving you the full 1/42" to work with. These days I use a vacuum bag/pump that I got used from a leather worker, but it's also possible to do a decent veneer with just a clothes iron (the 'trick' there being the glues; use specialty heat-lock veneer glue for the main join, but a heat-resistant variant of Titebond for gluing up the initial bookmatch), and either one can stand up to a full grit-range regimen of sanding without a factory stealing the thickness.
“Young emo me” 🤣🤣🤣 love it. Where did you get fine grit sandpaper, can’t find it in local DIY shops. And where was the dye from? I’m starting a Les Paul style kit soon!
Hey Andy, have a look for 'wet and dry' paper. If your local DIY places won't do it, ask a local motor factors.
The dye came from the same place at the kit, they sell finishing kits as well as the instruments, pop Guitar Kit Fabric into your favourite search engine :) Good luck with the LP build!
Great job but don't forget to shield the pockets There's a special paint you can use but I personally like copper tape shielding.
I would have sanded a bit more after the red applications that would of lightened it up a bit more,the point of making it your own is all that matters . Great job
Indeed. The wafer thin veneer of this kit was a little limiting on the top. If it had a proper top on it I agree, I would have probably done some more. That said, the dye was sold as 'wine red' and I did fancy quite a deep colour. Cheers for the nice comment!
Looking forward for part 3!
Thanks! It'll be a bit longer before we get a part 3, I'm trying to take my time with the finish, please stand by!
Where would I purchase a kit and can I get one with a maple top not veneer ? Thanks 😊
Not from where this kit came from, seems those guys only do veneers. I've seen a few with tops on ebay from China, can't comment in the quality though!
Part 1 explains where this kit came from, cheers for watching!
L I K E 👍👍 👍👍👍💯💯💯💯💯🤩🤩🤩🤩🤩
You should have made a Danolectro or Hello Kitty Walmart.
Ha. I dont hate pink.
Really cool dude. I'm about yo embark on my own kit in the next few weeks. Cant wait to see how yours turns out. What brand dyes did you use BTW?
Thanks man, let me know how you get on with yours!
The dyes are by Dartfords. They came as part of the kit.
Nice job, but too dark for my taste. I also am not a fan of "painting" all the wood a different colour of the natural wood.
We? We who?
I only see 1 of you.