How to Make a Coffee Can Forge

ฝัง
- เผยแพร่เมื่อ 26 ก.ย. 2024
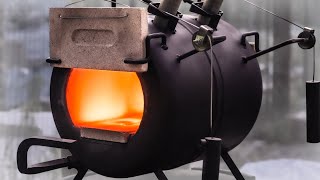
- This is a simple DIY forge, made from a coffee can and homemade refractory with materials that can be found at any hardware stores. This has no problems heating up metal to red hot, but tried forge welding with it, it doesn't quite have enough heat, maybe by making the chamber smaller that might help. Not sure how well it will hold up over the long term but the price was right.
Here is where I got the idea but the refractory material is completely different. TH-cam user: clkindred • How to make a coffee c...
The burner is a Bernzomatic TS8000 torch.
Refractory is made from 1 part Plaster of Paris, 1 Part Sand, 1 Part Water.
Check out my video for building a high efficiency propane forge here:
• How to Make a Propane ...
and check out my video on how to make your own burner:
• How to Build a Propane...


I’ve heard of “doing it yourself” but I’ve never heard of “doing yourself it”! This is brilliant!
if the world as we know it comes to an end, i hope youtube still works. there are some people with amazing ideas and talents. Thanks for the video!
Thanks!
Its all on hard drives somewhere. That would make for a fun post apocalyptic adventure, breaking into the youtube vaults to steal the lost knowledge.
trying to figure out what the hell the hole in the bottom of the can is for, besides air flow..
Celtic Saint so that he can place longer lengths of steel in etc..
I know, it's better than the American education system
Hi, I made the forge and it works great I'm going to write out how I did it. so here we go. so to start I used soda cans duck taped together end to end instead of the raid can (this makes it much easier to get out) and instead of making a large hole in the back I just drilled out about a 1/4 inch hole in the back. I also put in the gas port at a slight angle to great a vortex inside the forge. The ts8000 is incredibly fuel-efficient it will run for 30 sec at full bore on just what is in the 4 ft hose I have. I have made a small dagger and a mini Katan out of screws with this and it works great, thanks for the tutorial, Andrew.
@@nathanthegreat28 I'm not sure what you mean
@@nathanthegreat28 as for the weapon that you found I would like to know what it is, It sounds rather cool and that would help with name.
A file can be found at your local hardware store and get some sand paper up to 1000 grit. And I am pretty broke all the time so I can relate. Ps in that other reply I meant luck not lick
I’m not sure what you mean with file thing for free
@@nathanthegreat28 you have to pay for a torch
That is an awesome idea. I have been racking my brain on how I could do just this on the cheap and bam...there it is. Thank you for sharing!!!
Sadly after research this kind of refractory is not good to use for metal working temps. Plaster of paris and sand are heat sinks not heat reflective like a true refractory is. This mix will degrade, crack and can be dangerous. I confirmed this by building my own version and only used it twice and heard a loud pop. A crack formed on one side, so needless to say I will not be using this mix anymore. The only way to go is with soft fire bricks, or wool and satanite.
Excellent build, most likely to method I'll follow when building mine. Thank you!
I made one of these out of an empty paint can. Tried it out this weekend. Had to put a fire brick over one end and it worked great to heat trat a little edc knife i have been making.
A couple of thoughts, Using a pressured can is a bad idea, unless you pulled it out very quickly as he did, the torch angle should be steeper, so the flame wraps around the radius of the internal, 1:1? heard others say 60 plaster to 40 sand, think all will work, but after a few months the 60:40 might still be going.
Does it take Glock mags though?
5:50 using a jigsaw, sabresaw or electric sander (without the sawblade or sandpaper) to vibrate the mixture down to ensure no cavities in the mix. It may also aid in ‘releasing’ moisture from the mix, to be sponged off the surface, speeding up the drying of the mix.
I just did this and it worked superbly. Thank you so much for you informative, to the point and definitely helpful content.
Did it hold up
Man you just made my day! Thanks for posting this. I'm going to build one.👍
Great idea,easy made with low cash,good job
The design is great. There's only three things I would change about it. Instead of having to make your own refractory mix just buy some refrextory cement (Home Depot sells a 50 lbs bag for fourth dollars on delivery.) and I would angle the torch to hit the bottom of the forge somit comes in more direct contact with the steel, and I'd use a bigger burner. (I'm going to use this design to make my forge welding forge, all in all? Great job that's a cheap and easy starter forge for any up and coming blacksmith.
435
I thought it's so practical that it's extremely good we'll done .
I just made one using your directions....wow I had no idea it would set up so fast. I waited a little longer to pour it in thinking that it would prevent the oozing but I made a bigger mess that way. I also had enough left over to form sort of a door for the back opening to help keep the heat in while heating a smaller piece.
+RevJason1976 Great to hear!
That was a really nice forge you made when I tried it mine only got about 90% full I think my mixture was wrong.
i made one of these when i was a kid. left the bottom on and it got hot way quicker
You probably already know this but the other side of perlite is probably "Ver-Mick-U-Light". It is used often in soils as it will help hold moisture. Just please be aware, I believe the dust is a known carcinogen (no, I'm not from California). Thank you for the video 5 years ago and people are still watching!
Ver-mick-you-light. Great idea for a small forge.
Great video. You have given me an idea to insulate my smoker 👍
Thanks for sharing tutorial... Very neatly done...
If you put some oil or petroleum jelly on the can you're using for the burn chamber, it's alot easier to get it out after the pp/sand mixture starts to set up.
I used ribbed dog food can inside coffee can, filled with bbq charcoal and use hairdryer into the small steel pipe (with forge sat on its Base) as. Couldn't get the gas torch to heat evenly or quickly. Works brilliantly for small knifey type things. Thanks v much for the vid really helped.
thank you no irratating background music
just made one of these myself out of a paint can i bought for 5 bucks. thanks for the design! I haven't even tried it out yet, it's drying in the garage.
Helena Of Detroit did it work ?
I made 2 just like this from a paint can too, 1 open, 1 closed in. It works pretty well
What have you made so far? Good for you bye the way. I'm currently in welding school and there are a few females there too..
Amazing thank you! I will now follow your steps but minus the exhaust. Will post a video when the unit is complete!
Did you make it?
Did you make it?
you can buy refractory cement that can be formed inside this or made into bricks or whatever its very cheap usually near the wood stove stuff in lowes and menards. stove cement also helps with diy stuff like this. not sure why everyone seems to have missed refractory cement though.
I just made one of these and used it. I really don't know anything about forging but I was able to take a lag bolt and turn it into a coat hook. I was wanting to make this with only one opening but the plaster set way faster than I expected and my form got stuck. I had to drill out the other end to get it out. It works OK but not great. Good for small pieces. I Think I will try to make a plug for the back end to improve efficiency. It seems to do alright but if It wouldn't take much use really start going through a lot of propane. The price was right though at about 8 bucks and free materials from the scrap metal bin at work. Good video.
Lol.
How did this work out after, did it last or did it crack and break up. very interested as planning on making one. thanks
Just a quick tip: If you mold the opening for the nozzle at an angle, you would get a vortex effect that would not only increase the amount of heat, but also the efficiency of heat per fuel use.
Exact angles would have to depend on what type/size nozzle you are using.
+Valdarian RaevenHeart Cool, will have to try that on the next one. Would you suggest keeping the torch in the middle of the forge, or move it forward or back any?
For that size the placement is fine because it concentrates the heat in the middle, and will still be able to heat longer pieces.
If you make a bigger one though...personally I'd place the nozzle in the back angled towards the front, and slightly downward until you get the vortex.
I don't have the means here, but if you want I can draw it out for you.
+Valdarian RaevenHeart I won't be make making another forge for sometime but thanks for the offer!
+Valdarian RaevenHeart interesting thank you i am thinking to build a forge like this.
Serkanbah Coolbeans, let me know how it goes. I'm planning to make a similar build once I move to a better area to allow for noisy forge work ;p
You know a couple of fire bricks to use to close the ends when you don’t need to get all the way through might be a good idea..
Exactly..🙂
it would explode because of all that fire, oxygen and propane buildup in the chamber
@@danekane7511 if the can was filled with propane prior to lighting then rapidly oxidized that is a different story. But we are talking about the propane and oxygen being in a constant state of vaporization before being replaced and then burned again enclosing it will only make it more efficient until you close it so much that oxygen is no longer in the chamber inhibiting the oxidation of the propane and snuffing the flame. FIre bricks are very easy to move and control the air flow @ferdonandebull is completely correct
would also be cool to retrofit another quarter can full refractory with legs to stick to the back just to keep the fully homemade vibe.
It probably needs oxygen flow?
You can also use perlite from the garden center bonded together with water glass (made by mixing silica gel with lye drain cleaner; it produces a light purple liquid that can be used as a high temp glue.)
Hi mate, I am following your recipe of water glass and perlite…. I watched a video where someone added aluminium oxide, is that necessary? Also do I mix the water glass in its liquid form with the perlite then put it in the mold? Thanks in advance
Its a good idea to use an oil or wipe the surface of the metal can your going to remove with diesel to prevent it sticking to your molding material. It will come out with greater ease and help prevent damage on removal.
Or use a Pringles can, and just burn it out when done.
BTW, perlite and vermiculite can be found in garden supply stores. The reason you find them there is that they are also used for cutting/propagation benches since they promote root growth. Both are created by extreme heating and thus are also good as a refractory material. Perlite is easy to find most anywhere but vermiculite is a bit harder to find.
lockdown
@@thejurassicchicken1445 Fire your idiotic coward democrat state leadership then. Been open the whole time with no problems. Democrats aren’t following science.
@@BeefNEggs057 FJB!!!
the perfect video I was looking for with quality instruction! Thank you! great job
in the winter time when the forge is cold even though it warms up slowly, will that plaster crack?
I thought the same thing so I used ceramic , I busted up an old toilet tank , kitty litter - that's clay as in clay bricks , sand and mix , I tried to use more of the ceramic than the clay kitty litter and sand , and mine is in a 55 gal drum ,
2 toilet tanks ,1 bowl
50lb sand
Bag of clay kitty litter
80 lb Mortar mix
Add water
Crushed up the toilet with a sledgehammer , layed it on a hard surface , covered it with card board and crunched away , the card board keeps sharp pieces from flying everywhere , but wear safety glasses anyway
next time, wrap some plastic foil from the kitchen around the core you want to extract and grease it up with petrolium jelly or vaseline it's called in europe. you could further help it release with silicon or vegetable oil.... comes out much easier. also to get a bit more milage out of refactroy material, split the 50% sand part into maybe 25-30% perlite from the garden store and the rest sand. also ceramic gravel from same store gives more structural strengh... maybe also inox or rustfree sponge from the kitchen for netting
Nice man ... love your video. Big thx from Romania
will this work on my honda?
lol
Yes just don’t forget the oil
Probably tbh
yeah, should melt a Civic no problem
Is it vtech?
I think you were going for Vermicultite? Ver mick you light. Super absorbent. We used to advise it's use for cleaning up certain industrial spillages. A thick rubber band around the can will maximise grip on it's surface; Use of a door/lid to retain heat and/or blowing air into the furnace should raise it's Max Temp.
Easy, simple and works.
Cheers Andrew. Very informative.
galvanized pipe creates toxic fumes, so thanks for sharing info that will hurt people...
After reading a few more comments I can attest that this small scale forge works well. Not the most efficient maybe but it gets my carbon steel knives up to temperature in order to heat treat. A piece of pvc would be better than using a can for the chamber when it’s time to pull it out. Also you can wait to drill your hole for your burner last if you want. Nice video 👍
To be honest, I did this build and followed every step. I found that it doesn't get the metal to a good enough heat. Personally, I would highly recommend you go with a small devil Forge. Found the results were much different than the ones in the video.
If made using ceramic fiber blanket like Kaowool to insulate the forge, it will easily get hot enough to weld. And much faster than using either soft brick or refractory cement.
Nice, Simple, but very effective!
You could add Campbell’s soup can to the back of your exhaust so you can still sink your rod in and lose less heat
I made mine with a paper towel roll pretty much the same thing but didn't have to worry about the cylinder getting stuck in there..
@@danielbutler6823 Pringles can for mine. Same reason.
To p
@@chancetolbert4852
You are a GENIUS! I'm going to remember that!
@@chancetolbert4852 GENIUS!!!
How warm does the outside of the can get,generally speaking? How long did you wait for the mixture to set or cure before firing? Nice clarity and pace in your instruction. Thanks.
101platayoro Thanks for watching. It gets pretty hot but not so hot that it would burn paper or anything like that. Actually you don't need to wait for it to cure once it gets solid you can fire it up and water will dry out of it. It will just take 10 or 15 minutes to dry the water out of it (it won't explode).
Hey i used the lid of the raid as a mold to make a plug for the back. Put a bolt in the middle so it can be moved in or out
Thats a really good idea!
Amazing idea
0:40 “Vermi culti” 😂 Gonna assume that was a deliberate gag!
For any who don’t get it..he is saying Vermiculite 😜
I might try this design👍
Good for beginners. But I would recommend mixing fireclay with fiberglass to get longer lasting results.
By any chance can you provide the part numbers for your hose and accessories to connect a barbecue tank to a benzomatic TS8000 torch??
Can you use less refractory, and give it a bigger forge chamber? Anybody?
So I followed the steps. My forge will not heat to temp... Any advice?
If you try this, here are some tips to consider.
One, set up your coffee can inside a strong garabage bag, so, IF, the mix blows out of it's mold, you have someplace to go, other than the table or floor.
Two, use Formby's oil soap, from the bottle, as a mold release for the center pipe or can, just wipe a thin coat everwhere the mix will make contact.
Three, remove the galvanization, before positioning.
Four and Five, use electrical tape to secure the lid to the can and add a small 'rope of Plasticine clay, to the edge of the bottom of the can, to form a gasket that will help reduce or even eliminate the rising up of the buoyant can as the mix is poured in.
Do the same for a pvc tube, just to keep it in place better, and do both before you use the oil soap release.
Cheers.
You should make your own video!
I am going to have to use something like this design to start out with. From what I am hearing from knife makers is this one will not hold up for a long time using it. Also do not try forge welding in it. The borax would eat the lining to the can. Though years ago when I did forge welding in metal fab class we dug a pit, and used coal with an inflation pump for an air blower. Honestly if it works for a few hours it can be rebuilt cheaply, and easily.
Very helpful. Thank you for sharing.
Nice job
We have noticed that most of the forging chambers you folks are making you do not use a simple silicon release for your forms, the Raid Can or the Pipe nozzles. Silicon release mediums can be picked at your local sculpture or clay supply stores. Using a non-stick spray on the cans or pipes when prepping is even less expensive. Then you don't risk deforming your chamber.
+Triton Memnon Good tip.
Is the 1:1 ratio of plaster:sand based on weight or volume?
Great video. 👍
Is this good for actual forging or mostly heat treating knives and such? I have the supplies to make one of these but I want to be able to work railroad spikes.
Dude! You’re a badass fr!
really like your design, thanks for sharing, looking for something to heat treat knife blades. Seems like would be a lot nicer than a charcoal forge like a lot of people suggest. Can't wait to try it. Thanks
Thanks a very informatlve video, now i will build one. 😎
This is good and all but if you use a smaller tubed three way burner, which would equal the same diameter overall to reduce waste of propane, you could disperse heat over a wider range and be more efficient.
I am wondering if the tube for the torch was created at somewhat of an angle would it create a venturi effect. This might cause the flame and heat to follow a circular pattern to spread the heat more efficiently rather than concentrate on the opposite side of the forge wall. Great job regardless.
Venturi effect is when any fluid flows through a pipe and the pipe becomes smaller in diameter, causing a decrease in pressure while increasing the speed. You describing laminar flow which is the cause of a less turbulent "swirl" effect.
Could someone help me on this? I made this very close by design but cannot heat up a railroad spike for anything. I'm using a benzolight torch and it just gets metal hot but not glowing??...
A railroad spike is pretty thick, I think that torch is under powered to heat that up to any workable temperature. You need to go bigger both forge and torch. I'm doing another video on a larger forge in the coming months.
after a week of research, this is the one
Thanks, I need a forge and cant find one for less than 150. Only will use it once and a while. GREAT video.
Michael S Hansen
Get some high temp bricks and just stack them into a temporary oven.
Believe it or not, out of all the supposed coffee can forges I have seen built on youtube, your's is the first I have seen that is actually a functional forge -- and not just a foundry tipped on its side being called a forge. For those reading this that are wondering what I am talking about, a forge needs a spatially controlled heat source for precise application of heat to the metal -- notice the burner entering the unit at a ninety degree angle.
Angled burners are for foundries that have a crucible taking up the center of the unit so need a swirl flame inside the chamber to evenly heat the crucible.
4:55 when you sit down on the toilet first thing in the morning after some Taco Bell the night before
Yes just lightly scooping and scratching it up
😅
12:57 you forgot the burning feeling
OR A FEW MINUTES AFTER YOUR DONE TEAR'N SHIT UP
Very nice. Love the creativity. Might try it out not that a DIY ground forge won't work to hear up rail road spikes, but this could be an alternative.
Great video! I doubled up the cans to make it twice as long with another torch hole. Haven't fired it up yet, need to get another torch. I used a piece of black 2" PVC for the chamber and could not get it out. Twisting it with a pipe wrench and hitting it with a hammer and wood block did nothing. I let it cure for a week and tried it again; nothing. I then used a 24" bow saw to cut the pipe in three places (with the blade inside the pipe). Then PVC glued a plug in one end and was able to finally pound out
the pipe. What a relief. Thought I was going to end up with a 35lb paper weight. Not sure if there was some sort of chemicals reaction with the PVC and the Plaster of Paris. For the torch holes I used steel pipe and they can right out. The foundry also seems to be rather brittle. Hope it holds up!
+Rufus T Firefly I think the longevity of forge is ok, probably get a bunch of uses of it, but for the cost and simplicity it's hard to beat. I've used mine a bunch of times and it's still holding, but I try not to touch the top or the sides. I'm going to try making a different type of forge in the next few months that hopefully it will be stronger. Someone here suggested using a Smartwater bottle for the chamber, it's flexible and easier to take out. I bet putting a coat of oil on the PVC would have helped too. I plan on making a DYI torch soon too.
If you are looking to build a forge that will hold up, look up Kaowool forges.
Aren’t forges just so neat. Just plain old neat. Here 5 years later and I’m still fascinated with forges. I even have a nice heat treat oven but I still enjoy making and using different forges.
BTW the plaster of Paris and sand doesn’t last forever but even with the cracks my first forge is still working about 4-5 years in. Pretty darn good for such a small expense.
Great video thanks for sharing
I built one similar but it never heats up, gonna try lining with refractory cement and see if that helps and if it doesn't guess I'll go back to good old hole in the ground charcoal forge for heat treating 1084
Thanks man!
A couple of pivoting covers would make this a lot more efficient. Even if it was just coffee can lids of the same size with a small exhaust hole or two on each side would help.
Did you add more plaster mix off camera or did it expand and rise? The entire can lip was covered and the Raid logo was no longer visible after the footage cut, but it wasn’t like that after the pour but before the drying time cut?
very esay and fun
you place metal pipe directly or placing to create a vortex with angle?
+Serkanbah I have it straight but it would be best to put it at an angle so it creates a vortex.
yea i seen that vid to lol
I want a closed back, but I like the tube idea... (I'm so new to this) .. what could I use in the center that would be easy to remove once set? A longer piece of PVC?
I might have to make one, as a builder.
if you get a few fire bricks and set them on the ends to make a slot as wide as your work you'll make it much more efficient. :)
+geckomage yeah that was an excessive amount of heat loss on the rear opening.. the bricks are a really great idea..
+geckomage Could you make those bricks out of the same material, Plaster of Paris?
I guess you could just to have something to cover the opening. i just went to a local fireplace store and picked up a few. home depot might also have some. if you do cast some out of plaster of paris i'd recommend lining your form with plastic so you could pull them back out easily without breaking them. or do some research on sodium silicate. (you could make fire bricks out of that and sand, or perlite, and it should work quite well.
@@geckomage homedepot does have them, also Amazon.
Very cool!
I’m using a ts4000 for this, is that going to produce enough heat or do I need the ts8000?
Thats awesome. Thanks and what I was looking for.
Great video, thanks so much 👍👍👍👍👍
Andrew w. You should get/make a bigger torch it will heat up your metal in a very short time. It will probably cost a lot but it will be worth it if you want to get into blacksmithing. I recommend "the King of random" gas blaster propane torch. Beware you will have trouble with the set screws
thanks for the video, but wouldn't it been better in the long run to use aluminum oxide blasting sand?
Most kilns including the Kwik Kiln have the nozzle going in at an angle but yours goes straight. Any reason for that?
greetings, I'm from Brazil, congratulations. Could you tell which material you used? thankful
God vid, looking at the test firing i was thinking the torch may be better at more of an angle to get more of a swirl rather then pointing at the other side of the chamber.
You should put a bolt in the back and a plate of metal attaching the the back bolt so you can close and open it. If you have a short piece keep it on and you can put the thing on low, so then you can put that thing on low and have that tank for like a month cause like that little thing runs a lot for a small space like that and you have it hooked up to a big tank.
Hi. Nice build. You mention that you have your hose. Connected to a 20lb bbq tank. Can I inquire, is that just an ordinary bottle of gas. Regards john from Ireland
Beautiful!
Probably should have turned your a can upside down so that it would have sealed to the bottom then you wouldn't have to do all your digging. Loved the video.
how much do you spend on propane for heat treating steel in this forge??
why not make a lid for the back to open when you need the opening?
Maybe it would melt of?
don't worry about it!
just put a brick