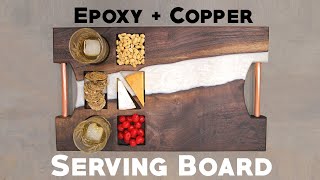
How To Make An Epoxy River Cutting Board

ฝัง
- เผยแพร่เมื่อ 28 พ.ค. 2024
- In this video I demonstrate the process I use to make an epoxy river cutting board, as well as a reusable epoxy form.
Don't forget to SUBSCRIBE and ring the NOTIFICATION BELL to stay up to date on more content like this.
Follow us on Instagram - / kelly_mountain_woodworks
Black Diamond Pigments - amzn.to/3hDzrgA
Pro Marine Epoxy - amzn.to/3jlWq08
Epoxy Mixing Buckets - amzn.to/3jk97sn
HDPE Cutting Board - amzn.to/32WLZtg - แนวปฏิบัติและการใช้ชีวิต


Authentic and genuine channel! I love the not so fancy videos that makes everything original. Subscribed!
Im astonished brother! Awesome, thank you for sharing the craft!
Thanks man!
Very cool!! I really like the green epoxy. Thanks for the tip on the beeswax and mineral oil along with the idea about making your own form out of an existing cutting board.
Thank you! Glad you enjoyed the video!
Came out amazing my guy
Great idea! I have not seen anyone else do this!
Glad you enjoyed it!
This video was really helpful thank u
Out of all the how to do videos I've watched, yours is the best and easiest to learn from! thanks so much I really enjoyed this video :)
Thank you so much! I’m glad you enjoyed the video!
I agree!
Awesome job mate, Looks great!
Thank you!
Great video and some helpful tips, thanks
Thank you!
One of the (if not thee) best tutorial I've come across, Every word dedicated to be instructional and specific. Great video, I'm going to do my first epoxy cutting board according to your tutorial. ...Just subscribed.
Hi, how did it go? Can you post a video when you finish?
@@Kamikazi_YT I just got started on the mold. Couldn't find that plastic at Home Depot and Lowe's but I didn't ask either. A friend gave me some Ash wood tongue and groove. I cut off the tongue and groove edges and glued and clamped three edge to edge for the mold base. Then ripped some strips for the side and ends. I'm going to take another plank off the Ash and make the left and right sides. I'm planning for a 2" or 3" clear River in the center with thin layer of epoxy on the bottom, spreading coffee beans, then filling the remainder of the river. I wanted 16 x22 but my planer is only 12". I may have a lot of sanding ahead of me.
@@p8ryotIf you have a router, you can use it to plane large pieces of wood. Good luck!
@@Kamikazi_YT Thankyou, I've considered making a planer sled. I only have a small palm size router (dewalt), hope it will be good enough. I also have a power hand planer. I think it might shave it down but having never seen it used for epoxy projects I'm wary that it may cause more bad than good. Any thoughts on a hand planer?
@@p8ryot Power hand planers are designed for quickly removing material and not for achieving uniform thickness. Consider using a small router, but expect to do some extra sanding.
Nice to watch it transform into working art!😅
Nice work, thanks for the tip about the beeswax mineral oil finish.
Thanks! Hope it helped!
Great video
Nice work
Very good work sir!
Thank you!
Board looks great! Fantastic work, brother. Subbed fo sho!
Cheers
Much appreciated!
Excellent
Very nice piece
Thank you!
Dude awesome vid ur channel will grow quick
Thank you! I’m glad you enjoyed the video!
Thanks for the video. This piece is beautiful. Do you also sand the resin parts only to 320?
Beautiful I like it!!!
Since your form or mold is made with HDPE plastic, do you apply anything to it so the epoxy won't stick?
La planche est magnifique chapeau bas, par contre quand tu découpes quelque chose dessus, l'époxy se fait défoncer non ?
I really enjoyed watching your process your cutting board turned out amazing here is a tip for you leave your epoxy down a tiny bit from your wood in other words leave your wood a little bit proud of your epoxy it is much much easier to plane and will not destroy your blades.
Good tip! Since this video was made I have purchased a drum sander so I don’t have to run my epoxy boards through the planer any more.
Nice
Very nice board! I only used two times epoxy resin...i made two river resin olive root bowls on the wood lathe...i sanded them till 2000 grit...now i see you sanded resin till 320 grit...is this enough? It doesnt look cloudy??
What kind of epoxy is this I would like to try it it’s beautiful
Great video. Is the Bee’s wax food safe?
great job! how long do you think this took you to make all in all?
Do you heat the board butter before applying it?
Beautiful work! Do you know exactly which formula of Black Diamond’s emerald you used? There’s a few and I love the way yours turned out!
Thank you!!! All it says on it is Black Diamond Pigmints Emerald green. It came in a variety pack.
Any cautions or suggestions before trying this,passing epoxy board through a planner?
Very nice work--very nice. I'm wondering if you treated/prepared the edges before you made the central pour(s).
I didn't do anything to the edges of this particular pour because it was a smooth cut on the band saw, rather than a live edge so I didn't have to worry so much with trapped air. I have used epoxy to seal edges on other projects and it does work for preventing air bubbles but I have had just as good results popping the bubbles with either a torch or a heat gun.
Thanks for the sub!
@@dagragg Ok, Thanks
No problem!
how much do you usually sell these kinds of boards for?
I love this look I have some black walnut pieces and are making boards. Where do you get the plain beeswax to mix with the mineral oil? Also do you rub it in and then wipe off any excess? Do you do more than one coat? Does this last as long is that your block or tongue oil?
I buy all my material for board butter on Amazon. Normally do 1 coat and then throw in a can for each board that sells so the customer can reapply as needed.
How do you clean epoxy off the mixing tool?
Where did you order your branding iron from?
Hello. I wonder if I make a silicone mold and Use that to hold the wood and the epoxy would it work? Or would it be not stiff enough?
I think it would work. They actually make silicone molds for this exact purpose, but they are very expensive. Give it a shot and let me know how it works!
Hi Kelly I really like the way your cutting board turned out. I was wondering about the Pro Marie epoxy you are using in your video. I will be using the same epoxy resin on a cutting board that I will be making for my new sister in law . I read that this epoxy can not be poured above 1/8” or it will heat up and crack up, how thick is your cutting board and how much did you pour at one time?
Excellent questions! This cutting board is about 3/4” thick. I actually did 3 pours of 1/4” each about an hours a part and had really good results with this method.
You may also consider putting a fan on it to help it dissipate the heat.
Very nice work. One question is the epoxy-resin on a cutting broad safe to eat off of and how long is it safe.
I see… no answer?
I once cured, epoxy is very safe especially since you’re not eating it as much as the knife may cut into the epoxy. It’s fine.
Hi. Very nice work. What is this in the end of movie? What do you use for polishing? Because I don't understand.
I use homemade board conditioner. It’s very easy to make. It’s just mineral oil and beeswax.
This cutting board looks wow! Really pretty. There is just one problem that i see. Epoxy cratches easily and i not really knife resistant. And as it scratches epoxy dust will stick to your knife and to the food. Given the toxidity of epoxy, this can't be food safe.
Very helpful video! Is there any way to accomplish a similar finish without using a planer?
Sanding! Lots of sanding! Lots and lots of sanding!
@@dagragg oh boy, lots of work ahead of me!
@@keatscubes Belt sander (make sure you have a dust mask or respirator)
Can you really cut on the board without damaging the epoxy?
Qual é o material usado na forma ?
So beautiful! Do you sell these?
Thank you and yes I do! You can contact me through my website, Instagram, or Facebook for pricing information or check out my store on Etsy to see what I have available.
Why specifically "Clear" silicone?
Nice Job. Curious about a couple of things. Did you flip the board over, and sand it? Did you apply finish to both sides? How long does the finish have to dry, before handling of the board?
Thanks
Yes, both sides are sanded up to 320 and I use my own homemade board conditioner on both sides. The finish doesn't really dry as its just mineral oil and beeswax, meant to keep the board from drying out and cracking.
@@dagragg Thanks for the info. So the board is for the lack of a better word, "oily" feeling to the touch, weeks later? Just curious.... I've never made one, or messed with Epoxy. Hoping to within a week or so. Planning on making an end table.
Yes, you want a cutting board to stay oily and I would recommend washing it with either a lemon juice and vinegar blend, or salt and lemon blend rather than soap and water. It will be increase the life of the board. It will also need to be retreated as it ages for utmost longevity.
@@dagragg Ahhhh gotcha. Thankx
That emerald green looks amazing...however, why does the board seem unstable? also shouldnt you raise the grain with some water and then sand again and apply the finish?
I do raise the grain. That just doesn’t always make it into the final cut of the video. Not sure what you mean by unstable.
@@dagragg ah ok cool,
it didnt seem flat
It was probably sitting on something. I have ways to make sure all my boards are flat and perfectly stable.
Where do you usually get the wood to make your boards? I'm wanting to make some for my wedding in november.
Also, would it work to add fake flowers in the middle of the board? Like pour the epoxy and then place some fake flowers in the middle
Local hard wood stores or saw mills. Just make sure it’s dry.
Flowers would be cool!
Can you actually cut on it?
How much do you sale that for?
How many times can you use that mold?
I’ve made probably 10 to 15 boards in it before the screw holes started wearing out. You really should be able to use for quite some time.
what that colour for mica powder?
Emerald Green from Black Diamond Pigmints
@@dagragg thanks sir
👍
What kind of epoxy did you use? Brand wise.
I’ve been using pro marine, but my next batch is going to be total boat. Thanks for asking!
Dimensões?
14” x 20” 👍
That was a plastic cutting board you cut up... now that's Gangster...
Hello gorgeous