You didn’t even play drums yet and decided to BUILD your own mesh heads and triggers? I’m extremely impressed. Good for you man!!! I hope your drumming is what you wanted it to be! :)
I'm very impressed by the DIY cymbals. Im my opinion, you should still buy good mesh heads instead of building them as well, since they do offer a better feel and trigger response. And they look much nicer.
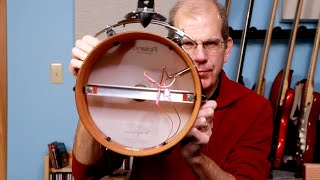
I like the way you made your mesh heads by threading a tube through the edges. I really had to sew mine on to the rim with thick thread. Thank you for the idea!
I did this, works great. Mesh heads and tubes are really strong! Just make sure you use HARD foam like Styrofoam on the cones! I accidentally used soft foam and had no signal. 😮 Also I used 50mm piezos to make sure all the drums signaled no matter where you hit them. Those 50s work well.
bro made a whole professional e-kit without even knowing how to play and did an amazing job. lol tag me when you’re a rockstar i have total confidence you’ll kill it!!!
I feel that in you I have found a kindred spirit! You too, as I do, have a need to put your own influence into objects, and add some of your own innovations to things. We have this need to get our hands into the core of the creative process, and really add our touch and make our stuff our own!! Aaagghh!! Forgot to add the heat shrink tube BEFORE SOLDERING, again!! Electrical tape to the rescue. THANKS FOR SHARING!!
As a drum teacher and coach, I've re-learned something here. Persistence and practice make permanent. :) I'll be watching your improvement through the sub - good luck! Drum away!
@@JakeOfAllTrades what techniques and practices have you done so far to improve your hand and foot Independence? What I like to do is pick a couple of rudiments, a few of the simple ones and do an exchange between the hand and the foot.: Left Hand > Right Foot (x8) Right Hand > Left Foot (x8) Then... Left Foot > Right Hand (x8) Right Foot > Right Hand (x8) Start slow and be persistent. Say the limb you're hitting when you strike. Alternate the name of the limb with counting. LH RF LH RF, 1 2 3 4 1 2 3 4 LF RH LF RH, 1 2 3 4 1 2 3 4 that's basically a single stroke roll interchange between the hands and the feet. You can then change to other rudiments like double-stroke-roll and paradiddles. Consistency is key! Start slow and keep at it. That persistence will transfer to your drum beats when practicing those move your hands around the difference drums and cymbals.
Great video!!! Technically, a piezo is a pressure sensor, not a vibration sensor, because it doesn't in itself vibrate and have to be glued to the surface! If you press on it, the values should register at 150 or 164. Also, you can use the snare drum vent to get the jack through!
Dude!! this is rediculous!!! In a great way! I've been messing with building my own electronic drums for a couple years! Fantastic job. I can't believe you made your own mesh heads! Gonna try one of your cymbal builds! Thanks and Cheers!!
If you arent great at soldering Goedrum sells prewired piezos to 1/4 inch jacks. Silentstrokes are cheap. Maybe cut 1 or 2 plys of the mesh, lay it over the drum and put a Silentstroke on top. After tightening trim the excess....
Wow this is by far the best video on this. There are very scattered options and this is so well done! The heads seem absolutely amazing man. Very excited to get back to working on mine.
I remember 6 years ago when i decided to diy convert my kit, nothing worked. Triggers would fall from cymbals, lots of broken project boxes, miss fires, double triggering, limited equipment ,poor soldering skills, you get it. It took me 6 years to get something decent with tweaks here and there. I should mention that i had been playing for 10 years already, even owned an e kit. How on earth can a new drummer figure out all this in such a short period of time? Im amazed. Have a great drumming journey. Great video!!! PS How does the ride bell respond? A switch on the bell would be more ideal than a piezo with this configuration i think but i dont know if its compatible with Alesis.
The bell didn't respond at all unfortunately. I'm going to change it to a switch because I'm guessing thats what the Alesis module is expecting on the ride plug
@@JakeOfAllTrades this response is probably too late but I have the same module and it dosnt support 2 zone cymbals, this can be fixed by plugging the cymbal into one of the Tom cables if you can use them as single zone. You can then make custom kits in the module to set the Tom to a cymbal
@@JakeOfAllTrades Post here too.. I'm not an instagram user!! and.. we dont care if it doesn't sound great yet... curious how the set sounds more than anything! Are you satisfied with the sensors and their range of pressure sensitivity?
I'm definitely satisfied with how the triggers perform. I find that the built in sounds of the Alesis Nitro are a bit lacking but good enough for practice. I've learned how to add VSTs to play over MIDI with my laptop though!
This video has inspired me to do the same thing. You've explained the process very well, so I don't anticipate many problems, however I do have one question. What kind of wire did you use to connect the piezo sensors to the TRS Jack's? Thanks!
So glad it inspired you! I used regular stranded copper wire, 16 gauge I think. I had it left over from some vehicle wiring I did. I'd recommend some thing speaker wire, there isn't much current to carry and you want to prioritize a high-quality copper strand for the cleanest signal
Thanks! The bass drum is triggered like the other drums, with the piezo mounted to a cross brace. It works good for now but I'm going to need a dampener for the kick to protect the piezo in the long run
If I wanted to do the "lazy way" of doing this with maybe just 1 sound per drum/cymbal and not have to take off any of my acoustic components, is there a reason I can't just attach piezo's to the bottoms of each drum and cymbal on my existing acoustic set?
Hi! Great job on this! I did a very similar thing on my acoustic snare. Bought a Remo silentstroke head though. Silentstroke has only one layer and is very bouncy which resulted in a double triggering issue. How did those mesh & tubing heads hold up in the end? Thinking about making the heads myself. Are they worth the trouble?
I bought some RTS jacks but they arent 3 pin connectors theres 2 extra ones, Do I bypass those? they're the TIP SHUNTS AND RING SHUNTS, do I connect the wires to them or bypass the shunts?
Good question, from the look of the diagram it looks like you can just bypass them. Always check continuity before adding power to make sure you're not going to short something out
The foam cone acts as a medium between the strike of the drumstick and the piezo sensor. It works to transfer the vibration without damaging the sensor. The mesh head works well with the cone shape to give a bit of a "zoned" sound, a directional quality to the vibration that makes it sound real.
Hi, your video is really great, do you have a detailed diagram explaining how to solder the wires to the outlet. And is it possible to connect two different drums with a splitting wire into one socket? Thanks
All the great how to... But you don't really play it!? I mean you did an awesome job, but did it hold up for more than an hour? That's a hell of a lot of work if not.
It still holds up 9 months later! I've been practicing on it all year. Had to replace one sensor on the hi-hat but other than that it's great! I also got a double kick to mess with
Wow, you built an acoustic electronic drum kit for $300, Roland's acoustic electronic drum kits only cost $8,000. I'm sure Roland doesn't make their's up much. Lol!
Why the FUCK would you add background music to a video with constant narration??? It ONLY makes it harder to hear what you are saying and is very distracting 🙄🤦♂️


You didn’t even play drums yet and decided to BUILD your own mesh heads and triggers? I’m extremely impressed. Good for you man!!! I hope your drumming is what you wanted it to be! :)
I'm very impressed by the DIY cymbals. Im my opinion, you should still buy good mesh heads instead of building them as well, since they do offer a better feel and trigger response. And they look much nicer.
I like the way you made your mesh heads by threading a tube through the edges. I really had to sew mine on to the rim with thick thread. Thank you for the idea!
I did this, works great. Mesh heads and tubes are really strong! Just make sure you use HARD foam like Styrofoam on the cones! I accidentally used soft foam and had no signal. 😮 Also I used 50mm piezos to make sure all the drums signaled no matter where you hit them. Those 50s work well.
Hows the response of the head compared to an acoustic head? I'm looking to do this for an A2E conversion.
The process is legit! The setup looks like one in the movies...move them things in buddy, that thing looks like a spread out octopus.
bro made a whole professional e-kit without even knowing how to play and did an amazing job. lol tag me when you’re a rockstar i have total confidence you’ll kill it!!!
Dude.i wasn't too sure when I saw you making this project. I am very impressed
I feel that in you I have found a kindred spirit! You too, as I do, have a need to put your own influence into objects, and add some of your own innovations to things. We have this need to get our hands into the core of the creative process, and really add our touch and make our stuff our own!! Aaagghh!! Forgot to add the heat shrink tube BEFORE SOLDERING, again!! Electrical tape to the rescue. THANKS FOR SHARING!!
My man! You nailed it. Glad someone can put into words the way I feel about these projects
Been looking to do this for quite sometime. I’m a visual learner as well and there are no good videos! So thank you very much!
As a drum teacher and coach, I've re-learned something here. Persistence and practice make permanent. :) I'll be watching your improvement through the sub - good luck! Drum away!
Thank you! As a drum student, any tips you can provide would be so grateful appreciated! I'm having a hard time with limb independence
@@JakeOfAllTrades what techniques and practices have you done so far to improve your hand and foot Independence?
What I like to do is pick a couple of rudiments, a few of the simple ones and do an exchange between the hand and the foot.:
Left Hand > Right Foot (x8)
Right Hand > Left Foot (x8)
Then...
Left Foot > Right Hand (x8)
Right Foot > Right Hand (x8)
Start slow and be persistent. Say the limb you're hitting when you strike. Alternate the name of the limb with counting.
LH RF LH RF, 1 2 3 4 1 2 3 4
LF RH LF RH, 1 2 3 4 1 2 3 4
that's basically a single stroke roll interchange between the hands and the feet. You can then change to other rudiments like double-stroke-roll and paradiddles. Consistency is key! Start slow and keep at it. That persistence will transfer to your drum beats when practicing those move your hands around the difference drums and cymbals.
Great video!!! Technically, a piezo is a pressure sensor, not a vibration sensor, because it doesn't in itself vibrate and have to be glued to the surface! If you press on it, the values should register at 150 or 164. Also, you can use the snare drum vent to get the jack through!
Wow, great video dude. It shows that you put a ton of work into this.
Dude!! this is rediculous!!! In a great way! I've been messing with building my own electronic drums for a couple years! Fantastic job. I can't believe you made your own mesh heads! Gonna try one of your cymbal builds! Thanks and Cheers!!
Thank you, and good luck with your build! Let me know how it goes!
I just say stunned at what's been created. This is absolute.. 🔥🔥🔥🔥 great job
Thank you so much!
If you arent great at soldering Goedrum sells prewired piezos to 1/4 inch jacks.
Silentstrokes are cheap. Maybe cut 1 or 2 plys of the mesh, lay it over the drum and put a Silentstroke on top. After tightening trim the excess....
Wow this is by far the best video on this. There are very scattered options and this is so well done! The heads seem absolutely amazing man. Very excited to get back to working on mine.
Excellent video and tutorial for converting any acoustic kit to a edrumset 👌🏾💯🥁😍😎
Great video! and also nice editing
Sir Blue baka naman gawa kang ganto para makopya namin pno gumawa ahhaa. Godbless.
Excesive overkill for my needs, but this is a great tutorial if someone wants to completely convert an acoustic to electronic kit. Bravo.
Impressive man!!!! Very cool DIY innovation. Inspiring even!
If you buy mesh heads for your acoustic conversion kit buy multi-ply. Single ply very bouncy.
Great video. I'm doing the same thing right now. Thanks for that video!
Hi, I have a question. What type of material do you use for mesh heads? Is it the same as what he used?
Love it bro! Make more stuff!
Very clever!
Very cool coverted kit!! Hope you had the time to learn how to rock out on it!!
You have inspired me with your video, thank you for posting!
I remember 6 years ago when i decided to diy convert my kit, nothing worked. Triggers would fall from cymbals, lots of broken project boxes, miss fires, double triggering, limited equipment ,poor soldering skills, you get it. It took me 6 years to get something decent with tweaks here and there. I should mention that i had been playing for 10 years already, even owned an e kit. How on earth can a new drummer figure out all this in such a short period of time? Im amazed. Have a great drumming journey. Great video!!!
PS How does the ride bell respond? A switch on the bell would be more ideal than a piezo with this configuration i think but i dont know if its compatible with Alesis.
The bell didn't respond at all unfortunately. I'm going to change it to a switch because I'm guessing thats what the Alesis module is expecting on the ride plug
@@JakeOfAllTrades this response is probably too late but I have the same module and it dosnt support 2 zone cymbals, this can be fixed by plugging the cymbal into one of the Tom cables if you can use them as single zone. You can then make custom kits in the module to set the Tom to a cymbal
Nice work dude. Thanks for this. I'm gonna try my rig as well.
Thanks! Good luck!
I really want to try this for playing rock band...
amazing! Thank you. Very creative content :)
You made nice work here you 're very creative guy!!!
Nice work, but how much did you save in the end verses outright buying the actual alesis kit?
We want to see it in action!
I'm still practicing and when I'm good enough I'll definitely post a video on my Instagram
@@JakeOfAllTrades Post here too.. I'm not an instagram user!! and.. we dont care if it doesn't sound great yet... curious how the set sounds more than anything! Are you satisfied with the sensors and their range of pressure sensitivity?
I'm definitely satisfied with how the triggers perform. I find that the built in sounds of the Alesis Nitro are a bit lacking but good enough for practice. I've learned how to add VSTs to play over MIDI with my laptop though!
Posted a video to Instagram and Twitter: twitter.com/Jake_AllTrades/status/1281812999733424129?s=19
Aye this was really cool my friend
Also how does it perform doing more complex hits? Flams, double/ single stroke roll, different dynamics, etc
Nice work
Thank you! Cheers!
Mate, awesome, thanks 🙏
This video has inspired me to do the same thing. You've explained the process very well, so I don't anticipate many problems, however I do have one question. What kind of wire did you use to connect the piezo sensors to the TRS Jack's?
Thanks!
So glad it inspired you! I used regular stranded copper wire, 16 gauge I think. I had it left over from some vehicle wiring I did. I'd recommend some thing speaker wire, there isn't much current to carry and you want to prioritize a high-quality copper strand for the cleanest signal
For the bass drum, do you put two piezoelectric as the same to snare drum or only one? Thanks man
Bass drum would be single zone, ie one trigger as you don't need rimshots etc like you would with a snare
Well done
I manufacture cymbals with commercial quality, but I'm having trouble making a trizone cymbal
Hi, fantastic vid! Could you provide a link to the piezoelectric sensors you are using for the build? Thanks!
Thank you! If you follow the Instructables link in the description there will be links to every part I used
Instead of drilling can't you just run the wire thru the vent hole?
great vid will try to make my own snare thanks man
Thank you! And good luck!
Did you do the same for the bass as for the toms?
How are you gonna trigger the bassdrum?
Great video and definitely gonna use this for my own conversion!
Thanks! The bass drum is triggered like the other drums, with the piezo mounted to a cross brace. It works good for now but I'm going to need a dampener for the kick to protect the piezo in the long run
If I wanted to do the "lazy way" of doing this with maybe just 1 sound per drum/cymbal and not have to take off any of my acoustic components, is there a reason I can't just attach piezo's to the bottoms of each drum and cymbal on my existing acoustic set?
How's the drum learning coming? You ready to jam?
Hi! Great job on this!
I did a very similar thing on my acoustic snare. Bought a Remo silentstroke head though. Silentstroke has only one layer and is very bouncy which resulted in a double triggering issue.
How did those mesh & tubing heads hold up in the end? Thinking about making the heads myself. Are they worth the trouble?
Do I hear Fugazi's waiting room in the background?
Hey where do you connect that choke switch on the crash symbol? did you connect it to the ring ?
Yep it hooks up just like the rim piezo (ring and sleeve connections). The module will recognize it a switch and use it as such.
Will this work with any kinds of drum module?
Super Arbeit , welche Piezo Elemente hast du benutzt ? Lg
If the sensor is placed in the middle it will get its ass kicked?
Do you think you could use the regular acoustic drum heads with the piezzos or would it have to be mesh heads?
how do you have the module mounted?
are the heads tight enough with this kind of "rim"? i want to try this but they look a little soft
I know someone who lives in a Sears house but Sears made drumsets too?🤭
How about kick? Tutorial pls
I bought some RTS jacks but they arent 3 pin connectors theres 2 extra ones, Do I bypass those? they're the TIP SHUNTS AND RING SHUNTS, do I connect the wires to them or bypass the shunts?
this is the specification diagram if that helps answer quicker www.markertek.com/Attachments/Specifications/Switchcraft/112BX-Specifications.pdf
TRS*
Good question, from the look of the diagram it looks like you can just bypass them. Always check continuity before adding power to make sure you're not going to short something out
So how much did this cost you? Looking to do something like this?
What is the function of the trigger cone?
The foam cone acts as a medium between the strike of the drumstick and the piezo sensor. It works to transfer the vibration without damaging the sensor. The mesh head works well with the cone shape to give a bit of a "zoned" sound, a directional quality to the vibration that makes it sound real.
Does it have Dynamic Controls?
Hi, your video is really great, do you have a detailed diagram explaining how to solder the wires to the outlet. And is it possible to connect two different drums with a splitting wire into one socket? Thanks
All the great how to... But you don't really play it!? I mean you did an awesome job, but did it hold up for more than an hour? That's a hell of a lot of work if not.
It still holds up 9 months later! I've been practicing on it all year. Had to replace one sensor on the hi-hat but other than that it's great! I also got a double kick to mess with
So this is what Drew McIntyre does on his free time.
everyone gets the nitro module but , Its SO BAD get a better roland module honestly
Dont use the on board sounds.....use software like Addictive Drums. 100% improvement
And he never even really demonstrated it at the end 🤷♂️🙄
I'm not impressed, this is going to lead to bad technique. But it was established that the goal is not really to learn drums but to make content.
Wow, you built an acoustic electronic drum kit for $300, Roland's acoustic electronic drum kits only cost $8,000. I'm sure Roland doesn't make their's up much. Lol!
I made my own cymbals using real cymbals check out my short drum covers I did my splash and high hats so far
Why the FUCK would you add background music to a video with constant narration??? It ONLY makes it harder to hear what you are saying and is very distracting 🙄🤦♂️
Next time just use the rims from the old heads and sew the screen to them with nylon thread.