You are a true tube connoisseur. I see you still have a CRT monitor. Great! I really appreciate all your videos. You make the complicated un-complicated.
Greetings, CC. Thanks for the kind words. Sadly, I recently replaced the old CRT with a 23" Flat Screen :( I couldn't bear to throw the old monitor in a Dumpster, so it's resting happily in my storeroom, just in case the new one fails :)
Thanks, John. I always prefer to do everything myself, if possible. When I seek outside help.....the delay, cost, and often shoddy result have convinced me to become totally reliant.
Thanks, Doug. I have just started building my own amps (completed my first 5E3 scratch build recently, no kit) and your videos have been super helpful -- full of great tips, clearly demonstrated.
Great project Uncle Doug, and thanks to Rusty too (great friend ya got there Rusty, he followed your ball tossing contract as written). Again, great instructional series.
I'm willing to buy, deliver and donate an apple computer to you...but then I thought you might like the "analog/pioneer" aspect of windows based products. I love your content, I wish there were more people like you in the world.
Uncle Doug. Thanks for this and all of your very informative videos. I have 4 amps I have built with no labels, however now I think I have a new fun little project in mind. Now for a logo and design. Thank you for these educational videos. I started out on tv repair in the early 80s and moved to Information technology. My hobby and passion is guitars, amps and music. Your videos have inspired me. Thank you!
Another great video offering a super-easy idea which is not only affordable but looks fantastic when complete. Your videos have upgraded the potential quality of my project(s) by three or four light-years. Not to mention, having the wonderful peace of mind of actually knowing what I'm doing as I go about doing this. ha! Many thanks!
Great info, time and money saver, and a DIY dream. Thanks Uncle Doug, I really enjoy your videos and the spirit which you impart information in. Pay It Forward!
Just found your channel a couple of days ago.............and am blown away by you down to earth. Straightforward and factual presentation style. Want to build a tube amp. But certain individual parts (such as the transformers) do not appear to be as readily available here in England. But still searching. Keep up they great work..........and stay safe. Just subscribed
Welcome to our channel, M, and thanks for subscribing. I guess shipping costs from the US would add greatly to the price of parts.....but there is a strong interest in tube amp circuitry in the UK and I would think that parts sources do exist, but may require some searching.
For front panels, using software like Draftsight or Corel Draw, I create the artwork for the panel, including the background color, then print it on photopaper. If I need to use 11" x 17" paper, I go to Staples and have them do the printing. Then, after making sure that the printed copy is free of dust, I apply clear sticky-back plastic over the paper avoiding any bubbles, and then finish the job by using a J roller to ensure good adhesion between the paper and plastic. Finally, I attach the paper to the metal panel by using Weldwood contact cement. Once again, I finish the job by using a J roller to ensure good adhesion.
Hi ya Doug .Thanks for sharing all of your expertise!I have used a similar method for making labels and panels using gloss paper and laser printing for black,and ink jet for color. I'll have to try the laminates .One thing I would like to share is that I have used that clear two part epoxy that is used for bar tops,as a top clear coat. It is very thick and glossy and adds a nice contour to the top of the tag. It adds a couple of more step to the process, but is extremely durable when it cures. Thanks again.
Your process works pretty well. I've had good success with decals and a bubble-jet printer in the past, which will allow you to do colors... but... now I have the local Trophy Shop Laser-Etch my badges and amp control face-plates onto a thin piece of stainless steel, which is extremely durable and permanent. The process can even do colors as well and it's not that expensive. As low cost as the lasers have been getting, if I did a lot of them, I'd probably spend the money and purchase my own. Oh... and single color graphics come out looking nice, too. ~ "Ladies underwear and beer bottles..." lol ~
Thanks, Mark. It's all part of my desire to maintain complete, independent control over the building process. Any time I need the services of an outside agency, it always adds extra time, travel, and frustration. I guess my wife is right about me being a control freak :)
nice one Doug, I just gone and got some engraved, before Christmas, wish i saw this then. will deff try this out on my amp. pictures are on my Google plus page i hope.
Thanks, Sorin. I really prefer to do everything myself, to avoid the delay and frustration involved in seeking outside assistance. I'm glad you liked my procedure. Best of luck :))
Finally the video I have been looking for, thank you, wow you made my life easy now I don't have to outsource to another company just to do a name plate. Love your videos full of fantastic ideas thank you..👍
@@UncleDoug thanks For answering and your welcome. I have been watching Your fabulous Well thought out Videos for months especially during the Virus shut down Better than my favorite Scifi shows on tv Sometimes both at once. Cant say enough Good about what You have been doing. I have been interested In electronics since My early years in the 60s and 70s. You fit A resource of knowledge that will help me when I find a Project. Live long healthy And prosper As spock would say Dwight.
Yes, indeed....and a lot more convenient than driving all over town to computer-graphics stores, and putting up with bored, unmotivated clerks who are texting the whole time you are trying to explain what you want.
This is so true; I deal with this all the time! I walk out if I'm not getting the proper attention as a customer...and I see this more and more with the actual owners of the business! Whatever happened to the days of the personalized service we used t get with merchants? It's really a shame...
Great stuff. Another way to put your logo on is to use a water transfer technique. I saw it in another TH-cam video based around the idea of getting a custom logo onto a homemade guitar pedal. Although I believe you need an inkjet printer for that.
Thanks, Mike. Yes, I believe you can buy water-transfer paper and then print decals with an inkjet printer. Since I have a laser printer, this is the method I have been using. I have no experience with the other method, but it would probably work quite well.
Nice tip. I used to use Letraset (rub off lettering) and the special spray fixative years ago, but it wasn't as durable as the method you suggest , and on some of my projects I just submitted my designs to a trophy shop that had a laser engraver..expensive but for "one- offs", it was a workable solution.
High praise indeed, JL. I'm still a mile (or 8) away from approaching his achievements, but with Rusty's help and the advantage of the Internet we're doing our best. Thanks !!!
A good thing to remember is to configure the printer for "best quality", so the logo looks nicer, specially if it has a lot of details, tho my designer side wouldn't recommend a logo like that to even be used... Simpler is always better when it comes to logos.
Uncle Doug You're welcome! Simplicity not only makes it easier for making the logo by hand (whatever the method you choose for it), and also makes you use / lose less material when making it, but it also makes it a lot easier for your logo to be recognized. Think about it. The logos that you can remember more easily are those that don't have much detail, however they have -enough- detail to make them unique. A good example is Orange. You may recognize the little "shield" logo they put on their cabs, but the name with that specific script they use is what -really- catches your eyes at first.
Thanks for this idea. I was wondering how you did all the labels on the Champ chassis. All of my amp nameplates are extremely worn from the constant high-velocity stream of women's underwear being thrown at me everytime I'm on stage. It's a under-addressed problem in the music industry. Thanks for help bringing it to the light.
You bring up a good point, CC....and as both we (and our audience) grow older, the size, weight, and texture of the underwear being thrown tends to increase exponentially, causing even more wear to amp labels. For this reason, I recommend adding one additional layer of clear, protective tape for each decade over 40 of musician age. On the plus side, however, by the time you are up to 3 or 4 layers, the nature of the projectiles gradually shifts to Depenz.....which are much softer and lighter in weight (unless they are, shall we say, "soiled").
That looks Really Professional Job !! ..you could or someone could use this Idea and sell on Ebay ... I need one for an old" Sanyo" tube amp, I'm going to try this, as soon as i get a working Printer
Since I don't have access to either process, I rely on the one in the video......and the labels and badges are still in perfect shape after several years.
I believe it's called Harlow Solid Italic. I liked it because it reminds me of the 1920's......a little early for amps, but a very stylish period nonetheless.
Greetings, BVA. Thanks so much. I'm glad the videos are of interest. Sadly, I sold all my vintage motorcycles before I started making videos......they would have been great subject matter. If you go to my Facebook page, Uncle Doug's Vintage Amps, I have posted some photos of several of my old bikes that you may find interesting :)
I better idea is to print in reverse on acrylic / ascetate sheets then you can touch them up with a fine brushand black paint and glue them down to the control bezel, all the markings are behind the plastic and safe. also, you can print in reverse onto paper, stick it print sode down with PVA glue to wood, then the next day when its solid just run water over the paper and rub it gently to dissolve the paper away leaving the toner powder print.
@@UncleDoug No problem. That's what I use for the graphics on guitar pedals. You can spray clear coat over it for durability. Appreciate the videos. I've learned a lot.
+Matt Stumblovski I print on paper to know exactly where to position the laminating sheet. After I tape the sheet (or small piece of the sheet) in place over the paper image, I run it through the printer again. I do use several coats of clear lacquer or acrylic enamel in some cases.....see my recent series on the Supro Tremo-Verb clone.
Hello again Uncle Doug, I'd like to hangout with you. Too bad you're so far away. Question! Was the reason that you used gloss for esthetics, or so the ink would stick better? As always, Thanks
I guess it was a combination of reasons, KG. I believe that matte finish laminating material is available at Hobby Lobby, but I felt that the clear would look better. Also, if you're going to cover the printing with a layer of acetate tape.....it wouldn't look right unless the bottom layer was glossy.
Are gloss laminating sheets the same thing as gloss laminating "pouches"? I'm trying to find some of these to buy even online here in Australia and I can find things that kinda sound like it but want to make sure to get the right thing.
I'll bet you could buy the pouches and separate them into two separate sheets (just cut around three sides of their perimeter with scissors), Liam, if you can't find the individual sheets for sale.
Doug, nice video ... funny too! I'm a bit confused as to why it's necessary to print it on the plain paper first since you go ahead and use the laminate printed one? Is it only to check the result of your font and logo size? If so, why did you did you go ahead and border the plain paper one? Would you clear this up please. I thank you. Btw, your finished plate is a very nice design and very professional looking as well.
Thanks, Mike. Yes, I print the paper version to verify it's size and how it will fit on the plate. Also, it tells me exactly where the printing will occur so I can attach a small piece of the laminating acetate to that exact area of a paper sheet......rather than sacrifice an entire sheet of laminate.
Thanks, BT. I was just about to flog the cabinet with red hot tire chains dipped in roofing tar, but my wife demanded that I empty the dishwasher instead.....hopefully, I'll get back to "vintaging" tomorrow after all my chores are done :))
+Uncle Doug I've got an XP box, Linux box, Win 7 box, and a couple of Macs. The Macs and the XP box are the most reliable :) I actually don't have the Linux box anymore. I gave it to my son. But it was a nice, fast machine with no problems too.
Microsoft renders its products obsolete after a few years to compel users to buy their newer, often inferior, programs. Like you, I like XP and see no reason to play their game :)
Yes, I used a couple dots of 5 minute epoxy to secure it to the grill cloth. You could also use double-stick tape, I guess, but it would be less permanent.
Can you give me a link to the laminating paper you use? I'm having trouble finding the right thing, the descriptions on most of the stuff to do with laminating don't really indicate a whole lot. Why do you print it first, cover it with the laminating paper and then print it again? This stuff confuses me.
I buy the laminating material at Hobby Lobby. They have a web site and sell on the Internet. I don't print twice......just once and then cover the printing to protect it.
Hi Doug, I tried this to day. But I only had the A4 Lamination Pouches, (which are to plastic sheets sticky in between), not like your single sheet with none stick cad packing. It sort of worked, the two sheets stuck together in the laser printer, but I did get a good image, so I thought (which was a sort a bad move) what if I put alumin kitchen foil in between. well it sort of worked and I did not damage my printer ( which was my worry), the two sheets stuck with the foil, but the image was not hard and fast it come off on my hands, (so it effected the harding of the toner. but it sort of work. the only prob I had it printed on the dull side not the shiny. may try again tomorrow. any help any one ???????
Greetings, Ron. Sorry for the delay in response, but YT never informed me of your inquiry. For best results, you really need to use the same type of laminating sheets that I show in the video. Also, to make the printing more permanent, you can overlay it with a covering of clear shipping tape (be careful with bubbles), or a couple coats of clear acrylic spray paint. Good luck !!
I was told by the social security office that it invalidates your card and they made me get a new one. I think if it's laminated then they can't tell if it's been altered


You are a true tube connoisseur. I see you still have a CRT monitor. Great!
I really appreciate all your videos. You make the complicated un-complicated.
Greetings, CC. Thanks for the kind words. Sadly, I recently replaced the old CRT with a 23" Flat Screen :( I couldn't bear to throw the old monitor in a Dumpster, so it's resting happily in my storeroom, just in case the new one fails :)
And Windows 98 or something old skool / cool!
My favorite uncle dropping some blue humor into the mix...
Not me, Mr. G. It must have been my evil twin ;)
Uncle Doug, there is no end of your slick tricks making home made products better than what we buy from the well known makers.
Thanks, John. I always prefer to do everything myself, if possible. When I seek outside help.....the delay, cost, and often shoddy result have convinced me to become totally reliant.
It's 2021 now. And I just saw this. Saw the covering and grille cloth videos first. Must admit, damn good looking speaker!
Thanks, DB.
Isn't it amazing that every time I google for diy amp building instructions, I end up at one of your videos. Thank you once again
You're quite welcome, Marcelo :)
Ladies’ underwear and beer cans thrown at you, all said in mono tone and with serious instructions to avoid damage.
Yes, we are quite concerned with the welfare of our audio equipment :) :)
Thanks, Doug. I have just started building my own amps (completed my first 5E3 scratch build recently, no kit) and your videos have been super helpful -- full of great tips, clearly demonstrated.
You're welcome, PTW. We're glad the videos are helpful :)
Great project Uncle Doug, and thanks to Rusty too (great friend ya got there Rusty, he followed your ball tossing contract as written). Again, great instructional series.
Thanks for your kind words, Scotty. Rusty and I are glad you enjoyed the video ^. .^
This is exactly what I’ve been looking for! Thanks
That's great news, Gerald. Best of luck :)
I'm willing to buy, deliver and donate an apple computer to you...but then I thought you might like the "analog/pioneer" aspect of windows based products. I love your content, I wish there were more people like you in the world.
Thanks, JG. I have no doubt that Apple products would revolutionize my life, but I'm just too old to adapt to modern technology :) Thanks !!!
Uncle Doug. Thanks for this and all of your very informative videos.
I have 4 amps I have built with no labels, however now I think I have a new fun little project in mind. Now for a logo and design.
Thank you for these educational videos.
I started out on tv repair in the early 80s and moved to Information technology. My hobby and passion is guitars, amps and music. Your videos have inspired me.
Thank you!
You're welcome, Mike. That's great to hear :)
Excellent! I don't know much about rectifiers, triodes and such but it just so happens that I needed this tip! Thank you!
You're welcome, RD.
This is exactly what I was looking for to make logo plates for my drum kit! Thank you Uncle Doug!
You're welcome, Rich. I hope they turn out great !!
Another great video offering a super-easy idea which is not only affordable but looks fantastic when complete. Your videos have upgraded the potential quality of my project(s) by three or four light-years. Not to mention, having the wonderful peace of mind of actually knowing what I'm doing as I go about doing this. ha! Many thanks!
You're welcome, IW. We're glad the videos are helpful :)
Great info, time and money saver, and a DIY dream. Thanks Uncle Doug, I really enjoy your videos and the spirit which you impart information in. Pay It Forward!
You're welcome, CG.....glad you enjoyed the video :)
Thanks for this, following it got me a very nice faceplate!
That's good to hear, Joe :)
Haha... ladies' underwear and beer cans... I got visions of the Blues Brothers. Outstanding good stuff!
It's a sad fact of life, Dr. S ;) Thanks !!
Clever. I have used a local store that does engraving and sports trophys .They did a nice custom panel for my Fender ab763 bandmaster head I built.
Thanks, L :)
Just found your channel a couple of days ago.............and am blown away by you down to earth. Straightforward and factual presentation style. Want to build a tube amp. But certain individual parts (such as the transformers) do not appear to be as readily available here in England. But still searching. Keep up they great work..........and stay safe. Just subscribed
Welcome to our channel, M, and thanks for subscribing. I guess shipping costs from the US would add greatly to the price of parts.....but there is a strong interest in tube amp circuitry in the UK and I would think that parts sources do exist, but may require some searching.
For front panels, using software like Draftsight or Corel Draw, I create the artwork for the panel, including the background color, then print it on photopaper. If I need to use 11" x 17" paper, I go to Staples and have them do the printing. Then, after making sure that the printed copy is free of dust, I apply clear sticky-back plastic over the paper avoiding any bubbles, and then finish the job by using a J roller to ensure good adhesion between the paper and plastic. Finally, I attach the paper to the metal panel by using Weldwood contact cement. Once again, I finish the job by using a J roller to ensure good adhesion.
This sounds like a good procedure, Roid. Thanks for sharing it with us.
Write on front panel like volume, gain etc,... (Its very small alphabets) With Sticker or paint?
Hi ya Doug .Thanks for sharing all of your expertise!I have used a similar method for making labels and panels using gloss paper and laser printing for black,and ink jet for color. I'll have to try the laminates .One thing I would like to share is that I have used that clear two part epoxy that is used for bar tops,as a top clear coat. It is very thick and glossy and adds a nice contour to the top of the tag. It adds a couple of more step to the process, but is extremely durable when it cures. Thanks again.
You're welcome, WB. Thanks for the interesting tip.
Another great video, clear, well presented-great result..A big thumbs up from the UK
X
Your process works pretty well. I've had good success with decals and a bubble-jet printer in the past, which will allow you to do colors... but... now I have the local Trophy Shop Laser-Etch my badges and amp control face-plates onto a thin piece of stainless steel, which is extremely durable and permanent. The process can even do colors as well and it's not that expensive. As low cost as the lasers have been getting, if I did a lot of them, I'd probably spend the money and purchase my own. Oh... and single color graphics come out looking nice, too. ~ "Ladies underwear and beer bottles..." lol ~
Thanks, Mark. It's all part of my desire to maintain complete, independent control over the building process. Any time I need the services of an outside agency, it always adds extra time, travel, and frustration. I guess my wife is right about me being a control freak :)
Nothing wrong with that at all... 😉
nice one Doug, I just gone and got some engraved, before Christmas, wish i saw this then. will deff try this out on my amp. pictures are on my Google plus page i hope.
Thanks, Ron. I'm sure the engraved plaques are really nice. Please give this method a try if you get the time and inclination. Good luck !!!
Great idea Uncle Doug, the amps final touch makes it look professionally done, great job! Regards, Sorin
Thanks, Sorin. I really prefer to do everything myself, to avoid the delay and frustration involved in seeking outside assistance. I'm glad you liked my procedure. Best of luck :))
Thanks Doug! I learn a lot from this.
You're welcome, Dave. I'm glad the video was helpful.
Finally the video I have been looking for, thank you, wow you made my life easy now I don't have to outsource to another company just to do a name plate. Love your videos full of fantastic ideas thank you..👍
P.o.B pedals You're welcome, PB....glad the video was helpful :)
Perfect! was polishing a Technics turntable cover and removed a bit of the black paint from the logo,ugh,this may be a fix,thank you Uncle Doug!
You're welcome, Ted. I hope it helps.
Uncle Doug I love you
Your silly and funny
Thanks, Dwight :)
@@UncleDoug thanks
For answering and your welcome.
I have been watching
Your fabulous
Well thought out
Videos for months especially during the
Virus shut down
Better than my favorite
Scifi shows on tv
Sometimes both at once. Cant say enough
Good about what
You have been doing.
I have been interested
In electronics since
My early years in the 60s and 70s. You fit
A resource of knowledge that will help me when I find a
Project.
Live long healthy
And prosper
As spock would say
Dwight.
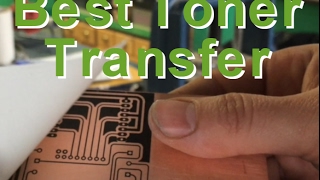
I need to try this. I have been using toner transfer sheets and ferric chloride to etch plates. This process is much less messy.
Try it and see what you think, Robert.
Great job!!!
Thank you!!
Very nice work Doug. Thanks for sharing.
You're welcome, SS.....glad you liked it.
This is clever! A lot cheaper than having them custom made! :)
Yes, indeed....and a lot more convenient than driving all over town to computer-graphics stores, and putting up with bored, unmotivated clerks who are texting the whole time you are trying to explain what you want.
This is so true; I deal with this all the time! I walk out if I'm not getting the proper attention as a customer...and I see this more and more with the actual owners of the business! Whatever happened to the days of the personalized service we used t get with merchants? It's really a shame...
Great stuff. Another way to put your logo on is to use a water transfer technique. I saw it in another TH-cam video based around the idea of getting a custom logo onto a homemade guitar pedal. Although I believe you need an inkjet printer for that.
Thanks, Mike. Yes, I believe you can buy water-transfer paper and then print decals with an inkjet printer. Since I have a laser printer, this is the method I have been using. I have no experience with the other method, but it would probably work quite well.
Nice tip. I used to use Letraset (rub off lettering) and the special spray fixative years ago, but it wasn't as durable as the method you suggest , and on some of my projects I just submitted my designs to a trophy shop that had a laser engraver..expensive but for "one- offs", it was a workable solution.
+SuperCarver2011 Thanks for the info, SC.
Huh, you're beyond Forrest Mims. You ARE Uncle Doug.
High praise indeed, JL. I'm still a mile (or 8) away from approaching his achievements, but with Rusty's help and the advantage of the Internet we're doing our best. Thanks !!!
WordPerfect?! I used to sell that, urrr... 31 years ago! Where did the time go? Oh, I remember, playing guitar! :D
I liked WordPerfect.....but everything I like becomes obsolete :)
@@UncleDoug A Canadian company! I still remember 'reveal codes' very helpful
same procedure, on Copper and cut in a "mod" look, perhaps too small~ but it did work~
the Oakland Vagabond amp 1996-2000~
Thanks for the input, Jay.
Thanks for this video!
You're welcome, Ted.
Genius...
Wow.....thanks, BP.
A good thing to remember is to configure the printer for "best quality", so the logo looks nicer, specially if it has a lot of details, tho my designer side wouldn't recommend a logo like that to even be used... Simpler is always better when it comes to logos.
I hadn't thought of that detail, BC, and I agree with your preference for simplicity. Thanks for your input.
Uncle Doug You're welcome!
Simplicity not only makes it easier for making the logo by hand (whatever the method you choose for it), and also makes you use / lose less material when making it, but it also makes it a lot easier for your logo to be recognized.
Think about it. The logos that you can remember more easily are those that don't have much detail, however they have -enough- detail to make them unique.
A good example is Orange. You may recognize the little "shield" logo they put on their cabs, but the name with that specific script they use is what -really- catches your eyes at first.
Thanks for this idea. I was wondering how you did all the labels on the Champ chassis.
All of my amp nameplates are extremely worn from the constant high-velocity stream of women's underwear being thrown at me everytime I'm on stage. It's a under-addressed problem in the music industry. Thanks for help bringing it to the light.
You bring up a good point, CC....and as both we (and our audience) grow older, the size, weight, and texture of the underwear being thrown tends to increase exponentially, causing even more wear to amp labels. For this reason, I recommend adding one additional layer of clear, protective tape for each decade over 40 of musician age. On the plus side, however, by the time you are up to 3 or 4 layers, the nature of the projectiles gradually shifts to Depenz.....which are much softer and lighter in weight (unless they are, shall we say, "soiled").
Uncle Doug Haha! Hilarious! Great reply. Thanks for the chuckle.
You're welcome, CC ;)
Thank goodness for your over active imagination. But if true, thank goodness for antibiotics!
That looks Really Professional Job !! ..you could or someone could use this Idea and sell on Ebay ... I need one for an old" Sanyo" tube amp, I'm going to try this, as soon as i get a working Printer
Thanks, B2. Give it a try.....I think you'll like the result. Good luck :)
great idea!
Great video Uncle!
Thanks, Mr. M :)
Nice touch!
Thanks, Riloh :)
Practical, but not going to last at all. Much better to do CNC or etching.
Since I don't have access to either process, I rely on the one in the video......and the labels and badges are still in perfect shape after several years.
Now if you anticipate things being thrown at you, like ladies underwear and beer cans, you can... That made me laugh out loud! hahaha
Glad you enjoyed it, Jeff :)
WordPerfect!
Thanks :)
VeryVery Awesome! :) Thanks for the idea
You're welcome, Ciro. Give it a try and I think you'll be pleased. :)
Yes :) What's is the name of the Text Font?
I believe it's called Harlow Solid Italic. I liked it because it reminds me of the 1920's......a little early for amps, but a very stylish period nonetheless.
Thaaanks! :D
first class ...
freak55beat Thanks :)
I'm extremely impressed with your videos. I also noticed the poster of the BSA Goldstar on the wall. Another video ? hint.
Greetings, BVA. Thanks so much. I'm glad the videos are of interest. Sadly, I sold all my vintage motorcycles before I started making videos......they would have been great subject matter. If you go to my Facebook page, Uncle Doug's Vintage Amps, I have posted some photos of several of my old bikes that you may find interesting :)
I will do that , please accept a friend request.
I better idea is to print in reverse on acrylic / ascetate sheets then you can touch them up with a fine brushand black paint and glue them down to the control bezel, all the markings are behind the plastic and safe.
also, you can print in reverse onto paper, stick it print sode down with PVA glue to wood, then the next day when its solid just run water over the paper and rub it gently to dissolve the paper away leaving the toner powder print.
Thanks for the tips, Prince.
Have you tried waterslide paper? That seems like that would be a little easier.
I have not, CM, but appreciate the tip. Thanks.
@@UncleDoug No problem. That's what I use for the graphics on guitar pedals. You can spray clear coat over it for durability. Appreciate the videos. I've learned a lot.
Looks great, What the hell does it sound like already?
Check previous videos, Janos.
@@UncleDoug Oh OK, that makes sense... Thanks, later. Good video...All Good info. I have an old Univox tube amp to re-cover...
@@janosistvan5226 Good luck with your project, Janos.
Wow! Now is a perfect jewel, beautiful :o
Thank you, Rene....:)
Why did you print on paper first? Also a good thick coat of clearcoat would be a good protector maybe.
+Matt Stumblovski I print on paper to know exactly where to position the laminating sheet. After I tape the sheet (or small piece of the sheet) in place over the paper image, I run it through the printer again. I do use several coats of clear lacquer or acrylic enamel in some cases.....see my recent series on the Supro Tremo-Verb clone.
Ah! Gotcha. I get it now DOH!
Matt Stumblovski I was wondering exactly the same thing. I was afraid I’d missed a step. Thanks for asking!
Hello again Uncle Doug, I'd like to hangout with you. Too bad you're so far away. Question! Was the reason that you used gloss for esthetics, or so the ink would stick better? As always, Thanks
I guess it was a combination of reasons, KG. I believe that matte finish laminating material is available at Hobby Lobby, but I felt that the clear would look better. Also, if you're going to cover the printing with a layer of acetate tape.....it wouldn't look right unless the bottom layer was glossy.
Are gloss laminating sheets the same thing as gloss laminating "pouches"? I'm trying to find some of these to buy even online here in Australia and I can find things that kinda sound like it but want to make sure to get the right thing.
I'll bet you could buy the pouches and separate them into two separate sheets (just cut around three sides of their perimeter with scissors), Liam, if you can't find the individual sheets for sale.
Doug, nice video ... funny too! I'm a bit confused as to why it's necessary to print it on the plain paper first since you go ahead and use the laminate printed one? Is it only to check the result of your font and logo size? If so, why did you did you go ahead and border the plain paper one? Would you clear this up please. I thank you. Btw, your finished plate is a very nice design and very professional looking as well.
Thanks, Mike. Yes, I print the paper version to verify it's size and how it will fit on the plate. Also, it tells me exactly where the printing will occur so I can attach a small piece of the laminating acetate to that exact area of a paper sheet......rather than sacrifice an entire sheet of laminate.
@@UncleDoug "ah Confucius say you smart ferrow!"
@@sunburstmike8745 Thanks, Mike.
A nice touch, neat and simple, but don't you need cigarette burns and paint speckles for that vintage look (as shown in a previous video) ? :))
Thanks, BT. I was just about to flog the cabinet with red hot tire chains dipped in roofing tar, but my wife demanded that I empty the dishwasher instead.....hopefully, I'll get back to "vintaging" tomorrow after all my chores are done :))
This is a great idea for like 15 years ago. Lol.
Thanks, Eric. At the time, it was an inexpensive, effective way to make labels.....and still is.
Of course Uncle Doug still uses WordPerfect!
+vandahm ......and Windows XP. We old timers hate change :)
+Uncle Doug I've got an XP box, Linux box, Win 7 box, and a couple of Macs. The Macs and the XP box are the most reliable :) I actually don't have the Linux box anymore. I gave it to my son. But it was a nice, fast machine with no problems too.
Microsoft renders its products obsolete after a few years to compel users to buy their newer, often inferior, programs. Like you, I like XP and see no reason to play their game :)
Hello, how do you fix the label on the front clothing? Is it glue?
Yes, I used a couple dots of 5 minute epoxy to secure it to the grill cloth. You could also use double-stick tape, I guess, but it would be less permanent.
Can you give me a link to the laminating paper you use? I'm having trouble finding the right thing, the descriptions on most of the stuff to do with laminating don't really indicate a whole lot.
Why do you print it first, cover it with the laminating paper and then print it again? This stuff confuses me.
I buy the laminating material at Hobby Lobby. They have a web site and sell on the Internet. I don't print twice......just once and then cover the printing to protect it.
Printing it out on paper first is to make sure that you have got it right, paper is cheaper than laminating plastic.
Great site do u play ur amps alot
Thanks, LS. Not as much as I used to. I have arthritis in my hands now and it really interferes with guitar playing.
Hi Doug, I tried this to day. But I only had the A4 Lamination Pouches, (which are to plastic sheets sticky in between), not like your single sheet with none stick cad packing.
It sort of worked, the two sheets stuck together in the laser printer, but I did get a good image, so I thought (which was a sort a bad move) what if I put alumin kitchen foil in between.
well it sort of worked and I did not damage my printer ( which was my worry), the two sheets stuck with the foil, but the image was not hard and fast it come off on my hands, (so it effected the harding of the toner. but it sort of work. the only prob I had it printed on the dull side not the shiny.
may try again tomorrow. any help any one ???????
Greetings, Ron. Sorry for the delay in response, but YT never informed me of your inquiry. For best results, you really need to use the same type of laminating sheets that I show in the video. Also, to make the printing more permanent, you can overlay it with a covering of clear shipping tape (be careful with bubbles), or a couple coats of clear acrylic spray paint. Good luck !!
Do NOT laminate you ss card
Why not, Jeff ?
I was told by the social security office that it invalidates your card and they made me get a new one. I think if it's laminated then they can't tell if it's been altered
I will keep this in mind. Thanks.
Yeah, it's silly. They make them super fragile, then expect you to not do anything to preserve them
Clever