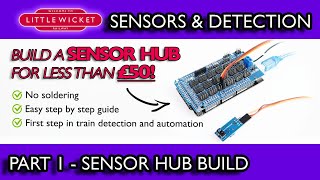
Arcomora - Arduino Controlled Model Railway DCC Accessory Decoder

ฝัง
- เผยแพร่เมื่อ 4 มิ.ย. 2024
- A quick look at the Arcomora (Arduino Controlled Model Railway) system created by Nico Teering and the DCCNext hardware he's designed to support it.
Arcomora enables easy create of Arduino based DCC accessory decoders that can be configured without any programming knowledge to perform a variety of tasks on a model railway.
It's a fantastic system that's is freely available, easy to use and very cheap to implement.
Per the Arcomora website (www.arcomora.com/):
"ArCoMoRa stands for Arduino Controlled Model Railway. On a digital controlled model railway based on the ArCoMoRa concept the whole automation is done with Arduino Microcontrollers without writing one single line of Arduino-code. As protocols ArCoMoRa uses DCC and LocoNet®. Each Arcomora program has its own specific task.
MARDEC is a multifunctional DCC decoder for servo’s and accessory’s.
With Mardec you can control upto 12 servo’s and many accessory’s like e.g. leds, relais, led strips and coil turnouts.
A Mardec has a maximum of 16 configurable devices. You can also define ‘inputs’. With an input you can control devices without a DCC signal but with e.g. a reed switch or current detection circuit
ARSIGDEC is a DCC signal decoder for light signals. It can control up to 8 signals per Arduino. Each signal can have a maximum of 8 lights and 10 aspects with a total maximum of 16 lights per Arduino. With Arsigdec you can create your own signal aspects. So you can use it for almost all light signals in the world. The Arsigdec also contains a database with many used signals.
ARLOCO is a feedback encoder based on LocoNet®. It supports up to 16 input channels for detecting a train. Each input can be optimized for pulse detection (e.g. a reed switch or infra red) and continuous detection (like current detection).
The most important feature of all ArCoMora programs is that they can be configured very easily without any programming knowledge. You configure ArCoMora with a simple ‘question and answer game’ on your PC.
You don’t need a digital command station or a complex setting of CV’s."
More information and DCCNext kits available at www.arcomora.com/.
Support the channel by becoming a member and get access to perks:
/ @littlewicketrailway
Chapters:
00:00 Introduction
01:45 DCCNext Kit
02:32 Connection Options
02:53 Software
03:10 Configuring Servos
04:26 Hornby Select Fail
05:18 Testing the Decoder in JMRI
06:00 Flickering LED Output
07:00 Summary - วิทยาศาสตร์และเทคโนโลยี


Nico Teering is my dad, and I'm really proud of him! He really likes his work at Arcomora and really puts a lot of energy and passion in it
You're very lucky to have such a talented dad 🙂 do you also like model railways and electronics?
I own four of these units and they are fantastic! Nico has created this product with so much care and passion it almost feels wrong it’s so cheap. It’s also a great way to practice your soldering as you get all the components and the instructions are really clear. Any problems and Nico is also responsive on email. Highly recommended!!!
You continue to find and succeed with the VERY THINGS I want for my (as yet un-begun) railroad...thank you!
Thanks Rob. You’ve given me my answer to slow down servos. Great stuff!
I don't like using terms like game-changer, but... This is a game-changer. 1/10th the price, easy setup, amazing support? Get out of the way, manufacturers, the Arduino/Pi maker culture is coming for you... :D
With people like Nico out there doing stuff like this they should be nervous.
Hi. Just come across Arcomora. I use DCC++EX and I was pleased to see in your video you can use Arcomora alongside DCC++. Arduino possibilities in model railways are great.
Yeah, Arcomora will work with most DCC systems. How you finding DCC++EX?
After more research Rob i am liking this piece of kit more and more 10/10
I've got a DCC Next on order from Nico after seeing this brief demo. Thanks for showcasing this piece of kit Rob. I keep having to hold myself back from ordering more at this stage until I've got one up and running! Loved the gas light flickering - exactly an effect I was looking to emulate. It's made so easy with this equipment as well.
I got a message from Nico to say that he'd had a few orders. I think he's created something really smart. Let me know how you get on.
@@LittleWicketRailway Will do Rob. I've actually got a whole load of kit that I am waiting for thanks to your videos! Really looking forward to getting started once it all arrives.
@@jonharbour9166 did you get it of so is it on your layout how do you rate it?
Looks very promising. I may have to give this a try
Very interesting! I was aware of Arcomora but was not aware they did a multi device decoder, something I have had at the back of my mind for years, as you pointed out Arduino based I/O are considerable cheaper than off the shelf. I know coding puts people off, but that looks really easy, even for the Arduino uninitiated!
I was surprised how easy it was, I'm considering making heavy use of it.
Hi. Great video. I have arduino control on my DC layout with 14 IR detectors, 10 servos controlling points and another 9 operating semaphore signals, and have coded signal operations to respond to train occupancy and point position. My biggest frustration during my build (and learning of Arduino and electronics) was erratic servo behaviour, often triggered by trains rolling over points. Solution is all down to power supply. Always power devices by own external supply (I use 12v for ardionos, 5v for servos & detectors), not the arduinos themselves, join all GNDs together and make sure you give a big enough main power supply to drive everything. The hours I've wasted trying to figure out random servos jitters! By the way, you can also use the PCA9685 to operate LEDs, even common anode bi-colour which I have mounted on my semaphore signals.
Very interesting perfect way incorporate Arduino on to layouts. Thanks for the demo.
Thanks Ron 👍 Nico has done an excellent job with the Arduino here.
I like this idea, and keen to implement on my layout upgrade (which is happening now). I started playing/learning Arduino about 12 months ago, and after seeing your use of servo's in earlier posts decided to go down the same route. Found a model plane/helicopter merchant in Australia who was selling the servos at a ridiculously cheap price. I made a control panel to manually switch Peco, Hornby and Guagemaster point motors (all 23 of them). However if the Acromora works nicely with Railmaster/e-link DCC then servo's will be the way to go.
Waoh awesome. As a coder and builder myself, I consider testing with amounts of wires but in real life having so many of them in a JMRI/CMRI combination is making me mad !
Thanks a lot for doing this video
Merci !
Hi Rob
I followed your instructions and videos for servo and block detection using the merg kit which I found great. I had an issue with 2 of the detectors stopping working so went looking for other detectors. It was then that I came a cross arcomora. I have 3 dccnext and 3 arloco with the okies. They are both brilliant pieces of kit and easy to set up and understand. Looking forward to see if I can learn anything from you regarding these.
As with any electronic equipment they sometimes will stop working. If you are still a member of MERG raise a thread on their forum and they will help you to try and diagnose the problem. I for one will look out for a thread and see if we can help sort it. It maybe a dry solder joint joint or a component that has failed.
I’m using 3 of them, controlling led, servos and other accessories. I don’t use de dccnext but a similar print provided by a model railway club here in the Netherlands. Also self soldering. That also works great.
It is quick, controlling servo speed and action is simple.
Good to see another positive review for Nico's work 👍
I can see these being used in conjunction with other Arduinos for layout automation. cheers Daz
I loved the videos, l must catchup on the rest. I just wanted to say keep up the good work, Alan
Thanks Alan 👍
Looks an interesting piece of kit
Hi, Rob, I'm not sure if it was me that first mentioned Arcmora to you as I thought it was only a few weeks / videos ago and I can't find my comment either ? Anyhow glad you like it and you are already well ahead of me as I have yet to assemble any of mine !
Hi Dave, if it was you then thanks! It was a great tip 👍
I'd love to see a deeper dive into the 3 different applications and all the functions.
This would probably replace the sensor boards that connect via USB / COM connections.
Quick question on the flickering light. Does the DCC Next have mosfet's to drive the output for higher current, say if you had a string of 20 or so "gas lights", or is it just direct to the Arduino pin?
Hmmm, definitely worth having a look at.
I'm using 2 of these and it's worth every cent I spend on it.
Thats good to know 🙂 What are you using them for?
@@LittleWicketRailway principally for the servos of my switches. I ordered half Dupont pins and half screw connections to keep some flexibility in my choices.
I did not buy the DYI kit but the finished controlers; excellent quality.
Very helpful
Hello
This product looks an ideal option for me as I would like to incorporate LEDS and other accessories on to the layout. Just to expand on you LED example. Did you have the LED couple to a PSU and then had a wire going to the controller?
Hi Tim. The LED lamp was connected directly to the screw terminal (+) and the common ground (-). I'm 99% sure the LED has a resistor built into the lamp though (I'm pretty sure it was advertisedas being safe to use with 12V). I was running the DCCNext board off the 5V servo supply.
Very interesting and worth more exploring for me, although I'm still in the framing build stage. I don't really understand how dcc knows the location of each train at startup. etc. but learning lots thanks to your videos, Please keep up the great work.
It doesn't know the location, Tony. :) DCC simply allows an order or "command" to go to a specific decoder, such as a locomotive, signal, or turnout. There are ways to detect trains, but that's not built into the DCC specification. I hope this helps!
Like Brian said, DCC doesn't detect the trains but is more a set of protocols to send commands via digital signalling. I have started experimenting with NFC tags and sensors to identify particular trains. With strategically placed block detection and NFC readers, you can work out what loco is where. I am in early days of experimenting though, so no real useful information on this from me yet
@@EsotericArctos That sounds really interesting. Thanks for the reply.
Hi there, great video. And based on this Igor myself 2 of these kits. But I’m having trouble with getting it to work with JMRI. How did you do it? As i have tried and it doesn’t work for me?
Hi Rob. I used a UNO + Sensor/Servo shield v5. I built the DCC input/output board and Mardec works fine with servo and LEDs from the JMRI interface using the assigned DCC addresses. However my sensors are not recognised by JMRI, although Mardec records their state change. As the Arduino is not connected directly to JMRI via USB (CMRI), only by the sensor DCC address. I can’t get JMRI to recognise the state change. I believe I’m not setting up the sensor address entry in JMRI correctly for it to be recognised. Does it need to have boardnumber: ID to work? Is it classed as ‘internal’? Have you tried this? I’m have just built a DCC Next and results are the same. I suspect I’ll have to attach the Arduino permanently to work. Have you tried a sensor with yours?
Heel interessant filmpje Nico!
Are you still using it? Have you experienced any glitches on the servo while the loco is running? My servos are about 4 feet away from the controller.
Also the Okkie currentdetector modules of Arcomora are very easy to use and have 8 blocks per module!
I've got one of these to try 👍
@@LittleWicketRailway they're cheap and easy to install! In combination wiht the builtin arduino digital pins (and using the built in pull-ups) it's very userfriendly. Here in action;
th-cam.com/video/53Im_XciouU/w-d-xo.html
very cool
Hi Rob, another great Video so I got one to play with and setting the servos up was easy but when I connect it to my DCC++ base station nothing is working I have set the jumpers to DCC and wired up my servo as per the instruction from Nico ( I don’t have and DuPont pins ) so Orange in the position 1 and 5v +/- to the servo and 5v - to the servo power block. Where I am slightly confused is the DCC connection how do I connect it to my base station? Ie do I connect it to my track or directly into terminals A on the base station
Many thanks Derek
Hi Derek. Best thing to do if you're struggling is to contact Nico, but you should just connect your DCCNEXT to the DCC bus with dropper wires, just like you would with a piece of track.
Just to add. My recommendation would be to have two sets of DCC bus wires around your layout. One feeds the track and the other feeds all your accessory decoders. I would put short circuit protection in between the base station and the track bus. This way if you have a short on the track it won't cause the base station to trop and cut the power to all your accessories. You don't need extra short circuit protection between the base station and the accessory bus because you're very unlikely to have a short circuit on your accessories once they've all be set up properly.
You don't have to have two DCC buses, you can connect everything to the same bus, but I think it makes the system a bit more robust and justifies the extra wiring. I rewired my original layout because I was fed up having a short on the track that stopped my points from working. Another benefit is that if you wanted to run a DC loco you could disconnect the track from the DCC base station, but still have the accessories connected. So you could connect a DC controller to the track, but still run all the accessories off the DCC bus, sort of a hybrid system. Again, this is what I did on my old layout to run old analogue locos. Just need to be careful that you take the old locos off again when going back to DCC.
I use the Mardec software but not the DCC Next board. The software is loaded on an Aduino Uno (I use three in all for 31 servo controlled points) and the servos controlled via an input/output board I built myself (at first I used a vero board but then got them printed in China) which feeds power to the servos and the signal from the Arduino. It’s all explained in Nico website so you can build everything yourself with some thought.
Hi Rob Many thanks for you previous reply, I have been using one Arcomora for 12 sets of points now for a while and because of the size of the fiddle yard I now need to use a second one! have you, or are you using two? and if so can you help me, for as hard as I try I cannot get the second one to work without the first one stopping, I'm sure its an easy fix but its beyond me, I have asked Nico and he has been very helpful but he does not use JMRI and hence does not have any answers to my problem, I have as you recommended set up a independent DCC power line to the first Arcomora and also to the second one.
Best regards
Derek
Very Facinating!
I'm very interested as long as its not a difficult to order or get over here in the States.
You'd definitely be able to get the Arduino and motor shield. Not sure how much shipping would be for the DCCNext kit from Nico.
Shipping to the USA: upto 350 gr €11,- without tracking (no tracking available)
Upto 2 kg €20,- without tracking or €26,50 with tracking
Shipping to the UK: upto 350 gr. €9,50 without tracking (no tracking available)
Upto 2 kg €12,50 without tracking or €19 with tracking
Nico from Arcomora
How does this compare with the Locomotive dcc app. available to download? I have it and it seems so much user friendly than this.
I've just Google Locomotive DCC and found the app and a video uploaded by Bill Cuthbert. The website is down though and I can't see where to get the kit. From what I can see Locomotive DCC looks like a DCC base station and WiFi controller, similar to DCC++. Let me know if I've got that wrong. Whereas Arcomora is a decoder, not a controller.
Arcomora will potentially work with Locomotive DCC.
Kinda weird I was just wondering if something like this would be possible, and then this video about a month later. That quick shot of the board looks like it really is just an ATMega 328 (the exact chip on the original arduino uno). You could definitely get something that has more IO or speed but the 328 is cheap and well documented so it makes sense to use it
how would one go about configuring the limit of throw on the servos? and also could you do a vid on using relays on point frogs with JMRI/CMRI?
You can adjust the range of the servos when configuring. You can also centre the servo for fitting into the point.
How to deal with frog polarity using a few different methods is on the video list. If you wanted to know how to do this using Arcomora then there's a good example in the mardec manual on the website.
@@LittleWicketRailway which vids? I'v viewed most of your JMRI vids and haven't seen any info.
@@theguru18 I meant the list of videos to make, sorry for the confusion.
Have a look at the videos on the Arcomora video page
Nice one Rob I have done this with a cmri node as well after help on MERG. as I am not a lover of dcc accessory decoders
Cheers John 👍 Out of interest, why no live for DCC accessories?
@@LittleWicketRailway mixing the different types of data signals maybe ok on a smaller layout which doesn’t have lots of data due to more locomotives and lots of sensors and turnouts. It’s only my opinion Rob but this new piece of kit is fantastic and it opens up more options for many users.
Plus I am ok with coding in arduino C and this kit is great because it does mean no coding required.
This looks great, will it run tortoise point motors too?
Hi Keagan, I'm not sure, maybe drop Nico a message on the Arcomora website. He'll know for sure.
do these work on A[pple Mac? Thanks.
Hi! Probably best to drop Nico a message via the Arcomora website just to confirm.
Have you had a look at the exrail that dcc++ex has to offer for automation of locomotives
Desperately need to look at DCC++EX, it's moving up the video priority list.
@@LittleWicketRailway I am made up with it and after getting to know one of the developers who is a member of MERG he has pointed out so much about it.
@@LittleWicketRailway I have added you on Instagram if you want to take it offline.
Also another thing that might interest you is 1join this sends the dcc signal to both the main track and the program track. you can drive a locomotive on to a spare siding that needs to be isolated and reprogram it. Also it has been mentioned about stacking a 2nd shield which is an on going topic on their discord booster page.
The exrail with your test layout may make a good video for automation and there is an example of how to do it. Same type of layout.
I have told to have a look at your You tube with Arduinos and Sensors and signals and maybe what ever else. I am learning about Arduinos and things, I want modules 2406mm x 1410mm in 3 Sections A,B,C - A is Ground Zero, B is MID HIGHLANDS 0-240mm, C is 240, these will lay on top of supports from a wall, I do not wish to get down on the floor to work underneath, so each section will be on on this support shelf, and me in a seat to work on
I think there is too much wires involved, so I want to find out about WIRELESS operation for hence the idea of WIRELESS ARDUINOS in a CABINET along side the 3 ASPECT SIGNALS
Funnily enough I only read today that Hornby Select only supports addresses 1-59. Don't quote me on that though as I've never used one, but that could be your reason
Is that just for loco decoders? I thought accessories started from 60? Maybe I should have tried an address below 60 just to be sure.