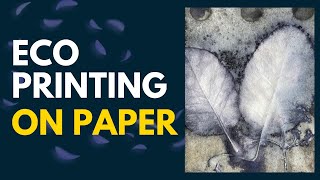
HOW TO MAKE ECO PRINTS - SECRETS FOR BEAUTIFUL RESULTS

ฝัง
- เผยแพร่เมื่อ 16 พ.ค. 2024
- Find out all the secrets there is to know about how to create beautiful Eco Prints. I will show you step by step on how to prepare your papers and what flowers and leaves I used for great results.
NOTE: some plants even though look beautiful can emit toxins into the air when steaming so always work in a well ventilated area and wear a mask. Hydrangea and foxglove are two that are poisonous if ingested or can cause rashes when handled.
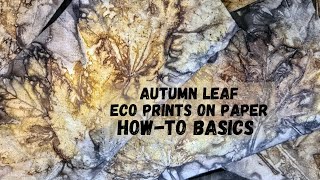
Answer to question what did I use to create the yellow print:
-basil, celery leaves, red lettuce
I am a participant in the Amazon Services LLC Associates Program
As an Amazon Associate I earn from qualifying purchases.”
This video and description contains links, which means that if you click on one of the product links, I’ll receive a small commission. This helps support my channel and allows me to continue to make videos like this. Thank you for the support!
Amazon Paid Links:
11" steamer pot
amzn.to/3rzIQzM
mixed media paper 117 lb
amzn.to/3XZiWl4
8x8" 140 lb water colour paper in block
amzn.to/3NXHUNf
bamboo paper 125 lb
amzn.to/3OkKf66
large paper clamps
amzn.to/44FxXeA
alum powder
amzn.to/43EIuoO
steamer basket
amzn.to/3Dm3k1t
Alum bath soak
1/4 cup alum to 1 quart of water
Supply list:
-steamer pot at least 11" in width and 6" high
-small canning jar
-steamer basket
-oven or hot plate
-long oven mitts
- 2 6x6" tiles
-2 8x8" tiles
-9x12 glass cake pan
-canning jar to mix alum with water
-1/4 cup measuring cup
-metal stirring utensil
-mixed media paper 115 lb
-8x8" 140 lb water colour paper
-sketch paper 60 lb
-bamboo paper 125 lb
-scissors or rotary cutter or paper cutter
-old towel to dry papers
-bowl or container to collect flowers and leaves
-scissors or garden shears to cut off flowers and leaves
-gloves to protect hands from drying from alum
-8 large bull clips
-water tap to rinse of flowers and leaves
-strainer to collect steamed flowers and leaves from rinsing
-paper towels to thoroughly dry papers
-large heavy book to weigh down pile of papers
-Flowers to try:
coreopsis, foxglove, fuchsia, goldenrod, -hibiscus, iris, marigold, nasturtium, pansies, petunias, rose, violet
Leaves to try:
-Alder, Blackberry, Blueberry, Ferns, Hydrangea, Japanese maple,Oak, Peony, Rose, Strawberry
-alum
Donate to my Crafty Patti Channel
If you would like to support me so I can continue to publish more fun videos, then you can make a donation by clicking on the link below. Your kind donation will be sent to my business PayPal account. Thank you so much!
Donate to my channel
www.paypal.com/cgi-bin/webscr...
Follow me on:
TH-cam: / @craftypattiartscrafts
Facebook: / craftypatti
Pinterest: / pins
Email: craftypatti60@gmail.com
Music: Pastel Slide Medium - iMovie Audio Library
timestamps:
0:00 intro
1:33 steam pot set up
2:59 alum mordant
3:31 alum bath
4:08 papers you can use
5:37 cut papers to fit the size oof your tiles
5:57 soak paper in alum bath
6:06 removing paper from alum bath
6:42 flowers to use
7:15 leaves to use
7:44 soaking leaves in alum bath
8:22 removing excess water from paper
8:38 gloves to prevent dry hands
9:08 placing leaves on paper
11:43 making sandwich with top tile and clips
12:15 flowers for prints
13:37 adjust size of sandwich to fit
14:05 placing tile sandwich's in steamer
14:36 simmer for 45 min
14:47 flower reveal
17:35 leaf reveal
20:04 second batch
21:31 third batch
23:08 guess what was used or eco print
23:27 drying and flattening - แนวปฏิบัติและการใช้ชีวิต


*Such a beautiful way of creating botanical prints that I had never heard of before, Patti...thank you for the technique and inspiration❣️🥰*
You are so welcome!
Very nice! Thank you!
Glad you like it!
Wonderful! Thank you...
Glad you enjoyed it!
This is great. I'll try it next weekend. Thanks for showing us.
It’s so exciting to reveal the outcomes!
I need to try this!
It’s so exciting to see the results. Yes, try it for sure!
I have tried the boiled method with rusty items added and loved the outcome. I will certainly try this as well. Thank you for taking the time to share this. It all turned out lovely!
Wonderful! I’m sure you will have great success!
Very pretty results.
If you want some more leaf definition you can dip the paper in a tannin before the Alum. When printing Cellulose fibre it is good to mordant in a tannin first, then Alum. (PAS works but AA is better for Cellulose)...
Also you could try an iron acetate blanket as another interesting process.
Soak some fabric in a rusty solution made from soaking rusty nails in vinegar for a week to ten days…(till it looks rusty) Strain it and use this to make an iron blanket. I find old flannel sheets work well. Wring out really well and lay over your leaves… damp not wet…do not soak your leaves in Alum.
The Alum is why your leaves are very yellow, if you don’t do that the mordant in your paper will help give enough yellow. You will also get the reaction of the tannins in your leaves and the iron in the blanket.. some people dip their paper in the iron water instead of Alum.
Also some people dip their leaves in iron water to get the deeper tannin/iron reaction; there is also a copper mordant that you can make as well.
So many variables. Have fun!
So many variables. Thank you for your informative comment and knowledge. It’s great how all artists can come together and help each other.
I'm guessing lettuce? But, lovely prints. I really like those where you laid the strips and it gave the line impressions. Pretty cool looking. Thanks for all that work. 💓
Yes, it was lettuce, basil and celery leaves. Always seems that something cool comes from something not intentional.
Ive done eco printing but not the stem method. They turned out lovely.
I was very pleased with the crisp lines and colours. Using the tiles really helps too.
So beautiful, would you use the same process on material?
It’s on my list to do a video for eco prints on fabric. Just need to prepare the fabric differently with an iron solution and different roll and barriers used for steaming.
Very cool! I don't know if I'll ever try it but, I love it! What size were your bigger tiles?
Glad you enjoyed it! Yes, you found the answer!
This is really cool. Thanks! Do you have any thoughts or suggestions on how to do this onto a piece of wood?
I have not tried doing eco prints on wood. If the wood is porous enough to absorb the colours perhaps. You would want to use clips to really squeeze it together. You will have to experiment. Let me know how it goes.
@@CraftyPattiArtsCrafts Thanks for the reply and the suggestion. I’ll let know how it works.
Does it matter if I use aluminum alloy pot or aluminum alloy?
Not sure of what your asking?
@@CraftyPattiArtsCrafts Pure aluminum cookware is made entirely of aluminum, while aluminum alloy cookware is made from a combination of aluminum and other metals, such as copper or stainless steel
You got me there. There is quite a science to how tannins react to different substances like iron, aluminum etc.
The pot I used I believe is aluminum as it dents easily. But can’t be 100 % as I bought it from a second hand store. It is true that you can get different results depending on the pot you are using. It really is an experiment and I don’t have all the answers for you.
@@CraftyPattiArtsCrafts thanks. I’m trying to find aluminum pot large enough to meet my needs.
I found mine at a second hand store by chance but I still need a taller one.
Saw this on Amazon. You can check it out
amzn.to/4atmHVp
Oh sorry I found the sizes, 6x6 & 8x8.
No worries.
I'm pretty sure I followed this as described and got absolutely no results. Nothing came out on the paper. Do you add Alum to the boiling water?
I’m sorry to hear that as I got such great results with the steam method
I’m sorry to hear that as you saw the results I got. The imprints were sharp and the colour was good. No Alum is added to the water as that is just for steaming. Maybe go over the steps again in case something was missed.
@@CraftyPattiArtsCrafts Thanks for the feedback. I'll try it again next weekend. I'll review the steps and use different leaves and flowers.
Make sure the leaves do not have a glossy coating as those leaves will not work.
@@CraftyPattiArtsCrafts oohhh well that helps explain some of this. I just picked leaves around my apartment and many were glossy. How tight does the "sandwich" need to be squished? Its another variable I'm unsure of. I didn't have clips so I tied the sandwich together as tight as I could but I can only get it so tight.