Great build Paul. I will be building something very similar in the not too distant future. I particularly like your stops to get the top in the right place when it has flipped, which I will be copying. I will probably build the top as a torsion box with the stops on diagonally opposite corners. Great to see another Aussie and love the beard.
Joshua Luther Thanks, this is the first time I've given the tenoning jig a serious work out. Like most things, its hard to know what works or doesn't before you've built it so Im planning on making a v2 of the tenoning jig somewhere down the track, with a bit more flexibility.
Hi I made a similar flip top for my morticer and bench drill,works great and is a massive space saver,like you I made it on the fly with no real plans, great vids keep them coming
Hi Paul, I just stumbled onto your channel a moment ago. I liked this flip top workbench. I have a planer and a spindle sander taking up room on a roll around bench. Something like this would free up that space to be used more for assembly work. I've subscribed to check out your past videos and to keep up with future projects. It's too cold in the shop right now to work in here in the midwest of USA. Hopefully another couple more weeks, and it will warm up some. Nice job!
+normel678 It can save you a lot of money on woodwork project if you have the in depth woodwork system. I have written all of my experience & expensive mistakes I've made in my very first days on wood working. You should discover more about it: *TopFineWoodworking .Com* >>>>>>>>>>>
can Sympathise with the heat mate my shop is tin roof and tin walls its pretty much an ovan this time of year but weridly enough it been rainning a lot the last few weeks dont know why its meant to be summer.
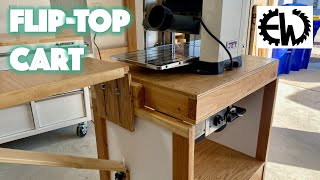
Hey there, I was wondering exactly what the finished product ended up looking like, even more so, being put into use with having the second tool mounted as well, like it states that it was created for. It looks a bit lightweight, possibly less worktime put into it than other fliptops I've seen, which would obviously be a plus, if it's just as stable. Like the other comment, I too, like that crosscut sled. I'm feeling too lazy to search your channel right now, so do you have a video on how you made it? Keep up the good work... :-)
Agboo Hans I've added a note to the next 'wrapup' video, so I'll include video/audio not just a photo of how the fliptop stand is holding up :) The crosscut sled build is th-cam.com/video/60BOsDnrYSc/w-d-xo.html, though as a spoiler, I'll remaking it in the next two months. Lots of ideas for improvements :)
Paul, enjoyed the video. A couple of questions. With the stop blocks installed, do you need all 4 bars, or could I get by with only 1 or 2? Also, is there any chance the pipe will wiggle loose? Does it need to be epoxied to the frame or have some end caps epoxied on?
+Frank Y (SawdustAndShavings) Its probably better to watch the updated/mk2 version of this flip top stand - it addresses many concerns! th-cam.com/video/JcdzAdjLx5s/w-d-xo.html
Amazingly, I went into to my workshop (also in Melbourne) to make the exact same thing today, but after finish another project to make room, I gave up and went inside. Way too hot. Have you had any thoughts on how to get enough grip for whatever is on the other side? (Say a 30kg sander?) i'm a bit worried that screws won't hold unless the base gets really thick.
Humidity was a killer too. Worked up a sweat just shellacking outside today! My grinder is currently bolted to a melamine platform to get all the positioning correct. I'll probably drill/bolt through that for the best grip. Does your sander have any through holes (or could you drill through its base) that you can bolt it down with? If not, two alternatives: Make some cleats to hold around the base of the sander, and/or laminate a few pieces of plywood so you can use longer screws (ie 2x 12mm on each side)
Hey Paul, nice to see someone down-under rackin' up a subscription base and views. Well done. But how much time do you spend building stuff for the workshop, over building practical stuff for the house or income? Is it a fun first venture with practicality and income being distant considerations (not that TH-cam pays much, nor are Aussies willing to pay top dollar for a top product that is otherwise poorly made in China and the request of an importer who sells it here for much more than it's worth)? I ask because I'm considering spending big coin on tools but I'm not sure the 'fun' argument is enough to justify the expense. Most of the TH-cam vids I come across are guys building stuff for the workshop. Cheers...
At the point I am at now, TH-cam pays the for the workshop. I'm not really the right person to ask - its all 'pocket money' to me. Because of medical conditions, this can't be a full time job for me. You either have to be extremely talented (built up over many years) putting out one or two pieces a year, or making several large pieces a month to get a decent living off it. You won't start in category A, and if you don't enjoy it you'll burn out in category B. If you can buy a few tools at a time and sell pieces here and there to pay them off/pay for future tools, its slower to grow your workshop but you take much less of a dent and get to learn each of your tools properly before "moving on". I've got plenty of furniture pieces in my videos, but as a hobbyist they cost more and take longer than workshop projects. I put out a video every week (except this month!), so shorter form projects like workshop stuff often makes the mix. And if its a good project, it makes actual furniture making better/quicker/etc. This month I'm short on content because I'm making a dining chair set for my wifes christmas present. Having a workshop can be useful ;)
Thanks Paul. Your response was very helpful. I'll let the workshop be a hobby and if it turns into an income, great. If not, I got to have a great workshop - even if I had to work to get it. And starting in 'catergory B' with my woodworking skills would be a Great achievement. P.S. I won't go into my workshop on 40 degree days. Kudos!
That particular one is sold under Aldi's branding (yes, the supermarket) - "Taurus", but its actually just a rebadged Scheppach CS-55 saw. Grizzly, ShopFox and a few other brands all resell it with a different paint job.
Those lockers have moved around the garage many times that the safety cupboard wasn't always shoved down the end. Eventually I'll be getting rid of them, as lockers are *awful* for storing anything other than textbooks in. Too deep, not wide enough, difficult to retroactively add shelves in.
It'd vary pretty dramatically depending on the tools you put on it anyway. Mk2 had some rough drawings done, you can grab the 3d model from a360.co/1QeWRF8 (various formats, including Fusion360 and Sketchup)


Great build Paul. I will be building something very similar in the not too distant future. I particularly like your stops to get the top in the right place when it has flipped, which I will be copying. I will probably build the top as a torsion box with the stops on diagonally opposite corners. Great to see another Aussie and love the beard.
Nice job! I love the crosscut sled and tenoning jig. The stand turned out quite nicely.
Joshua Luther Thanks, this is the first time I've given the tenoning jig a serious work out. Like most things, its hard to know what works or doesn't before you've built it so Im planning on making a v2 of the tenoning jig somewhere down the track, with a bit more flexibility.
Hi I made a similar flip top for my morticer and bench drill,works great and is a massive space saver,like you I made it on the fly with no real plans, great vids keep them coming
Nice work! I should have done this with the base I made for my planer.
Paul great job mate
Hi Paul, I just stumbled onto your channel a moment ago. I liked this flip top workbench. I have a planer and a spindle sander taking up room on a roll around bench. Something like this would free up that space to be used more for assembly work. I've subscribed to check out your past videos and to keep up with future projects. It's too cold in the shop right now to work in here in the midwest of USA. Hopefully another couple more weeks, and it will warm up some. Nice job!
Good Job!!!
"nice use of the stop block" 😆
Great work man. I like your job & what U have done is realy usefull. Greetings from Poland. Nice tools for saving fingers in right places :-)
Nice work, and a great idea. I might have to modify my table!And what a coincidence its 42c in Sydney today as I watch your video.......
+normel678 Be sure to checkout the Mk2 that the wife and I built th-cam.com/video/JcdzAdjLx5s/w-d-xo.html
Better design, much sturdier construction.
+normel678 It can save you a lot of money on woodwork project if you have the in depth woodwork system. I have written all of my experience & expensive mistakes I've made in my very first days on wood working. You should discover more about it: *TopFineWoodworking .Com* >>>>>>>>>>>
can Sympathise with the heat mate my shop is tin roof and tin walls its pretty much an ovan this time of year but weridly enough it been rainning a lot the last few weeks dont know why its meant to be summer.
It's -19c here right now, but I vastly prefer that to your 40c.
Hey there, I was wondering exactly what the finished product ended up looking like, even more so, being put into use with having the second tool mounted as well, like it states that it was created for. It looks a bit lightweight, possibly less worktime put into it than other fliptops I've seen, which would obviously be a plus, if it's just as stable. Like the other comment, I too, like that crosscut sled. I'm feeling too lazy to search your channel right now, so do you have a video on how you made it? Keep up the good work... :-)
Agboo Hans I've added a note to the next 'wrapup' video, so I'll include video/audio not just a photo of how the fliptop stand is holding up :)
The crosscut sled build is th-cam.com/video/60BOsDnrYSc/w-d-xo.html, though as a spoiler, I'll remaking it in the next two months. Lots of ideas for improvements :)
Paul, enjoyed the video. A couple of questions. With the stop blocks installed, do you need all 4 bars, or could I get by with only 1 or 2? Also, is there any chance the pipe will wiggle loose? Does it need to be epoxied to the frame or have some end caps epoxied on?
+Frank Y (SawdustAndShavings) Its probably better to watch the updated/mk2 version of this flip top stand - it addresses many concerns! th-cam.com/video/JcdzAdjLx5s/w-d-xo.html
Great video. Where did you get that air-ratchet chisel at the 3:00 mark?
Ha, I wish. Baltic pine (vs radiata pine) is so soft and squishy, its rubbish to chisel out. Especially not pleasant with how how it was!
do you have a link on that slid
Amazingly, I went into to my workshop (also in Melbourne) to make the exact same thing today, but after finish another project to make room, I gave up and went inside. Way too hot.
Have you had any thoughts on how to get enough grip for whatever is on the other side? (Say a 30kg sander?) i'm a bit worried that screws won't hold unless the base gets really thick.
Humidity was a killer too. Worked up a sweat just shellacking outside today! My grinder is currently bolted to a melamine platform to get all the positioning correct. I'll probably drill/bolt through that for the best grip.
Does your sander have any through holes (or could you drill through its base) that you can bolt it down with? If not, two alternatives: Make some cleats to hold around the base of the sander, and/or laminate a few pieces of plywood so you can use longer screws (ie 2x 12mm on each side)
Yeah i'd probably bolt them too with some good washers for support...
Hey Paul, nice to see someone down-under rackin' up a subscription base and views. Well done. But how much time do you spend building stuff for the workshop, over building practical stuff for the house or income? Is it a fun first venture with practicality and income being distant considerations (not that TH-cam pays much, nor are Aussies willing to pay top dollar for a top product that is otherwise poorly made in China and the request of an importer who sells it here for much more than it's worth)?
I ask because I'm considering spending big coin on tools but I'm not sure the 'fun' argument is enough to justify the expense. Most of the TH-cam vids I come across are guys building stuff for the workshop. Cheers...
At the point I am at now, TH-cam pays the for the workshop. I'm not really the right person to ask - its all 'pocket money' to me. Because of medical conditions, this can't be a full time job for me.
You either have to be extremely talented (built up over many years) putting out one or two pieces a year, or making several large pieces a month to get a decent living off it. You won't start in category A, and if you don't enjoy it you'll burn out in category B. If you can buy a few tools at a time and sell pieces here and there to pay them off/pay for future tools, its slower to grow your workshop but you take much less of a dent and get to learn each of your tools properly before "moving on".
I've got plenty of furniture pieces in my videos, but as a hobbyist they cost more and take longer than workshop projects. I put out a video every week (except this month!), so shorter form projects like workshop stuff often makes the mix. And if its a good project, it makes actual furniture making better/quicker/etc. This month I'm short on content because I'm making a dining chair set for my wifes christmas present. Having a workshop can be useful ;)
Thanks Paul. Your response was very helpful.
I'll let the workshop be a hobby and if it turns into an income, great. If not, I got to have a great workshop - even if I had to work to get it. And starting in 'catergory B' with my woodworking skills would be a Great achievement.
P.S. I won't go into my workshop on 40 degree days. Kudos!
new sub here. what kind of track saw are you using? if love to pick one up but wow are they expensive!!
+robhimself79 at the time of this video, a scheppach rebranded saw. Inexpensive. I've moved to a Bosch gtk 55 ce
l like thank's see more soon
Hey do you have any problems with snipe with the Thicknesser
No, but I also don't use this thicknesser any more.
Who manufacturers that track saw?
That particular one is sold under Aldi's branding (yes, the supermarket) - "Taurus", but its actually just a rebadged Scheppach CS-55 saw. Grizzly, ShopFox and a few other brands all resell it with a different paint job.
Kind of sad that you missed the opportunity to have your safety cabinet in the first locker.
Those lockers have moved around the garage many times that the safety cupboard wasn't always shoved down the end. Eventually I'll be getting rid of them, as lockers are *awful* for storing anything other than textbooks in. Too deep, not wide enough, difficult to retroactively add shelves in.
You look so happy while you work. Good job. I'm debating on building a couple for various tools, handy for a small shop.
Do You have Plans Available? ONLINE?
No, and this isn't the 'latest' version of the fliptop cart, which also doesn't have plans.
i' have to Guesstamate , No Problem
It'd vary pretty dramatically depending on the tools you put on it anyway. Mk2 had some rough drawings done, you can grab the 3d model from a360.co/1QeWRF8 (various formats, including Fusion360 and Sketchup)
Very nice flipcart. I'm thinking about trying something similar with my new (old) planer. I'm not sure whats worse. Your 40° C or my -17° C... hmm...
Michael Olson I think its a situation where we all lose!
Paul Jenkins HA!! I think you are right.
Very cool video. Love it. Thanks Douglas.
Thank for sharing. More beer in that heat!!
I would like to know how U made the Bridal sled
Good stuff.
Excellent build! A bit wobbly so might I suggest you put some horizontal braces as high as you can to allow clearance while rotating the two tools.