🔥 How to Mount PLADUR Ceiling with Omega Master ✅ Under Stairs Ramp (drywall installation)

ฝัง
- เผยแพร่เมื่อ 5 ก.ย. 2024
- TIP adjust plasterboard to stone ▶ ︎ • 🔥 TRUCO ▶︎ Cómo Ajusta...
✅If instead of doing the work yourself, you are going to choose to hire a company to do it, I have created a short guide to help you analyze the budget and avoid common deceptions in the sector. Head over to www.tutorialcre... to download it.
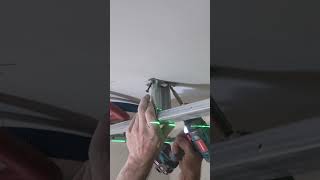
In this video we will mount a plasterboard ceiling under a stair ramp.
We will use omega masters of 15mm by 3m, screws, plastic plugs, wooden wedges and waterproof plate. Omega is usually used for when we want to lower the ceiling as little as possible. This system is perfect for when you want to go low. But if the surface is very crooked, it is not very comfortable because you have to use a lot of wedges and it takes more work.
🔺How to mount plasterboard wall- • 🔥 Cómo HACER una Pared...
🔺How to make a squad- • 🔥 Cómo Sacar una ESCUA...
🔺Place the door drawer- • 🔥Cómo INSTALAR Puerta...
🔴Links to materials / tools that I get online
- Screwdriver = amzn.to/3r1L2tH
-Red light self-leveling laser = amzn.to/2Lw66ty
-Green light self-leveling laser = amzn.to/3nphzIr
-Set of two scissors = amzn.to/38qVg0Z
- Bit holder with depth stop = amzn.to/2L9Xmt2
-fischer Sx / UX / (Briefcase of 290 Tacos) = amzn.to/3okzVvz
If you liked this video, don't forget to click I LIKE it and share it with your friends.
Video transcript:
Are you ready? Well take your tools.
We are going to use omegas, screws, plastic plugs and wooden wedges.
We check with an omega if the ramp is more or less straight.
In this case we have a small kink at the back.
The omegas distance must be 50cm between axes.
We mark on the side of the omega, to guide us when screwing it.
We place the first omega on the side, leaving a 4cm distance from the vertex so that when drilling it does not break the concrete.
We fix the omega in the center so that it is attached.
Now we fix the two sides of the omega on the upper side.
In this case, I do the same with the omega in the center, because the other side is a little crooked.
We cut a piece of omega and let it mount about 5cm.
We screw them on the side.
We fix the omega in the lower part.
We put a screw to hold a string in the lower part and in the upper part.
We tighten the string to be able to level the omega.
As we can see in this case, we need to lower the omega.
We loosen the screw to be able to insert a wedge and place a longer screw.
We make sure that there is approximately one or two millimeters above the string and we screw.
We leave a distance between screws of 50cm. We can also cross the screws.
Are you still there and still not subscribed? Think no more! Subscribe!
We do the same with the central omega.
Now we place the omega on the side.
We fix the upper part of the omega, leaving it level with the ones already in place.
Now we fix the lower part leaving it level with the ones already placed.
In this case we have to wear a lot. We will use a piece of omega.
We fix the piece of omega.
We screw, checking that it is level with the ones already in place.
We pass the string. In this case, we see that we have a few millimeters high.
What we do in this case is mash the omega a bit at that point.
We measure the plate and cut it a few cm longer.
Do you want a trick to adjust the plate to the stone? Check out this video.
With a beveled piece we mark the point where the plate will reach us.
We measure from the mark to the side of the plate.
We cut on the side so that we have the beveled cut.
Earthquake!!
We mark in the lower and upper part to draw a line.
We cut along the line.
In the slot we will glue the pieces of plate with pasta.
Soon you will have a video on the channel about the placement of the metal angle and the plaster. Make sure you are subscribed so you don't miss it.


![[กูเพิ่งซื้อมึงปิดหนี] 20 นาที ผมรีวิวเกมที่แย่ที่สุดในโลก CONCORD](http://i.ytimg.com/vi/XhC-3q3Ii7I/mqdefault.jpg)


🔥 También lo puedes montar con este sistema ▶︎ th-cam.com/video/ycXEeentS-0/w-d-xo.html
Eres un auténtico máquina, aprendo mas contigo en 10 minutos que en una academia,, sigue así compadre..
Muchísimas gracias ☺️. Me alegro que sirvan para aprender. Un saludo 👋
Que bueno,eres todo un maestro.
Es la primera vez que te veo usar un martillo,jejeje
Muchísimas gracias ☺️ cuando hay que usarlo, usarlo bien 😂 un saludo 👋
Si es que cuando sacas un tutorial aprendemos cosas nuevas ole oleeee eres un crak
Muchísimas gracias ☺️ me alegro que sea así. Un saludo 👋
Puff bien trabajo miedo me da que tengo que liarme con mi casa pero la verdad es que lo haces fácil gracias por tus vídeos
Muchísimas gracias ☺️ la clave esta en no tener miedo. Un saludo 👋
Como siempre buenas tomas desde distintos puntos de vista, se ve fenomenal.👍
Muchísimas gracias ☺️ por comentar, intento que se vea lo mejor posible, lo que si que luego me da mas trabajo editar el vídeo , que hacer el trabajo 😂. Un saludo 👋
Eres un crack señor , felicidades por tus vídeos y gracias por enseñarnos.👍
Muchísimas gracias ☺️ me alegro que se vean así. Un saludo 👋
buena técnica compañero!!
Mi enhorabuena, trabajas muy fino, y muy bien, tienen suerte tus clientes. Suerte en el canal.
Muchísimas gracias ☺️ la gente no se da cuenta que cuando trabaja mal nunca te recomiendo. Por el contrario si lo haces bien el boca a boca lleva s muchos clientes. Un saludo 👋
Digno trabajo como siempre lo hace, mil gracias. 😊
Buen vídeo campeón 💪🏾
Muchísimas gracias ☺️. Un saludo 👋
Otimo trabalho, obrigada por ensinares a fazer. Um abraço e bom Domingo.
Muchísimas gracias ☺️. Como siempre por todo tu apoyo . Un abrazo 🤗
Hola, muchas gracias por el video.... bueno, por todos!!! Se aprende mucho viendolos... pero este lo estaba esperando por las omegas y como has solucionado varios problemas que se presentan muchas veces, como el del canto (esquina). Tengo una duda, en caso de tener los omegas sujetos a la pared/techo medinate mecanismos antivibratorios (no tornillos al soporte como suele hacerse) se puede cortar puntalmente un trozo del ala (por donde se atornilla a la pared)? Es para salvar una ventana... Espero haberme esxplicado bien. Gracias y sigue así.
Muchísimas gracias ☺️. Si te queda sujeto en el otro lado de la omega. Aún que le quites simplemente en ese trozó por la ventana no pasa nada lo puedes hacer. Un saludo 👋
Gran video. Gracias por compartir.
Muchísimas gracias ☺️ un saludo 👋
Hola, que tipo de.broca estas utilizando que taladra metal y pared a la vez?
Excelente video. Sabrás si puedo hacer algo similar con un techo pvc, es decir amurarlo al cielorraso sin puntales o velas.
Se puede hacer con lamas de pvc ancladas en las guías o atornillarlas directamente
@@TutorialCreativo genial! Gracias
فير فافور This is a beautiful and easy job, the hardest is humans
Muchísimas gracias ☺️ un saludo 👋
Muy buen trabajo y aprendizaje excelente eres un crack tengo una pequeña duda
Voy a bajar el techo del salón y para no perder altura porque es bajo lo pensaba hacer con omega de 70 por 30 el techo es de 5 por 4 metros , lo voy anclar cada 50 cm la duda es tengo que poner perfil perimétrico y cada 50cm está bien cada omega
Muchas gracias y perdona las molestias y sigue así eres el mejor que veo poniendo Pladur
Muchísimas gracias ☺️. Si la distancia es cada 50cm eje. Si le pones en el perímetro es mejor. Pero no pasa nada si no le pones al pastear y pegar la cinta le dara la resistencia. Hay en casos que lo que se hace es poner una omega pegada toda por el perímetro. O justo entre omega y omega donde coinciden de cabeza con el perímetro aprovechar atornillar trozos.
ME gustan tus videos, voy a forrar una pared que es mas fria que el hielo y para no perder mucho espacio he pensado en poner omegas y poner poliestireno extruido, mi problema es que hay una ventana y tendre que buscar la forma de rematar el contorno... pero indagare por la red.
Muchísimas gracias ☺️ puedes rematar con doble guarnición o con un ángulo de aluminio. Sino con pladur en este vídeo puedes ver una idea pero como vas usar omega lo que puedes es en el perímetro ponerle una U o un ángulo que tiene el grosor de la omega para poder atornillar la tapeta.
la idea esta al final del vídeo. th-cam.com/video/ClILEkY-Djo/w-d-xo.html
@@TutorialCreativo dandole vueltas los mas factible y facil es poner una L que haga de soporte y proteger el canto con un guardavivos, ademas esto lo he poner si o si, ya que en esa ventana es donde se tiende la ropa asi que habra uso constante.
Buen día que medida de broca usas para perforar
Gracias.
Muchísimas gracias ☺️
Que tipo de taco utilizas me refiero en milímetros tanto de grosor y largo?
Michas grazias
Excelente video. Una duda, que broca usas que veo que igual perfila metal que ladrillo?
Es una simple broca para piedra.
@@TutorialCreativo una broca de piedra perfora el metal?
Los perfiles es normal sujetarlos a las viguetas? Tengo un garaje con bovedilla y viguetas, llas bovedillas no las veo yo para agusntar peso, pero hacer taladros a las viguetas no puede ser perjudicial? No las afecta estructuralmente? Gracias
Una duda. En el remate final no conviene poner un esquinero para reforzar de piso les golpes
Si pero aun estoy editando el vídeo. Un saludo 👋
Puedo hacer esto mismo en un techo de bobedillas enfoscado con yeso, o tengo que localizar las viguetas de hormigón?. Es un techo de 2,50 x 90
Lo puedo hacer para un techo de un pasillo?
Si se usa también en techos grandes.
Excelente
Buenas!
Primero, enhorabuena por tus vídeos, se aprende muchísimo!
Tengo una duda: estoy reformando una buardilla y quiero poner omegas para no perder altura. Es mejor anclar las omegas paralelas con las bigas de hormigón o perpendiculares? Tengo 80 cm entre bigas.
Gracias por adelantado
Hola! Excelente video! De gran ayuda. Tengo una duda. Perforas el perfil y el ladrillo al mismo tiempo? Saludos y gracias!
Muchísimas gracias ☺️ si con una broca de piedra. Un saludo 👋
Y si la terminación termina en corcho y no hay hormigón
Usas la mecha de pared para perforar el omega???todo al mismo tiempo?
Si taladro todo junto. Con broca para piedra
Como se llaman esos tarugos que usas y que medida e sla broca de tu rotomartillo?
Enhorabuena por el video! Tengo una pregunta...en este caso tambien podiamos pegar las placas como en otro video que tienes colgado? Un saludo
Muchísimas gracias ☺️.
Yo en techos no recomiendo pegarlo con el sistema de pegote.
Es mucho mejor hacerlo con perfiles y queda mucho mejor.
En paredes si que no pasa nada porque el peso es diferente.
Yo tengo que hacer el cielo raso en mi habitacion(3m x3m) pero tambien los tirantes estan desnivelados? Decis que lo haga de igual manera?
Puedes hacerlo como en este vídeo lo malo que igual tienes que calzar mucho.
Echa un vistazo a este otro vídeo que tengo si te fijas el la parte en caída lo bajo muy poco y se nivela bien de esta manera, los anclajes los tienes que sujetar en las viguetas. th-cam.com/video/ycXEeentS-0/w-d-xo.html
@@TutorialCreativo dale muchas gracias
Se puede hacer asi una pared, sin techo?
No se bien a que te refieres. Pero si se puede usar estas omegas en pared atornillandolas contra la pared de ladrillo.
@@TutorialCreativo a eso me referia , gracias
Top de mais sucesso também sou youtuber
Muchísimas gracias ☺️. Hay que trabajar duro para conseguir resultados ánimo.
th-cam.com/channels/1UxxC7mAd3Y39L_swXeF8w.html
Dalle Lume Langran
Que calabaza
0:48 No es muy buena idea usar tacos de plastico para anclar cargas suspendidas en hormigon o cemento. Con el tiempo terminan descolgandose por la fatiga del plastico. Hay que usar taco metalico.
Puedo hacer esto mismo en un techo de bobedillas enfoscado con yeso, o tengo que localizar las viguetas de hormigón?. Es un techo de 2,50 x 90
@@alejandromolina2989 Si al taladrar ves que has perforado la bovedilla puedes usar un anclaje oscilante por gravedad. Lo mas importante es que NUNCA uses taco de plastico para cargas suspendidas. Terminan cayendo. Por la medida que pones de tu techo parece que es pequeño (2.50m. X 0.90m.) con lo que podrias incluso dejarlo sujeto al marco de perfiles que harias en las paredes. Mira algun tutorial mas por ahi.
Demasiado tarde... esta anclado con tacos de nylon fischer 8 x 40 y tornillos de 5 x 40. No lleva escuadras perimetrales. El peso total aprox es de unos 18 kg , con lo que si cada tornillo y taco en óptimas condiciones soporta unos 30 kg.... y en total lleva unos 30 para anclar las omegas a las vigetas.