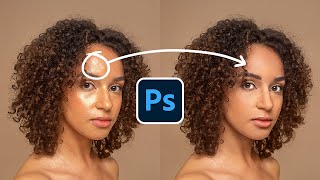
QUICKLY Remove Flyaway Hairs (On The Face!)

ฝัง
- เผยแพร่เมื่อ 12 มิ.ย. 2024
- Photoshop tutorial: Fix flyaway/stray hairs on the face FAST! Use this easy method to remove annoying flyaway hairs on the face in the cleanest, most natural & fastest way possible!
Chapters:
0:00 Intro
1:33 3 Old/Other Stray Hair Removal Methods
3:13 QUICKLY Remove Flyaway Hairs (On The Face!)
Old Method: • 3 Steps to Remove and ...
^ PiXimperfect is a creator/educator that I admire & respect greatly, check him out (if you haven't already!)
***ACCESS Portrait PRESET Pack (PS & LR): go.justinlaurens.com/access
***JOIN Full Portrait Editing/Retouching Courses: go.justinlaurens.com/access
***ACCESS the products used in this video (+ see my Gear / Desk Setup): kit.co/justinlaurens
Follow me: / justinlaurens
* SUBSCRIBE for more videos like this!
* Music via SoundStripe: Peppermint Mocha (by Mala) & Epidemic Sounds


Great tips for removing hair with filter I would not have thought of using. I will try it!
Glad it was helpful! Thanks so much for saying so. Let me know how it goes :)
Very clever stuff - thanks for these valuable insights!
My pleasure! Glad it was helpful :)
Another amazing video like as usual
Thank you so much brother! Many more to come 😊
Hello. Thank you very much for this new tutorial! Do you have the same courses (with your 3D effect etc) using Affinity Photo? ^^
🤗🤗Amazing and Useful Tutorial
🖥️Sir which 🔎"screen recording software" do you use
I've just found and tried this method and it works amazingly!!! Thaaaank you!!! ❤
Hell yeah that’s awesome!
@@justinlaurens you are awesome buddy!!! Thanks a lot!!! 🙏🏼
Amazing video like as usual..... Dodge and Burn tutorial please.. 😊
I really love you work
Ah thank you so much my friend ❤️
Awesome video!
Glad you enjoyed it
Thanks for the tutorial! I didn't use it to remove hair, I used your method to clean chapped lips and unevenly applied lipstick. Works well enough to get me to the next stage.
Great job! That's cool, I'll have to give that a try.
@@justinlaurens I learned that the dust and scratch method works better in frequency separation for some images. I do each on low and high. Low stays at 100% opacity, but on high it reduces to about 50%.
Thanks Bro 🤗🤗
This tutorial video is very informative and useful
How to set this magnify🔎🔎 Mouse cursor on my PC
Please tell me 💡💥💯
Most welcome 😊 It is in the screen recording software man.
@@justinlaurens
🧐🔎🤗screen recording software name???
Seems like you use natural lighting with no flash for a lot of outdoor photos where with back-lit subjects the face is about 1 to 0.5 stop darker than background, then face brightened in post. Is this your preferred method, or do you use off camera soft flash-fill light sometimes. Is there any advantages to all natural light images vs. off camera flash-fill images for outdoors, or it is mostly convenience and the quick mobility of not having to bring along a small battery powered diffused flash stand. In photography group workshops outdoors, photographers are using one or the other methods.
You have a good eye - that's exactly what I do. I never use off-camera flash - only natural / available light for 2 reasons: 1. It helps push me as a Photographer to be more creative and also helps to refine/develop my editing skills; and 2. it is much more convenient yes. Thanks for the great question!
im so confused on how you got folders at the end on the screen. im stuck after i add the noise and dust and scratches. it wont let me retouch because i dont have "skin retouching" folder in my layers. how do i get that with the dodge and burn??? plsssss help
same!
same ugh
How to edit bangs and make them shorter? (There to long and are covering the eyes somewhat)
I would use A.I. Generative Fill in Photoshop Beta. Make a selection around the hair that's too long and try entering prompts like "remove hair", 'shorten hair', etc. and see what results you get. I'd recommend trying it a few times.
The dancing in the chair!!!! Love it!
LOL thanks Laurie 😅 Thought I'd sprinkle in some pizzaz!
🆃🅷🅰🅽🅺🆂 🅱🆄🅳🅳🆈!!!
My pleasure David, hope it helps 🙏
interesting way to present your video..... funny yet educational.... Thanks 🙂
you literally pulled "add details" in an old drawing tutorial and left us out to dry
Super 👍🍫☺️
Thanks 🤗
Dude, frequency separation.
Don't get me wrong, I enjoy and give all credit to content creators that share their techniques. But this is not new at all and the way you comunicate you make it sound like you're a genius. BTW the most natural way (recomended and used by almost every lab) is something equally simple called "Texture Graffting". We use it to repair any type of texture, from skin, to clothes, bluildings, cars, product, etc. In this case will be skin graffting over the stray hairs (via frequency separation) followed by painting and/or micro d&b. Because nothing is more "natural" than a persons own texture. Using noise+emboss+gaussian is an awsome way to create texture, indeed.
I actually appreciate this comment a lot, and the feedback. First of all, I don't mean to sound like a genius, I was just excited by the discovery - I hadn't seen anything like it on TH-cam so thought I'd share my discovery with the community. I would love to learn your method though, how could we make that happen? Haha Perhaps a trade of some sort? Let me know. Thanks Rui.
@@justinlaurens thanks for the reply. I don't know. Maybe via Zoom; that's how we edit in real time with the magazine's editors and consultants.
But it quite easy to describe. Its a fancy name for graffting texture from the high frequency layer.
Perform your freq separation routine.
Make a copy of the high/texture layer: ctrl J+ctrl alt G to clip it and change blending mode to Normal.
Use a selection tool of choice (I use lasso with 0px feather) to select good texture.
Copy it to another layer and clip it.
Ctrl T to transform and drag over the area to be repaired. Choose more than you need. Create a inverted mask and paint white to reveal just where you need (hairs in this case).
Each time, keep using you texture copy layer as your source of "good" texture to graft. At some point it might be useful to select that layer and all the above "selected repair area layers" and merge them (just to keep organized.
You will end up with texture all repaired and color missmatched.
Correct the color either by painting in low frequency and/or by micro d&b (outside freq separation group).
It may sound complicated, but after a few times you'll see that its just a routine using a lot of shortcuts :)
feat. Pix imperfect LOL
th-cam.com/video/AEUjUp7hCPc/w-d-xo.html
100 kkk , flicidaessss
Thank you! 🙏
bros a yapper
Until you actually look at her right eye, eyebrow and eyelashes - then you can see exactly how flawed this is. A simple 'Clone-Tool' used with a retouching tablet works best on many systems and does not require expensive software such as photoshop~!
Never look directly in the eye
@@justinlaurens Because if you do, you will see the reflection some gnarly dude with a camera to his face! Nice try though, it just falls flat.
Hell yeahhh you think I’m a gnarly dude!! 🤘😎🤘 thanks man
@@justinlaurens It's all cool - I just never leave my 'image' in the subject's eyes; but I have used a micro-watermark on some of my work.
A bit before your time - that was copied from Hirschfeld: In 1945, Hirschfeld celebrated the birth of his daughter, Nina, by placing her name in the background of a drawing. What the artist described as an innocent prank soon became a personal trademark and national obsession, as he began hiding numerous NINA's throughout his drawings for years to come.
It's a much better trademark - yes?
So much blah blah but I suggest the new method of blah blah but actually do this instead. Waste of 10 minutes to be honest dude.