BUILD FIREPIT YOURSELF | NATURAL STONE FIREPLACE | MAKE WOOD BURN CAMPFIRE BACKYARD SPOT | DIY

ฝัง
- เผยแพร่เมื่อ 27 ส.ค. 2024
- Hey,
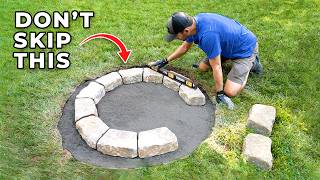
DIY FOX is here, and welcome to my tutorial channel. Today I'll be building this beautiful outdoor fireplace. For this garden fireplace, I'm using granite stones that I already have at home. I've decided that the outer diameter of the circle will be 1.2 meters and I will mark a circle with a radius of 60 cm on the lawn. To do this, I put a rod into the ground and mark the circle with a 60 cm long rope, as you can see here in the video. Now I dig this circle out using a spade. Here I remove the lawn and soil about 20 to 25 centimeters deep, and I make sure that the hole is nice and even at the bottom. With cement and gravel, I mix a mortar that will be used to set the stones in later. I chose a ratio of 5 to 1. If the concrete is a greenish dark grey, then it has the right mixing ratio. The granite stones are now placed in the concrete a little bit higher than the edge of the lawn. Afterwards I check with a spirit level to make sure I put the stones into the mortar evenly. Once the rows are set, you can smoothen the remaining concrete out with a trowel. For grouting we need mortar again. I have chosen a low-cost concrete. There is also a special grouting mortar that can be used, but it is rather expensive and will probably crack when exposed to heat. The mixture should not be too moist, so that you can easily sweep it off the stones again. For drainage I built a kind of drainage shaft with things I already had at home. There are much more professional ways to drain the fireplace, but they all have a similar principle. The water can run off through the pebbles and seep into the ground. It is best to cover the top of the pipe with a kind of fleece so that dirt does not gradually wash into the pebbles. The fireplace is now ready, but you should let it harden for at least a week before using it for the first time. I hope you enjoyed this video and that you can soon enjoy your own outdoor fireplace. Until then.


Dear lord this is brilliant! Guten tag!
I like it. Thanks for the plan!
love it. simple and nice.
what is the pipe and white store for?
Very helpful! Thanks
I like your firepit very much! It's attractive as well as functional. I realize you have talked slowly so that I can understand you since you have an accent (as I do to you) but I have difficulty understanding all you are saying. BUT, I have some issues with hearing anyway and it is a video after all, so I will go through it again. I have questions about the tube you put in it. That's where I couldn't quite hear. Was that for water drainage? Did you cover it up completely on the top? How do you deal with the wood ashes? Again, thank you very much for this great video.
Nice, well done!
I would have done it a bit higher ..
What if raining happen and it becam a pond
Drainage issue will be there due to use of cement
How do you cover it throughout the year?
with nothing :D