"My shop is Way Too Big!"...said no woodworker ever! New subscriber here, and thank you for sharing your work with us. I appreciate your attention to detail, your organizational abilities, and the quality of your workmanship. Mike
Ron This was a GREAT video. You are older & purely a perfectionist at heart. I can tell. There aren't many of us left. Your shop was AMAZING. I was taking some notes to improve on my shop layout. Thank you for sharing this FANTASTIC project. It turned out very functional & useful. Your commentary was spot-on. Just enough info, yet some comedic tales as we went along. You even ID'd you mistakes & then.....how to fix them. Usually the producers cover all that up with out-takes, retakes, etc. Well, time to get off here & go smell some of that wonderful wood. Take care my northern friend.
Very nicely done video, Ron. When I began viewing the first in the series, I was thinking your shop was way too clean to be used very much, but after seeing your attention to dust control at every step of the build, it's obvious why! You've given me several ideas for improvement in my little space! Thanks for sharing your project and time with us.
I just completed my build of this air cleaner box, wow , I didn't know!, what a large amount of fine dust I collected. This video has really opened my eyes as to inhaling fine dust . Thanks for the video.
I love how deliberate you are and keep everything clean and almost dust free. I love the green too... Being color blind I can see it!!! Thanks for your inspiration Ron!!!
Watched all three videos. I came here for the air cleaner build, I stayed for the awesome shop and humor. A different color indeed lol. I am building my own wood shop, Hope it is as nice as your one day. Thanks Ron. liked and subbed.
please take this as its intended, a genuine compliment. I enjoyed watching this so very much and when I closed my eyes and just listened to your knowledgeable, humorous narrative, I coudnt help but to think I was in the "cellar" with my dear Grandfather. You're every move seems choreographed with little wasted effort. I love that everything is green and uniform. side note. when you were installing the patches on the sides from the miscut it made me remember something that my grandfather taught me that I don't see a lot of people doing. we called it "gluewood" we would basically take fine, clean sawdust and mix with wood glue to make a puddy to fill in the gaps like a caulk but when it's dried and sanded it's almost invisible. I'm sure that's something you know about but it's fun reminiscing about my Grandfather. he was such a hero to me.
Thank you for this lovely video. So refreshing to watch a video when the content creator takes its time to really show all steps in the build. As someone else mention. You inspired me to build something similar for my new shop. Definitely a followers from now on. Keep the videos coming.
Hi Peter, Thank you for watching and commenting. Although my woodworking projects seem to be slowing down, I still consider my air cleaner to be an essential in my shop. Enjoy "your" air cleaner project. 👍
Great video series! I can tell you take great care for a very organized shop, especially with air quality and all that sawdust. Plus you built this neat unit yourself and saved big bucks in the process!
Sorry Ron. I didn't see that there was a part three. I really enjoy projects like this that are "warts and all". There are so many on TH-cam that are clinical in their accuracy. It's nice to see the odd mistake! Cheers from "Down Under".
Great project! Loved your narration and how you laughed about and pointed out your mistakes. You had me laughing when you pointed out how you paint everything green and that well this time how about a different color and then the scene changes and your first brush stroke reveals green paint... I nearly spit out my drink!
Hello from Santa Fe, NM. Love your shop. What a great space to spend time. I think I can learn a lot from you and am looking forward to watching more of your videos. I appreciate that you can make a mistake and not edit from your video. Thanks for all the effort you have taken to post these videos. Dave
I agree! Good job on the video sir! The time and effort you've put into everything is impressive. If I only had the room I'd build the same type of air filtration system. Maybe something smaller to fit on the ceiling.
Ron I love your videos. Your so much fun to watch and very calming. your right about never enough room in a work shop. Were always making new tool and projects like this and the shop just gets smaller. love the carpet. must have quite the dust collection. Im might have to up my game:)
Ron, About to start building a "Calverley inspired" version of the air cleaner. I found a nice used furnace motor (3 speed)...much like yours...for $40 from a local junk dealer. Really good shape. Took it home...cleaned it and re-assembled. Runs really quiet and BLASTS out the air. Also...found that HomeDepot carries a VERY NICE 24 hour to 1 minute LED Digital Countdown Timer that I'm testing. It's called a "Backlit LC Indoor Countdown Timer"...you can search for that at HD. That thing will provide even more flexibility (to the minute...up to 24 hours) that those ceiling based EXPENSIVE units. Allows you to run the filter UNATTENDED and then turns off. Slick. (I have no economic interest in referring you/others to this timer). Then I discovered a ROTARY SWITCH (OFF-ON-ON-ON) that I'm using to control all 3 speeds. You have to get one with enough AMPS to run the rating of the motor. My first try...led to my SECOND try...and a 16A version. Need I say more? I guess you can tell...I generally don't have a clue about electronics...BUT am learning something new every day. Thanks for your inspiration. Created a model in Sketchup and posted it to the Warehouse if you want to take a look. "Air Filtration Cabinet"...Caverley inspired. Robert
I realize this is a much older video, but since I am building basically the same setup with a perfectly good old AC system fan, I am going to use a four position rotary switch. It has the capability for the current needed and since it is a selectable rotary switch, only one panel needed for operation. And I am building mine in a small close to the floor design. That way when I am working under a vehicle for any reason (oil change and such) I can have a good flow of air coming under the vehicle...
Hi Gary, I like your rotary switch idea. I should have done something like that too, but I've got a bad habit of trying to make use of what I've got an hand, instead of going to an electrical supply shop and getting the proper switch. Thanks for commenting. 👍
@@roncalverley Actually I bought the rotary switch online and it was very reasonable. Actually it cost less then three typical house wall switches. But what works is all that matters...
I just watched your segment on your shop filter and truly enjoyed it and your commentary. I just wish that you had spent a little more time on exactly how you wired your switches up. I have been searching the web for some time now, on exactly how to go about wiring my furnace fan up just like yours. You will not believe this but I have even gone to some electric stores and shops and no one can seem to tell me how to do it. If you would please show me how you did this, I would like to finish my shop filter setup soon. Thank you in advance for your time and knowledge. And again I have enjoyed your videos. Tim
Take a look at these diagrams. Perhaps you will find one that is similar to what you have there. Good luck :) www.google.ca/search?q=5+speed+furnace+motor+wiring+diagram&rlz=1C1GGGE___CA640CA640&espv=2&biw=1920&bih=974&tbm=isch&tbo=u&source=univ&sa=X&ved=0ahUKEwim2vLssOPRAhUT24MKHR8HA2YQsAQIIA
+Dennis Adams It is very large, that's for sure. That is one reason why I put castors on it --- get it out of the way. You would need at least a 9 foot ceiling for this design. Thanks for viewing :)
Ron ,Thank you the great videos. I think I will be making one of these as I have two furnace blowers and now I have a use for one. Although one thing that bothered me was that you showed, when using the table saw, you have your fingers way to close to the blade. Way too close for me anyway.
Im sure someone has mentioned this, but only one switch should be on at a time. Power can only go to one winding at a time, or the windings will burn out
@@roncalverley 25 yr hvac tech here, and we call that "double tapping". Ive seen some motors run fine while double tapped, and others fry in minutes. Very nice build btw
Hi Jake, It's been so long ago now that I made that air cleaner that I can't recall how I wired it up. I do recall getting info from the internet on that specific blower. I'd hate to be giving you the wrong info for a different blower motor. Thanks for watching and commenting. 👍
Was wanting to build one of these units. Though I couldn't decided if I wanted a ceiling mount or small floor level one. Your design looks like the best of both worlds. How has it been working for you the last 6 months???
Really enjoyed this video Ron,got some great ideas from it & one day I will make one the same,providing I ever catch up on the backlog of jobs ahead.You are very professional & .good to watch. Thank you for sharing,Jamesjj7777
Have such a fan. Will build something like your box. How effective is it near the scroll Saw? Suppose you wanted to connect a hose to a circular saw, what modifications would you do ignoring filtration modification? Oh, I found a wiring diagram...why did you need multiple 3-way switches?
Hi Ed, I have used this next to my scroll saw. It is very effective. As for why do I have three switches --- it's because that's all I had on hand. I did not have a proper switch. Thanks for watching and commenting. 👍
They should charge extra for the knot, not every stick of woods going to have a knot in it, so they might charge extra for it, consider yourself lucky you got it at normal price no extra charge! You might incorporate it into a project for them like a business card holder! Not just anyone knows they sell that stuff, it would be good advertisement for them!
I'm having my HVAC replaced tomorrow and want to build one of these for my garage shop. My electrical knowledge is limited... can you post (or point me to) a wiring diagram?
Hi Ron, I noticed that you have a cowl of sorts on the air intake to the motor and fan. Could you share your source for this item? Also, I enjoyed your three part series on the filter and it's nice to see a woodworker admit their mistakes. We all have them don't we? I have to agree with "Woodfellow," and the carpeted shop. I'm sure it keep the shop a lot quieter but you must go through a lot of vacuums.
Hi David, I'm not quite sure what you mean "a cowl". This is how the unit comes out of someones "newer" old furnace. Look for this newer type of blower that uses a low RPM multi-speed motor, rather than the older belt driven type. As for the carpet ... I hate it! Your right, it's hard to clean up. See my video on this th-cam.com/video/m6UqPD9YMsY/w-d-xo.html
Is it safe to have the electrical connections in a wooden box ? I thought most electrical codes require the use of approved boxes like plastic or metal. Love the overall design. Thx
Thanks for sharing. It was fun to watch! I wonder if you should have used some spring or lock washers to hold the motor down? I think maybe the vibration loosen those bolts after a long time? Or just put a dab of silicon glue? Anyway I like that green myself lol but I am not really irish ;-) ... Thanks again.
oh btw, I got one of these blowers from when I was doing AC work but I cant deal with wood or build anything. I measure 1 thing 3 times and I get 3 different readings! I never know how you do all this? Once I was installing 1 of those sliding aluminum/glass shower doors , I measured the distance between 2 walls where the top rail went, I had to count in the body of the tape-measure, but when I cut I forgot and so the top rail was like 2 and 1/2 inch too short! That's me lol :D
+Dennis Adams Hi again Dennis. I just noticed now that you had commented earlier. I was bad at not replying then, sorry. YES, I'm very happy with it :)
Great job Ron. Always a pleasure to watch your videos; very entertaining. Your color choice really surprised me. I had no idea you liked green. The question is, did you choose General for the color?
Ron, Any chance you can share HOW you wired the 3 switches to the blower motor? Don't think I understand how the 3 switches (together) somehow make the blower motor 'variable'. Sparky stuff really isn't my long suit. Now...got to call the local furnace dealer and see if he's got any OLD blower motors in good condition. RW
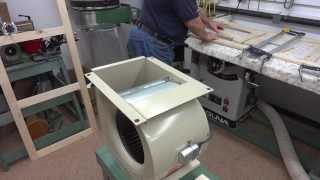
I am wondering why did you mounted the fan at the top? Would it not be better to have it bottom heavy? I like the idea to use more filters but why not have the box shorter and have filters on 3 sides and let the blower blow air out on the 4th side?
Yes, it is a bit on the tippy side but I had wanted the clean air to exit closer to the ceiling rather than the dusty floor. The reason that I've got the intake only on one side is because at that time I was doing a fare amount with my scroll-saw close up beside the filters, and was hoping that the dust produced would be drawn in ... and it was. Thanks for noticing :)
Nice project Ron. It all looks great. Thank you for posting it. Perhaps you've shown it here, however I'm not clear on how the paper filters are held in place. Is it just a friction fit, or something mechanical?
Yes! It's embarrassing lol. It was our our basement rec-room. The carpet is glued down to the cement floor so it now can't easily be removed. Sometimes it makes me feel like a sissy lol.
Great build and amazing shop! Just one thing how did you wire up those 3 switches and be able to Turn on the next speed without burning up the motor from having two speeds on? Thanks so much I have one of those squirrel cages it's a 1hp 4 speed. I'm building a box on casters for it now am curious how to wire the switches being able to use the 4 different speeds. You used one 3 way switch and the other two were just 1 way?Just curious, thanks so much and keep up that great work!!
Ron. I have commented on several of your videos. Really like how in depth you go into them and your responses to my questions. On the workshop filter, your build is quite different from all the others I have watched on TH-cam. If you don't mind I have a few questions. After using your air cleaner now would you make any changes? Most units I have seen built hang then from the ceiling... Yours is on rollers on the floor? Is that so you can move it to the area you are working in and catch the concentration of dust? Did you build it that tall to move the air up high or would it work as well not being as tall? Sorry for all the questions but I highly value your advise. Thanks, Jim
Hi Jim. Thanks for your interest. Answers: It's on wheels, as is almost everything in my shop, so that it may be easily moved close to a machine that produces dust and does not have a good attachment for dust collection, like my scroll-saw. It's tall because I wanted to have all the filters on one side in order to have all the air intake to be from one direction. As for changes, I might have put in 2 or maybe 3 furnace fans. I can get them free, so why not:)
Very nice video, I did compelted all parts unusually. how you wiring the blower? does it mean one common wire and three coils of same function, the speed depends on how many coils you truned on? I got a similar blower of four wires but can't find the wiring diagram on Internet. Thanks for help.
The safest thing for you to do is to take your blower to a furnace installer and get them to show you how to wire it up. That way there will be less of a chance that you will accidentally burn out you motor. Good luck my friend :)
Hi Bruce, Now 4 years later I likely wouldn't bother to build it at all. I'm sort of winding down. However, I really glad I've got it --- actually used it again today :)
Hey there Ron, I gotta tell ya, you have some great videos. I watched the three videos on the air cleaner and I think I just might incorporate some of your ideas. My shop is 30 x 50 and I think it is way small but it manages to get so dusty in there. I badly need to purchase a vac system but money is always tight so I think I'll start with the air cleaner. Aside from the switches, I think I have everything for it. I have only one fan but what do you think about two of these at opposite corners hanging from the ceiling to circulate the air more. I think my motor is a 4 speed and it is a pretty good size but I'm not sure if just one can do this shop. I deal a lot with old barn wood and it is messy without cutting into it. Any input from you or anyone would be greatly accepted. Thanks in advance.
30 X 50 --- nice! My shop is in the basement of a small house. I've found that the trick is to keep the dust suspended in the air until it eventually passes through the filters. Another trick is to remember to turn it on lol. It may be a bit windy all around the shop (and noisy) but it works :)
With all the tools you have, what kind of a dust collection system are you using and do you have everything connected at once? I am looking to buy a Unisaw with a Unifence on it. Once I do that, I'll need to purchase a system directly. Anyway, that's the plan.
I use a 3 hp General dust collected with the canister filters. I wouldn't go smaller than 3 hp in a nice big shop like yours. You would think that by now I'd have all the machines connected to one main duct, but I don't --- not yet anyway. Because my shop is so cramped I have to wheel (almost all my stuffs on wheels) what I want to use into the center of the main room and connect a 4 in. hose. In the case of the drum sander it's two 4 in. hoses. What a nuisance. That Unisaw/Unifence will be one sweet machine.
+Ron Calverley Took your advice and came home with a 3 hp unit last night. It is a Grizzly brand unit and I bought it used for a sweet price considering it still looks pretty new. My plan is to mount it to the wall and set it up as a 2 stage type system. I paid $250.00 for it and it came with several pieces of pipe as well as a remote start switch. Truly a blessing I wasn't expecting. Although the pipe was free, it was mostly the galvanized stove pipe not the stronger stuff which I about fell over on the pricing of. The unit came with a metal 7" to three 4" duct adapter but I think I'll go with a 7" to 6" reducer just prior to my thien collector and then maybe do PVC out from there with blast gates as needed. Any more thoughts O'le Great Grandmaster of great wisdom and knowledge? Oh and another thing, if my job allows me time, I might stop in to look at a 10" SawStop 3HP 52 inch sweet little thing. I about lost a thumb making drawer fronts late one night. If I would have had this saw, I doubt I would have needed a band-aid. Thanks again Ron! PS My name isn't Coomanboo, it is Ross. LOL
Hi Ron, What type of electrical switches did you use. Are they all single, or are there other switch combinations (e.g. two-way etc.). Thanks again. David Chisholm Sarnia, ON
I think you spend too much work and space for that. 1 20 x 20 '' filter is good enough. The out air should blow up so dirt will push down and get into the filter more. and the filter is on the other side. I hope it make cense to you
Because grinder dust is loaded with sparks that may ignite the sawdust accumulated on the air-cleaners filters, that may not be a good idea. Don't want to be calling the fire department lol. It does work really well on airborne dust however.
+Ron Calverley No no, I mean sanding wood with an angle grinder (with an attachment like this for example: www.weem-abrasives.com/photo/pl1807072-angle_grinder_flap_disc_type_p27_p120_grit_zirconia_alumina_sanding_disc.jpg ) , you might as well just sand. I'd like to see how it performs with lots of airborne dust
Now that is something new to me. I've never used a "Flap Disc". I can see where that would produce a lot of sawdust in a hurry. Perhaps someday I'll try them. Thanks for that link :)
Yes! I have noticed that when I'm videoing a project, I tend to do more stupid things than I normally do. I'll talk about safety, but I don't always practice it. Shame on me! Sometime when I'm editing my video, I say say to myself in disbelief "I did that!!!" I think it may be because my concentration is half on my work, and the other half on my camera. I was 15 when I got my first power tool. I'm almost 70 now, and I look at my hands and am surprised that all my fingers are still there lol. Well, maybe I shouldn't laugh. Perhaps I've got a "Guardian Angel" or something. Anyway, thanks for noticing the safety issue, and thanks for the compliment on the project :)


Man with golden hands!!! A good example of how any job should be done!!! Your workshop is the dream of a real man!!!!!
Hi "Truth Only"
Re: "Your workshop is the dream"
Yes, I've often referred to it as "my dream workshop".
Thanks for commenting. 👍🙂
Ron, not only are you a very skillful person, but you have a great sense of humor
You are too kind. Thanks for watching :)
Ron I can't remember the last time I enjoyed a you tube video more! Great job! I think I had almost as much enjoyment watching as you had building.
"My shop is Way Too Big!"...said no woodworker ever! New subscriber here, and thank you for sharing your work with us. I appreciate your attention to detail, your organizational abilities, and the quality of your workmanship. Mike
Thank you Michael for watching and commenting 🙂
Ron
This was a GREAT video. You are older & purely a perfectionist at heart. I can tell. There aren't many of us left. Your shop was AMAZING. I was taking some notes to improve on my shop layout.
Thank you for sharing this FANTASTIC project. It turned out very functional & useful. Your commentary was spot-on. Just enough info, yet some comedic tales as we went along. You even ID'd you mistakes & then.....how to fix them. Usually the producers cover all that up with out-takes, retakes, etc. Well, time to get off here & go smell some of that wonderful wood. Take care my northern friend.
Very nicely done video, Ron. When I began viewing the first in the series, I was thinking your shop was way too clean to be used very much, but after seeing your attention to dust control at every step of the build, it's obvious why! You've given me several ideas for improvement in my little space! Thanks for sharing your project and time with us.
One of the best shop air cleaners I've seen. I'll definitely borrow some of your ideas when I build one for my shop
🙂
Great Build! I have one of those blowers I am going to have to make a cabinet for it!
I just completed my build of this air cleaner box, wow , I didn't know!, what a large amount of fine dust I collected. This video has really opened my eyes as to inhaling fine dust . Thanks for the video.
+Suzzy Larry The trick is to remember to turn it on "before" you start creating dust in the air :)
I love how deliberate you are and keep everything clean and almost dust free. I love the green too... Being color blind I can see it!!! Thanks for your inspiration Ron!!!
Watched all three videos. I came here for the air cleaner build, I stayed for the awesome shop and humor. A different color indeed lol.
I am building my own wood shop, Hope it is as nice as your one day. Thanks Ron. liked and subbed.
Thanks Ray :)
When you turned it on high and the enclosure moved backwards, I had to chuckle. That was awesome.
Surprised me too. Thanks for commenting Tom :)
please take this as its intended, a genuine compliment. I enjoyed watching this so very much and when I closed my eyes and just listened to your knowledgeable, humorous narrative, I coudnt help but to think I was in the "cellar" with my dear Grandfather. You're every move seems choreographed with little wasted effort. I love that everything is green and uniform.
side note. when you were installing the patches on the sides from the miscut it made me remember something that my grandfather taught me that I don't see a lot of people doing. we called it "gluewood" we would basically take fine, clean sawdust and mix with wood glue to make a puddy to fill in the gaps like a caulk but when it's dried and sanded it's almost invisible. I'm sure that's something you know about but it's fun reminiscing about my Grandfather. he was such a hero to me.
Hi Billy, thanks for that complement and tip on the"glue wood" :)
Excellent. I have asthma an I am upgrading my shop filtration units. Thank you for the inspiration. You have a clean and safe shop.
Well, it was clean back in 2014 when I made that thing. Thanks for commenting. 👍
Watched all three parts. Great! Love your humour during the construction process. Looks a great piece of kit.
Thank you :)
Thank you for this lovely video. So refreshing to watch a video when the content creator takes its time to really show all steps in the build. As someone else mention. You inspired me to build something similar for my new shop. Definitely a followers from now on. Keep the videos coming.
Hi Peter,
Thank you for watching and commenting. Although my woodworking projects seem to be slowing down, I still consider my air cleaner to be an essential in my shop. Enjoy "your" air cleaner project. 👍
Thanks Ron very helpful. You gave me some great ideas for mine.
Glad to help Mike, and thanks for watching and commenting. 👍
Great video series! I can tell you take great care for a very organized shop, especially with air quality and all that sawdust. Plus you built this neat unit yourself and saved big bucks in the process!
Thanks for watching and commenting :)
Very practical build, great presentation. I'm very impressed with your shop. Real organized and WELL equipped! Thanks
Glad you like it!
That was fun to watch. First carpeted shop I have seen. Very posh.
I hate that carpet, but it's glued down. Too much work to remove.
+Ron Calverley Do you still use this air cleaner? Nice job by the way. :)
+Gandalf White
Yes I use it quite regularly. btw. the carpet was removed yesterday.
+Woodfellow
btw. the carpet was removed yesterday.
James McCurle
Sorry Ron. I didn't see that there was a part three. I really enjoy projects like this that are "warts and all". There are so many on TH-cam that are clinical in their accuracy. It's nice to see the odd mistake! Cheers from "Down Under".
Great project! Loved your narration and how you laughed about and pointed out your mistakes. You had me laughing when you pointed out how you paint everything green and that well this time how about a different color and then the scene changes and your first brush stroke reveals green paint... I nearly spit out my drink!
Hello from Santa Fe, NM. Love your shop. What a great space to spend time. I think I can learn a lot from you and am looking forward to watching more of your videos. I appreciate that you can make a mistake and not edit from your video. Thanks for all the effort you have taken to post these videos. Dave
Hi Dave,
Thank you for your positive comment :)
I agree! Good job on the video sir! The time and effort you've put into everything is impressive. If I only had the room I'd build the same type of air filtration system. Maybe something smaller to fit on the ceiling.
Glad you enjoyed it Greg! 👍
I enjoyed your three videos about making your air filter very much. Very high skill level. I learned a lot. Many thanks
Meticulous Perfection! Love the project and will be making a similar version for my dusty shop. I too am envious of your shop!! Jeff
Thank you for you comment Jeff :)
Thanks for sharing Ron.
The air cleaner is on my list as I put my shop together.
:)
Ron, sir, you are a,,,,,,,craftsman!! You like your clamps, don't you?? I wish you built cars!!! Nice job, sir!!
Thanks 👍
Thanks for taking the time out to do these videos Ron!
Thank you for watching and commenting John :)
Ron I love your videos. Your so much fun to watch and very calming. your right about never enough room in a work shop. Were always making new tool and projects like this and the shop just gets smaller. love the carpet. must have quite the dust collection. Im might have to up my game:)
Carpet is gone now --- thankfully, lol :)
I am looking at building one of these soon.
👍
Ron,
About to start building a "Calverley inspired" version of the air cleaner.
I found a nice used furnace motor (3 speed)...much like yours...for $40 from a local junk dealer. Really good shape. Took it home...cleaned it and re-assembled. Runs really quiet and BLASTS out the air.
Also...found that HomeDepot carries a VERY NICE 24 hour to 1 minute LED Digital Countdown Timer that I'm testing. It's called a "Backlit LC Indoor Countdown Timer"...you can search for that at HD. That thing will provide even more flexibility (to the minute...up to 24 hours) that those ceiling based EXPENSIVE units.
Allows you to run the filter UNATTENDED and then turns off. Slick.
(I have no economic interest in referring you/others to this timer).
Then I discovered a ROTARY SWITCH (OFF-ON-ON-ON) that I'm using to control all 3 speeds. You have to get one with enough AMPS to run the rating of the motor.
My first try...led to my SECOND try...and a 16A version. Need I say more?
I guess you can tell...I generally don't have a clue about electronics...BUT am learning something new every day.
Thanks for your inspiration.
Created a model in Sketchup and posted it to the Warehouse if you want to take a look.
"Air Filtration Cabinet"...Caverley inspired.
Robert
Romeo Whiskey I like your timer idea. I'm going to look into it. Thanks for the heads up on that :)
Maybe when I get a little older and kids move out I will also have a nice workshop but until then the garage will have to do. Nice unit.
Brilliant video.
Many thanks!
I realize this is a much older video, but since I am building basically the same setup with a perfectly good old AC system fan, I am going to use a four position rotary switch. It has the capability for the current needed and since it is a selectable rotary switch, only one panel needed for operation. And I am building mine in a small close to the floor design. That way when I am working under a vehicle for any reason (oil change and such) I can have a good flow of air coming under the vehicle...
Hi Gary,
I like your rotary switch idea. I should have done something like that too, but I've got a bad habit of trying to make use of what I've got an hand, instead of going to an electrical supply shop and getting the proper switch. Thanks for commenting. 👍
@@roncalverley Actually I bought the rotary switch online and it was very reasonable. Actually it cost less then three typical house wall switches. But what works is all that matters...
Thanks again Ron! You do fantastic work and I really enjoy/learn from you!
I just watched your segment on your shop filter and truly enjoyed it and your commentary. I just wish that you had spent a little more time on exactly how you wired your switches up. I have been searching the web for some time now, on exactly how to go about wiring my furnace fan up just like yours. You will not believe this but I have even gone to some electric stores and shops and no one can seem to tell me how to do it. If you would please show me how you did this, I would like to finish my shop filter setup soon.
Thank you in advance for your time and knowledge. And again I have enjoyed your videos.
Tim
Take a look at these diagrams. Perhaps you will find one that is similar to what you have there. Good luck :) www.google.ca/search?q=5+speed+furnace+motor+wiring+diagram&rlz=1C1GGGE___CA640CA640&espv=2&biw=1920&bih=974&tbm=isch&tbo=u&source=univ&sa=X&ved=0ahUKEwim2vLssOPRAhUT24MKHR8HA2YQsAQIIA
webstorehouse.com/happywoodworking/MotorWiring.html
scroll down to THREE SPEED MOTOR SWITCH
Interesting design, definitely worth a like and fallow 👍🏻👍🏻👍🏻
Thanks for watching and commenting :)
I gotta say, I’ve definitely got “shop envy”!
Thank you for watching and commenting Rickey. I wish I'd had this shop 50 years ago, lol :)
awsom keep up the good work ..im going to copy this ...outstanding video keep em coming...love the humor too
Attention to detail!👍🏻👏🏼👊🏻
🙂👍
Great series! Love the dry wit. :)
great job, but I don't want that beast taking up my valuable floor space... I need one above head out of my way. Thanks for the video
+Dennis Adams
It is very large, that's for sure. That is one reason why I put castors on it --- get it out of the way. You would need at least a 9 foot ceiling for this design. Thanks for viewing :)
Ron ,Thank you the great videos. I think I will be making one of these as I have two furnace blowers and now I have a use for one. Although one thing that bothered me was that you showed, when using the table saw, you have your fingers way to close to the blade. Way too close for me anyway.
Good build sir!
Thanks :)
You should do another short video going over its design and performance
Nope! Too old and too slow now. 😁
Im sure someone has mentioned this, but only one switch should be on at a time. Power can only go to one winding at a time, or the windings will burn out
Nope! You are the first. Thanks!
@@roncalverley 25 yr hvac tech here, and we call that "double tapping". Ive seen some motors run fine while double tapped, and others fry in minutes. Very nice build btw
I guess I'm one of those lucky ones where "some motors run fine while double tapped" Thanks again for caring Dan. 👍
😀I need to make me one of these. Thanks for the videos!
And thank you for watching :)
Great project, awesome shop!
Thank you Mark :)
To me vidios like this cant get to long. one can learn a lot of valuable ideas. I would just like to know how you wired it up on 3 speeds.
Hi Jake,
It's been so long ago now that I made that air cleaner that I can't recall how I wired it up. I do recall getting info from the internet on that specific blower. I'd hate to be giving you the wrong info for a different blower motor. Thanks for watching and commenting. 👍
very nicely done sir.
Was wanting to build one of these units. Though I couldn't decided if I wanted a ceiling mount or small floor level one. Your design looks like the best of both worlds. How has it been working for you the last 6 months???
Jake B Works great :)
Nice project.
Really enjoyed this video Ron,got some great ideas from it & one day I will make one the same,providing I ever catch up on the backlog of jobs ahead.You are very professional & .good to watch. Thank you for sharing,Jamesjj7777
Thank you for watching and commenting James :)
Have such a fan. Will build something like your box. How effective is it near the scroll Saw? Suppose you wanted to connect a hose to a circular saw, what modifications would you do ignoring filtration modification? Oh, I found a wiring diagram...why did you need multiple 3-way switches?
Hi Ed,
I have used this next to my scroll saw. It is very effective. As for why do I have three switches --- it's because that's all I had on hand. I did not have a proper switch. Thanks for watching and commenting. 👍
great info, Ron. thanks
You should use push sticks! Lots of folk running around with missing fingers doing what you are doing.
Thank you for that tip Tyler. 👍
I like your videos, you seem like a nice guy and you didn't junk them up with a bunch of lousy music.
+EnergeticWaves
Thank you for your positive comment :)
love wood work, well done
Thank you for watching :)
dust seems to floats up first because of the heat in the air. But nice build
Thanks Eric. And you are right --- it is top heavy. 😁
Thx for sharing
My pleasure
They should charge extra for the knot, not every stick of woods going to have a knot in it, so they might charge extra for it, consider yourself lucky you got it at normal price no extra charge! You might incorporate it into a project for them like a business card holder!
Not just anyone knows they sell that stuff, it would be good advertisement for them!
Thanks for your comment :)
Very enjoyable
Thanks for watching and commenting Tom 👍
great job
Can you expound on the 3 way switch wiring. Great Video.
Sorry! Too long ago now to remember, haha!
I'm having my HVAC replaced tomorrow and want to build one of these for my garage shop. My electrical knowledge is limited... can you post (or point me to) a wiring diagram?
It was a do-it-yourself project and I don't want to be accidentally giving out wrong information. But thanks for watching and commenting Dale. 👍
Hi Ron,
I noticed that you have a cowl of sorts on the air intake to the motor and fan. Could you share your source for this item? Also, I enjoyed your three part series on the filter and it's nice to see a woodworker admit their mistakes. We all have them don't we? I have to agree with "Woodfellow," and the carpeted shop. I'm sure it keep the shop a lot quieter but you must go through a lot of vacuums.
Hi David, I'm not quite sure what you mean "a cowl". This is how the unit comes out of someones "newer" old furnace. Look for this newer type of blower that uses a low RPM multi-speed motor, rather than the older belt driven type. As for the carpet ... I hate it! Your right, it's hard to clean up. See my video on this th-cam.com/video/m6UqPD9YMsY/w-d-xo.html
Is it safe to have the electrical connections in a wooden box ? I thought most electrical codes require the use of approved boxes like plastic or metal. Love the overall design. Thx
When you make yours, I suggest that you make use of approved boxes like plastic or metal. Thanks for watching and commenting 🙂
Thank you, nice work
The last 10 seconds was definitely Canadian.
Hahaha --- it was all Canadian Ross. 😁
Thanks for sharing. It was fun to watch! I wonder if you should have used some spring or lock washers to hold the motor down? I think maybe the vibration loosen those bolts after a long time? Or just put a dab of silicon glue? Anyway I like that green myself lol but I am not really irish ;-) ... Thanks again.
oh btw, I got one of these blowers from when I was doing AC work but I cant deal with wood or build anything. I measure 1 thing 3 times and I get 3 different readings! I never know how you do all this?
Once I was installing 1 of those sliding aluminum/glass shower doors , I measured the distance between 2 walls where the top rail went, I had to count in the body of the tape-measure, but when I cut I forgot and so the top rail was like 2 and 1/2 inch too short! That's me lol :D
Thanks for watching! Good tip re: the dab of silicone because if the wood dries out and shrinks, things will get loose :)
The use of the three way switches has us wondering how they are wired......Hmmm, most interesting
.... so long ago now. I'm wondering too, lol.
Hi speed, med speed, and low speed. It's a blower from a furnace (ac unit). Each wire goes to a different winding.
Thanks for the videos. I wonder how it is working. Are you pleased with it?. I need one badly. My basement still has a lot of dust .
+Dennis Adams
Hi again Dennis. I just noticed now that you had commented earlier. I was bad at not replying then, sorry. YES, I'm very happy with it :)
Great job Ron. Always a pleasure to watch your videos; very entertaining. Your color choice really surprised me. I had no idea you liked green. The question is, did you choose General for the color?
"choose General for the color" Haha 😁
nice job
More stable with the blower on the bottom
Yes, but then it would be blowing the dust from the floor. 😁
Ron,
Any chance you can share HOW you wired the 3 switches to the blower motor?
Don't think I understand how the 3 switches (together) somehow make the blower motor 'variable'.
Sparky stuff really isn't my long suit.
Now...got to call the local furnace dealer and see if he's got any OLD blower motors in good condition.
RW
Romeo Whiskey I can't remember. Sorry!
Hey Romeo, I can prob help. How many speeds does your motor have
Nice Work!!!
Thanks Dustin :)
hey no problem how has that been working out for you?
It works really well.
keep up the cool videos you crack me up on some of your comments lol!!
Dustin Marklow
I am wondering why did you mounted the fan at the top? Would it not be better to have it bottom heavy? I like the idea to use more filters but why not have the box shorter and have filters on 3 sides and let the blower blow air out on the 4th side?
Yes, it is a bit on the tippy side but I had wanted the clean air to exit closer to the ceiling rather than the dusty floor. The reason that I've got the intake only on one side is because at that time I was doing a fare amount with my scroll-saw close up beside the filters, and was hoping that the dust produced would be drawn in ... and it was. Thanks for noticing :)
+Ron Calverley the explanation makes sense. Thank you.
Nice project Ron. It all looks great. Thank you for posting it. Perhaps you've shown it here, however I'm not clear on how the paper filters are held in place. Is it just a friction fit, or something mechanical?
I went really low-tech here. This is all that's keeping them in LOL sweetclipart.com/multisite/sweetclipart/files/thumbtacks_six_colors.png
+Ron Calverley That works for me Ron. Thanks for the tip.
That's a clean workshop :D
Yes! It's embarrassing lol. It was our our basement rec-room. The carpet is glued down to the cement floor so it now can't easily be removed. Sometimes it makes me feel like a sissy lol.
@@roncalverley ha, ha
Impressive filter. Nice work. Do you ever use it on the 'max' setting?
Great build and amazing shop! Just one thing how did you wire up those 3 switches and be able to Turn on the next speed without burning up the motor from having two speeds on? Thanks so much I have one of those squirrel cages it's a 1hp 4 speed. I'm building a box on casters for it now am curious how to wire the switches being able to use the 4 different speeds. You used one 3 way switch and the other two were just 1 way?Just curious, thanks so much and keep up that great work!!
Hi Jared,
Re: The switches --- can't recall, was over 4 years ago now. However, thanks for watching :)
Ron. I have commented on several of your videos. Really like how in depth you go into them and your responses to my questions. On the workshop filter, your build is quite different from all the others I have watched on TH-cam. If you don't mind I have a few questions. After using your air cleaner now would you make any changes? Most units I have seen built hang then from the ceiling... Yours is on rollers on the floor? Is that so you can move it to the area you are working in and catch the concentration of dust? Did you build it that tall to move the air up high or would it work as well not being as tall? Sorry for all the questions but I highly value your advise. Thanks, Jim
Hi Jim. Thanks for your interest. Answers: It's on wheels, as is almost everything in my shop, so that it may be easily moved close to a machine that produces dust and does not have a good attachment for dust collection, like my scroll-saw. It's tall because I wanted to have all the filters on one side in order to have all the air intake to be from one direction. As for changes, I might have put in 2 or maybe 3 furnace fans. I can get them free, so why not:)
Very nice video, I did compelted all parts unusually.
how you wiring the blower? does it mean one common wire and three coils of same function, the speed depends on how many coils you truned on? I got a similar blower of four wires but can't find the wiring diagram on Internet. Thanks for help.
The safest thing for you to do is to take your blower to a furnace installer and get them to show you how to wire it up. That way there will be less of a chance that you will accidentally burn out you motor. Good luck my friend :)
Did I miss it or can you provide source of the motor/blower and type?
This was not meant to be a tutorial. Thanks for watching and commenting however. 👍
I’ve cut it twice but it’s still too short!!
Haha, gotta remember that one. 😁
So now it's almost 4 years later -- what would you do different? Also - how many CFM's did that motor have?
Hi Bruce,
Now 4 years later I likely wouldn't bother to build it at all. I'm sort of winding down. However, I really glad I've got it --- actually used it again today :)
I'm no electrition but I swear on the back of a light switch there's a grounding screw.
That was over 4 years ago --- still going good :)
Hey there Ron,
I gotta tell ya, you have some great videos. I watched the three videos on the air cleaner and I think I just might incorporate some of your ideas. My shop is 30 x 50 and I think it is way small but it manages to get so dusty in there. I badly need to purchase a vac system but money is always tight so I think I'll start with the air cleaner. Aside from the switches, I think I have everything for it. I have only one fan but what do you think about two of these at opposite corners hanging from the ceiling to circulate the air more. I think my motor is a 4 speed and it is a pretty good size but I'm not sure if just one can do this shop. I deal a lot with old barn wood and it is messy without cutting into it. Any input from you or anyone would be greatly accepted. Thanks in advance.
30 X 50 --- nice! My shop is in the basement of a small house. I've found that the trick is to keep the dust suspended in the air until it eventually passes through the filters. Another trick is to remember to turn it on lol. It may be a bit windy all around the shop (and noisy) but it works :)
With all the tools you have, what kind of a dust collection system are you using and do you have everything connected at once? I am looking to buy a Unisaw with a Unifence on it. Once I do that, I'll need to purchase a system directly. Anyway, that's the plan.
I use a 3 hp General dust collected with the canister filters. I wouldn't go smaller than 3 hp in a nice big shop like yours. You would think that by now I'd have all the machines connected to one main duct, but I don't --- not yet anyway. Because my shop is so cramped I have to wheel (almost all my stuffs on wheels) what I want to use into the center of the main room and connect a 4 in. hose. In the case of the drum sander it's two 4 in. hoses. What a nuisance. That Unisaw/Unifence will be one sweet machine.
+Ron Calverley Took your advice and came home with a 3 hp unit last night. It is a Grizzly brand unit and I bought it used for a sweet price considering it still looks pretty new. My plan is to mount it to the wall and set it up as a 2 stage type system. I paid $250.00 for it and it came with several pieces of pipe as well as a remote start switch. Truly a blessing I wasn't expecting. Although the pipe was free, it was mostly the galvanized stove pipe not the stronger stuff which I about fell over on the pricing of. The unit came with a metal 7" to three 4" duct adapter but I think I'll go with a 7" to 6" reducer just prior to my thien collector and then maybe do PVC out from there with blast gates as needed. Any more thoughts O'le Great Grandmaster of great wisdom and knowledge? Oh and another thing, if my job allows me time, I might stop in to look at a 10" SawStop 3HP 52 inch sweet little thing. I about lost a thumb making drawer fronts late one night. If I would have had this saw, I doubt I would have needed a band-aid. Thanks again Ron!
PS My name isn't Coomanboo, it is Ross. LOL
Hi Ron, What type of electrical switches did you use. Are they all single, or are there other switch combinations (e.g. two-way etc.). Thanks again.
David Chisholm
Sarnia, ON
I honestly can't recall. I think that they were all 2 way.
I think you spend too much work and space for that. 1 20 x 20 '' filter is good enough. The out air should blow up so dirt will push down and get into the filter more. and the filter is on the other side. I hope it make cense to you
I've been using it for years now. Works really well as it is. Not saying that there is no room for improvement. Thanks for commenting. 👍
Can you do a test with much airborne dust ? (Like sanding with an angle grinder)
Because grinder dust is loaded with sparks that may ignite the sawdust accumulated on the air-cleaners filters, that may not be a good idea. Don't want to be calling the fire department lol. It does work really well on airborne dust however.
+Ron Calverley No no, I mean sanding wood with an angle grinder (with an attachment like this for example: www.weem-abrasives.com/photo/pl1807072-angle_grinder_flap_disc_type_p27_p120_grit_zirconia_alumina_sanding_disc.jpg ) , you might as well just sand. I'd like to see how it performs with lots of airborne dust
Now that is something new to me. I've never used a "Flap Disc". I can see where that would produce a lot of sawdust in a hurry. Perhaps someday I'll try them. Thanks for that link :)
your fingers...to close on the back of the cut, if ever a kick back( as I did) you will catch a finger or two ( as I did) nice job !
Yes! I have noticed that when I'm videoing a project, I tend to do more stupid things than I normally do. I'll talk about safety, but I don't always practice it. Shame on me! Sometime when I'm editing my video, I say say to myself in disbelief "I did that!!!" I think it may be because my concentration is half on my work, and the other half on my camera. I was 15 when I got my first power tool. I'm almost 70 now, and I look at my hands and am surprised that all my fingers are still there lol. Well, maybe I shouldn't laugh. Perhaps I've got a "Guardian Angel" or something. Anyway, thanks for noticing the safety issue, and thanks for the compliment on the project :)
My shop's blue!!
Blue is good too Bob, lol. Thanks for watching and commenting :)
Why did not put a filter on the window Type air conditioner he will Make same work
+علي المرشدي
That is a good idea. Simple, easy and likely effective :)
With the 3 filters, how much amperage does the motor pull?
Yes, 3 filters, but there is still only 1 motor. I'm guessing about 900 watts max.
super smart men
Hurray!!!!!
Ron, is your green paint a close match to the General Green ? If so were did you get it? I have a 15" band saw which needs refurbishing.
I removed a part, took it to a paint store where they matched it by using their color analyzing Spectrometer. It's fairly close.
Thanks, I may order a can of green from General and then get a color match to that (no fading to worrying about)
Re: "order a can of green from General" Never even thought of that. Hope they sell it to you :)
Ron Calverley it's on their website www.general.ca/accessories/acc_universal/a_GP-002.html
That's really good to know! Thanks for that info James :)