How to Remove Fence Lines: PHOTOSHOP TUTORIAL #49

ฝัง
- เผยแพร่เมื่อ 11 มิ.ย. 2024
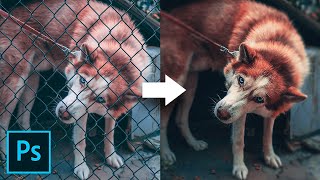
- In this video (#49) I show you how to remove those distracting fence lines that you get on your pictures when photographing animals in their enclosures behind fencing at wildlife parks and zoos.
Download and Practice with the Lion picture used in this tutorial:
adobe.ly/1pgew4O
Each week I also produce a Photography, Photoshop and Lightroom Video Show; a weekly video that goes 'Live' each and every Wednesday where you can learn all manner of Photography, Photoshop and Lightroom Tips, Tricks and Techniques for Retouching, Compositing, Special Effects, Workflow and more. Come back each and every Wednesday for new episodes!
Visit my channel for more FREE videos:
/ glyndewis
Check out my Web Store for Full Length downloadable tutorials:
www.glyndewis.com/store
Subscribe to get notified about my latest videos:
th-cam.com/users/glyndewis...
This weekly Show is also available on iTunes as a Video Podcast
itunes.apple.com/gb/podcast/g...
Thanks for stopping by.
Glyn


![[Live] : ONE 167 วันนี้!! "ตะวันฉาย vs โจ"](http://i.ytimg.com/vi/D9_dvfIa6Ao/mqdefault.jpg)


*PHOTOSHOP TUTORIAL: How to Remove Fence Lines (#49)*
Ok so here's a video I recorded showing you how to use Photoshop to remove those blurry fence lines you get in your pictures when you're photographing animals in their enclosures as wildlife parks, zoos etc...
Hope you 'Like' it and as always make sure you click on the SUBSCRIBE button and please feel free to share with others...hint, hint :)
ps> I've also included a link so that you can download the same picture that I use in this tutorial for you to practice on.
Thanks for looking in,
Glyn
How to Remove Fence Lines: PHOTOSHOP TUTORIAL #49
Thanks
Thanks Glyn
SO MANY tips in one single video!
I am not a photograph expert, but I learning new things. Thank you.
Denise Sims Brilliant to hear :)
absolutely fantastic ... I've got a bucket load of pics from a couple of zoo trips that I've hung onto ... never dreaming I'd find such a great tutorial ... thank you so much!!
Clever technique, thanks for sharing!
What an informative video, and I found your delivery easy to follow. I now have a better understanding of using color range and will be adding that to my list. Great results. Thanks so much for the tutorial
Ingenious Glyn, thank you! In the past I would have prepared lightened, darkened and re-coloured layers; then reassembled these layers over areas I wished to correct. This is a far more efficient method. You are an excellent educator. I have just subscribed and sung your praise on FB.
A tremendous tutorial, I was glued to it from the first minute to the last. Well done.
Excellent...thanks David :)
Great technique, thank you for sharing!
Great tutorial Glyn (good to have you back :) ), an excellent lesson on how to analyse the problem you're trying to solve, in this case colour and sharpness.
Thanks Mark
A very clever combination of techniques which produce a great improvement to the photograph ... thanks Glyn. I thought the video was going to be about lens choice, distance to subject and depth of field to avoid the fence lines.
Thanks for looking in mate
pure genius Glyn!
Cheers Buddy :)
Most excellent! Thank you.
Brilliant !!
Really great technique!!!
OMG!! Thank you , Thank you!! I have been looking for a video on how to do this
Great tutorial Glyn!
Cheers
thanks for sharing
Gracias . Saludos .
Fantastic Glynn - sure I've got some stuff in my LR catalogue that just became useful :)
Cool :)
Greate...thank´s a lot.
Good technique. It should work well on smeary or stained windows, too.
So good!
Thanks
How do you not have a million subs?!? Excellent information shared here.
Hopefully will have in time :)
Thanks for looking in.
Thanks Glyn: don't worry about speaking fast, you can manage playback speed on TH-cam - .75 or .5 usually get the right speed.
In the event you actually have 'hard' lines - fence is in clear view - would it be best to select the fence wire and try content aware fill ??
Actually, it would be great if Adobe made a standard tool to deal with this, seeing as this issue occurs regularly. Somewhat of a sky-replacement command for fences !!
Thanks
The only thing i didnt get was the opening it in camera raw as an option.
Question you mention using Photoshop CC [I guess that's creative cloud?] I use Photoshop CS6 Extended what would I do in my software when you mention the difference of the software? What steps should I do?
again a really great tip.
thanks
Thanks for the very useful tut, Glyn. BUT, I'm unable to find the lion picture for practice. The link goes to Adobe's home page.
what is the fence is more sharper what do you do then great video
I know it's two years later, but the de-haze slider in lightroom is really good at this ...
Tom King where would I find the dehaze slider?
Zoos need to get more creative to allow visitors to get photos of the animals without cage wire.
I am going to our zoo next week, so I will be able to see the situaton for myself.