Range Rover P38 # 096 - FIP Installation and Timing

ฝัง
- เผยแพร่เมื่อ 28 ก.ค. 2019
- Finally it's out, the video about how reinstall a reconditioned or new fuel injection pump (FIP). I'll also show you how to time the pump up so that it's has the correct alignment / angle.
It's taken a while to complete the video because my timing gauge was in the crate I shipped over from the US in March. The crate took a bit longer than I'd hope which delayed everything.
In my previous videos I took out the leaking injection pump, resealed it and cleaned it up.
Video # 83 - FIP top gasket: • Range Rover P38 # 083 ...
VIdeo # 88 - Removing the FIP: • Range Rover P38 # 088 ...
Video # 89 - Resealing the FIP: • Range Rover P38 # 089 ...
Video # 90 - Going for a "new" factory reconditioned pump: • Range Rover P38 # 090 ...
I'm also referring to video # 72 to jump relay 12 for the in-tank fuel pump: • Range Rover P38 # 078 ...
We'll test the resealed pump for leaks, then install it back onto the engine. Before we time it up we'll crank the engine to make sure the pump is bled and providing fuel to the rear outlet valves on the pump.
This is where I ran into issues. I could not get any fuel out of the pump. I tried numerous things.
- I discovered the rear output valves were mounted incorrectly, so I had to remove the pump to fix those.
- Hot-wired the stop solenoid to verify it's working and attempt to bypass any issues with it.
- Rebuilt the pump once more after removing it yet again from the engine. To make sure absolutely everything was fine. In this second rebuild I completely stripped it down except from removing the axle shaft seal since I didn't have it. It wasn't leaking anyways.
- Bled and verified that the pump does get fuel and isn't leaking anywhere.
Either putting the output valves backwards in managed to damage them or the pump, or I've done something completely wrong somewhere. I could not get any fuel out of the pump. So I ordered a "new" reconditioned pump from Germany.
NOTE! Always test-turn the pump on the bench while it's out of the car to make sure it's not seizing up. It should turn with little force, only requiring a little bit more force to pass the 6 compression cycles per revolution. Use the LRT-12-118 shaft tool to turn the axle of the FIP.
Installing the new pump it only took a short while of cranking after bleeding the system to get fuel out the high pressure lines and to the injectors.
As a bonus we'll have a look at what happens if your needle lift sensor (on injector # 4) fails or is disconnected. It turns out the engine will run, the check engine light will come on, and you'll get code / error 142 (needle lift sensor).
You'll need a few tools:
LRT-12-108 Crank / flywheel locking pin
LRT-12-117 Injector pipe socket
LRT-12-118 FIP axle turning tool
LRT-12-119 FIP sprocket holding tool
6 and 7 mm sockets to loosen / fasten the coolant hoses (yours might use different hose clamps).
8 mm socket / spanner to loosen / fasten the windshield washer reservoir and power steering reservoir.
12 and 13mm sockets / spanners to loosen / fasten the FIP mounting nuts and manifold intake.
17 mm socket / spanner to loosen / fasten the fuel feed and return lines.
7/8" or 22 mm socket to turn the crankshaft.
5 mm allen key for the engine top cover.
A feeler gauge tool with extension to time up the pump. I used one similar to this one (Nielsen CT4077):
www.amazon.co.uk/DIESEL-INJEC...
Though I recommend at least 10cm (4") longer extension to make it easier to clear the oil filter canister.
And a few parts:
STC2279 Large o-ring between FIP and timing case on engine.
STC2015 O-ring for FIP fulcrum cap.
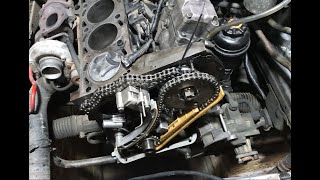
Installation of the pump is pretty much reverse of removal in vIdeo # 88 - Removing the FIP: • Range Rover P38 # 088 ...
I found it easiest to mount the pump back onto the engine with the high pressure lines already onto the pump.
The engine firing order is: 1-5-3-6-2-4. The back of the FIP is marked A through F. A being the first output to fire fuel and connected to injector # 1. Injector # 1 is towards the front of the vehicle. Connect B to injector 5, C to injector 3, D to injector 6, E to injector 2 and F to injector 4 to achieve the correct firing order.
Some torque values of use:
FIP mounting nuts: 22 Nm (16 lbf.ft)
FIP axle nut: 50 Nm (37 lbf.ft)
Injector pipes at pump and injectors: 22 Nm (16 lbf.ft)
FIP fuel feed line: 14 Nm (10 lbf.ft)
FIP return fuel line: 25 Nm (18 lbf.ft)
You can reach me at gamuso@gmail.com if you want to get in touch with me.
Follow me on Twitter: / 0ddj4rl3 or Instagram: / 0ddj4rl3
Please consider subscribing. And as always please comment below and I'll respond as best as I can.
Thanks for watching, and I hope you found this video interesting. - ยานยนต์และพาหนะ


![CAMPปลิ้น | EP.79[1/2] แก๊งไทบ้านพาบุกเมืองบั้งไฟโก้ ยโสธรรรร!!!](http://i.ytimg.com/vi/Ldr3_fvTEXk/mqdefault.jpg)


Great video, thank you sir
Special my friend
Brawo 👍💪💪
Hello Odd.
Nice to know your name at last. I've following your video's with great pleasure.
They are so helpful and informative, I'd love to have your full collection on the
P 38. But I don't know how to get it.
Thank you Odd for making these.
Sg. Gervais.
Yet another great video!! Well done. When I adjusted my fuel quantity value, I moved the top 2 sections of the pump forwards and backwards in relation to the very bottom section of the pump. You was adjusting sideways. I was using a faultmate to read the fuel quantity value. Ended up on about 5.
Hello Alan. Just to clarify, please note I was not trying to adjust the fuel quantity adjustment / sensor. I was setting the fuel pump timing. In other words when the fuel pump should inject fuel to the injectors relevant to TDC / piston position. For optimal running, power and cooling the fuel needs to be injected at the correct time. This part of the pump is fully mechanical and static. I was not not moving just the top portion of the pump, but moved the whole fuel pump. The quantity sensor inside the top of the pump, as I'm sure you are aware, adjust the amount of fuel depending on engine speed, load, and amount of gas pedal applied. These diesel engines are drive-by-wire. So think of the quantity adjuster as an electronic gas wire instead of a mechanical wire connection from the gas pedal to the fuel pump. The engine computer controls the position of the quantity adjuster (and amount of fuel to be injected). Using feedback from the quantity sensor position the computer can estimate injected fuel quantity. As you mention if you move just the top lid around you will mechanically alter the position of the quantity sensor. It's just so viewers don't confuse adjusting the quantity sensor with adjusting the pump timing :) Thanks for watching and taking time to write comments!
@@WorkOnP38 Ah, I see. I didn't remove the pump when I replaced some of my seals so didn't need to do the timing. I'm glad I didn't, because that looked quite difficult, although you make it look easy! Thank you for the detailed explanation. It's all clear now. Many thanks.
Hello. I have the same engine in my bmw, it is a lumpy idle on it and it is hard to start, its way harder to start warm than cold. Will the adjusting of the pump like you did help?
I need help my pump is leaking and I don't know if I can open it up myself. It's leaking from the back box where the injector pipe nozzles come off the pump so between that box and the actual pump itself if you understand what I'm trying to say
I'm so glad I found your videos. Following your blog on removal and replacing the pump. Next is to try and adjust the timing on the pump, although I'm thinking I may get the garage to do it.
I have one question, where I can find the manuals you are using please. I've tried to search for a Haynes manual for the p38 and via Google but seem to be hitting dead ends.
All the best Barry (UK)
Thanks for watching, Barry. The workshop manual can be found here: drive.google.com/open?id=1GxAowv9_u3UjfT0NCqb_GCb5wYeV2lja and the electrical manual here: drive.google.com/open?id=1DE1zkP5G42BWkh8QdGEIK4wlkSkLpqNC The FIP timing isn't too hard, but if you need to adjust the IQ (injected quantity) a professional Bosch shop might be a good idea.
Hi there,,,,do you have any electrical info,,diagram ? My F38 keeps blowing, ll abs system disconnected,,, what area thise fuse 38 supplies?? Msny thank yoi atorres 96' P38
I recently removed the top 2 x sections of the injector pump, to replace some seals that were causing a leak. Is it the pump timing that i need to reset like you have done in this video, as its really struggling to start now. Please help!
Hi Gavin. No, it's probably that you've not matched up the QA (quantity adjuster) excactly where it should go. Check out my latest video (# 102: th-cam.com/video/gWPCtQNq4x8/w-d-xo.html ) it will give you a few hints on how to proceed. Note it takes extreme small amounts of adjustment to get out of limits. Thanks for watching!
Hey, what's the thread size on the FIP timing hole? The gauge ebay link in the video description is outdated and unfortunately is not very useful, so I need this information to get a fitting extension.
Hi, I don't have the tool right here to check, but I believe it's the same as Nielsen CT4077 if that helps. The set looks really similar. I've updated to video description. Thanks for letting me know.
@@WorkOnP38 Alrighty, thank you very much for the information!
Would you be able to confirm if the hot start issue on the 2.5 can be improved by having the static timing checked / adjusted.
I read on a number of forums, it's caused by chain stretch.
I can confirm that it will improve if the chain has stretched. The workshop manual states two different timing settings (up to 20.000 km and if more than 20.000 km on the chain). Thanks for watching!
Work On P38 thanks for the information, the previous owner had fitted a new 68Ah battery last December, I alway doubted it had enough cranking power for a 6 cylinder engine, especially when cold.
I fitted a new battery a couple of days ago, 96Ah 750 cold cranking Amps it made more improvements than I was expecting, it's had a good run out today, tried starting it a number of times when hot, it would fire up on the button or within two seconds, the engine isn't what I would call high mileage at 116K.
I'm happy with that for now, will monitor it over winter.
@@chrisgreenwood271 I have installed 925 crank amp with 105 AH recently can get you supplier reference if you are interested.
@@poodumrover1 that would be handy, I struggled to find anything with that kind of capacity when I purchased mine.
ps: it is 110 amp / 20 hours . . btw you could be ok with your current battery I had been using a 725 with 95 AH over 4 years
If you put the fuel feed pipe on the return side of the pump and flick the ignition it back fills it saves turning your pump dry, soon as fuel squirts out of 6 injector return swap pipe back over on the fip and she should be full in a second and ready to 🏃♂️
Great tip. Thanks!
@@WorkOnP38 your very welcome it saved me a lot of time and hassle hooe it works for you too
im having the same problem with the diesel pump not giving diesel to the injectors! ive tried two different pumps from different donor cars and sent the original to be rebuild and resealed. None of the 3 pumps are working. can clearly hear the solenoid operating. but the pump itself is bone dry, starting to think there might be ECU / Key problems, do you have any tips?
I think it's misadjusted QA (quanity adjustment) that is the cause. But I haven't had time to verify it. Just need to adjut the top section very carefully to get it within spec.
Wish you were my neighbour.
I am a terrible neighbour :) But thanks for watching!