
ฝัง
- เผยแพร่เมื่อ 26 ก.ย. 2024
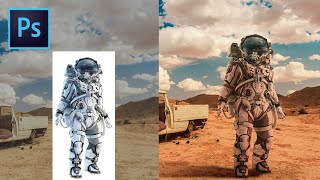
- This video will be explain the tutorial of making trend double exposure. This tutorial is combining a man image and two city images, make precision among all the images, and how to set adjustment the color of each images. So the image be look integrates. Let's try the tutorial guys.
Resources:
Man: unsplash.com/p...
First City: unsplash.com/p...
Second City: unsplash.com/p...
Music Provided by NoCopyrightSounds:
Kontinuum - Be Aware: • Kontinuum - Aware | Tr...
Kontinuum:
/ kontinuum
Tutorial by:
Eka Ahmad
Inspired from:
Yulia Sokolova's Tutorial


Yoo tnx dude, everything works. I LIKE IT
keep it up
tru man, tnx it really does work
thankyou mas eka, tutorial nya mudah untuk diikuti
dan caranya simple
Thank you for this!
The music is destroing my ears btw... :D
Its very good! Working! Thanks.
Just awesome, high quality, thank you for this great tutorial.
So I followed these instructions and it looks great so I definitely had to show respect and give you a like lol. Patience was NECESSARY! I wish this would have been a talk through tut because I had to continuously pause the video & read the sub title throughout the video. Anyways Thank-you for the video!
Thank you so so so so much for this video ❤️👍, it helped me a lot great job.👍🙂
Good tutorial. I realized it takes a lot of work to do these so I'm gonna chill on making more.
Good
Thanks bro 💞💞💞
the video is pretty awesome despite of being very fast. be little slow with your speed, if you are setting an illustration.
you can change it on setting
if it were any slower, it would be going backwards.
Here is the best photo editing tutorial that you can check out: HootPhoto. info
Ačiū! (Thank you!) From Lithuania!!!
Thanks! Was very helpful, well explained
you should become a trillionare!! thanks MY Guy for doing this I love !
keren bang, ditunggu tutor Illustratornya, lagi memperdalam Ai nih hehe, keren2 tutornya !
Thank you so much, i might use this idea for a client and add to it
THIS IS COOL
excellent video with every possible explaination. thanx my man.
I have returned to this video like 7 times now, since it was posted... Lol
Bro I subbed and hit the bell
Sweet artwork & tutorial, cheers mate
result is very cool. Thanks for the vid.
Very nice tutorial! Thank you!
GOOD IDEAS NEVER FALL
Mungkin masnya mau nunjukin teknik dasar Pen tools nya dulu ya? 🙏jadi nya pakai Pen tools nya terlihat dasar gitu. Pen tools dipilih yg sudah advananced user karena hasil seleksi jauh lebih rapi, tapi teknik pakainya jauh lebih efisien dengan bantuan Alt dan Ctrl. Aku sarankan sebaiknya sekalian jelasin juga soal teknik cepatnya biar sekalian maximal belajar Pen Tools nya..
Great Presentation.
thank you
nice job
I really appreciate this video, that was amazing
Thanks to the author of the video
tried it .. really awesome
mantep lah mas
Muy bueno..Muchas gracias!!!
that was an amazing tutorial, great stuff thanks a lot
upload like this cool stuff more
with more details so we can try it
thanks :)
and in this video details are pretty clear :)
good :)
Merci from France ;)
Thanks for the tutorial
bro you could use 'quick selection tool'
quick selection tool is very unprofessional. If you want to work as a designer or a visual artist, you should indeed work with pen tool.
Right I was also thinking this
Then I thought that bro whould be happy with this 😂👍🏻👍🏻
if i use lasso tool what happen?
quick selection tool "lazy designers"
This video is very unprofessional. Poor quality image is a good start.
1/3 of this video just for pentooling, but the pict is awsome
good crack
keren bro...thank you yah
Awesome!
Awesome video man
I think that it would be necessary you to learn to optimize your use of the Pen tool et the layers. But the result is nice.
great vid
Very great Tutorial, 10/10 the video is Perfect except the Gammar...
Hi well karma is a bitch,isn't she?😂😂😂
LMFAO!
Hi dud you got ROASTED
gammar lol
I like this video. I do two hours Hahaha. I can do it. I want to picture editing.
Have a picture I had the idea to try it again.Thanks
What is the version of the photoshop software being used above?
I am using a slightly different version of the above and sometime I can't do the same things as they do
Thanks so much!!!
Its awesome, dude!
thank you so much!!!! for sharing this :3
so raww🔥🔥
thanx man ..
Nice..
Possible give designed by Picture
nice tutorial :D
why pen? why not quick selection tool?
Kenneth R " P for professional "
Hey bro, every time I try to set the layer effect to "SCREEN" the city images don't show up as much as your one, it's really weak and too transparent and the model shows through more than the background which doesn't look like your final product at all.
ya sure this works
tnx for resources men
How did he drag it to the other tab
Please
WOOW
I am not getting the same result, I'm positive the function for Pen tool hasn't changed in CC 2017, but I have that, and when I started outlining my model, a new layer call "Shape" for the pen outline is appears, and then when I'm done outlining, everything is okay and I "Make Selection" then go onto the "Rectangle" and "shape layer to via copy" except it creates a new layer of the same outline, not the cropped of the model. Please help.
top left there will be options you need to click and change it to path you will see this as a drop down menu on the bar just under edit in the top corner
Is there a way to do this in other apps like gimp, krita or medibang???
thanks alot
Thak you!
bellicimo :)
+1 subscriber)
6:24 how is he selecting the man layer? To hold ctrl and click on the layer doesn't work on mac, or at least not for me. Thanks for helping.
Marshall Mic The combination for Mac is cmnd+click on the layer miniature :)
to me its working with Alt Gr
nothing
It is a little bit confusing but i made it work.
1) You select the city layer
2) hold ctrl
3)select the man layer on your right ( he moves his mouse around for nothing in the video and that confused the most of us. watch when the mouse goes on the right)
you have to Ctrl (CMD) + Left Click on the layers thumbnail to load the selection around the image.
time 7:22 (Select layer mask of the first city and add brush as on video) does not work. Means that the top of the building (Time 7:29) does not work. I have choose the right layer but as mentioned it doesn't work. Maybe you have an idea what I'm making wrong
Exactly! Did you find any solution? I'm having the same issue
On the "first city" layer, you have the vector mask, the one that is black with the white space in it. When you click on that, you can use your brush just as mentioned :D
Oh and your color must be set to white! Or else it wont work
excelente bro :D
why does my Man goes B&W when the selection is moved to the double exposure document..
Time 7:22 (Select layer mask of the first city and add brush as on video) does not work. Means that the top of the building (Time 7:29) does not work. I have choosen the right layer but as mentioned it doesn't work. Maybe you have an idea what I'm making wrong. Pls help
I have the same problem here.
Bikin tutorial bikin effect glitch dong pake after effect
What`s the name of the music?
at 6:24, i cant work that method,pls help me
@King Trapper music OFFICIAL
delete the unnedeed part.... so why you didnt do it first?
sweet
Can i make the selection with the quick selection tool?
leonardo bertagnolli I was thinking the same thing. It would be much faster.
I used the magic wand followed by Quick Mask mode to do it much faster.
Peux-tu m'aider a craquer mon logiciel photoshop
what you song?
Safe Bru !
how do you do this on mac, ctrl and what?
command
great steps , but can someone tell me what he means by "as on video"? i don't get it at these parts! how that works?
XeqtR, I believe he means to do the step as shown in the video. At 5:46 he says brush the sky white as in video so he means brush it like he is brushing it in the video.
How to answer photos in high quality ...
CTRL + T
Not Working on CS6!
MANU ☆ Gameplay & Reviews Well he is doing it on PS CS6 😂
like
what would you look up in google to get that type of picture of a man
What's the name of this man in the picture?Sorry I'm an Asian.
me bien a photoshop hhhh
THAT IS NOT HOW YOU USE THE PENTOOL!!!!
yes iam agree just press alt
Cah Indo Taa
Can you come help me?
ทำจนปวดตางงด้วย
No disrespect, but, you don't know how to use the pen tool.
It you did, you won't be selecting multiple points to get a line or curved selection.
Jeez!
👐
🤕
He provided a helpful video. You could say this is a better way. No one knows all or else you wouldn't have watched in the first place
well said, cool social
He got the job done didn't he? Kudos to him. Sure there are different ways of doing it.