If I might add to my previous comment, as an “older man” I must tell you ,I find it so pleasing to see old machines restored, especially with the modern attitude of “throw it away “ . Those old machines were built by craftsmen with a lot of pride. I doubt if (with a few exceptions) any machine built today would still be around in 65 or 70 years from now👍👍😊
Thanks! I'm on the younger end of the age spectrum and I've quickly learned after a few years of restoring things that you're absolutely right in that things used to be built to last instead of built to be inexpensive.
That's awesome! If you check out the video description on this video I linked a site where you can look up serial number of your drill press to find our exactly what year and which plant it was manufactured at!
My uncle was a mechanical engineer for Delta during that time period and he sent my dad a drill press and table saw as a house warming present when dad built our house out on the farm. My drill press that I inherited is very similar. Some of the castings are different and it is labeled just as Delta Milwaukee. I think 1953 would be about the time frame. I did just what you did as far as restoration several years back. Nice job on yours.
What a great story, Larry! If you're ever curious, Google 'vintage machinery Delta project' - people have put together a fantastic database of Delta serial numbers and the production year and location they were built!
What a great video! I just picked up a 1953, same exact one, though mine has the original motor. Paid $40, what a deal! Mine is super gunky like yours was, I feel so much better having your video for a reference, I really appreciate it!
You're welcome, Brenden! I made this video for that exact reason because when I restored mine there was only one other video out there that was halfway decent and I still had to fumble through most of it figuring it all out! Enjoy your drill press, it's fantastic for a home setup. Jealous you have the original motor too!
That was a very nice restoration, so much fine detail, and a lot of hard work, I’m actually in the process of restoring my great grandpa’s, Rockwell, bandsaw.
When I saw your video header I immediately started watching, hoping to see some tidbit of info that I may have missed when I restored My old Delta DP-220 drill press. I went deep, but not quite to the extent that you have here. Anyway, I was watching along, completely enjoying the show when up pops your banner saying that the link to the manual was in the description... OMG I almost peed myself with excitement! I hadn't even considered the possibility that such a thing still existed! You completely made my day! Thanks for the great video. The drill press looks awesome! Now if I could only get that very slight wobble out of mine... 🤨
I so glad I could help out! As soon as I found that manual I knew I had to pass along the favor to anyone else watching because I assumed there would be a good number of people looking to restore their own by watching this video. The whole purpose of my channel is to help others restore their own things just like this! As far as the wobble there's a lot of possibilities. It could be your motor that just vibrates a lot, a loose belt that also causes a lot of vibrating, uneven wear on the bearing sleeves in the column, or even just the table setup itself isn't sturdy enough. So many possibilities!
I acquired this same drill press and did exactly what you did in this video Unfortunately mine came without a motor so I had to install a more modern one. I never got up the nerve to undo the spring, but now that I have seen it done, I will attempt it. Thanks for this!
Your table was in great shape. When they are rough, I have not been above having a shop spin these in a 4-jaw and take a pass or two (my lathe is too small). Excellent restore, thanks for the video & (vicarious) enjoyment.
Very cool! I particularly appreciated the fact you kept the original power switch, polished by your grandfather's hand. I have a Delta of similar vintage and it's amazing that they built the homeowner's version to the same standard as the commercial ones.
I have to thank my viewers for that one - after watching part 1 they rightly suggested I keep it! I don't know why I ever considered not to! And it really is amazing that his 'home' drill press was (and is even more so today) on par with some commercial ones.
beautiful restoration! i have a similar version of this drill but about 6ft tall and am hoping to one day do a similar restoration of it. This video will really come in handy!
That was fun to watch! Good catch on the quill lock handle being on the wrong side, surprised there was not a head lock handle instead of a bolt and nut. There are likely two clamp cylinders in the table clamp assembly that can be swapped so the table lock is also on the left side. This would allow you to lift the table with your right hand and lock it with your left. Unless you're left-handed, then the current set up will work. (I'm a lefty so I swapped the table lock to the right side). The coil spring energy was released when you unwound it at 21:26. It can easily be removed from the housing for cleaning or replacement as there is only a bit of tension now coiled in the housing. Once you wind it back up on the headstock and impart potential energy back into it, then it deserves caution. You may have done this off camera, but the tops of the two pulleys need to be level to each other when mounting the motor. There are magnetic base flexible gooseneck very bright LED task lights for under 15 bucks that work great and you can mount it on the body of the press or in the cavity under the headstock This will get the cool light source very close to the work or tip of the drill bit or whatever tool is in the chuck. I also add a disk magnet to hold the chuck key.
This is all excellent advice for anyone else reading these comments as they restore their own drill presses! Brilliantly simple idea of putting a magnet on the chuck key - I'm 100% going to do that because I swear every time I set that thing down it falls into a black hole!
Nice restoration and video! It's incredible that this press, even as a homeowner version, is more solid and smooth than my modern 16" Jet DP. I love the old iron and I'm afraid we won't see the likes of its kind made again.
The result was amazing. You did a great job of restoring this drill press. Thanks for sharing your work. I'd like to suggest one thing if I may - if you wet sand the etching primer the end result, once painted, will be much smoother.
Yup, great tip Ben! On rough cast iron surfaces like this there's not much that can be done to really get it smooth without using a lot of filler primer, but still a great tip nonetheless! Thanks!
Great work my friend. I keep a drawer of assorted second string screwdrivers that I'll grind into a perfect fit for screw removals on restoration projects. I'll take a minute to get a perfect fit which makes removal much easier and the hardware doesn't mangled. Most often the same screws are used throughout the piece so the driver is worth the two minutes work.
Nice job! FWIW... WD-40 is a better de greaser for the first step than Acetone. I've yet to meet grease/oil "gunk" that WD-40 wouldn't cut in no time. If you live in a country where WD-40 isn't available, kerosene works just as well. Acetone is fine for a final pre-reassembly cleanup (it evaporates too fast IMO), though to remove the WD-40 residue, you can also use Isopropyl alcohol. Not a criticism, but a suggestion... Prior to re-assembling parts where the screw head slots are all buggered up. Hit them with a file before wire brushing them. They'll look loads better in the end. No need to replace every screw, just clean them up. Great work... Really enjoyed this video!
Good job... I found the exact model at a garage sale last month. Nothing moved on it . Lots of oil solvents and elbow grease working like a champ. Only part missing was the quill lock. Just used a 1/2 inch bolt. Just did a cleaning and back in service. New belt also😊
Thanks! The cream white did have a sort of a classic "warm" vintage vibe, so I totally get it. If I wasn't trying to go for authenticity here, I would've gone with a similar cream color I think!
Excellent restoration, but just so ya know, the spindle return spring should NEVER be greased! Just cleaned and oiled is all it takes. Grease attracts sawdust and dirt, making it stick.
You are 100% right! After about a week of using it I noticed the return was already a bit sluggish so I did exactly what you recommended and switched to oil instead of grease! I need to update the video description to make sure everyone else knows this too.
Yes I would like to see the dis-assy of the chuck. I have the Walker Turner version of this drill press and also have several chucks that came with some other tooling I bought.
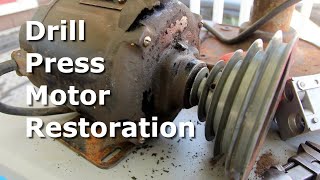
Hi , nice job on the motor so far👍 The only thing I would have done differently on the motor would be to clean the winding with a mild detergent, dry out in an oven at around 110 degC and I would then replace the leads at the coil ends and re- varnish the entire stator, I would also have taken a very light “skim” of the commutator and undercut & bevel the segments….. however , refurbishment of electric motors was my trade for many years👍😁
Excellent tips! This was my first electric motor restoration so I learned a lot! One other thing I should have done was correctly wire it to 3-phase to fully utilize what it was meant to do. The way I have it wired it just runs at full speed all the time.
One suggestion for the future . If using a "new" tag that takes that type of "screw" , bend the tag so that it fits the place it needs to go . That way the screws are only holding it there . The way you did this one the tag has preload to push the screw out over time with vibration .
Man, I finally changed the chuck on my drill press and in the process my shaft fell down... I was like, how in the world?! Went back to your video, check mine... Could not figured out how my shaft could fall off like that, the guy that had the tool before me was using it every single day... And when I remove the kind big cylinder to control the vertical movement of the shaft... Watch your video again, saw the earthquake... And man I didn't had any shaft collar to make any earthquake on my side!! So the shaft was like holding like this for years... Without any collar. And by looking at the press drill, that thing has not been disassembled for a thousand moon. And for the clock spring, mine almost ran away after one counter clock... I have experience with those as I repaired a lot of typewriter in the last, but still... I'm one shaft collar away to finally use my drill press...!!!! Thanks a lot for this detailed restoration!!!
So glad you were able to figure it out!!! I get comments that my videos are sometimes too long or too detailed, but I do that on purpose so that anyone else (like you!) can follow along and restore their own similar tools. Glad I could help!!
I always use Citristrip! It might not be THE most powerful stuff out there, but it's less toxic to both you and the environment and doesn't have terrible fumes.
Hola a todos....me parecio muy bueno el video....quedo muy bien, aunque sea solo para vos....desperdicias muchos productos en tus restauraciones: usas toallas de papel nuevas para hacer lo tuyo....podrias usar papel de periodico o cualquier otro papel de descarte..... Y cuando usas removedor de pintura, me parece que usas producto de mas....con menos se puede hacer.....eso te lo aseguro.... Saludos....adios.....
Thanks for watching! Paper towels are very, very inexpensive where I live and far more absorbant than newspaper. I could use washable shop towels too, but sometimes paper towels are just simply easier. And you're right, I'm sure I could use a bit less paint stripper. The instructions say to apply a thick layer and it's always worked for me, so I've just stuck to doing it that way.
It was the belt tension! Just after about a week after I wrapped up this video I adjusted the plate the motor is on to get more tension in the belt and everything calmed way down!
Nah . . . I am not buying your explaination . Your pulley and probably the motor shaft are both junk. Look at the video at 6:13 and you can see the pulley flop sideways on the shaft while the motor is on the bench under no belt tension. Beating that pulley off over the mushroomed shaft has certainly taken a toll on an aluminum pulley. Over-tensioning the belt may quiet it down, but it is going to continue wallowing out the pulley. There are cures for this, but they would probably exceed the value of this old drill press. I would largely consider this job a "Sherwin-Williams tune up". However, I am sure that you will get years of use from this venerable piece of machinery.
where can i get a on/ off switch for vintage Delta Milwaukee drill made in the 1950's, also called the DP-220 or some way for me to create a switch for myself. this unit has 2 black wires coming out of the motor, ? thanks, gary
Hi Gary! My first suggestion would be to confirm that your motor is still all in good working order. I assume that the two black wires are a + and - and they're just not color coded, but you should first probably use a multimeter to confirm you have a complete circuit. If you can verify it's a complete circuit, then I would go very simple and buy yourself a regular old light switch and power cord (like I have towards the end of the video) and wire up the motor on one side of the light switch with a wire in each screw and wire up the power cord to the other side of the light switch and test that it powers the motor on and off. If it works, then you have the choice of keeping the light switch and making a more permanent fixture for it somewhere on the drill press or start looking around eBay for a vintage original. Disclaimer on all of this: these are just suggestions; any repairs you attempt are at your own risk. Please follow all safety procedures and wear proper PPE when working with electricity. If you're not familiar with how to wire a light switch, I would suggest searching and watching a few TH-cam videos at least to start.
Right from the start of the video this drill press looks almost perfect. :) I do not know why you decided to restore it instead of couple tweaks like new power cord :)
Your power leads coming off motor is because it is a 3 speed motor One side will be slow. The other side will be medium and the two together will be high on motor speed. So that will give you 15 speeds that you can run the drill press at. So the way you have it wired it will always run its high speed. If you decide to make it work correctly, you will need a special 4 position switch, The motor was designed for the neutral and the hot to be cut off at the switch, so it will will have off, low, medium and high. And the neutrals will be paired to hot so you’ll need to test it or get the wiring schematics for the motor.
You're the first person that's both noticed this and was able to explain this to me! Thank you so, so much for pointing this out and taking the time to write that out - I'd love to unlock the full range of this motor!
Great job, although I know you wanted it as original as possible. I would have painted it that off white /cream color, grandpa painted it. Just my personal preference. Definitely looks good grandpa is smiling & proud
Thanks Doyle! I was definitely torn about the final color too, for sure. Really wish my grandpa could see it today, but I know he'd be so proud it's still around today.
This press has worked like a charm for my projects th-cam.com/users/postUgkxajoEbapTfqWaadnqb04h6U576yxXp-FE . I didn't even secure it to my table top, mainly due to the fact that I was using a 15 lbs drill vise. It's not flimsy at all as to what others have claimed it to be. Make sure the locking nuts and levers are secured and there won't be any issues with light pressure and patience. I was able to drill through aluminum, plastic, and steel (steel took a while) with no problems at all. Yeah it took a little longer than a regular drill press, but I don't have the space OR the money for one.The instruction manual was worthless, but luckily assembling the press was intuitive. However, the manual would be good for ordering replacement parts if needed. There is a nice breakdown of the parts that are included in the kit. Before ordering, make sure it is compatible with your unit, it is clearly stated what models the press is compatible with.This was an excellent purchase for $40!!
No marzel veins on this one, but it IS made with prefabulated amulite surmounted by a malleable logarithmic casing, though, so I still consider that a win.
The cone-shaped part is commonly called a step pulley. There are different ones with different numbers of 'steps' depending on your motor/drill press configuration. I'm not sure what the little cap piece is that holds it in place, though.
@@johnlabarbera4949 My chuck is a Jacobs 33, which looking at a Jacobs taper chart shows small end is 0.5604", big end is 0.6240", length 1.000". Hope that helps!
I see he already gave you the answer to your taper question. If you pause this video at 29:00, you can see the number 33 upside down. It reads "33 TAPER" just after the Model 64.
nice job, I just this week , 3/5/23 form my neighbor, a 50's homecraft ,Rockwell drill press in much better shape , in fact the only thing wrong is the chuck , is bad , so my question is , How remove the chuck from the quill,? Mine came with the mortise parts , was in a cabinet shop for 30 years and then my neighbor got it and had the next 40 years , the cabinet shop built my neighbor's house cabinets , 40 years ago , the drill press was only used for mortising , that's why the chuck run out is .010 to .012 with gauge pin in the chuck, out side of the chuck runs .001 to .005 .. Again , How to Remove the Chuck form quill ..??
At 19:57 I remove the chuck from the quill. It just needs a strong downward force to remove it, as it's just press fit on like most drill press chucks are. Is this what you're asking about?
@@CatalystRestorations yes , its on tight , just move the lock caller , at the top of the quill, wedge ball joint tool , tried small wedges on each side , and tried a brass punch , thanks , Clifford
Pretty good restoration! A little crude with the methods, but turns out ok. I have a similar Delta, floor model from 39'-40' Advice: don't remove things on shafts "unevenly", you can seriously damage things, unrecoverably. Use pullers, make your own as needed. That pulley could have been coaxed for enough clearance for a board with a slot for the shaft an then used clamps in reverse to push it off. OMG! Don't wire wheel shafts if you can ever help it - the shaft will never be as round as it was. Use the lightest sandpapering you can, you end up making the shaft to bearing clearance looser and the motor will run noiser & hotter, unless you are replacing the bearings. Lastly, the motor wires you cut off were fine as they were, just cut back an inch and re-strip. Don't solder, you aren't good at it & yours is a fire hazard, use some kind of compression fitting instead, there are lots of different ones to use.
Very pretty. You used a wall plate for your handybox. A handybox cover won't reach out and grab you. Commutators should not be cleaned with emery paper. Metallic components are in this material. A non conductive commutators stone is a better choice.
Every Tool that was shown on this Video was the cheapest available. Buying cheap tools is False Economy. You do great work so use great Tools. “Spindle” that’s a Step Pulley. Buy yourself a “Puller” as one of these days you are going to break an item you are trying remove. Just friendly advice.
Was watching your vid because I happen to have that same drill press that my dad bought new,, but you ran me off when you started testing the paint. Don't count on a subscription here. And just what were you going to do if it was lead paint? Call the EPA to send a HaxMat team out to save you? I'm 76 years old. From the time I was like 6 years old until they outlawed it in the late 70s I painted with lead paint, sanded it, stripped it and about anything else you can name with regard to it.. We also used white lead on the dead center of lathe tailstocks and OD Grinders and other lubrications in machine shops my whole life and I still have like a 1/4 can that I still use on occasion. I have hsuffered zero point no harm for lead in any form.,,,,and I use lead /tin solder too!. My eyes are not what they used to be, and I am looking at a knee replacement, but other then that I am in good enough health to get drafted again. - Zero0 defects, baby......My point. You watch too much television or is it just that cowardice has become and artform in this country.
"We estimate population-level effects on IQ loss and find that lead is responsible for the loss of 824,097,690 IQ points as of 2015." www.pnas.org/doi/10.1073/pnas.2118631119 It sounds like you might be accounting for quite a bit of those points lost.
That soldering job is frankly terrible, and downright dangerous. You should never solder wires in machines that vibrate, and the poor solder joint you made will break up in no time and can cause sparking and overheating. Please redo using crimping connectors or screw terminals. At least you did the grounding correctly. The rest of the restoration is top notch though!
That soldering job is extremely poor and hazardous. You don't have sufficient contact with the wires of the motor. You'd have been better off with crimping.
Ok. I like to watch restoration videos, and there are a lot of copy cats around . That's probably why your video was suggested to me, and that's probably why you started this channel too (make a quick buck or how hard can it be?). I made it to the end on double speed. Why on double speed you might ask? Well your painting is Ok but your technical way of doing things sucks. Big time. I don't like to nag and I appreciate your effort to show your work on TH-cam but I like to be honest too. "Don't give up your day job" is my sincere advice after making it to the end of this video. In a technical way you don't have a clue what you're doing. Hitting parts sideways to remove it from a shaft several times (bending)? Restoring an old motor and don't care about the bearings? Replacing a felt washer with a combed sheep? Giving "Pro Tips" along the way? I made a list of what went wrong and it's quite long. One of the last shots when you're happy with the result and joyfully drilling away says it all; Did you notice the wobble on the pulley on the motor end? Off course you did. Pulling a zamac part over a mushroomed shaft destroyed the fit. Agree? If you're interested in the full list I can give it to you. The essence of my message is that I don't like to see amateurs at work who behave like a pro. If you're gifted and/or have a long experience in doing certain kind of work I like to be informed and will enjoy the videos you make. If you don't master a trade, like you, I'm worried about the young folks out there who are watching your work and think that this is the way it should be done... Therefore, "Pro Tip" investigate the job at hand thoroughly before you put an amateur effort like this in a "restoration" (don't ever put your hands on my drill press) video project and have the nerves to put it online like a "Pro". I know, it's not the sweetheart response you're used to because I'm real and you should be too. So, in short, if you don't know what you're doing stay quite. Best, Job
"I don't like to nag" (proceeds to post a 389-word 2,004-character wall of text nagging and berating a complete stranger online) I must have missed the memo that TH-cam was only meant for "pros", but thanks for watching this entire video and adding to my paycheck anyways.
@@andrewrussell26 No, you would plug an extension cord into that male plug and plug the other end into the outlet, thus powering the switch, the light, and the motor that are all tied into that power strip.


If I might add to my previous comment, as an “older man” I must tell you ,I find it so pleasing to see old machines restored, especially with the modern attitude of “throw it away “ . Those old machines were built by craftsmen with a lot of pride. I doubt if (with a few exceptions) any machine built today would still be around in 65 or 70 years from now👍👍😊
Thanks! I'm on the younger end of the age spectrum and I've quickly learned after a few years of restoring things that you're absolutely right in that things used to be built to last instead of built to be inexpensive.
Excellent video. It's refreshing to see professional images/video without obnoxious music or someone trying to pretend to be a comedian.
Thanks! I do still think I'm a professional comedian though.
Excellent video! This drill press turned out amazing! I really love old tools with such history. Grandpa would be proud of you. 😊
Thanks!!
I have the same drill press that my father bought about 1955. I have used this drill press all my life. Great video!
That's awesome! If you check out the video description on this video I linked a site where you can look up serial number of your drill press to find our exactly what year and which plant it was manufactured at!
Very nice 👍 restoration. I really enjoy watching old tools come back to life.
Thanks Danny! You've come to the right place! 😁👍
I love how you mention the other restorers in your videos. Great job.
My uncle was a mechanical engineer for Delta during that time period and he sent my dad a drill press and table saw as a house warming present when dad built our house out on the farm. My drill press that I inherited is very similar. Some of the castings are different and it is labeled just as Delta Milwaukee. I think 1953 would be about the time frame. I did just what you did as far as restoration several years back. Nice job on yours.
What a great story, Larry! If you're ever curious, Google 'vintage machinery Delta project' - people have put together a fantastic database of Delta serial numbers and the production year and location they were built!
What a great video! I just picked up a 1953, same exact one, though mine has the original motor. Paid $40, what a deal! Mine is super gunky like yours was, I feel so much better having your video for a reference, I really appreciate it!
You're welcome, Brenden! I made this video for that exact reason because when I restored mine there was only one other video out there that was halfway decent and I still had to fumble through most of it figuring it all out! Enjoy your drill press, it's fantastic for a home setup. Jealous you have the original motor too!
That was a very nice restoration, so much fine detail, and a lot of hard work, I’m actually in the process of restoring my great grandpa’s, Rockwell, bandsaw.
Awesome!! Can't go wrong with old Rockwell stuff!
Yep.
When I saw your video header I immediately started watching, hoping to see some tidbit of info that I may have missed when I restored My old Delta DP-220 drill press. I went deep, but not quite to the extent that you have here. Anyway, I was watching along, completely enjoying the show when up pops your banner saying that the link to the manual was in the description... OMG I almost peed myself with excitement! I hadn't even considered the possibility that such a thing still existed! You completely made my day! Thanks for the great video. The drill press looks awesome!
Now if I could only get that very slight wobble out of mine... 🤨
I so glad I could help out! As soon as I found that manual I knew I had to pass along the favor to anyone else watching because I assumed there would be a good number of people looking to restore their own by watching this video. The whole purpose of my channel is to help others restore their own things just like this!
As far as the wobble there's a lot of possibilities. It could be your motor that just vibrates a lot, a loose belt that also causes a lot of vibrating, uneven wear on the bearing sleeves in the column, or even just the table setup itself isn't sturdy enough. So many possibilities!
@@CatalystRestorations Yes, I guess it's just time to break down and buy a dial indicator...
Thanks again!!
Btw... YES! I'd absolutely love to see the video of taking apart the chuck.
this is the kind of stuff they don't made anymore 😍
They don't make them like this anymore for sure!
A first class job. Round of Applause 👏👏👏.
Thank you very much! And a round of applause to you for watching! 👏👏
I acquired this same drill press and did exactly what you did in this video Unfortunately mine came without a motor so I had to install a more modern one. I never got up the nerve to undo the spring, but now that I have seen it done, I will attempt it. Thanks for this!
You're very welcome, this is why I make these videos! Good luck!!
Your table was in great shape. When they are rough, I have not been above having a shop spin these in a 4-jaw and take a pass or two (my lathe is too small). Excellent restore, thanks for the video & (vicarious) enjoyment.
I got super fortunate that my grandpa took such good care of it for so many years! Thanks for watching! 😊
Very cool! I particularly appreciated the fact you kept the original power switch, polished by your grandfather's hand. I have a Delta of similar vintage and it's amazing that they built the homeowner's version to the same standard as the commercial ones.
I have to thank my viewers for that one - after watching part 1 they rightly suggested I keep it! I don't know why I ever considered not to! And it really is amazing that his 'home' drill press was (and is even more so today) on par with some commercial ones.
this turned out awesome , ive used so many of these drill presses over the years. thanks
Thanks for watching! These drill presses are real workhorses despite their size!
@@CatalystRestorations yes they do , and this one is going on 70 years old and looking brand new. I'm sure it will last another 70 years at least
Very nice job. I have the same exact drill press. I restored my about 2 years ago and I really like it. A great drill press.
Thanks! They really don't make them like they used to. Such a great machine.
THIS IS FRICKIN INCREDIBLE!!!!!!!!
THANKS!!!!!!
@@CatalystRestorations do you have a beard?
@@CatalystRestorations I'm sure your grandpa would love this......
@@davinattbaker1436 just enough scruff to make me look like a hobo
@@CatalystRestorations you're not a hobo!........Do a face reveal!
beautiful restoration! i have a similar version of this drill but about 6ft tall and am hoping to one day do a similar restoration of it. This video will really come in handy!
Awesome, glad I could help! Best of luck and feel free to add another comment if you have any questions along the way!
That was fun to watch! Good catch on the quill lock handle being on the wrong side, surprised there was not a head lock handle instead of a bolt and nut. There are likely two clamp cylinders in the table clamp assembly that can be swapped so the table lock is also on the left side. This would allow you to lift the table with your right hand and lock it with your left. Unless you're left-handed, then the current set up will work. (I'm a lefty so I swapped the table lock to the right side). The coil spring energy was released when you unwound it at 21:26. It can easily be removed from the housing for cleaning or replacement as there is only a bit of tension now coiled in the housing. Once you wind it back up on the headstock and impart potential energy back into it, then it deserves caution. You may have done this off camera, but the tops of the two pulleys need to be level to each other when mounting the motor. There are magnetic base flexible gooseneck very bright LED task lights for under 15 bucks that work great and you can mount it on the body of the press or in the cavity under the headstock This will get the cool light source very close to the work or tip of the drill bit or whatever tool is in the chuck. I also add a disk magnet to hold the chuck key.
This is all excellent advice for anyone else reading these comments as they restore their own drill presses! Brilliantly simple idea of putting a magnet on the chuck key - I'm 100% going to do that because I swear every time I set that thing down it falls into a black hole!
Nice restoration and video! It's incredible that this press, even as a homeowner version, is more solid and smooth than my modern 16" Jet DP. I love the old iron and I'm afraid we won't see the likes of its kind made again.
Thanks Julian! I'm afraid you're right and "they don't make em like they used to" definitely holds up here.
The result was amazing. You did a great job of restoring this drill press. Thanks for sharing your work. I'd like to suggest one thing if I may - if you wet sand the etching primer the end result, once painted, will be much smoother.
Yup, great tip Ben! On rough cast iron surfaces like this there's not much that can be done to really get it smooth without using a lot of filler primer, but still a great tip nonetheless! Thanks!
Perfect is an understatement. It is very beautiful! Excellent video! 👌👌
You are too kind! Thank you!
Great work my friend. I keep a drawer of assorted second string screwdrivers that I'll grind into a perfect fit for screw removals on restoration projects. I'll take a minute to get a perfect fit which makes removal much easier and the hardware doesn't mangled. Most often the same screws are used throughout the piece so the driver is worth the two minutes work.
Excellent idea Scott, I'm going to absolutely use this idea! I've got loads of old screwdrivers sitting around that would love to get some use again!
Nice job! FWIW... WD-40 is a better de greaser for the first step than Acetone. I've yet to meet grease/oil "gunk" that WD-40 wouldn't cut in no time. If you live in a country where WD-40 isn't available, kerosene works just as well. Acetone is fine for a final pre-reassembly cleanup (it evaporates too fast IMO), though to remove the WD-40 residue, you can also use Isopropyl alcohol.
Not a criticism, but a suggestion... Prior to re-assembling parts where the screw head slots are all buggered up. Hit them with a file before wire brushing them. They'll look loads better in the end. No need to replace every screw, just clean them up.
Great work... Really enjoyed this video!
Thanks for the tips!!
Good job... I found the exact model at a garage sale last month. Nothing moved on it . Lots of oil solvents and elbow grease working like a champ. Only part missing was the quill lock. Just used a 1/2 inch bolt. Just did a cleaning and back in service. New belt also😊
Awesome job!! I would love to see the dissembly of the chuck please. Tia!
I think you did a very nice job.
Thank you, Bob!
beautiful restoration
Thank you and thanks for watching!
Subscribed, loved the restoration, nice job and very relaxing …. Pleasing to the eye 😊🇬🇧
Thanks for watching and subscribing! Cheers!
Gramps would be proud. Excellent
Thanks ❤️
Beautiful job.
Thanks Donna!!
Watching this video for maybe the 5th time,enough said.👍👍👍
You've probably watched this more than even me at this point!! Thanks for watching!!
Very cool and very nice Work
Thanks for watching Dirk!
thank you for posting this, it is well done!
You're very welcome, and thank you for watching! 😁👍
Una Verdadera Joyita..!!..Very very Nice...Excelente Restauración...Saludosss.
Muchas gracias!!
Belo restauro 👏👏👏
Thank you!
Nice work!!
Thank you!!!
Very difficult work✌✌✌✌
But you💪💪 are genius💪💪 ❤❤
I don't know about GENIUS, but thanks! 😎😎
Great job as usual! However i personally love the cream white better than the original gray
Thanks! The cream white did have a sort of a classic "warm" vintage vibe, so I totally get it. If I wasn't trying to go for authenticity here, I would've gone with a similar cream color I think!
Another great restoration!
Thanks Mike! Biggest restoration project I've ever done!
Excellent restoration, but just so ya know, the spindle return spring should NEVER be greased! Just cleaned and oiled is all it takes. Grease attracts sawdust and dirt, making it stick.
You are 100% right! After about a week of using it I noticed the return was already a bit sluggish so I did exactly what you recommended and switched to oil instead of grease! I need to update the video description to make sure everyone else knows this too.
C'mon, he rebuilt the MOTOR for christs sake.
@@Telephonebill51 It's okay William, always room for constructive feedback as long as people as nice about it! 😁
Excelente restauração.
Uma apresentação merecedora de parabéns.
Muito obrigado!
Love these old drill presses. Pretty sure that's not the original motor. Mine is badge as a Rockwell. Turned out great!
Thank you! You are correct, this is not the original Rockwell motor.
Yes I would like to see the dis-assy of the chuck. I have the Walker Turner version of this drill press and also have several chucks that came with some other tooling I bought.
Sounds good, Terry! I will make a video of it soon!
It's a psychology experiment to see how many people notice that you posted the complete restoration before, isn't it? 😉
You're far too smart, Jozsef 😎
@@CatalystRestorations Finally somebody gets it. I should be running everything, you know, for the benefit of everyone. 😇
Hi , nice job on the motor so far👍
The only thing I would have done differently on the motor would be to clean the winding with a mild detergent, dry out in an oven at around 110 degC and I would then replace the leads at the coil ends and re- varnish the entire stator, I would also have taken a very light “skim” of the commutator and undercut & bevel the segments….. however , refurbishment of electric motors was my trade for many years👍😁
Excellent tips! This was my first electric motor restoration so I learned a lot! One other thing I should have done was correctly wire it to 3-phase to fully utilize what it was meant to do. The way I have it wired it just runs at full speed all the time.
Nice job.
Thank you, Zeke!
Great job
Thank you and thanks for watching!
Very nicely done!
Thanks Mike!!
18:02 Perfect and hilaryous!
Safety first.. 👍👍👍
Abraços do Brasil 🇧🇷
😂 Thanks!!
One suggestion for the future . If using a "new" tag that takes that type of "screw" , bend the tag so that it fits the place it needs to go . That way the screws are only holding it there . The way you did this one the tag has preload to push the screw out over time with vibration .
Excellent suggestion Chris! I've never seen this tip anywhere before but putting that bit of a preload on the tag makes sense! Thanks!
Great work!
Thank you! 😁👍
I just found your channel,good work man! New subscriber.
Thanks George! Welcome aboard!
Ficou excelente! Parabéns
Thank you!!!
Your Grandpa would be proud!!!
Thanks Donna, I know he would be too. Really wish he could've seen it.
@@CatalystRestorations Something tells me that he DOES see it! (((((hugs)))))
@@DonnaMSchmid thanks 😊
Excellent!
Thanks for watching James!
i like thise video's , its terapeutic to watch
And they're therapeutic for me to make!
New subscriber 🔥🔥🔥
@@TonyJohnson-t6c thanks so much! Welcome!!
Man, I finally changed the chuck on my drill press and in the process my shaft fell down... I was like, how in the world?!
Went back to your video, check mine... Could not figured out how my shaft could fall off like that, the guy that had the tool before me was using it every single day...
And when I remove the kind big cylinder to control the vertical movement of the shaft... Watch your video again, saw the earthquake... And man I didn't had any shaft collar to make any earthquake on my side!!
So the shaft was like holding like this for years... Without any collar. And by looking at the press drill, that thing has not been disassembled for a thousand moon.
And for the clock spring, mine almost ran away after one counter clock...
I have experience with those as I repaired a lot of typewriter in the last, but still... I'm one shaft collar away to finally use my drill press...!!!!
Thanks a lot for this detailed restoration!!!
So glad you were able to figure it out!!! I get comments that my videos are sometimes too long or too detailed, but I do that on purpose so that anyone else (like you!) can follow along and restore their own similar tools. Glad I could help!!
@@CatalystRestorations keep it like this! When you're doing the repair for real, you need as much detail as possible!!
@@Aquefaque Agreed!!
The little guys wearing the safety gear was cute
There's LEGO in almost every one of my videos! Blink and you might miss it sometimes!
Awesome!!!
Thank you! 😁👍
I have one that is a bit later than this one. Grandpa is smiling!
Thanks Edwin! It's a great machine! 🙂
Vary nice!! what kind of paint stripper did you use?
I always use Citristrip! It might not be THE most powerful stuff out there, but it's less toxic to both you and the environment and doesn't have terrible fumes.
Hola a todos....me parecio muy bueno el video....quedo muy bien, aunque sea solo para vos....desperdicias muchos productos en tus restauraciones: usas toallas de papel nuevas para hacer lo tuyo....podrias usar papel de periodico o cualquier otro papel de descarte.....
Y cuando usas removedor de pintura, me parece que usas producto de mas....con menos se puede hacer.....eso te lo aseguro....
Saludos....adios.....
Thanks for watching! Paper towels are very, very inexpensive where I live and far more absorbant than newspaper. I could use washable shop towels too, but sometimes paper towels are just simply easier. And you're right, I'm sure I could use a bit less paint stripper. The instructions say to apply a thick layer and it's always worked for me, so I've just stuck to doing it that way.
Very nicely 🙃
Thanks!! 🙃🙃
At about 47:25, what is with the drive pulley on the motor wobbling around? It looks like it is ready to fly off!
It was the belt tension! Just after about a week after I wrapped up this video I adjusted the plate the motor is on to get more tension in the belt and everything calmed way down!
Nah . . . I am not buying your explaination . Your pulley and probably the motor shaft are both junk. Look at the video at 6:13 and you can see the pulley flop sideways on the shaft while the motor is on the bench under no belt tension. Beating that pulley off over the mushroomed shaft has certainly taken a toll on an aluminum pulley. Over-tensioning the belt may quiet it down, but it is going to continue wallowing out the pulley. There are cures for this, but they would probably exceed the value of this old drill press. I would largely consider this job a "Sherwin-Williams tune up". However, I am sure that you will get years of use from this venerable piece of machinery.
@@danielmays1986 ok bud
where can i get a on/ off switch for vintage Delta Milwaukee drill made in the 1950's, also called the DP-220 or some way for me to create a switch for myself. this unit has 2 black wires coming out of the motor, ? thanks, gary
Hi Gary! My first suggestion would be to confirm that your motor is still all in good working order. I assume that the two black wires are a + and - and they're just not color coded, but you should first probably use a multimeter to confirm you have a complete circuit. If you can verify it's a complete circuit, then I would go very simple and buy yourself a regular old light switch and power cord (like I have towards the end of the video) and wire up the motor on one side of the light switch with a wire in each screw and wire up the power cord to the other side of the light switch and test that it powers the motor on and off. If it works, then you have the choice of keeping the light switch and making a more permanent fixture for it somewhere on the drill press or start looking around eBay for a vintage original.
Disclaimer on all of this: these are just suggestions; any repairs you attempt are at your own risk. Please follow all safety procedures and wear proper PPE when working with electricity. If you're not familiar with how to wire a light switch, I would suggest searching and watching a few TH-cam videos at least to start.
I have this same model!
That's awesome!!! Such a great little piece of history and so sturdy!
Excellent job. Although I cannot believe you didn't machine a ball out of stainless steel stock to go on the end of the pull handle.
I don't have any way to machine anything out of steel.
Right from the start of the video this drill press looks almost perfect. :)
I do not know why you decided to restore it instead of couple tweaks like new power cord :)
It definitely still looked decent on the outside! It was in dire need of a tune up on the inside though, both in the drill and motor.
Your power leads coming off motor is because it is a 3 speed motor One side will be slow. The other side will be medium and the two together will be high on motor speed. So that will give you 15 speeds that you can run the drill press at. So the way you have it wired it will always run its high speed. If you decide to make it work correctly, you will need a special 4 position switch, The motor was designed for the neutral and the hot to be cut off at the switch, so it will will have off, low, medium and high. And the neutrals will be paired to hot so you’ll need to test it or get the wiring schematics for the motor.
You're the first person that's both noticed this and was able to explain this to me! Thank you so, so much for pointing this out and taking the time to write that out - I'd love to unlock the full range of this motor!
Just subscribed..🌟✌️
Awesome, welcome to the club! Thanks for watching!
Great job, although I know you wanted it as original as possible. I would have painted it that off white /cream color, grandpa painted it. Just my personal preference. Definitely looks good grandpa is smiling & proud
Thanks Doyle! I was definitely torn about the final color too, for sure. Really wish my grandpa could see it today, but I know he'd be so proud it's still around today.
Your grandfather would be proud.
Thanks Will! I think you're right!
Your grandfather would be proud
Thanks Bob, I think so too!
This press has worked like a charm for my projects th-cam.com/users/postUgkxajoEbapTfqWaadnqb04h6U576yxXp-FE . I didn't even secure it to my table top, mainly due to the fact that I was using a 15 lbs drill vise. It's not flimsy at all as to what others have claimed it to be. Make sure the locking nuts and levers are secured and there won't be any issues with light pressure and patience. I was able to drill through aluminum, plastic, and steel (steel took a while) with no problems at all. Yeah it took a little longer than a regular drill press, but I don't have the space OR the money for one.The instruction manual was worthless, but luckily assembling the press was intuitive. However, the manual would be good for ordering replacement parts if needed. There is a nice breakdown of the parts that are included in the kit. Before ordering, make sure it is compatible with your unit, it is clearly stated what models the press is compatible with.This was an excellent purchase for $40!!
Are you asking how to drill into stone beads? Put the bead in a vise and try using a masonry drill bit.
Thought this was the same Rockwell that makes the Retro Encabulator from Rockwell Automation. Sans marzel veins though, of course.
No marzel veins on this one, but it IS made with prefabulated amulite surmounted by a malleable logarithmic casing, though, so I still consider that a win.
What are the two top pieces called at 38:25?
The cone-shaped part is commonly called a step pulley. There are different ones with different numbers of 'steps' depending on your motor/drill press configuration. I'm not sure what the little cap piece is that holds it in place, though.
Does anyone know what taper the chuck is? I'd like to replace mine with a keyless one. Thanks
I'm currently out of state, but when I get back after the new year I will look at which Jacobs chuck I have and let you know the taper!
Thank you.
@@johnlabarbera4949 My chuck is a Jacobs 33, which looking at a Jacobs taper chart shows small end is 0.5604", big end is 0.6240", length 1.000". Hope that helps!
@@CatalystRestorations Yes that does, thanks a lot. Will see what I can find on line.
I see he already gave you the answer to your taper question. If you pause this video at 29:00, you can see the number 33 upside down. It reads "33 TAPER" just after the Model 64.
nice job, I just this week , 3/5/23 form my neighbor, a 50's homecraft ,Rockwell drill press in much better shape , in fact the only thing wrong is the chuck , is bad , so my question is , How remove the chuck from the quill,? Mine came with the mortise parts , was in a cabinet shop for 30 years and then my neighbor got it and had the next 40 years , the cabinet shop built my neighbor's house cabinets , 40 years ago , the drill press was only used for mortising , that's why the chuck run out is .010 to .012 with gauge pin in the chuck, out side of the chuck runs .001 to .005 .. Again , How to Remove the Chuck form quill ..??
At 19:57 I remove the chuck from the quill. It just needs a strong downward force to remove it, as it's just press fit on like most drill press chucks are. Is this what you're asking about?
@@CatalystRestorations yes , its on tight , just move the lock caller , at the top of the quill, wedge ball joint tool , tried small wedges on each side , and tried a brass punch , thanks , Clifford
look stil decent, but might need some upgrades😄
Your Grandpa must be smiling.
I would like to think that as well! :)
good//
Thanks!!
Pretty good restoration! A little crude with the methods, but turns out ok. I have a similar Delta, floor model from 39'-40'
Advice: don't remove things on shafts "unevenly", you can seriously damage things, unrecoverably. Use pullers, make your own as needed. That pulley could have been coaxed for enough clearance for a board with a slot for the shaft an then used clamps in reverse to push it off. OMG! Don't wire wheel shafts if you can ever help it - the shaft will never be as round as it was. Use the lightest sandpapering you can, you end up making the shaft to bearing clearance looser and the motor will run noiser & hotter, unless you are replacing the bearings. Lastly, the motor wires you cut off were fine as they were, just cut back an inch and re-strip. Don't solder, you aren't good at it & yours is a fire hazard, use some kind of compression fitting instead, there are lots of different ones to use.
Isn't the oil wool thing banned because it's a pretty serious fire hazard?😅
Very cool video though
I'm not sure on that, but worth thinking about at least!! 😬
Very pretty.
You used a wall plate for your handybox. A handybox cover won't reach out and grab you.
Commutators should not be cleaned with emery paper. Metallic components are in this material. A non conductive commutators stone is a better choice.
Yes, a commutator stone is a better choice.
the switch housing was kinda weird, i dont love that the face plate was bigger than the box and stuff
I understand. It's been working great for me so I'm happy enough with it.
Шкив с мотора следовало снимать съёмником. А так отверстие в шкиве теперь разбито.
It's not perfect, but it works perfectly fine for me still 🤷🏽♂️
@@CatalystRestorations Ну, и хорошо.
Well, that's good.
Every Tool that was shown on this Video was the cheapest available. Buying cheap tools is False Economy. You do great work so use great Tools. “Spindle” that’s a Step Pulley. Buy yourself a “Puller” as one of these days you are going to break an item you are trying remove. Just friendly advice.
Everybody has to start somewhere, Nigel. Just some friendly advice.
looks great but you destroyed that pulley. they make pullers for that.
But then what pulls the pulley puller?!
they have a center bolt that pushes against the shaft. it's what they're made to do. google is your friend.@@CatalystRestorations
That’s not Nutella. The drill press was a smoker and that’s the tar from his pipe
Was watching your vid because I happen to have that same drill press that my dad bought new,, but you ran me off when you started testing the paint. Don't count on a subscription here.
And just what were you going to do if it was lead paint? Call the EPA to send a HaxMat team out to save you?
I'm 76 years old. From the time I was like 6 years old until they outlawed it in the late 70s I painted with lead paint, sanded it, stripped it and about anything else you can name with regard to it.. We also used white lead on the dead center of lathe tailstocks and OD Grinders and other lubrications in machine shops my whole life and I still have like a 1/4 can that I still use on occasion. I have hsuffered zero point no harm for lead in any form.,,,,and I use lead /tin solder too!.
My eyes are not what they used to be, and I am looking at a knee replacement, but other then that I am in good enough health to get drafted again. - Zero0 defects, baby......My point. You watch too much television or is it just that cowardice has become and artform in this country.
"We estimate population-level effects on IQ loss and find that lead is responsible for the loss of 824,097,690 IQ points as of 2015."
www.pnas.org/doi/10.1073/pnas.2118631119
It sounds like you might be accounting for quite a bit of those points lost.
That soldering job is frankly terrible, and downright dangerous. You should never solder wires in machines that vibrate, and the poor solder joint you made will break up in no time and can cause sparking and overheating. Please redo using crimping connectors or screw terminals. At least you did the grounding correctly.
The rest of the restoration is top notch though!
Good call, I'll get that fixed!
That soldering job is extremely poor and hazardous. You don't have sufficient contact with the wires of the motor. You'd have been better off with crimping.
Not my finest soldering job, but it's held up to daily use for over a year now so I'm fine with it
Rad
Thanks! 💯
damn, your cord plugs really look like you could be electrocuted at any time.... design is terrible
Luckily that's all fixed now!
Cheap homeowners model hardly worth all that effort
Cheap comment hardly worth all that effort
Ok. I like to watch restoration videos, and there are a lot of copy cats around . That's probably why your video was suggested to me, and that's probably why you started this channel too (make a quick buck or how hard can it be?). I made it to the end on double speed. Why on double speed you might ask? Well your painting is Ok but your technical way of doing things sucks. Big time. I don't like to nag and I appreciate your effort to show your work on TH-cam but I like to be honest too. "Don't give up your day job" is my sincere advice after making it to the end of this video. In a technical way you don't have a clue what you're doing. Hitting parts sideways to remove it from a shaft several times (bending)? Restoring an old motor and don't care about the bearings? Replacing a felt washer with a combed sheep? Giving "Pro Tips" along the way? I made a list of what went wrong and it's quite long. One of the last shots when you're happy with the result and joyfully drilling away says it all; Did you notice the wobble on the pulley on the motor end? Off course you did. Pulling a zamac part over a mushroomed shaft destroyed the fit. Agree? If you're interested in the full list I can give it to you. The essence of my message is that I don't like to see amateurs at work who behave like a pro. If you're gifted and/or have a long experience in doing certain kind of work I like to be informed and will enjoy the videos you make. If you don't master a trade, like you, I'm worried about the young folks out there who are watching your work and think that this is the way it should be done... Therefore, "Pro Tip" investigate the job at hand thoroughly before you put an amateur effort like this in a "restoration" (don't ever put your hands on my drill press) video project and have the nerves to put it online like a "Pro". I know, it's not the sweetheart response you're used to because I'm real and you should be too. So, in short, if you don't know what you're doing stay quite. Best, Job
"I don't like to nag" (proceeds to post a 389-word 2,004-character wall of text nagging and berating a complete stranger online)
I must have missed the memo that TH-cam was only meant for "pros", but thanks for watching this entire video and adding to my paycheck anyways.
Did the second plug break? At 1:40 the prongs are still in the outlet.
Nope! That's how that old power strip was designed. Two female plugs on the ends and a male plug in the middle.
@@CatalystRestorations Wow, so it the the male hot? Can it zap you?
@@andrewrussell26 No, you would plug an extension cord into that male plug and plug the other end into the outlet, thus powering the switch, the light, and the motor that are all tied into that power strip.
Beautiful machining marks holy crap they ran the fly cutter for its worth over that thing
Haha, they certainly went for speed over finish, that's for sure!