I've watched a zillion different Procreate tutorials, and yours are always the best -- interesting, friendly yet professional, right to the point and everything's explained in a clear and logical way. Apart from all the gorgeous inspiration! Love your work -- high quality throughout, both regarding videos, newsletters and tools. I'm a huge fan.
I love it! I am very into graphic design and love all of your videos. You are very detailed with your explanations and very fun to watch! Thank you for being so inspiring! ❤❤❤
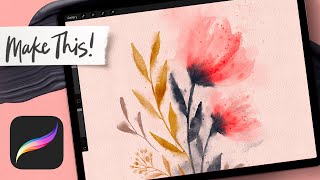
Hi. I like this tutorial and it gives many ideas about changing colours from hue, color balance and gradient map. I never knew it. thanks! One thing about the canvas cropping - don't you think abstract artwork on 2500 px * 2500 px gives better quality than 1500 pixel * 1500 px if want to print for stationary cards for example?
I always size my tutorial artwork for social media use (why I size in pixels), but you can definitely follow the same process using inches with the intention to print instead!


🤯Brilliant tip with the canvas sizing! This was so satisfying to watch it all come together
Thanks, friends! 😘
I've watched a zillion different Procreate tutorials, and yours are always the best -- interesting, friendly yet professional, right to the point and everything's explained in a clear and logical way. Apart from all the gorgeous inspiration! Love your work -- high quality throughout, both regarding videos, newsletters and tools. I'm a huge fan.
You made my whole day with this, Camilla! Thank you so much ❤️
Brilliant. That trick for avoiding cropping is huge! I'm learning how to create repeating patterns using Procreate and this idea is a game changer!
This was so informative and interesting. I loved it so much. Thank you ❤
I’m so happy you enjoyed it! Thanks for watching!
This was a really great tutorial. I learned so much! Thank you Teela.
I love learning watercolor backgrounds. Thank you for this, and also for the free brushes
Clever! As always. Thank you for another great little lesson.
Nice, finally I've created the time to actually paint along with you :) Thanks!
Thank you, this is brilliant.
Thanks for checking it out!
Thanks for the tutorial, it was really helpful! ❤
Great tutorial Teela!
I love it! I am very into graphic design and love all of your videos. You are very detailed with your explanations and very fun to watch! Thank you for being so inspiring! ❤❤❤
Thanks so much, it really means a lot! 💕
Great video. I will use this a lot of different ways. Thanks!
This was really helpful, thank you!
Amazing !!! Thank you ! ❤
Great video with awesome tips!
Thanks Evelyn! 💕
This so fun 😀🥰🧑🎨 I'm new here and can do it 😊 thanks a lot!
Hi. I like this tutorial and it gives many ideas about changing colours from hue, color balance and gradient map. I never knew it. thanks! One thing about the canvas cropping - don't you think abstract artwork on 2500 px * 2500 px gives better quality than 1500 pixel * 1500 px if want to print for stationary cards for example?
It all depends on your use - I chose that size as it’s optimized for social media which was my intent for it, but please use any size you prefer!
Okay
I’m curious if you can share how to get the setting proper so that when I move something to center it will show the center lines like yours did.
Of course! When something is selected, in the bottom palette, tap on 'snapping' and make sure snapping is turned on 👍
Have you ever made an abstract seamless design? I would love to learn how to do that.
Photoshop is better suited for that - here's how :) th-cam.com/video/6j5ECLpth2U/w-d-xo.html
Teela why didn’t you choose canvas size in inches in order to print it as wall artwork?
I always size my tutorial artwork for social media use (why I size in pixels), but you can definitely follow the same process using inches with the intention to print instead!
I was lost at 12:26, couldn't do that step, can someone help me please?
You should have all of your art flattened at that point, so you'll select it and move it to the bottom corner
❤