Thought I would share my first experience with a rock tumbler I purchased and used for the first time. This is not really a review but can be. It is more of a show and tell. Please let me know what you think? Your comments are appreciated and can be helpful for future tumbling. Thanks!
I agree with Stephen Dossett, haste makes waste tumbling rocks, and stones. Following the steps accordingly leads to a more favorable end product. The channel "Michigan rocks" has a "Step By Step Rock Tumbling Tutorial." Being fussy step, by step really makes a difference from start to finish. I have my tumbler on a wooden folding tv type table which seems to work fine rather than using the tumbler on the floor. Using the final grit might have smoothed out the rocks better assuming the rocks were ready for the fine grit finish procedure. The plastic pellets are used to fill the empty space in the barrel, although, you can use other rocks during the process if you have extra rocks available. Bob (Michigan Rocks) videos are helpful to explain the basics (as well as a bit more advanced in other videos). I received my first tumbler as a Christmas gift, and Bob's videos helped me understand the how, and why he follows the process of tumbling. He also has videos of him cutting, and polishing rocks as well. Hopefully his videos are as helpful for others, as they are for me. :-)
About the plastic beads...grit gets embedded into the plastic, so once you've used the beads in coarse grit, you can't use those beads in medium or they'll just scratch up the stones. I prefer to use ceramic polishing media, it washes off nicely, lasts a long time and is more eco-friendly than plastic. Also, for many stones more than one cycle in coarse grit is necessary to shape them. And lastly, there are many types of stone that just won't polish...it's best to stick with known material when you're learning, jasper and agate are best and rough/crushed rock is available from many sources. Oh, and I always add borax to the tumble, it makes the stones sticky and the grit gets well distributed. A tablespoon is all you need.
WOW...so much great information. Thank you sooooo much for your awesome response. I am going to give it another try when I get back from my next road trip.
As many have said, do not skip the pre-polish step. This will prep the surface for the final polish to adhere to the surface of the rock. The Lortone tumblers are the best rotary tumblers out there, so you made a good purchase. However, as someone without time or patience to wait, I use a vibratory tumbler for every step after the first coarse stage to get the shape I want from the rock. The best vibratory tumblers are the Lot-O tumbler and the Thumler Ultra-vibe industrial vibratory tumbler. The Tumble-Vibe is a decent, more affordable vibratory tumbler. My process is to use my Lortone 33B rotary tumbler for Step 1, and use a coarse grit for about 5-10 days depending on how hard my rocks are, or how much I want to shape them. Then, I thoroughly clean my rocks, and put them into my Thumler UV-10 vibratory tumbler with a 500 aluminum oxide grit for 2 days. You need to check the tumbler daily to see if you need to add water or grit. Finally, I use an aluminum oxide polish in the vibratory tumbler for another 2 days, again, checking daily. I cannot stress enough how much vibratory tumblers not only improve the overall look of tumbled rocks, but how much time and money you save using them. The only drawback being they are loud, and you need to maintain a watchful eye on the process. But if rock tumbling becomes a hobby, this just adds to the fun. Anyway, if you’re interested, research vibratory tumblers. I’m glad I did! Feel free to reach out with any questions.
Hi from a fellow Tumbler, Your Rocks are fine, and your not doing anything wrong, here is what I do...Use 80 Grade Grit for 10 days minimum, wash out and then use 120 Grit grade for 10 days, wash out again then use 400 grade Grit with a spoonful of grated Ivory Soap to Burnish your Rocks into a shiny finish.
First time tumbler for my 6 year old son. So do you not need the silicone rocks 1st? Our sweet neighbor gave my son this tumbler, with the 80, 220, and 600 grade grit, along with walnut and polish. No instructions so figuring it all out. Thanks for any tips.
My Dad got a Gem Sparkle 45C-NR Lortone rock tumbler-polisher and he never told me about it until he gave me some polished agates he had done. He probably got it after I had moved out. He's been gone now for many years and I finally took it out of storage to try it out. Haven't found the instructions yet so checking online for a manual. Bad news is that I opened the barrel on its side because I seemed to get a better grip on the lid. It opened up and about 1/4 cup of the coarse grit that was stored in it spilled on my bedroom carpet and I can now taste the 'dust' in the air. Of course, I didn't realize there was anything inside the drum, or I would have been more careful. I'm really sensitive to any dust and now I have to deal with probably inhaling dangerous dust! This is not a great start to trying this out but I have a huge bag, about 20 lbs. of agates, that I wouldn't mind polishing eventually. As a kid, we did a lot of beachcombing and exploring and rough camped at a secluded beach that is difficult to access unless you have a boat. The area was a goldmine of agates that we collected. I still occasionally get dreams of sitting on the beach and saying, 'There's one, there's another one..' That trip was 58 years ago! Talk about procrastination...
What a story. Hopefully the dust settled and it did not bother you too much. Would love to see the end result of you polishing some of those agates. Memories are wonderful for sure.
@@DigginSoCal The funny thing is that the small bit of dust the spilled grit created was practically invisible but I was affected. I wonder if there is any research on safety issues around the grits, especially the really fine polish. I opened my bedroom window and covered my nose and mouth and it did finally settle down. I work on a lot of hobbies (stained glass is one) and have to wear so much protective gear that I feel like superfly with the respirator I use. With this Covid problem I hope we all can get back to breathing the air without masks one of these days. The agates that Dad had polished were so shiny and so many different colors that I am looking forward to picking the nicest in the sack and polishing those soon.
@@islandgal500 I was not aware they were dangerous to inhale but I will def be careful. I want to collect some good agates and try again for sure. best of luck on your polishing. Hope you create some real beauties...
I applaud your patience. I've had a rock tumbler for many years that came with a bunch of lapidary equipment I bought. I've never had the patience to run the rocks through all of the grits. But my tumbler also isn't quiet like yours. Well done.
You mentioned this works like rocks on a beach being polished by the waves and sand. That is good advice because if you beachcomb and find rocks that aren’t at least fairly well polished it’s leaverite- leave ‘er right where you found it.
I am working on a new batch. I ran them for 10 days with 80 grit, 7 days with 220 and they just started with 600. I will post pics in about 2 weeks on IG.
Might think about adding some ivory soap after your final polish. cut some slivers in and run for 24 hours. never skip a step either. I probably would have ran a bit longer on first grit to get a better shape my self. great job on your first run.
you need to get some larger ceramic beads just for fillers, and I think but I am not certain but some of those rocks look kind of porous softer than the others so you may want to check that as well. I just ordered my tumbler so I am waiting for 4 days now. Great video I did learn a few things.
That’s good to know that the rocks shrink in the tumbler. Like I mentioned in your video for the metal detector and pinpointer last video as of this moment. I still haven’t tried my tumbler yet.
I’m new to this but the biggest mistakes I saw you make was putting the same plastic beads in each step. The grit gets lodged in it and cross contaminated your polish. Also Not washing them between stages. By washing I mean tumbling the stones after cleaning in just water and a drop of dish soap to get old grit out of cracks and nooks in the stones. Other than that you seemed to do fine
Thanks for the tips. Yes this was my first time trying and I followed the directions but always learning. I actually haven’t tried since this video. I primarily use the tumbler to clean clad and Pennie’s I find detdcting. I would like to try it again and appreciate your feedback
From what I saw at the channel "Michigan rocks", Rob drives a lot of attention on repeating the first stage many times, until you are satisfied with the results. Did you tried that after this video? He also uses a 500 alumina for pre polish and 1000 alumina for polishing.
At 9:32 you state that you followed directions. Yet at 8:10 you decided to skip the 600 grit. Was the 600 grit part of the directions??? So, did you follow the directions???
A rock crusher is a whole different animal. You can use this to wear down your rocks to see what is inside but a gock crusher pulverizes the rock. Using this to look inside your rocks would be like using a weed wacker to mow a football field. You might consider smashing some rocks manually and then putting the bits in here to see what comes out.
So glad I found your video. Too bad it made me feel like putz. LOL I bought mine at an estate sale but it had no instructions. I was never able to get the lid to stay on and was about to sell it "In need of repair". Never occured to me to fit the stupid lid into the container before attacting the metal cap and nut. I even tried using a rubber mallet. Now I am looking forward to polishing up some stones before I go ahead and sell it. Thanks again. #Instructionsarestupid
Well, I am glad you figured it out. I have been more than happy with this tumbler. I use it to clean all the coins I find metal detecting and it makes life so much easier... Happy New Year
I also had no idea what mixture to use so that was a big help also. Mine is about twice the size of yours so I'm going to just double the mix. Also had no idea it needed water. Basically I was an idiot. 😂 Going to fire it up later today.
The grit come in different sizes. Like sand paper. Yeah you have to get them separately. Then you do add water. The lid should come off then there is an inner lid that comes out. Shouldn’t be stuck but can be hard to pull out/off at times.
I had a hard time getting my lid off too. the lid is an inside seal which threw me because I was looking for a seam on the outer rip. think bathtub plug since that kinda how the lid fit in the barrel
Not sure. Advertised as a rock tumbler? Directions show how to polish rocks. Doesn't say anything in them about coins but I am planning on trying it with coins soon.
@DigginSoCal weight before and after To see how much is lost. You said some rocks look a lot smaller. I ended up here. Because someone is selling one of these machines and I wanted to compare prices.
Thanks for the demo on your first process. Sorry to criticize, but those are some ugly rocks you have there, even compared to my yet unpolished sack of agates. I think I'm harder to please. After spending that long tumbling rocks, there better be some diamonds in that end result. LOL and haha.
@@DigginSoCal I was teasing you about the ugly rocks... not all of them are that bad and I see that you wanted to see what would happen with the variety you had. I was surprised at how much smaller they got too.

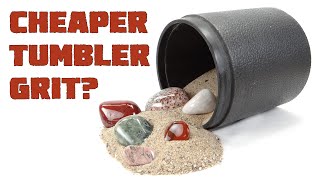


Thought I would share my first experience with a rock tumbler I purchased and used for the first time. This is not really a review but can be. It is more of a show and tell. Please let me know what you think? Your comments are appreciated and can be helpful for future tumbling. Thanks!
I agree with Stephen Dossett, haste makes waste tumbling rocks, and stones. Following the steps accordingly leads to a more favorable end product. The channel "Michigan rocks" has a "Step By Step Rock Tumbling Tutorial." Being fussy step, by step really makes a difference from start to finish. I have my tumbler on a wooden folding tv type table which seems to work fine rather than using the tumbler on the floor. Using the final grit might have smoothed out the rocks better assuming the rocks were ready for the fine grit finish procedure. The plastic pellets are used to fill the empty space in the barrel, although, you can use other rocks during the process if you have extra rocks available. Bob (Michigan Rocks) videos are helpful to explain the basics (as well as a bit more advanced in other videos). I received my first tumbler as a Christmas gift, and Bob's videos helped me understand the how, and why he follows the process of tumbling. He also has videos of him cutting, and polishing rocks as well. Hopefully his videos are as helpful for others, as they are for me. :-)
About the plastic beads...grit gets embedded into the plastic, so once you've used the beads in coarse grit, you can't use those beads in medium or they'll just scratch up the stones. I prefer to use ceramic polishing media, it washes off nicely, lasts a long time and is more eco-friendly than plastic. Also, for many stones more than one cycle in coarse grit is necessary to shape them. And lastly, there are many types of stone that just won't polish...it's best to stick with known material when you're learning, jasper and agate are best and rough/crushed rock is available from many sources. Oh, and I always add borax to the tumble, it makes the stones sticky and the grit gets well distributed. A tablespoon is all you need.
WOW...so much great information. Thank you sooooo much for your awesome response. I am going to give it another try when I get back from my next road trip.
As many have said, do not skip the pre-polish step. This will prep the surface for the final polish to adhere to the surface of the rock. The Lortone tumblers are the best rotary tumblers out there, so you made a good purchase.
However, as someone without time or patience to wait, I use a vibratory tumbler for every step after the first coarse stage to get the shape I want from the rock. The best vibratory tumblers are the Lot-O tumbler and the Thumler Ultra-vibe industrial vibratory tumbler. The Tumble-Vibe is a decent, more affordable vibratory tumbler.
My process is to use my Lortone 33B rotary tumbler for Step 1, and use a coarse grit for about 5-10 days depending on how hard my rocks are, or how much I want to shape them.
Then, I thoroughly clean my rocks, and put them into my Thumler UV-10 vibratory tumbler with a 500 aluminum oxide grit for 2 days. You need to check the tumbler daily to see if you need to add water or grit.
Finally, I use an aluminum oxide polish in the vibratory tumbler for another 2 days, again, checking daily.
I cannot stress enough how much vibratory tumblers not only improve the overall look of tumbled rocks, but how much time and money you save using them. The only drawback being they are loud, and you need to maintain a watchful eye on the process. But if rock tumbling becomes a hobby, this just adds to the fun.
Anyway, if you’re interested, research vibratory tumblers. I’m glad I did! Feel free to reach out with any questions.
Thank you for the detailed awesome info. I really appreciate it and I am going to look into your suggestion.
Natureszoom is my alt channel btw
Hi from a fellow Tumbler, Your Rocks are fine, and your not doing anything wrong, here is what I do...Use 80 Grade Grit for 10 days minimum, wash out and then use 120 Grit grade for 10 days, wash out again then use 400 grade Grit with a spoonful of grated Ivory Soap to Burnish your Rocks into a shiny finish.
Thanks for the advise. I appreciate it. I will give it a try. I def need to order more grit and hunt for some rocks
First time tumbler for my 6 year old son. So do you not need the silicone rocks 1st? Our sweet neighbor gave my son this tumbler, with the 80, 220, and 600 grade grit, along with walnut and polish. No instructions so figuring it all out. Thanks for any tips.
My Dad got a Gem Sparkle 45C-NR Lortone rock tumbler-polisher and he never told me about it until he gave me some polished agates he had done. He probably got it after I had moved out. He's been gone now for many years and I finally took it out of storage to try it out. Haven't found the instructions yet so checking online for a manual. Bad news is that I opened the barrel on its side because I seemed to get a better grip on the lid. It opened up and about 1/4 cup of the coarse grit that was stored in it spilled on my bedroom carpet and I can now taste the 'dust' in the air. Of course, I didn't realize there was anything inside the drum, or I would have been more careful. I'm really sensitive to any dust and now I have to deal with probably inhaling dangerous dust! This is not a great start to trying this out but I have a huge bag, about 20 lbs. of agates, that I wouldn't mind polishing eventually. As a kid, we did a lot of beachcombing and exploring and rough camped at a secluded beach that is difficult to access unless you have a boat. The area was a goldmine of agates that we collected. I still occasionally get dreams of sitting on the beach and saying, 'There's one, there's another one..' That trip was 58 years ago! Talk about procrastination...
What a story. Hopefully the dust settled and it did not bother you too much. Would love to see the end result of you polishing some of those agates. Memories are wonderful for sure.
@@DigginSoCal The funny thing is that the small bit of dust the spilled grit created was practically invisible but I was affected. I wonder if there is any research on safety issues around the grits, especially the really fine polish. I opened my bedroom window and covered my nose and mouth and it did finally settle down. I work on a lot of hobbies (stained glass is one) and have to wear so much protective gear that I feel like superfly with the respirator I use. With this Covid problem I hope we all can get back to breathing the air without masks one of these days.
The agates that Dad had polished were so shiny and so many different colors that I am looking forward to picking the nicest in the sack and polishing those soon.
@@islandgal500 I was not aware they were dangerous to inhale but I will def be careful. I want to collect some good agates and try again for sure. best of luck on your polishing. Hope you create some real beauties...
I applaud your patience. I've had a rock tumbler for many years that came with a bunch of lapidary equipment I bought. I've never had the patience to run the rocks through all of the grits. But my tumbler also isn't quiet like yours. Well done.
You mentioned this works like rocks on a beach being polished by the waves and sand. That is good advice because if you beachcomb and find rocks that aren’t at least fairly well polished it’s leaverite- leave ‘er right where you found it.
My advice is never miss a step even if you think they are ready. The pre polish stage gets the rocks ready to polish make it stick to the rock.
Sounds like good advice. I will make sure to hit them all on the next batch. Thank you!
The rocks look so shiny!!!!!!!!!!!! It'll be cool to see more videos of different rocks that you use the polisher on!
I am working on a new batch. I ran them for 10 days with 80 grit, 7 days with 220 and they just started with 600. I will post pics in about 2 weeks on IG.
Might think about adding some ivory soap after your final polish. cut some slivers in and run for 24 hours. never skip a step either. I probably would have ran a bit longer on first grit to get a better shape my self. great job on your first run.
I liked collecting rocks more. I enjoyed your video and saved it for features use.
LONGER THE BETTER ALWAYS
I have the same one. Never used instructions used it 2x. Cool video!
Thanks. Looking forward to trying another batch
you need to get some larger ceramic beads just for fillers, and I think but I am not certain but some of those rocks look kind of porous softer than the others so you may want to check that as well. I just ordered my tumbler so I am waiting for 4 days now. Great video I did learn a few things.
Thanks...yeah it was my first time and I did not have all the best rocks. Thanks for the advice and good luck with yours.
That’s good to know that the rocks shrink in the tumbler. Like I mentioned in your video for the metal detector and pinpointer last video as of this moment. I still haven’t tried my tumbler yet.
I’m new to this but the biggest mistakes I saw you make was putting the same plastic beads in each step. The grit gets lodged in it and cross contaminated your polish. Also Not washing them between stages. By washing I mean tumbling the stones after cleaning in just water and a drop of dish soap to get old grit out of cracks and nooks in the stones. Other than that you seemed to do fine
Thanks for the tips. Yes this was my first time trying and I followed the directions but always learning. I actually haven’t tried since this video. I primarily use the tumbler to clean clad and Pennie’s I find detdcting. I would like to try it again and appreciate your feedback
From what I saw at the channel "Michigan rocks", Rob drives a lot of attention on repeating the first stage many times, until you are satisfied with the results. Did you tried that after this video? He also uses a 500 alumina for pre polish and 1000 alumina for polishing.
At 9:32 you state that you followed directions.
Yet at 8:10 you decided to skip the 600 grit.
Was the 600 grit part of the directions???
So, did you follow the directions???
greetings from Long Beach
Can I use it to crush gold ore? Or will it ruin the canister?. Thank you.
I am not sure? Have never tried. If you do, let me know how it goes?
A rock crusher is a whole different animal. You can use this to wear down your rocks to see what is inside but a gock crusher pulverizes the rock. Using this to look inside your rocks would be like using a weed wacker to mow a football field. You might consider smashing some rocks manually and then putting the bits in here to see what comes out.
You need to use 600 grit because then the polish won't work as it is supposed to. You can't polish surface that's not smooth enough.
Thanks for the info. I haven’t done it more recently but will try that when I get the chance. Much appreciated
So glad I found your video. Too bad it made me feel like putz. LOL I bought mine at an estate sale but it had no instructions. I was never able to get the lid to stay on and was about to sell it "In need of repair". Never occured to me to fit the stupid lid into the container before attacting the metal cap and nut. I even tried using a rubber mallet. Now I am looking forward to polishing up some stones before I go ahead and sell it. Thanks again. #Instructionsarestupid
Well, I am glad you figured it out. I have been more than happy with this tumbler. I use it to clean all the coins I find metal detecting and it makes life so much easier... Happy New Year
I also had no idea what mixture to use so that was a big help also. Mine is about twice the size of yours so I'm going to just double the mix. Also had no idea it needed water. Basically I was an idiot. 😂 Going to fire it up later today.
Fill it with what? Water I assume lol. And mine didn’t come with grit? I can’t even open mine barrel 😂
The grit come in different sizes. Like sand paper. Yeah you have to get them separately. Then you do add water. The lid should come off then there is an inner lid that comes out. Shouldn’t be stuck but can be hard to pull out/off at times.
I had a hard time getting my lid off too. the lid is an inside seal which threw me because I was looking for a seam on the outer rip. think bathtub plug since that kinda how the lid fit in the barrel
@@Chungustav use the top washer to help separate the metal lid from the rubber barrel working it around a bit as you go.
Is this kind of tumbler good for Coins too..Modern dirty coins ?
I plan on trying....I have seen videos where they clean jewelry and coins with tumblers.
Isn't primarily for cleaning coins?
Not sure. Advertised as a rock tumbler? Directions show how to polish rocks. Doesn't say anything in them about coins but I am planning on trying it with coins soon.
60 grit is coarser than 80 if the grits are measured Iike sandpaper grits.
Yes...Thanks for the info. It is hard to tell by looking at the powder. I am about to try again!
Next time weigh the rocks
Thanks for the info.... haven't tried since but would like to do it again... can you elaborate more about that?
@DigginSoCal weight before and after
To see how much is lost. You said some rocks look a lot smaller.
I ended up here.
Because someone is selling one of these machines and I wanted to compare prices.
Well you skipped a step. Sooo yeah...
you had to much water
Thanks... yeah, it was my first try. I have gotten better at it. I think I overfilled it with everything.... lets just stuff it full...lol
Thanks for the demo on your first process. Sorry to criticize, but those are some ugly rocks you have there, even compared to my yet unpolished sack of agates. I think I'm harder to please. After spending that long tumbling rocks, there better be some diamonds in that end result. LOL and haha.
Yeah, I think mistake one is not picking the right type of rocks...First try...what can I say. Some of them shrunk down to invisible...lol
@@DigginSoCal I was teasing you about the ugly rocks... not all of them are that bad and I see that you wanted to see what would happen with the variety you had. I was surprised at how much smaller they got too.